Test Studio Step-by-Step: Testing Execution Paths With Conditional Tests

Summarize with AI:
Not all tests are just a continuous series of steps—sometimes you need to check what’s happened in your test and do something different: a test with conditions. Here’s how to create a conditional test that tests a variety of inputs and does the right thing when bad data is entered.
You’ve created an end-to-end (E2E) test with Test Studio that proves your application works “as intended” when passed standard data—your application’s “happy path.” Now you want to make sure your application works “as intended” when it’s faced with bad data.
First, you’ll have to decide what “as intended” means with bad data. You could, for example just test to ensure that the right message appears when bad data is entered. That’s not bad, but a more complete test would ensure three other things:
- The application doesn’t let the user continue with bad data present.
- When the user corrects the bad data, the user can continue.
- Only the good data is saved.
You could create a separate test to prove each of those things, but with Test Studio’s conditional processing, you can create a single test that proves the application does all of those things.
But you also don’t want to create a test so complicated that you have to test it to prove your test is working right. Your goal is to create simple, focused, well-understood tests that prove that a transaction works “as intended” with bad inputs. Test Studio lets you prove everything you want with a test that remains easy to understand.
While the case study I’m using in this article (download my code and Test Studio project here) is a data-driven test, you can use Test Studio’s conditions in non-data-driven tests (just ignore the sections below on updating your data source). With a data-driven test, however, a single test can prove that your application works “as intended” with a variety of inputs, including bad ones.
The Application, the Test and the Condition
In my initial test, the steps in the “happy path” test look like this:
- Good data is entered.
- The Save button is clicked and the next page is displayed.
- The entered data is confirmed as having been saved by verifying the data on the Department Details page.
However, when bad data is involved, these are the steps I want followed:
- Bad data is entered.
- The Save button is clicked.
- The user is held on the page and an error message is displayed.
- The data is corrected.
- The Save button is clicked and the next page is displayed.
- The corrected data is confirmed as having been saved by verifying the data on the Department Details page.
If I want a single test to handle both good and bad data, I need a condition that ensures that steps 3 through 5 are executed when bad data is entered and skipped when good data is entered. My new test script should look like this:
- Data is entered.
- The Save button is clicked.
- The Condition: Did the application flag the data as bad?
a. The data is corrected.
b. The Save button is clicked. - The entered/corrected data is confirmed as having been saved by verifying the data on the Department Details page.
The easiest way to build this script is to:
- Create a script that proves the happy path works (see the article at the start of this post).
- Potentially, make the test a data-driven test.
- Enhance the test to handle bad data.
Regardless of how I got to this point, however, I need some bad data. Because I’m using a data-driven test for this case study, I’ll provide the data by updating my data source with some “unfortunate” input. In a non-data driven test, I would just expand the test steps that enter data and update the text field with invalid inputs.
Updating Your Data Source With Bad Data
In my data-driven test, I’m using an Excel spreadsheet as my data source, but the process is the same for wherever you’re getting your data from.
First, of course, I need to add at least one row containing bad data to my test data. I’ll add a row that enters an X for the budget amount (I put it first to make setting up my test easier).
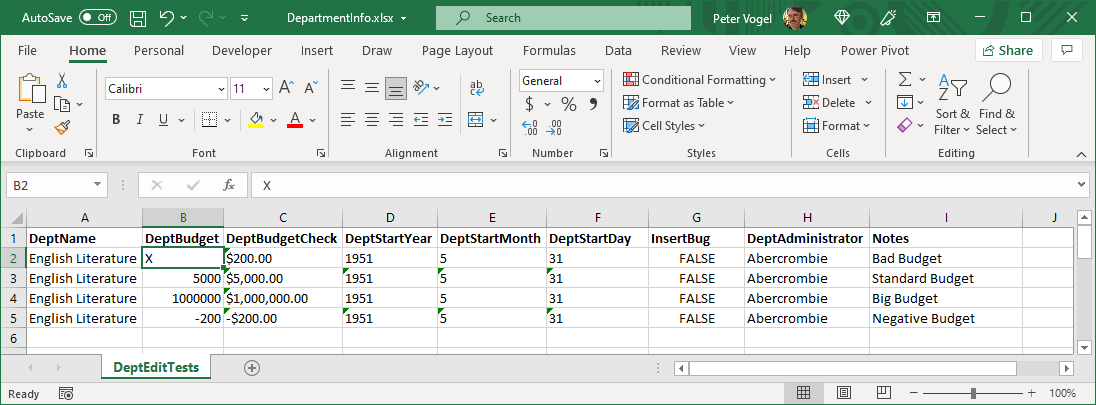
When I’ve finished making my changes, I just close and save my spreadsheet to have Test Studio start using my revised data.
Conditional Processing
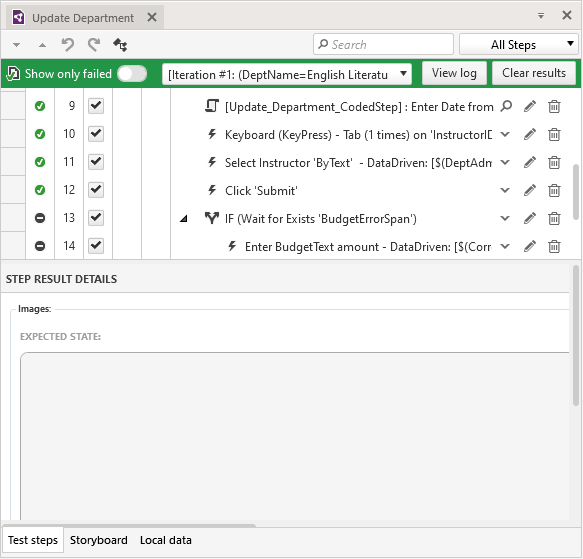
To begin enhancing my script, I right-click on my script on the step where the Save button is clicked and select Run > To Here. The script runs, the bad budget amount is entered, the Save button is clicked … and the application stops on my selected step, displaying an error message about the X in the budget textbox.
I’m going to use that error message in my condition to determine when the application has found bad data.
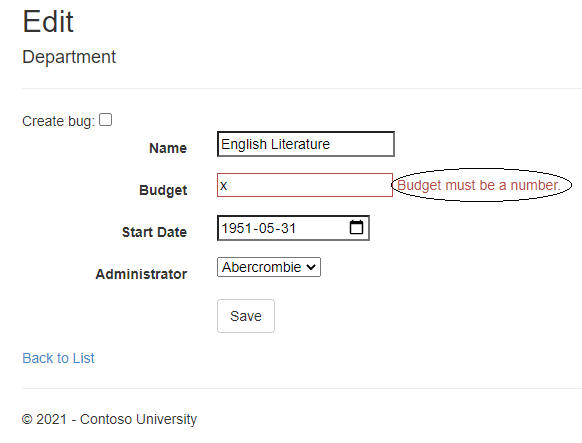
To use that error message element in my condition, I first need to make Test Studio aware of the element. That’s easy: I just click on the error message element in my page while Test Studio is still recording my actions (this adds a new step to my test script labeled “Click ‘BudgetErrorElement’”).
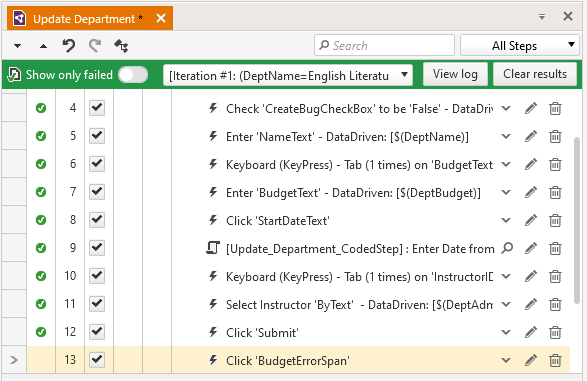
I then shut down the browser and return to Test Studio to stop Test Studio recording my actions.
To begin creating my condition, I add a verification step at this point in the script (one of the benefits of using Run > To Here is that I’ve made the step where I want to add my verification step the “current step”). I’ll now use Step Builder to add my verification step.
Hint: When you add a step using Step Builder, the new step gets added at the “current step” … which may not be where you want it. Don’t panic! If you add a new step in the wrong place in your script, you can always drag that step to the right place. It’s probably easier, though, to make sure that, before you add your new step, the current step is the “right step.” To make a test step the “current step,” click on the gray tab down on the left of the test step. A greater-than sign (>) will appear in the tab, marking the current step.

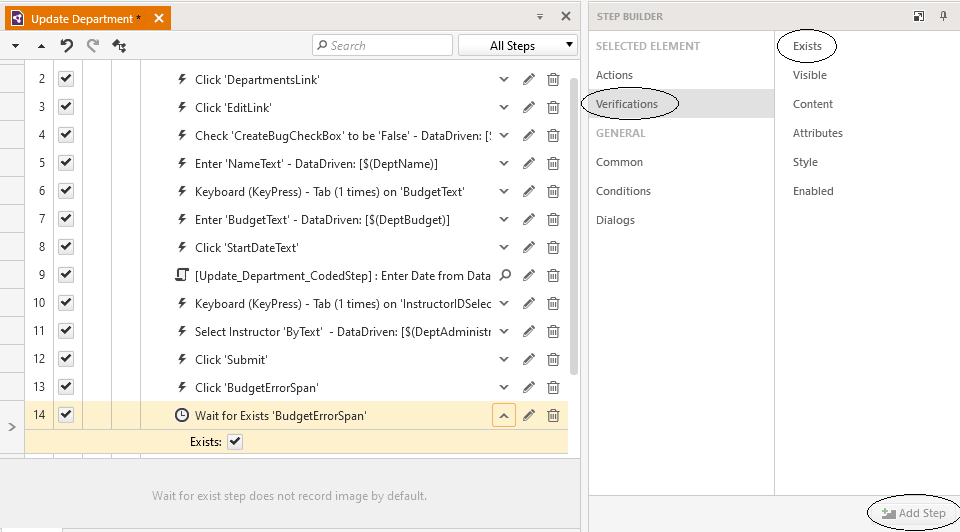
To add my verification step, I switch to the Step Builder panel to the right of my test script, select the Verifications > Exists choice and click on the Add Step button at the bottom of the pane. This adds a new step named “Wait for Exists ‘BudgetErrorSpan’” that checks for the existence of the message element in the current page.
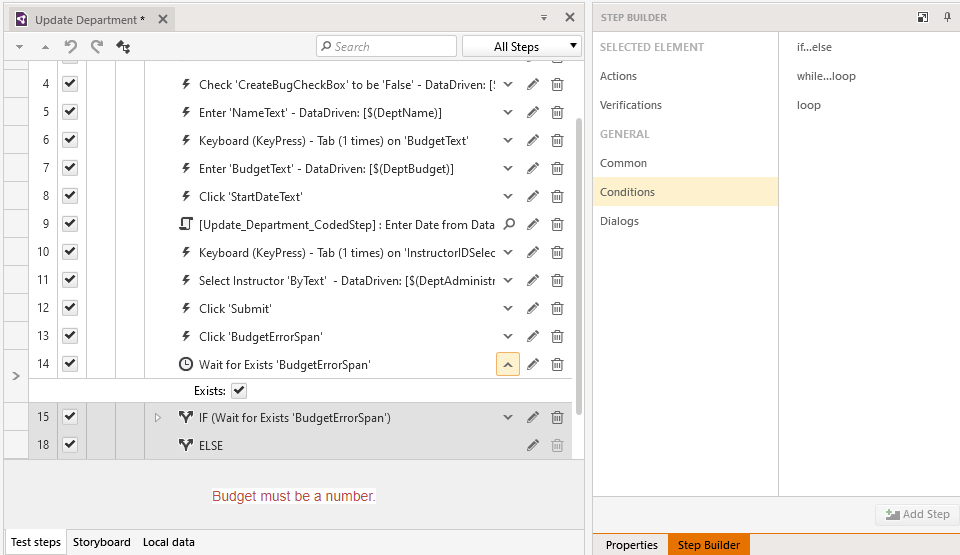
Now that I have a verification step that checks for the appearance of the error message, I’m ready to create the condition that uses my “correct the data” step when bad data is entered. I return to the Step Builder pane, select the Conditions > if…else choice, and click the Add Step button. An IF step and an ELSE step are added to my script.
I then click on the dropdown list in IF step and get a list of all the verification steps in my test script. For this condition, I select the verification that checks for the existence of my error element. With that selection, I’ve created my condition.
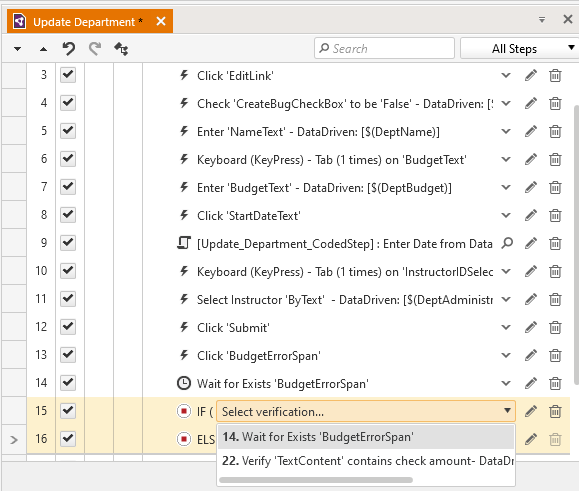
Side Note: My if…then block begins with an IF step and ends with an ELSE step. However, as I’m using the if…then here, the ELSE step just marks the end of the IF block rather than marking a separate processing branch.
With my IF statement set up, I can delete both the step generated when I clicked on the error message and the original verification step that checked for the existence of the message. That verification step has become part of the IF statement and, if I need to tweak the verification, I can access it through the IF step’s properties window.
Side Note #2: It’s worth pointing that the error message element is always on the Department Edit page (it’s just not always visible). This test won’t be true—the error message element won’t exist—only if the test has advanced to the next page after the user clicked the Save button. The verification step I added here is really just using the presence of the error message to see if the test has advanced to a new page when the Save button was clicked. I could have used any element on the page to check for this, but I picked the error element in case I want to extend this test for other kinds of bad data with different messages.
Handling Bad Data
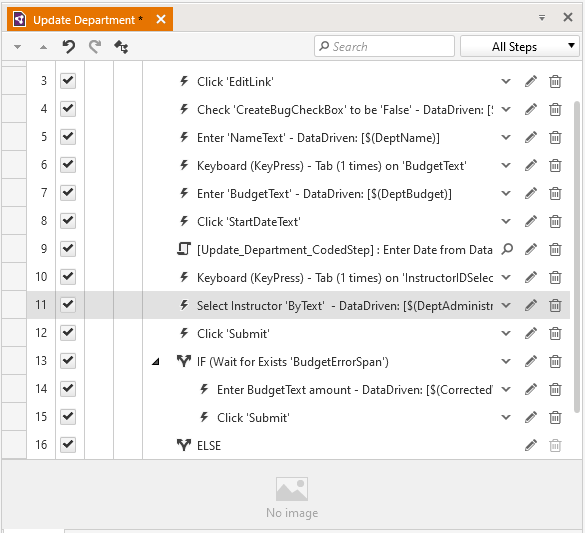
Inside my IF block, I’ll add two steps. The first mimics the user entering good data into the budget field to correct the error; the second step mimics the user clicking on the Save button to carry on.
Elsewhere in my test script, I already have steps that enter data into the budget field and click the Save button. I can just copy those steps and paste them inside my IF block. Alternatively, I could use the Run > To here option from my IF step to execute my script and, with Test Studio still recording, enter the good data and click the Save button to add those steps.
Enhancing the Dataset
It’s at this point that I realize that, for my data-driven test, I need another column in my data source to hold the corrected data that replaces the bad data in my budget textbox. I use Project > Manage to open my Excel spreadsheet and add a new column called CorrectedData to the spreadsheet. For any row with bad data, I’ll put in the value that corrects the problem in this column.
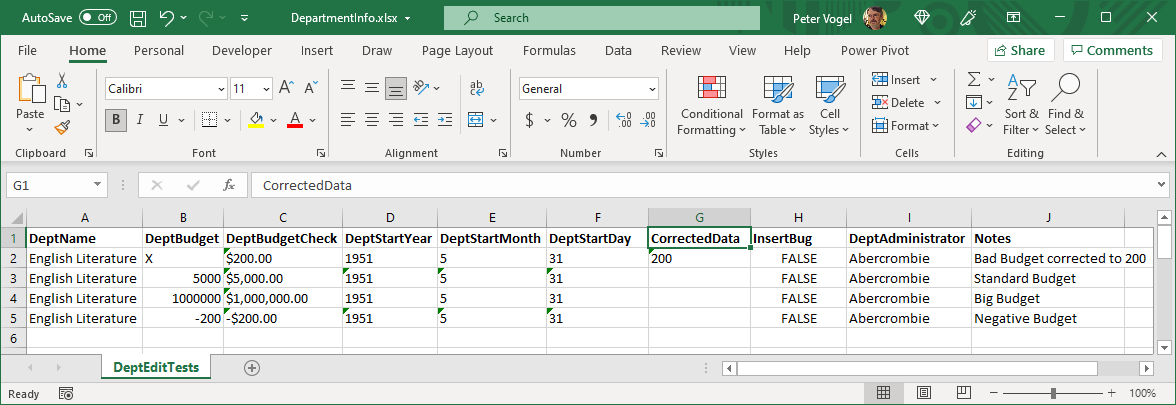
Now that I’ve enhanced my data source, I have to enhance the binding on the step that enters the corrected budget amount: I want that step to use my new CorrectedValue column in my data source. To do that, I click on the step that enters the corrected budget data and switch to its Properties window (the Properties window is on the right, tabbed together with the Step Builder.
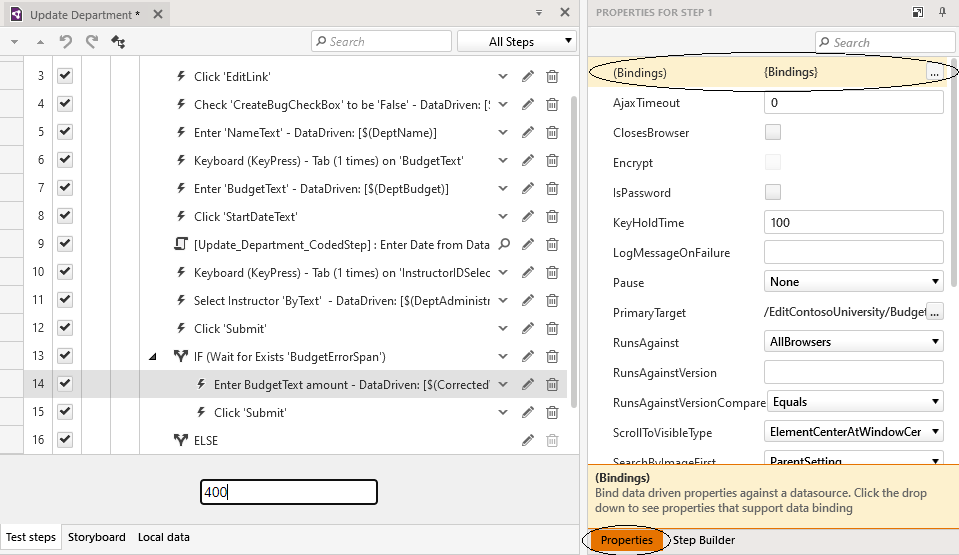
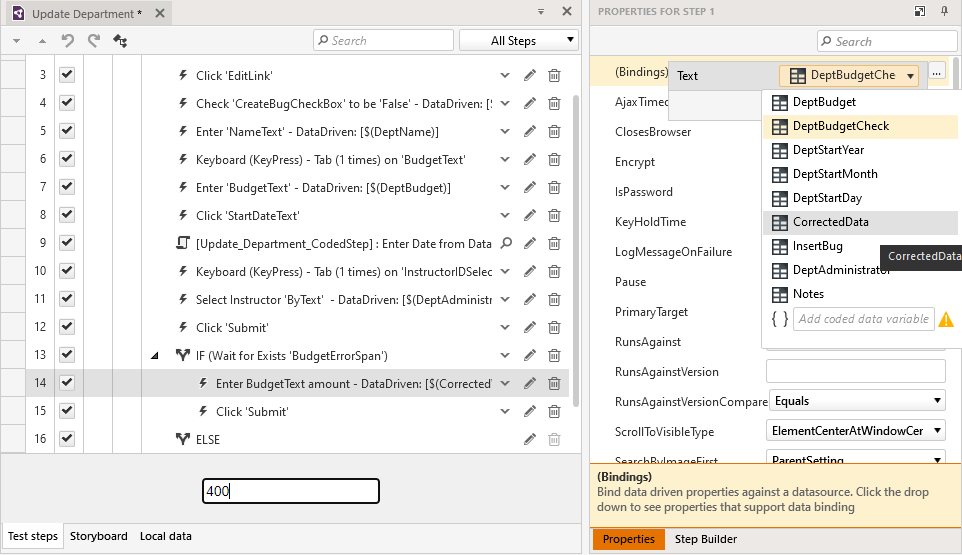
At the top of the Properties window, I find the Bindings line and click on the builder button (the button with three dots) to its right. From the dropdown list that appears, I select CorrectedData column.
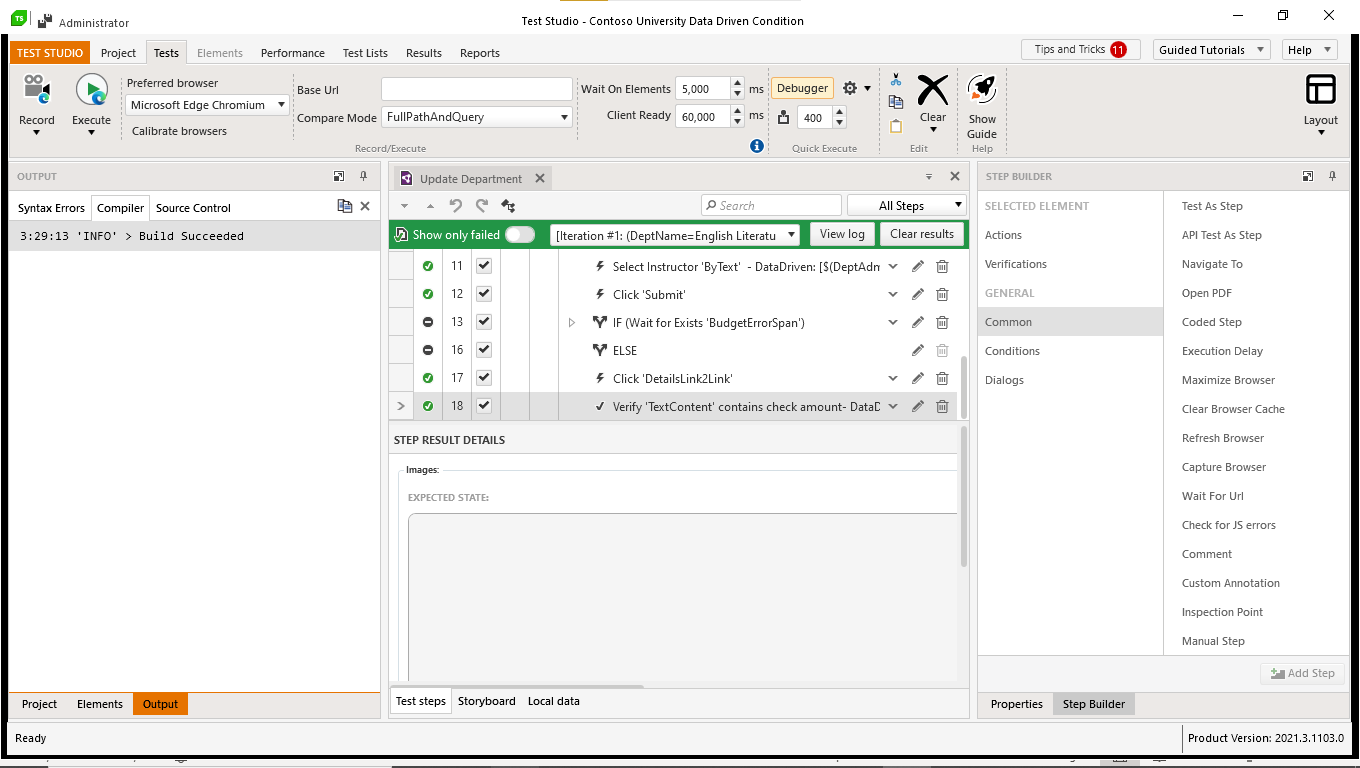
With this change made, I can run my test. I’ll see good data entered and bad data corrected. At the end I’ll be rewarded with a green bar at the top of my test script.
It’s up to you how much you may want to extend this test script. There are, for example, three other input fields on the Department Edit form—do you want to expand this test to handle bad data for all of them? I probably would (it would just require duplicating my if…else block for each field), but you might decide that you’re better off with separate tests for each field to keep your tests more focused.
In my case study, I could have created two scripts: one that tests “good” inputs and one that tests “bad” inputs—two scripts that would look very much alike. Had I made that choice, I would not only have to manage a larger inventory of tests, I’d have to make sure that I kept these two scripts in sync as the application evolved.
By using conditional logic and having one just test to handle those places where the tests differed, I reduced the inventory of tests I have to manage. I also reduced the maintenance burden of managing my test inventory. Altogether, I have a test that checks that my application not only prevents bad data from being entered but proves the application does the right things when a user does make a mistake.
And, by building on a data-driven test, that single test proves my application does all of these right things for all of my data inputs. That’s a powerful test to have around.

Peter Vogel
Peter Vogel is both the author of the Coding Azure series and the instructor for Coding Azure in the Classroom. Peter’s company provides full-stack development from UX design through object modeling to database design. Peter holds multiple certifications in Azure administration, architecture, development and security and is a Microsoft Certified Trainer.
