Designing Load Tests with Test Studio and Fiddler Everywhere in 6 Easy Steps

Summarize with AI:
Load testing may seem like a daunting task: Load tests as a collection of REST requests are complicated and hard to read. But with the right set of tools and approach, load testing can be quite straightforward and easy to create, regardless of previous automated testing experience.
In this article, I am going to demonstrate a load-testing use case and walk you step by step through the creation of a load test by using Test Studio and Fiddler Everywhere.
What Is Load Testing?
Load testing falls under the non-functional testing category as it helps ensure performance as an opposite to functional behavior. Load tests verify the performance of web applications or servers when exposed to expected and unexpected (extreme) load conditions. This article will focus on web application load testing.
What Is the Goal of Load Testing?
Load testing used to be a practice of large testing teams with dedicated performance engineers tasked with securing mission-critical web application behavior under extreme load. However, as web applications are omnipresent and almost everything—from B2B to our personal daily routines—happens on the web, testing teams have started exploring the value of gaining deeper understanding of the characteristics of their applications upon user interaction. Thus, load testing has become a much more common testing practice.
Load testing can help you gather information about:
- Stability and performance of the application under certain load
- Number of concurrent users that the application can support
- Number of requests that the application can handle
- Sustainability of the network traffic generated by all requests within a user session
- The operating capacity of the application or scalability of the server infrastructure
How Does Load Testing Work?
The main purpose of load testing is to put a certain application infrastructure under load and understand how it behaves to eventually prevent production issues. Some popular use cases involve pulling data from a database, entering new data and assessing the application’s performance under load in order to measure the number of server errors for a given period under load.
The information we need to collect based on a load test is mainly associated with measuring the capabilities of our application’s infrastructure, how it is withstanding the load, and how the user experience is affected when this infrastructure is challenged.
When you design a load test, you need to make sure that the dynamic elements are unique for each user session. If that is not the case, the results from the load test may not represent the reality. For example, if the scenario uses a session ID stored as a cookie, when every user uses the same cookie (session ID), this may result in a load balancing problem.
If you want to create a load test out of a web test and then run that load test for 30 concurrent users with identical data, that may lead to numerous problems so that any analysis resulting from the load test could be inaccurate.
How Are Load Tests Supported in Test Studio?
Load tests are a collection of ordered REST requests, which the Test Studio Load Testing engine will try to run as fast as it can and in parallel (depending on the test runtime settings). It is important to remember that the requests themselves are built and sent using the Telerik Testing Framework and they do not originate in a browser client, so there is no UI to consider for load testing.
Test Studio supports customization of load tests to meet your specific load testing needs. In Test Studio, dynamic elements are not created in code but are set as dynamic targets with a UI editor.
Designing Load Tests in 6 Easy Steps
Now I will demonstrate creating a load test in six easy steps with a hands-on example. For the purpose of the demo, I will be using Test Studio and Fiddler Everywhere. For additional information and guidance, you can always refer to the technical documentation explaining in detail how to configure Test Studio and design load tests.
Step #1: Define the Test Scenario
The first step is to decide on the actual scenario that requires creating a load test. In this example I am going to use the login process of a demo application. In terms of API, the login process is the process of exchanging username and password for a cookie or a token (depending on the authentication type), and then getting this authenticated user authorized and equipped with certain abilities and user rights within the application. User authorization could be the basis of most test case scenarios but it could also serve as a standalone scenario.
Step #2: Get Insight Into the Application’s API
The next step is to understand how the API of the application under test works. Here Fiddler Everywhere comes in handy. The main goal is to get all network requests that will be sent during our scenario and organize them in a way that allows us to use them for a load test. The most important information we need to get from these requests are the dynamic elements which the login scenario utilizes. The dynamic data may be coming from POST requests, cookies, URL queries or headers (usually the authorization header).
Step #3: Identify All Requests That We Need for the Load Test
In this step we will identify the exact requests we need to create the load test. Not all requests are relevant to our load test though. For example, any requests to third-party services should be removed. The load scenario should test specific functionality.
Step #4: Import Requests Into the Load Test
Finally, the clean list of HTTP requests, selected in the above step, should be imported in a load test within Test Studio.
Step #5: Setting Dynamic Targets
Now with the information from Step 2, the dynamic elements of the HTTP requests should be handled. The most critical part is to make sure that the authentication and then the authorization are handled dynamically, meaning that each user for whom those requests shall be executed will be “presented” with its own unique user session.
The dynamic cookies, headers, POST data and queries can be set by using dynamic targets. Usually each successful request will get a response where these elements are set. For example, new cookies are set in the response. User data such as keys, IDs and other dynamic elements which are specific for the actual load scenario may also be found in the response data of POST/GET requests. Identifying dynamic cookies and headers, unique for each user session, is one of the key aspects in load test design.
Step #6: Test the Newly Created Load Test
After the scenario is done and each request has been set by using dynamic data, it is time to test the load test itself. To do that, the correct approach is to configure the load test to run for a set number of minutes with only one user. While the test is running, we can capture the requests issued by the load test engine in Fiddler Everywhere and inspect them. The goal is to verify that the scenario will be successfully completed. Once this is done, it can be scaled to run with a bigger amount of concurrent users.
Scaling Your Load Test
To put these steps in a real context, I am going to create a load scenario from scratch. The scenario involves authenticating with a user and uploading a file to a server as an already authorized user.
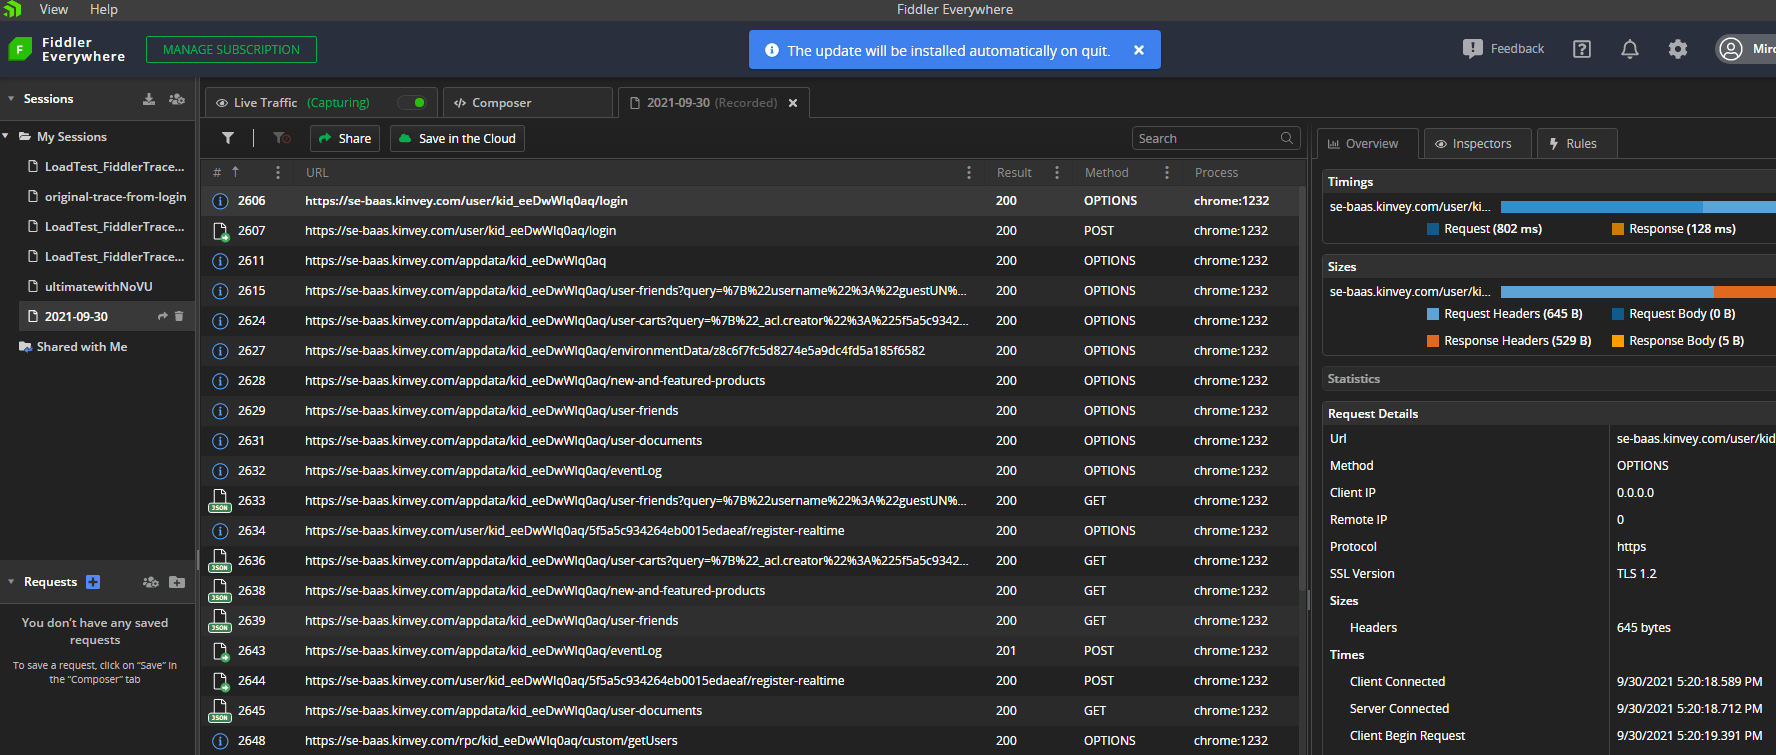
My first action will be to perform the scenario manually and capture the requests in Fiddler Everywhere. The functional steps will include “Login” and then “Clicking on a button” which opens a dialog for file upload.
This is how the recorded session in Fiddler Everywhere should look: 
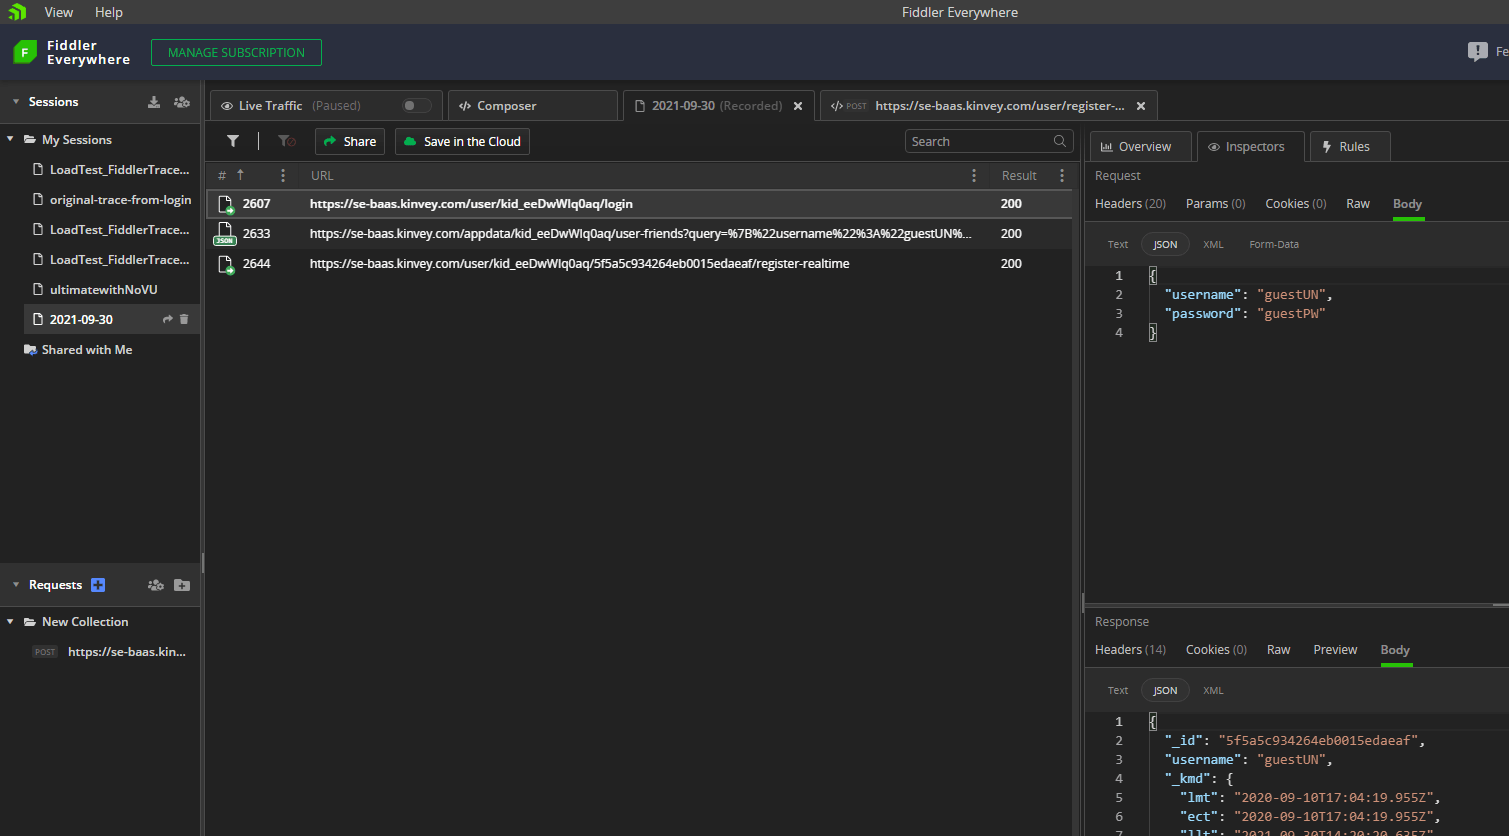
Now is the right moment to filter the requests and get the ones that we need for the load test as described above in Step 3. A lot of the recorded REST requests are not relevant to our load test but involve getting cached resources, analytics, etc. An easy way to filter is to order all of the captured requests by domain name, delete everything that we do not need, and then keep only the requests required for authorizing the user and the POST request that uploads the sample file.

The next step is to run the functional test and capture all requests once again. The goal of this action is to end up with two sets of identical requests captured from the same functional scenario that we are going to use in the load test.
When we compare the two requests, the differences in the user session data will be obvious. The reason for that is that each run is associated with a unique user session. Our goal here is to replicate those differences dynamically in the load test.
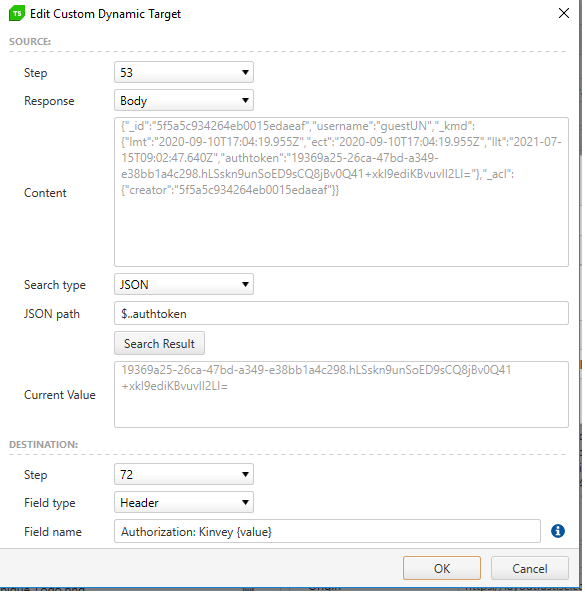
As we are using Kinvey Authentication to build this scenario, in our case the differences are in the Kinvey token (it may be a bearer token, cookie or something else) we get upon successful authentication. There is a request hitting the login endpoint where we in the response get the token in exchange of the username and password.
In other scenarios, dynamic sections may be the URL, the POST data where applicable, headers, etc. It is important to identify those and ensure that each virtual user will appear as unique as possible when the requests are sent by concurrent users in real time.
With that in mind, we can take one of the recorded sessions and import it in Test Studio as a load test. Now the only thing that’s left is to set the dynamic parts of the test as dynamic targets, using the information we gathered with Fiddler Everywhere.

Conclusion
Designing load tests in Test Studio is easy but you still need to follow certain steps for your load test to succeed. The approach I’ve demonstrated will help you design stable load tests, regardless of the application’s specifics. Especially testers with less to no coding experience will greatly benefit from this load testing workflow in Test Studio as they won’t need to write code.
Modern test automation solutions like Test Studio should focus on delivering efficient load testing workflows to support the work of both developers and testers. If you haven’t checked out Test Studio recently but have been looking for a load testing solution, it’s time to give it a try. With your free 30-day trial you will be able to create and run the above described load testing scenario out of the box.

Miroslav Shtilianov
Miroslav Shtilianov is a Principal QA in the Telerik Mobile Testing Team. Prior to Progress, he was working as an automation engineer for VMWare.
