How to Run Customized Load Tests like a Pro with Test Studio

Summarize with AI:
Creating and customizing load tests is a powerful way to ensure your website can handle traffic before it comes. Learn why it matters and how Test Studio can help you do this easily.
Web applications are getting more and more complicated nowadays, but at the same time users expect more from their software than ever before. Recent research suggests that the average online shopper expects a page to load in two seconds. More than 40% of your website visitors will not wait more than three seconds for a single page to load before abandoning it. One out of three dissatisfied customers will visit a competitor’s website.
A lot of companies claim they lose revenue opportunities because of poorly performing applications or downtime. If you tried to shop on Amazon's website in the opening moments of Prime Day two days ago, you know even giants like Amazon can have downtime issues.
When it comes to downtime, most people don’t consider excessive load as its source, but it's very possible that it is. Imagine you own an ecommerce website running a Black Friday campaign, and thousands of customers are visiting your website browsing and purchasing products. A very reasonable question is - are you prepared for this traffic? Is your website able to handle a sudden spike in the number of users? If you are hesitating or can’t answer these questions then you are good candidate for load testing.
Load testing is a type of non-functional testing which is conducted to verify the behavior of an application, website or server when subject to both normal and extreme load conditions.
If you are wondering how you can be sure your website can handle the load when a surge of popularity hits, I have the answer – with Test Studio, of course.
Creating and Designing Your Load Test
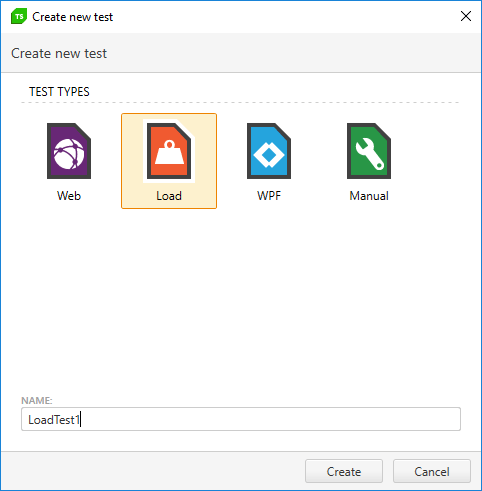
Getting started with Test Studio’s Load Testing feature is relatively easy. Adding a new test is quite straightforward. You simply create a new project, and with a right-click on the newly created project you select the type of your test, in our case Load Test.

Once you have the load test created you can start adding user profiles to the load test. We call a “user profile” a specific sequence of HTTP traffic that represents how one user is interacting with your web application. For your convenience we have created three ways to add one:
- Imported from an existing web test: If you have our Test Studio Ultimate package, you can save time and increase your accuracy by beginning with functional tests to ensure your application behaves correctly, and then use your functional tests to capture load tests to verify the behavior of the application with a large number of users.
- Imported from a Fiddler trace: Another time saving approach is to use your captured Fiddler traces of site activity during troubleshooting or monitoring, and use that data by directly importing it into Test Studio as a user profile.
- Manual capture: Last but not least, you can manually capture new traffic from a web browser of choice.
After the user profile is captured using one of the three options here comes another important part – editing the user profile. This is very important to properly execute your load test, and to simulate real users interacting with your application as much as possible. This is done with the help of the following:
- Dynamic Targets: These are unique parameters or variables used by your application to generate information like a user ID or session ID. You have the ability to extract those variables from the response of one request and use it in the request of another.
- Think Times: In Test Studio they represent the time it takes a user to process the information received from the application and decide what to do next, or can also represent delays such as the amount of time spent filling a form before submitting the content. Using Think Times, you can closely replicate a real user scenario. If you don't set Think Times in the recorded user profile you risk simulating traffic that resembles a DDOS attack, as hundreds of virtual users will access the same resource in the same time.
You are now one step closer to the execution of the load test, but what is a load test without virtual users? You will need to manage the virtual users you have and adjust your test settings to use those virtual users. Each Test Studio license includes 100 virtual users which should be quite enough for your proof of concept. If your testing needs require more virtual users you can always purchase additional user packs.
Once you adjust the number of virtual users you need to specify the test settings as per your testing scenario. The test settings consist of the following parameters:
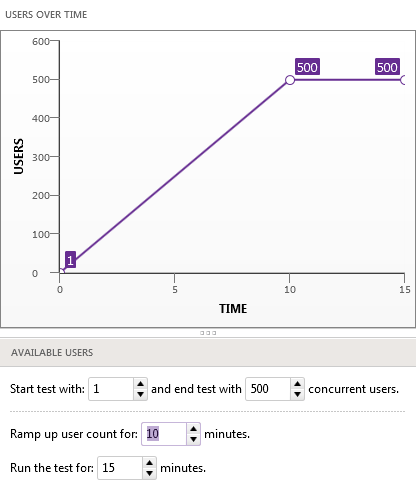
- Available users: You have to specify how many concurrent users to use at the beginning and end of the load test.
- Time: Specify the Ramp Up time and the total load test duration. The Ramp Up time is the amount of time over which you'll gradually increase the total virtual users.

Running Your Load Test
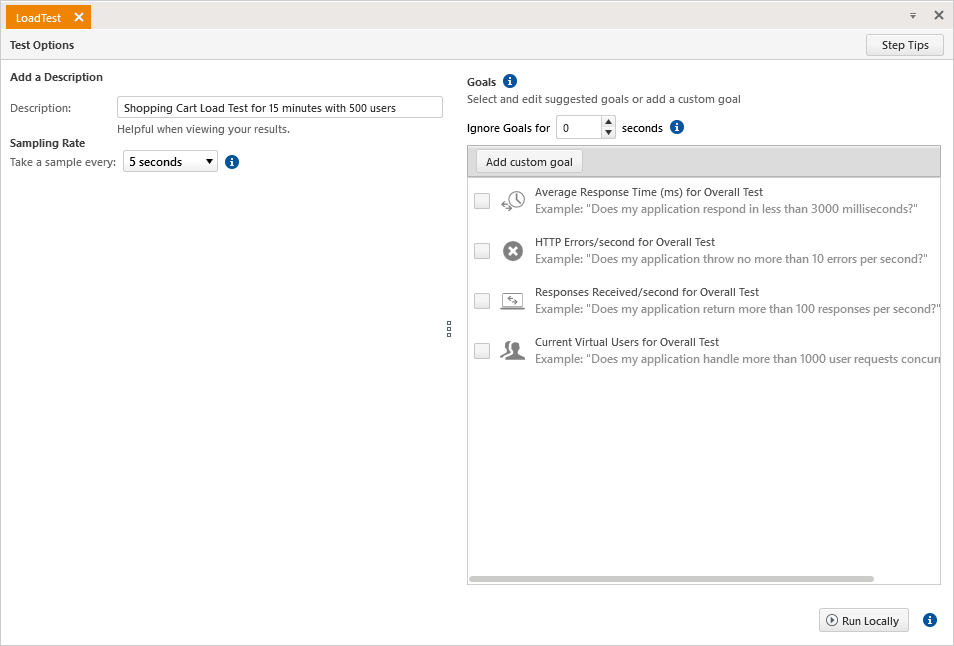
As you have finished designing your load test, it's time to run it. Prior to executing the load test there are three parameters you can adjust:
- Description: Add a description that will be saved along with the test results
- Sampling rate: Specify how often you want to take snapshots of the load test performance data.
- Goals: Set goals for load test metrics to define success or failure

Analyze and Export Load Test Results
An important aspect of testing is gathering and analyzing results. During your test runs you’ll be shown clear informative screens letting you know the state of your system throughout the run. You can drill into exactly the metrics you’re interested in, such as total errors, traffic size, time to first byte, and other common metrics.
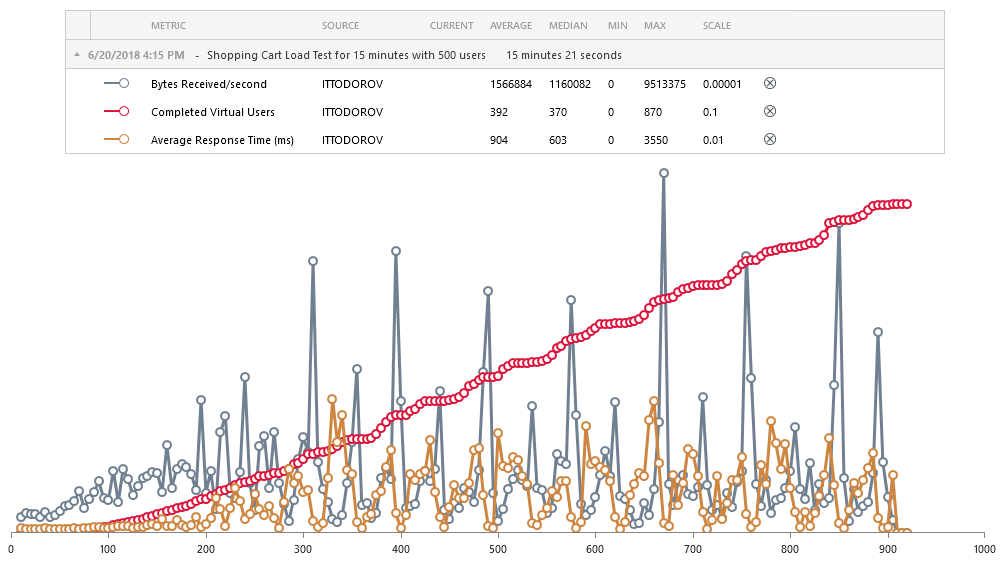
Once the run is completed the analysis screen lets you compare up to five metrics from different runs at the same time. Statistics for each selected metric appear at the top of the analysis screen. A graph of the selected metrics appears below the statistics.

You can export the generated results to HTML format or Excel spreadsheet.
Best Practices for Successful Load Testing
Understand Your Environment
In-depth knowledge of your application’s architecture is quite important. Please note that the goal of the load testing is to replicate your production environment as closely as possible. Even the smallest configuration difference may have a big impact on your test results.
Run the Load Test Incrementally
Make sure you start your load test with a small numbers of virtual users and scale up. The best case here is to make sure your scenario is executed successfully with one virtual user. Doing this will help you identify the bottlenecks of the scenario and eliminate problems which are not related to the number of virtual users.
Tweak Load Scenarios
You now understand the value of dynamic targets, so to simulate a more realistic load on your server replace the recorded parameters. This guarantees you add dynamic behavior to your scenario if it is run by multiple unique users. Tweaking your scenario goes hand in hand with exploring requests and responses to better understand the transferred data.
Don't Crash the Server Your Load Tests Run On
Make sure you understand the hardware limits of your testing server and don’t go beyond them. While in stress testing the idea is to check the upper limits of your system and even reach the point of complete failure, in load testing we test the functionality of the system under high level of simultaneous requests.
Want to try all these great load testing features out and see how your system performs? Start a free trial today:

Ivaylo Todorov
Ivaylo is a QA Engineer on the Progress Test Studio team, where he helps build a better and more reliable product. Before starting as a QA Engineer, Ivaylo spent three years as a Technical Support Engineer in Test Studio doing his best to guide customers in their automation endeavours. Ivaylo enjoys skiing, cooking and portrait photography.
