
Make Your Automated Tests See Better Than Yourself

Summarize with AI:
Get the most out of Test Studio’s features to create stable and reliable automated tests across different browsers, platforms and environments.
The Purpose of Visual Test Validation
If you wonder how an automated test could validate things that you see with your own eyes, don’t look any further. Test Studio has a robust solution for setting up an automated test that checks everything visually as you would do with your own eyes:
- Has the page loaded correctly?
- Are all dynamic or static elements displayed as expected?
- Did the user receive a positive confirmation for being logged in or an error message in case of failure?
One of Test Studio’s key features is the ability to record tests based on browser actions that get packed into automated test scenarios straight away. When you start running these steps against different browsers or even on different machines, you might get into the vicious cycle of randomly failing test steps when executed in a test list but passing flawlessly when executed on their own.
More so, flaky tests may turn the test troubleshooting experience into a nightmare as there is mostly no obvious reason for their failure. Let’s look at what makes automated tests fail randomly on various steps.
The Consequences of Flaky Tests
Test flakiness, characterized with the above described behavior inconsistencies, is usually related to the lack of proper synchronization between the application state and actions sent from the test. This is the reason why the test is sometimes reported passed—during this run the application response was fast enough to match the speed of the automated steps.
But what if you change the executing browser and this is the first time the page is loaded in that browser? Even if you do that on your local machine and you have used other browsers to access the application, it will take longer for the current session to load all resources from the application server and render them properly in the application’s UI.
Potentially, you are faced with a scenario involving odd and inconsistent test failures. The more you run the test, the faster the application loads because it already uses the browser’s cache, and the failures disappear without a further clue for you.
This is a clear indication that your automated tests require some additional tweaking to be more robust so that you can rely on test results and be confident about what happens every time you run a test.
Here comes the super power of Test Studio’s wait and verification steps. These can verify the state of each element on the page—its existence, visibility, text content, styles, the values of different attributes, the element's image, etc. Anything that you would validate with your own eyes in a manual testing process can be replaced by a verification step in your automated tests created with Test Studio.
Common Scenarios Requiring Verification Steps
The general recommendation is to use verification steps when something changes visually on the page. Typical scenarios that can benefit from adding a verification are:
- Opening a dropdown
- Entering text that triggers populating other fields on the page
- Waiting for a label that indicates successful action
- Reloading the page
I will now walk you through several scenarios, where the wait and verification steps always fit perfectly well.
Handling Dropdowns
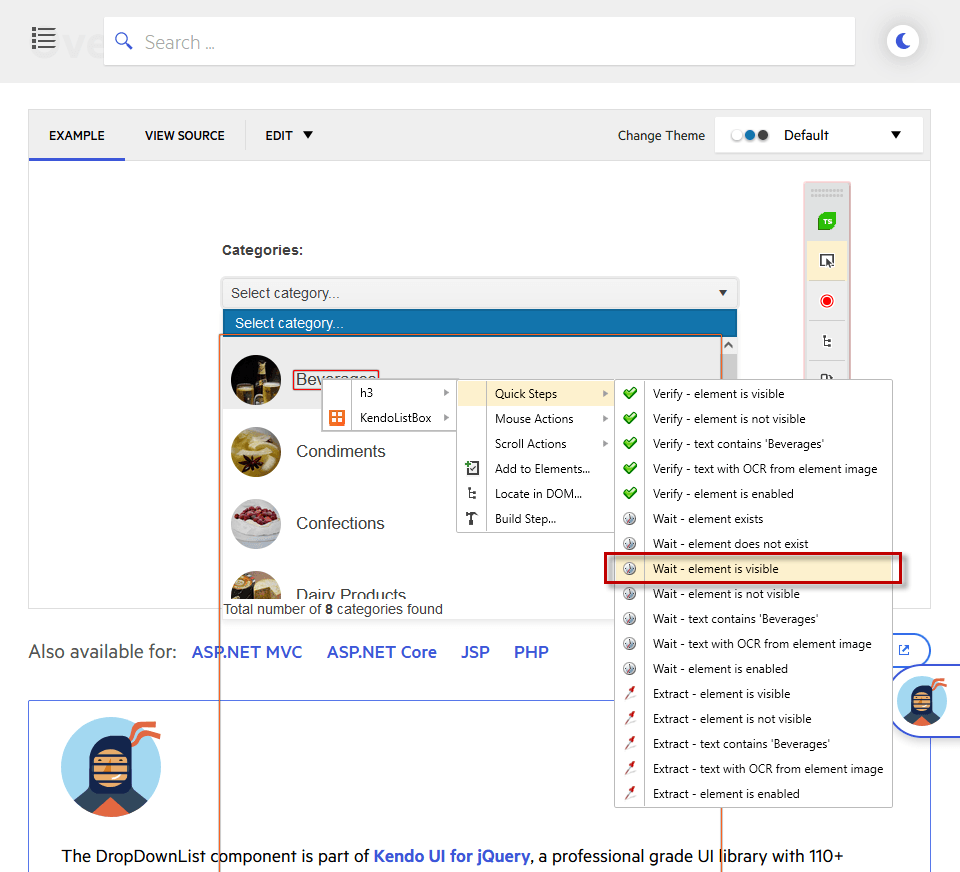
There are different types of dropdown controls—autocomplete, combobox, multiselect, dropdownlist—and any other sort of visual item representation. Usually, while you record the steps for selecting an option from the list, you don’t imagine that an item can be picked before the list is visualized entirely.
However, this is one of Test Studio’s most prominent and yet hidden benefits. Automated tests created with Test Studio are much faster compared with manual tests, which is why there are situations, when an action is sent before the application is ready to accept it.
This outcome is possible because Test Studio interacts with the elements in the DOM tree. Once the dropdown list is opened, its items are populated as elements in the DOM even if these are not completely rendered in the UI yet.
To make the test scenario fully reliable you can enhance it with inserting a wait for visible step created for the element, which represents the item from the list. That way you force the test to wait after performing the action of opening the list (and, optionally, filter it by typing a value in the input field) until the actual element is visible on screen, and then send the action to click on this item.
The good news is that this type of step is not really slowing down test execution—in fact, no more than it is required for the application to respond.
Actions Triggering Changes on the Same Page
Nowadays most of the web apps out there are using different types of technologies and scripting functions to fascinate the user with animations and content populated out of the box. This is great in terms of user experience, but how can such applications be handled from a testing perspective? There is more and more information on the page testers have to check and observe, and yet this is something Test Studio can help with.
Let’s have a look at a web form that requires entering your address. To speed up the form fill-in process, once you enter your town, the state/country and postal code get populated in the dedicated input fields which enables the Next button. Users are extremely happy with such autocomplete functions in the apps they interact with on daily basis.
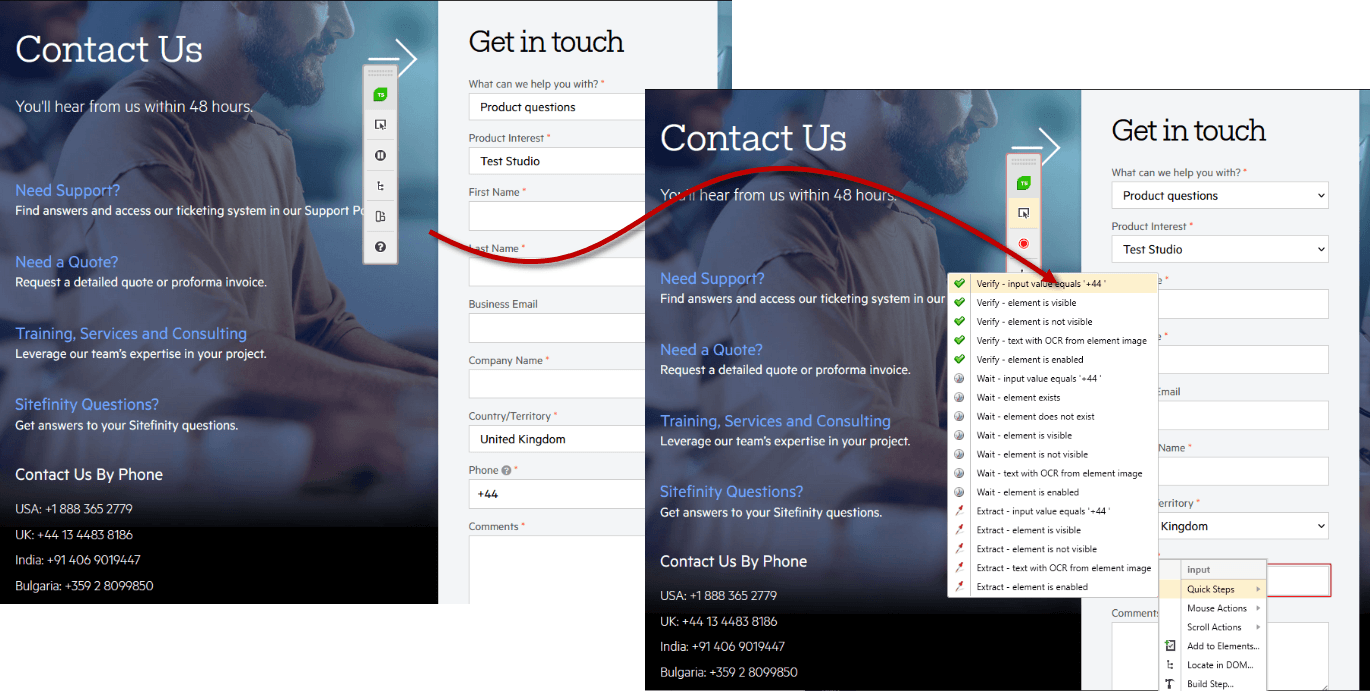
QAs can also be satisfied from doing their job properly. They simply need to add verification steps to ensure the populated content for the country name and postal code inputs fill in as expected. That will make the automated test scenario complete, but is that really so?
If any of these values is not set correctly while the test is running, it will fail on the exact verification step and the failure information brings the desired details to sort it out right away. Otherwise, you can run into the case that the test reports that an element on the next screen in the web form is missing although it didn’t really reach this view. If you check the images from the failure details, you can get a clue to focus on the previous screen. But this can also happen on a single page with dynamic content loaded.
Actions Reloading the Page
If we stick to the web form example, we can expect that it is completely filled in at some point and the last button in the form is Submit. Once you hit the Submit button, the entire page gets reloaded and navigates to a view with all form entries, for example. Here you want to click on the last added one on the top of the list/grid and check in the quick view mode if the entry is correct.
Submitting data to the application server always takes time and depends on various external factors like network and internet speed, current browser speed on the machine, web server responsiveness at the time of sending the request, and probably many other environment-specific ones.
If you manually work through the scenario, you will wait until the next screen of the page is loaded and you can start interacting with it. That is why, what you need to do to make the automated test see the application the way you do, is insert a few wait for visible steps for some of the elements you expect to appear in that next view.
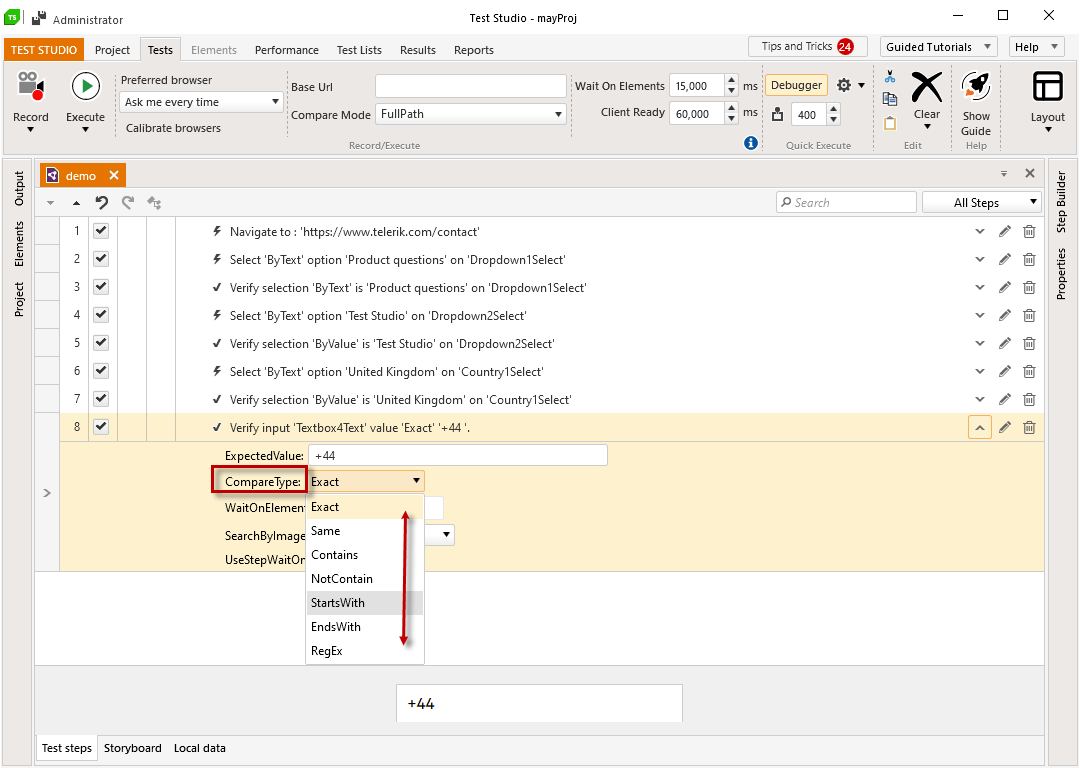
Аdvanced Verifications
The Test Studio Advanced Recording tools allows you to create advanced verifications and extend the test scenarios you cover tremendously. You can add a step to verify each exposed attribute of a given element, or use the image verification steps if there is no other way to check the current state of the application. Another useful feature is extracting text from an image, which is supported by Test Studio’s OCR-based capabilities.
Summary
Seems complicated? It really isn’t. The good news is that you don’t need to re-record all your tests now or run them partially to make the tweaks and improvements this article suggests. You can add wait and verification steps anytime “offline” for already recorded elements in your test project. With all these various types of verification and wait options, you can bring your automated tests to the next level of reliability.

Elena Tsvetkova
Elena Tsvetkova has been a Senior Technical Support engineer for Test Studio for the past few years. Her ability to spot the tiniest detail in everything helps her build and promote customer success as part of her day-to-day job. Other than automation testing, she is passionate about dancing and acrobatics.
Related Posts
Comments
All articles
Topics
Web MobileMobile
Desktop
Design
Productivity
People
