Posting your Test Studio Results in Slack

Summarize with AI:
Monitoring your CI/CD daily can sometimes be a very cumbersome job. Learn how you can make your life easier by posting your Test Studio results directly in Slack.
When it comes to testing, if your organization is using many different tools in its build chain, you probably need to monitor several different UIs. That could be simplified though, if most of your monitoring could be done in one place. If, by chance, your team uses Slack for collaboration, you can use it for more than just messaging. Slack has great extensibility through its APIs.
Telerik Test Studio allows for easy integrations with other tools and solutions, thanks to its execution extensions. In this blog post I will show you how easily you can build an extension that will post your test list run results in Slack.
Building an Test Studio Extension for Slack
Creating Web Hook
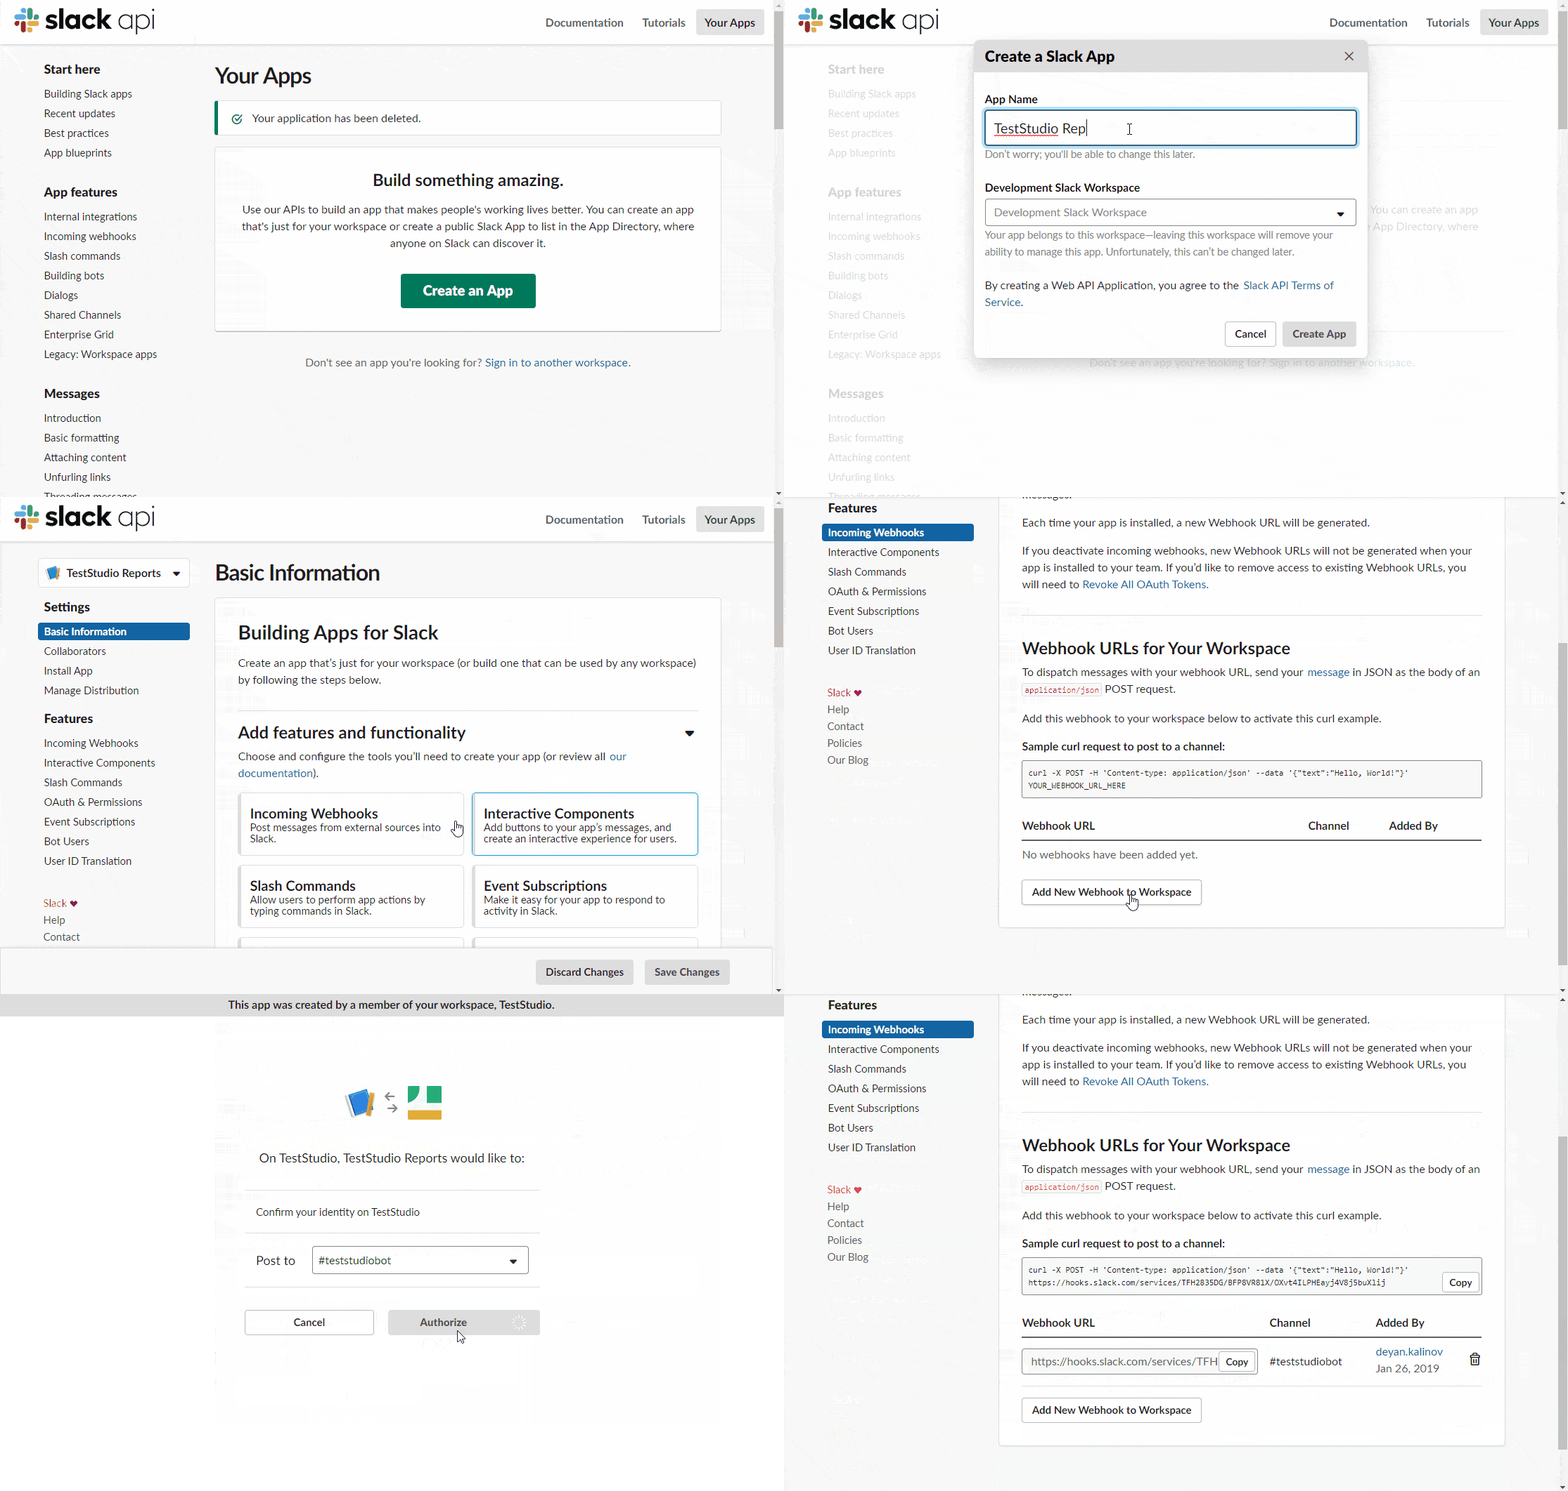
- First we need to create new Slack app, to do that go to: https://api.slack.com/apps
- Then activate the app's incoming web hooks
- Last, create new web hook URL, which will give us a link where we can post our messages - the web hook URL should look something like this: https://hooks.slack.com/services/XXXXXXXXX/XXXXXXXX/XXXXXXxxxxxxXXXXXXX
Add a New Entry in Windows Registry
One good security practice is to keep secrets out of the source code and to do that we will proceed with creating a new registry entry that will hold our web hook URL.
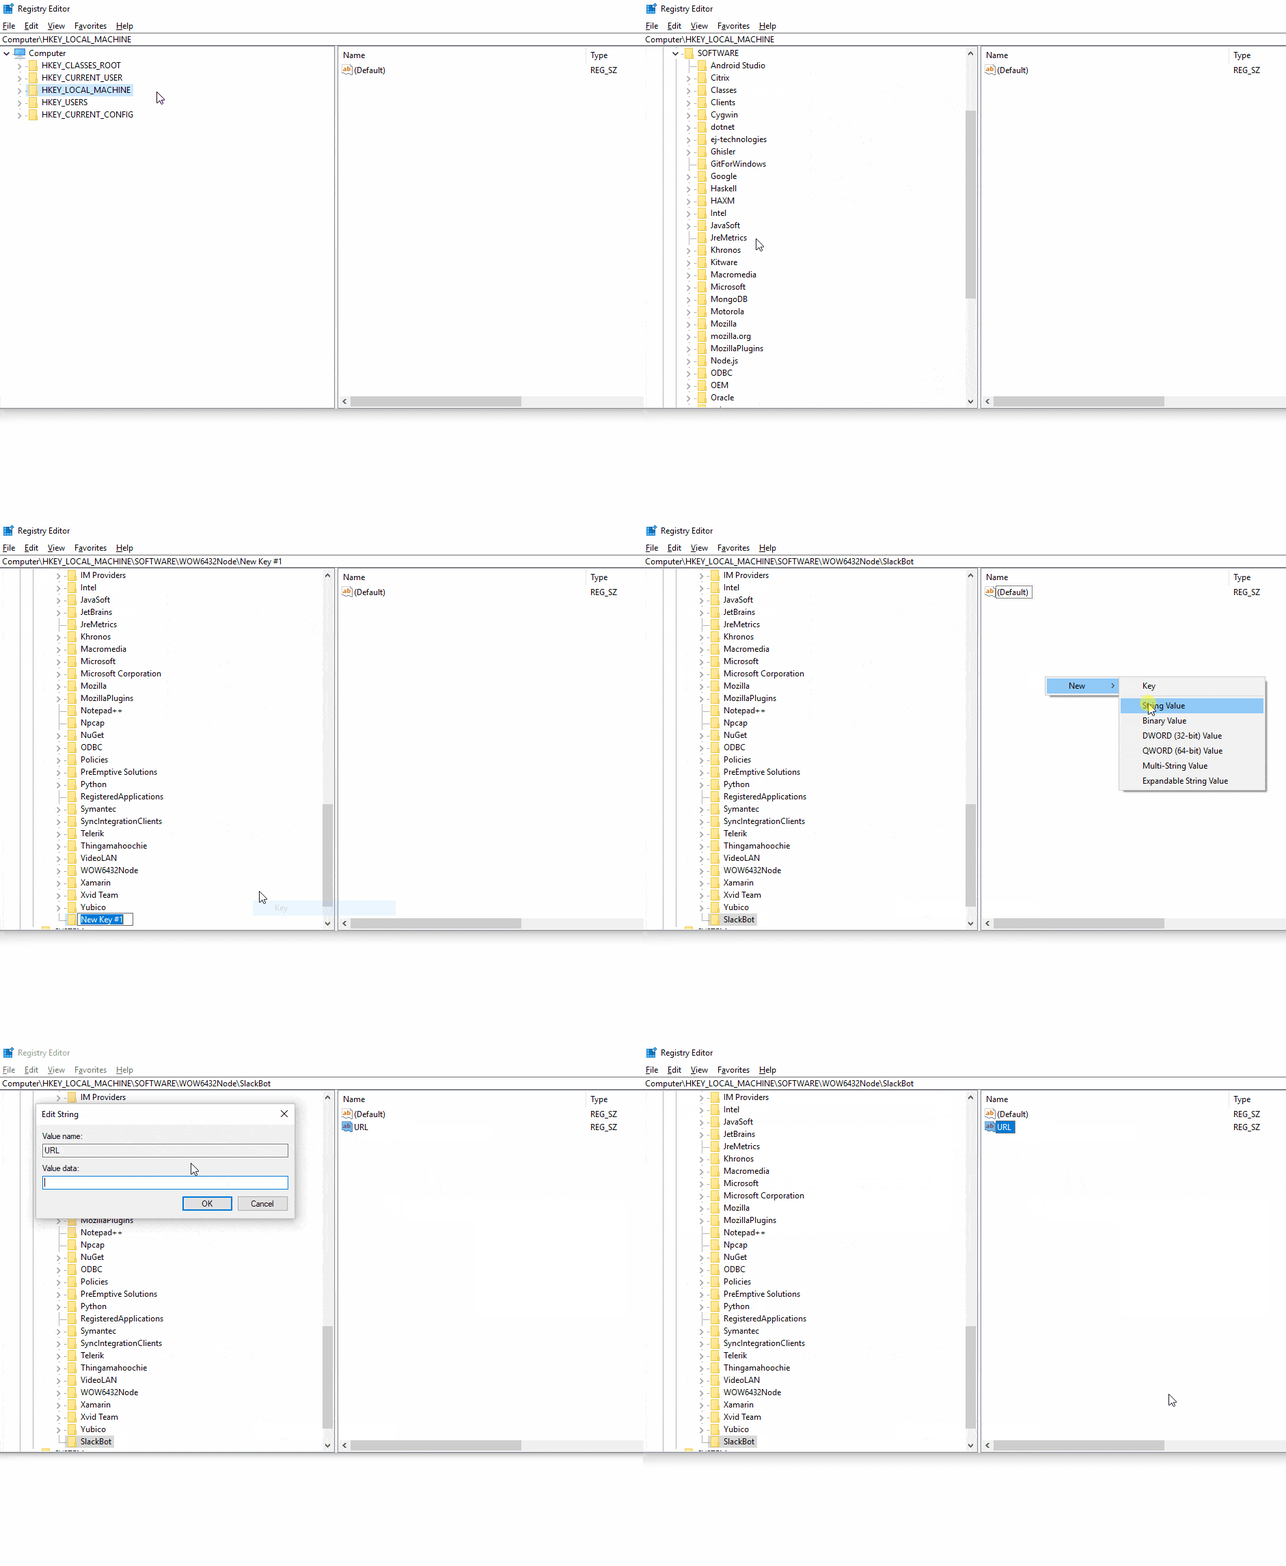
- Start Windows registry editor
- Navigate to
HKEY_LOCAL_MACHINE\SOFTWARE\WOW6432Node(if you are using 32-bit Windows useHKEY_LOCAL_MACHINE\SOFTWAREinstead) - Add new key and name it "SlackBot"
- In the "SlackBot" key add a new string value with the name "URL," and paste the web hook URL as its value
Creating a Test Studio Extension
Now let's get your hands dirty and start building our Test Studio extension.
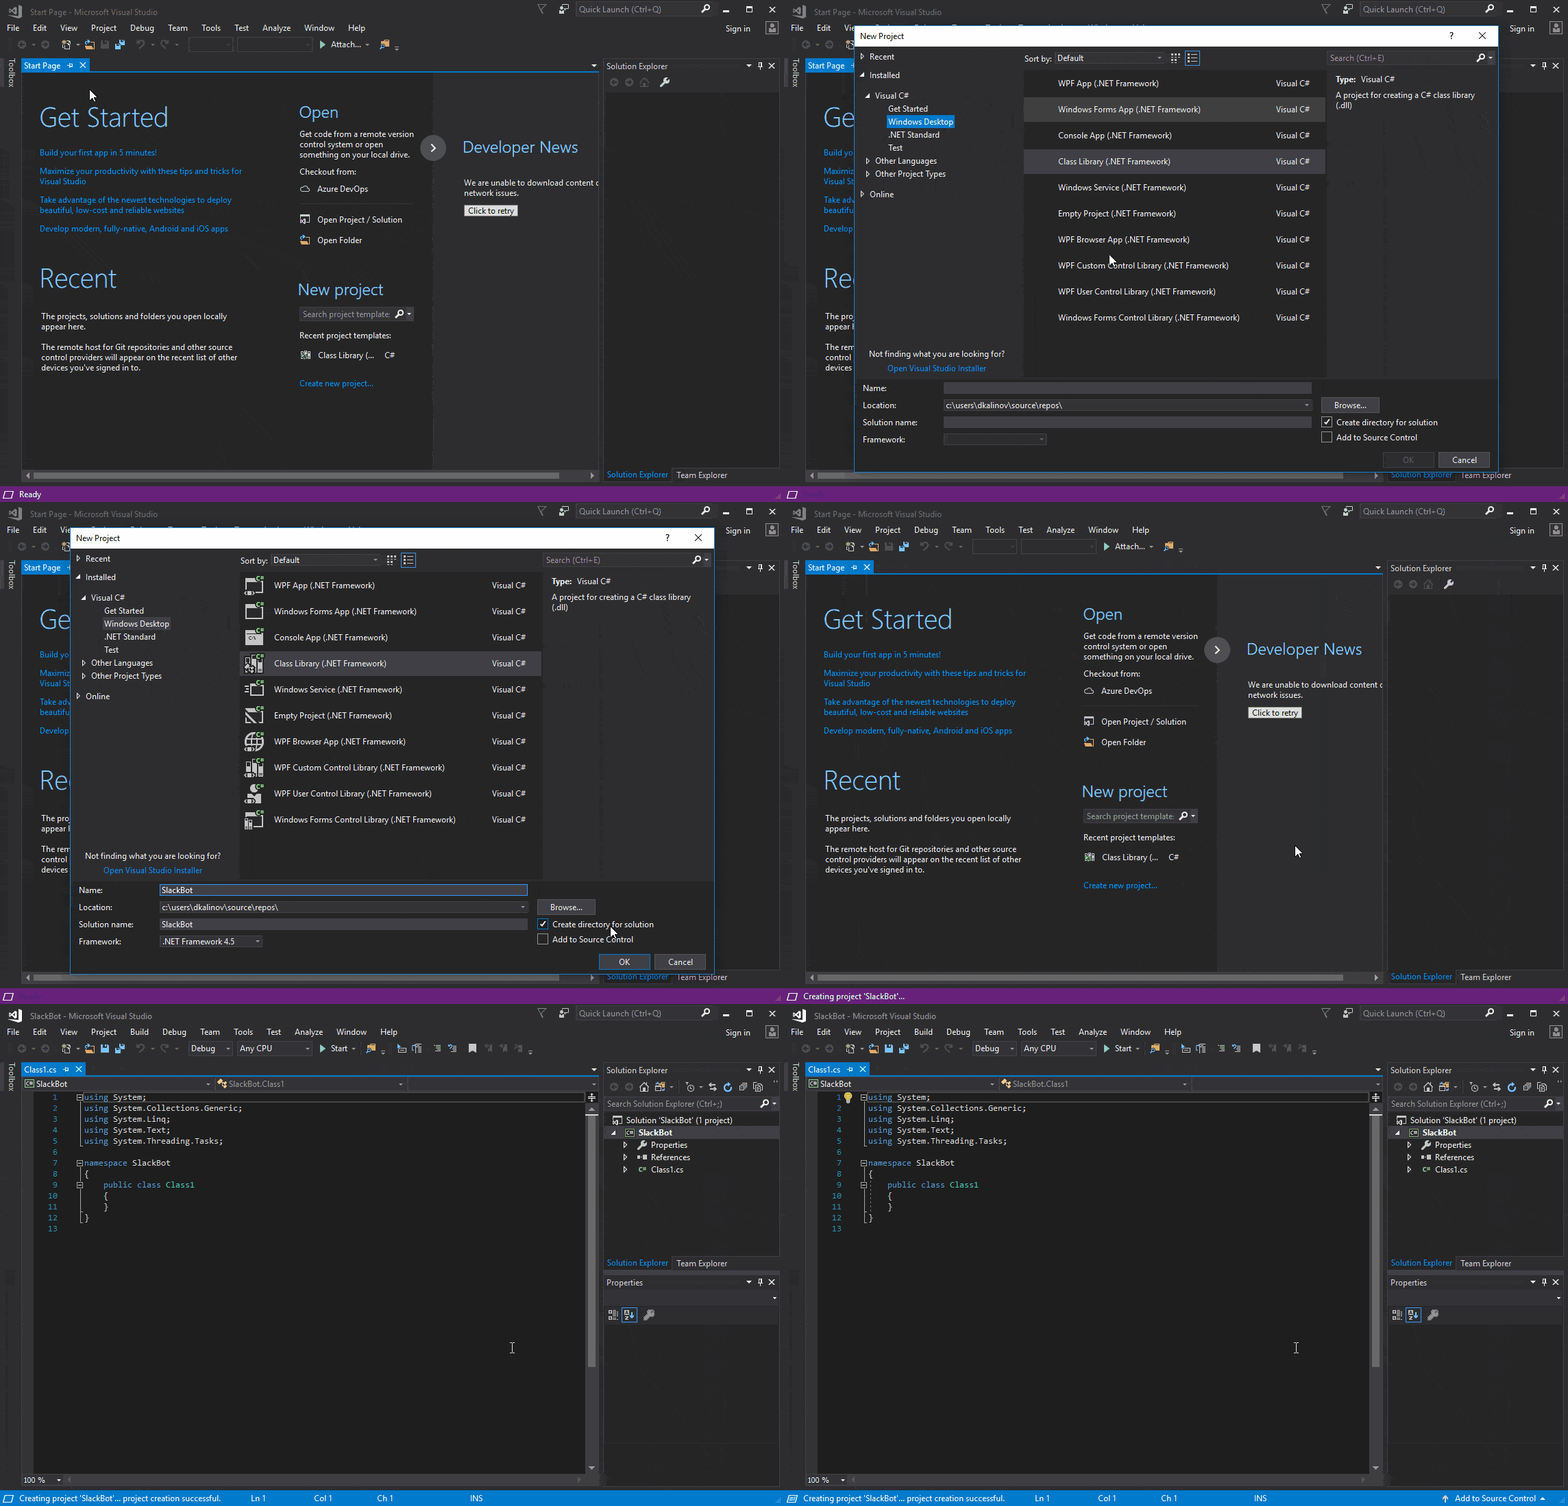
- We will start by creating new project in Visual Studio 2017
- For project type select Visual C# -> Windows Desktop -> Class Library (.NET Framework)
- Make sure that the selected framework is ".NET Framework 4.5"
- Give your project a name and click "OK"
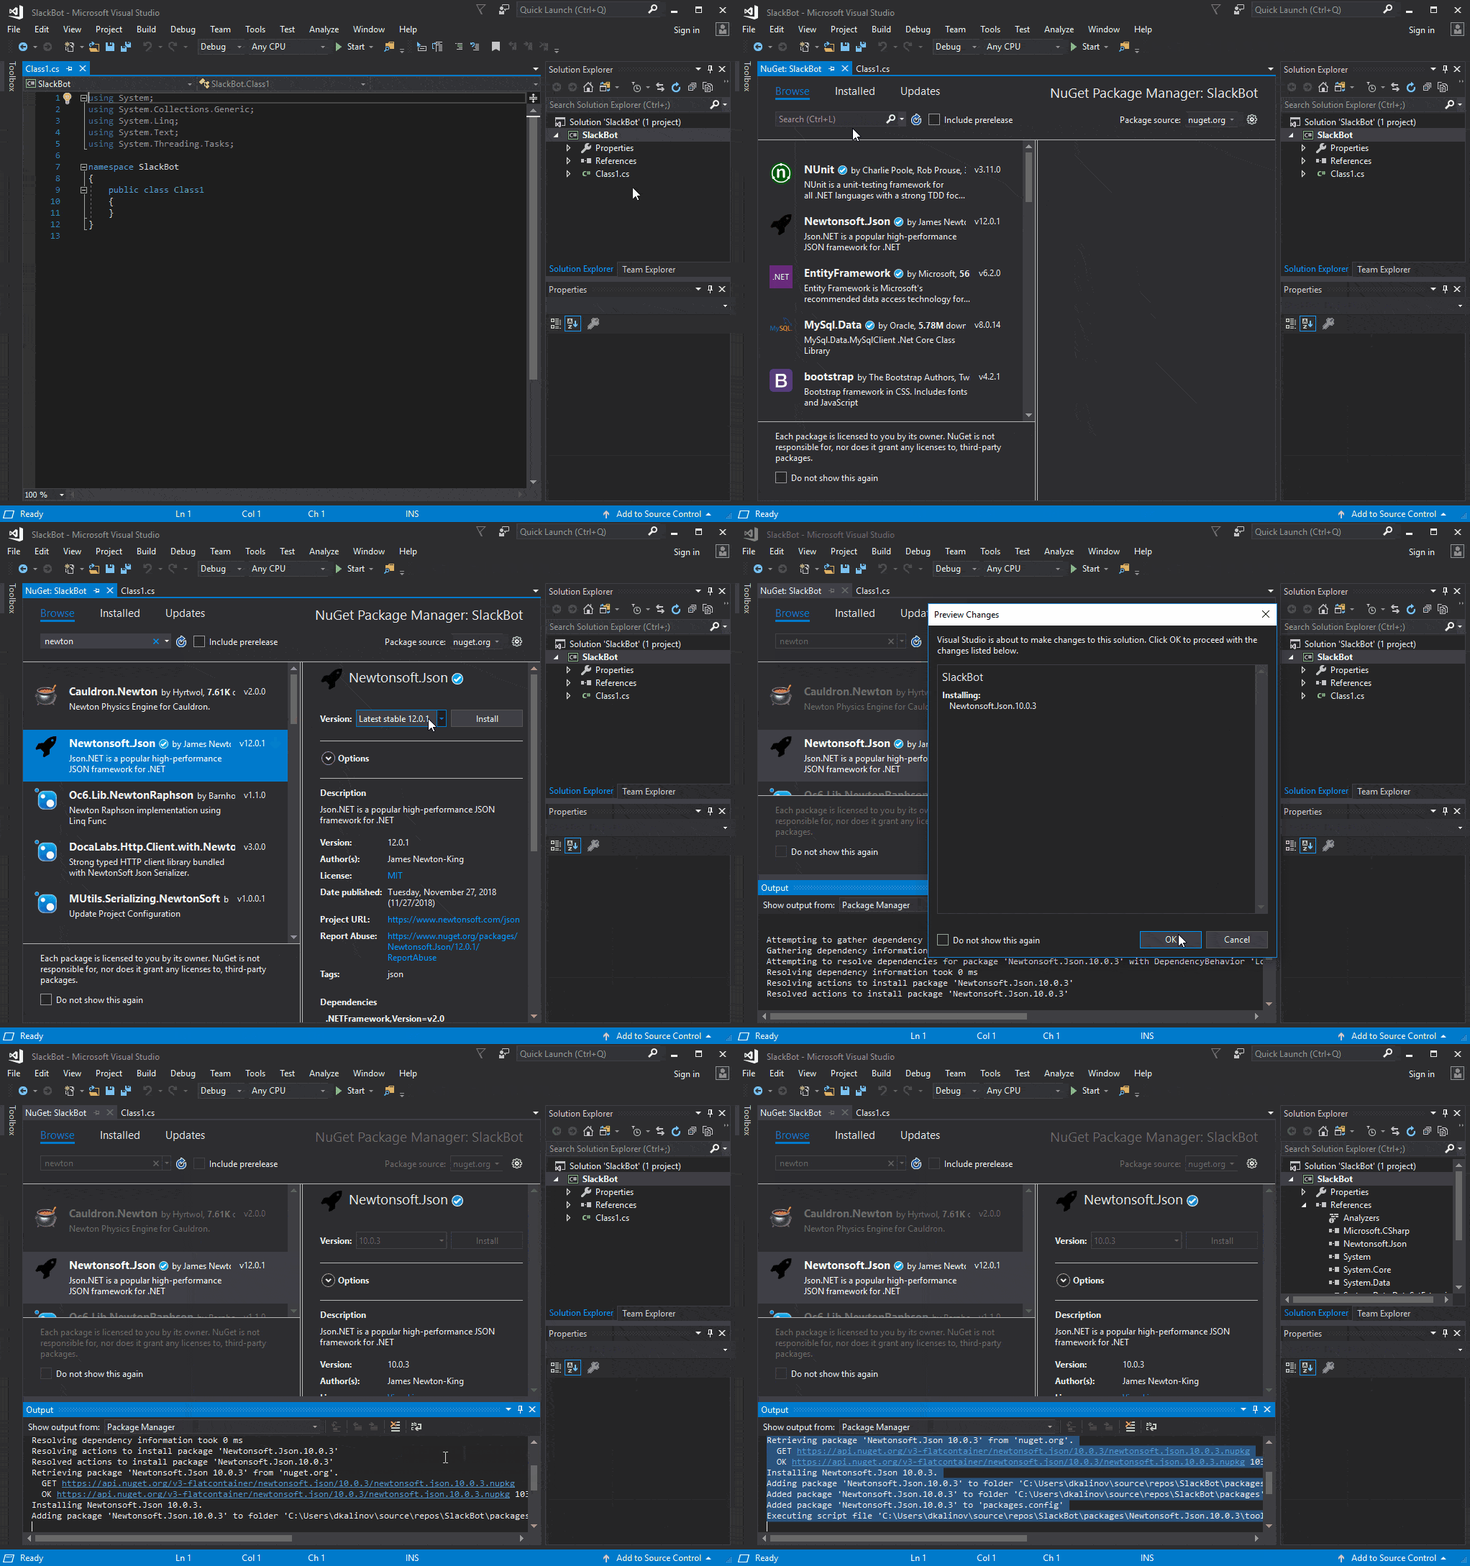
Our next step should be adding dependencies to the project. There are two dependencies that we need to refer to.
The First one is Newtonsoft.Json. You can add it as nuget library from the Visual Studio NuGet manager, just make sure to install version 10.0.3.
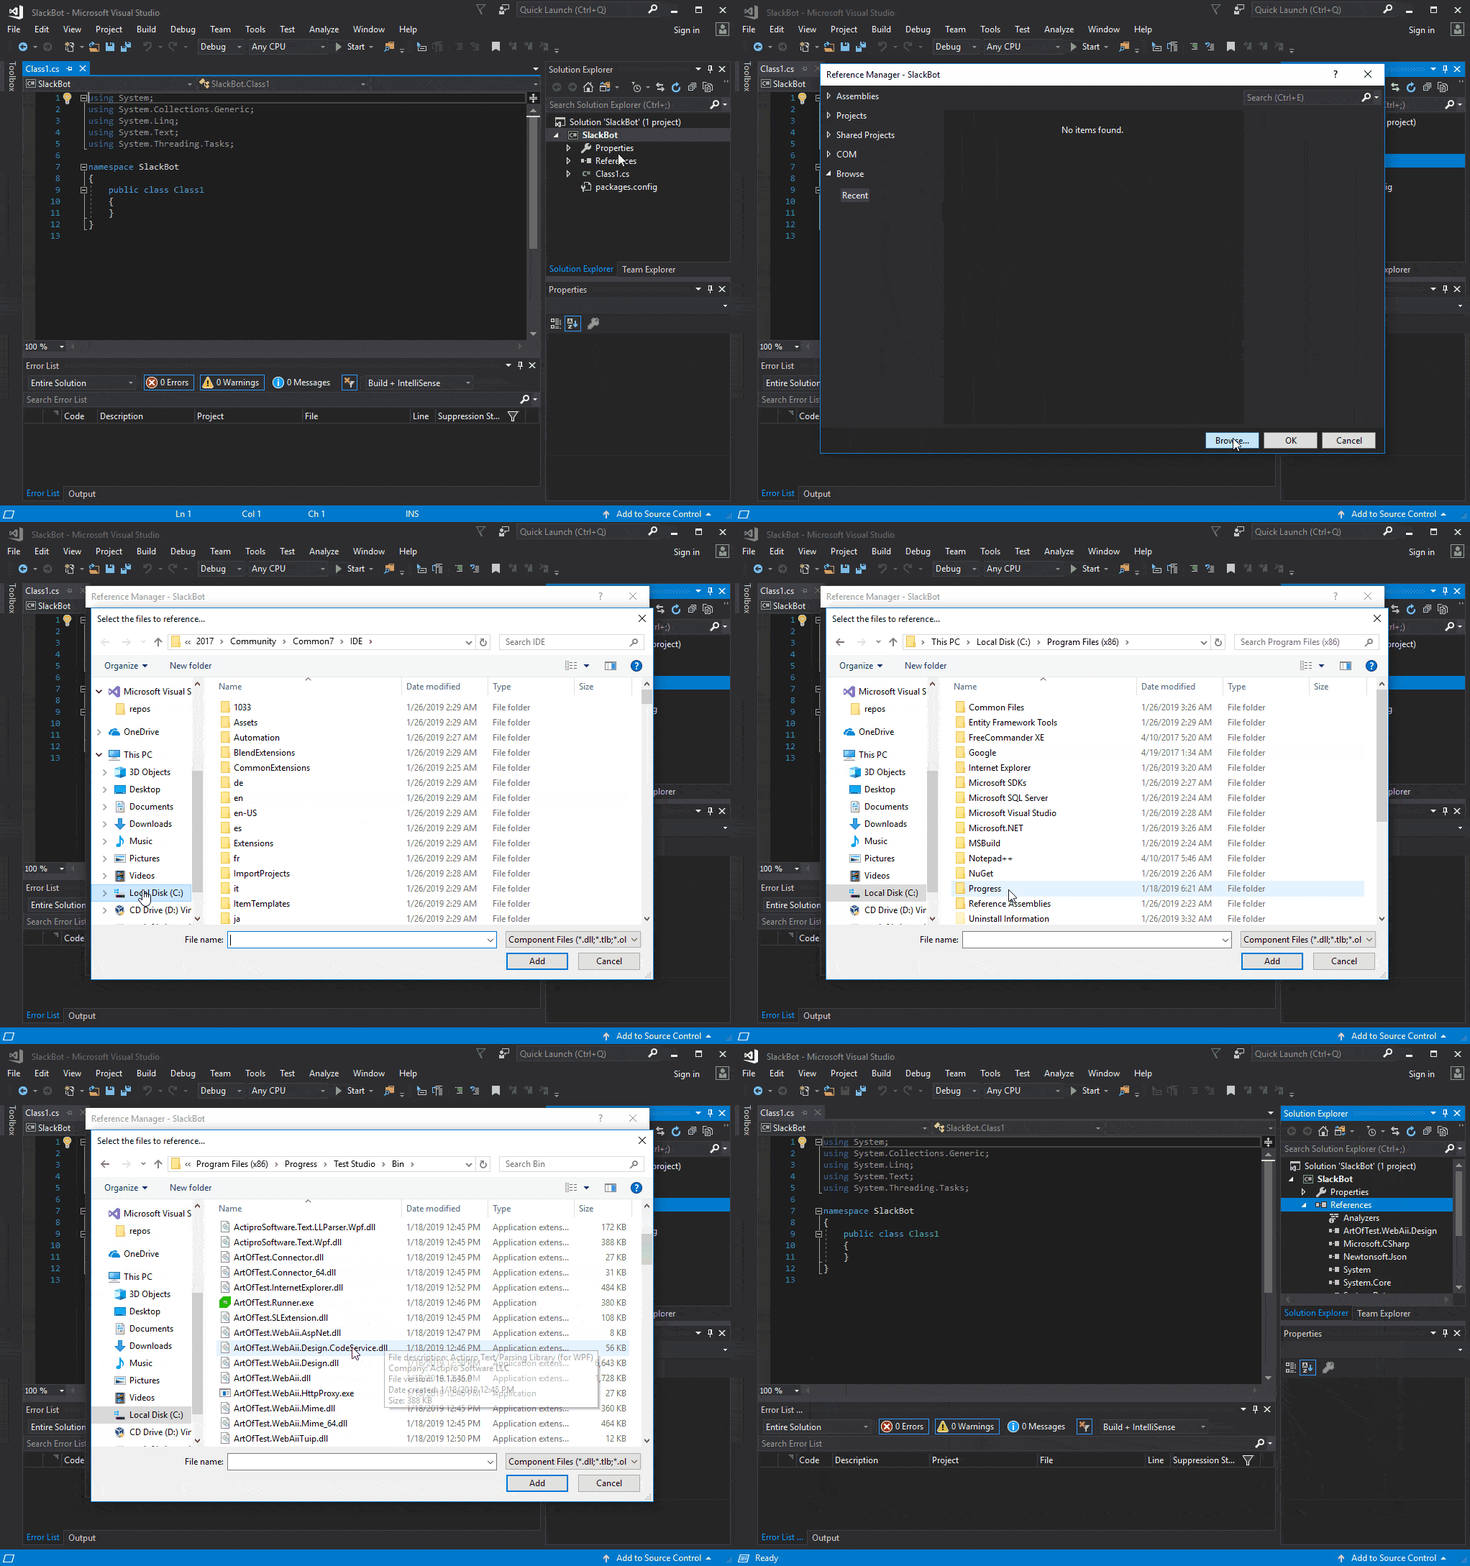
The second dependency is ArtOfTest.WebAii.Design.DLL. To add it, just right click on project references and select "Add reference...". Select "Browse" and navigate to your Test Studio bin folder (by default it is located in %ProgramFiles%\Progress\Test Studio\Bin)
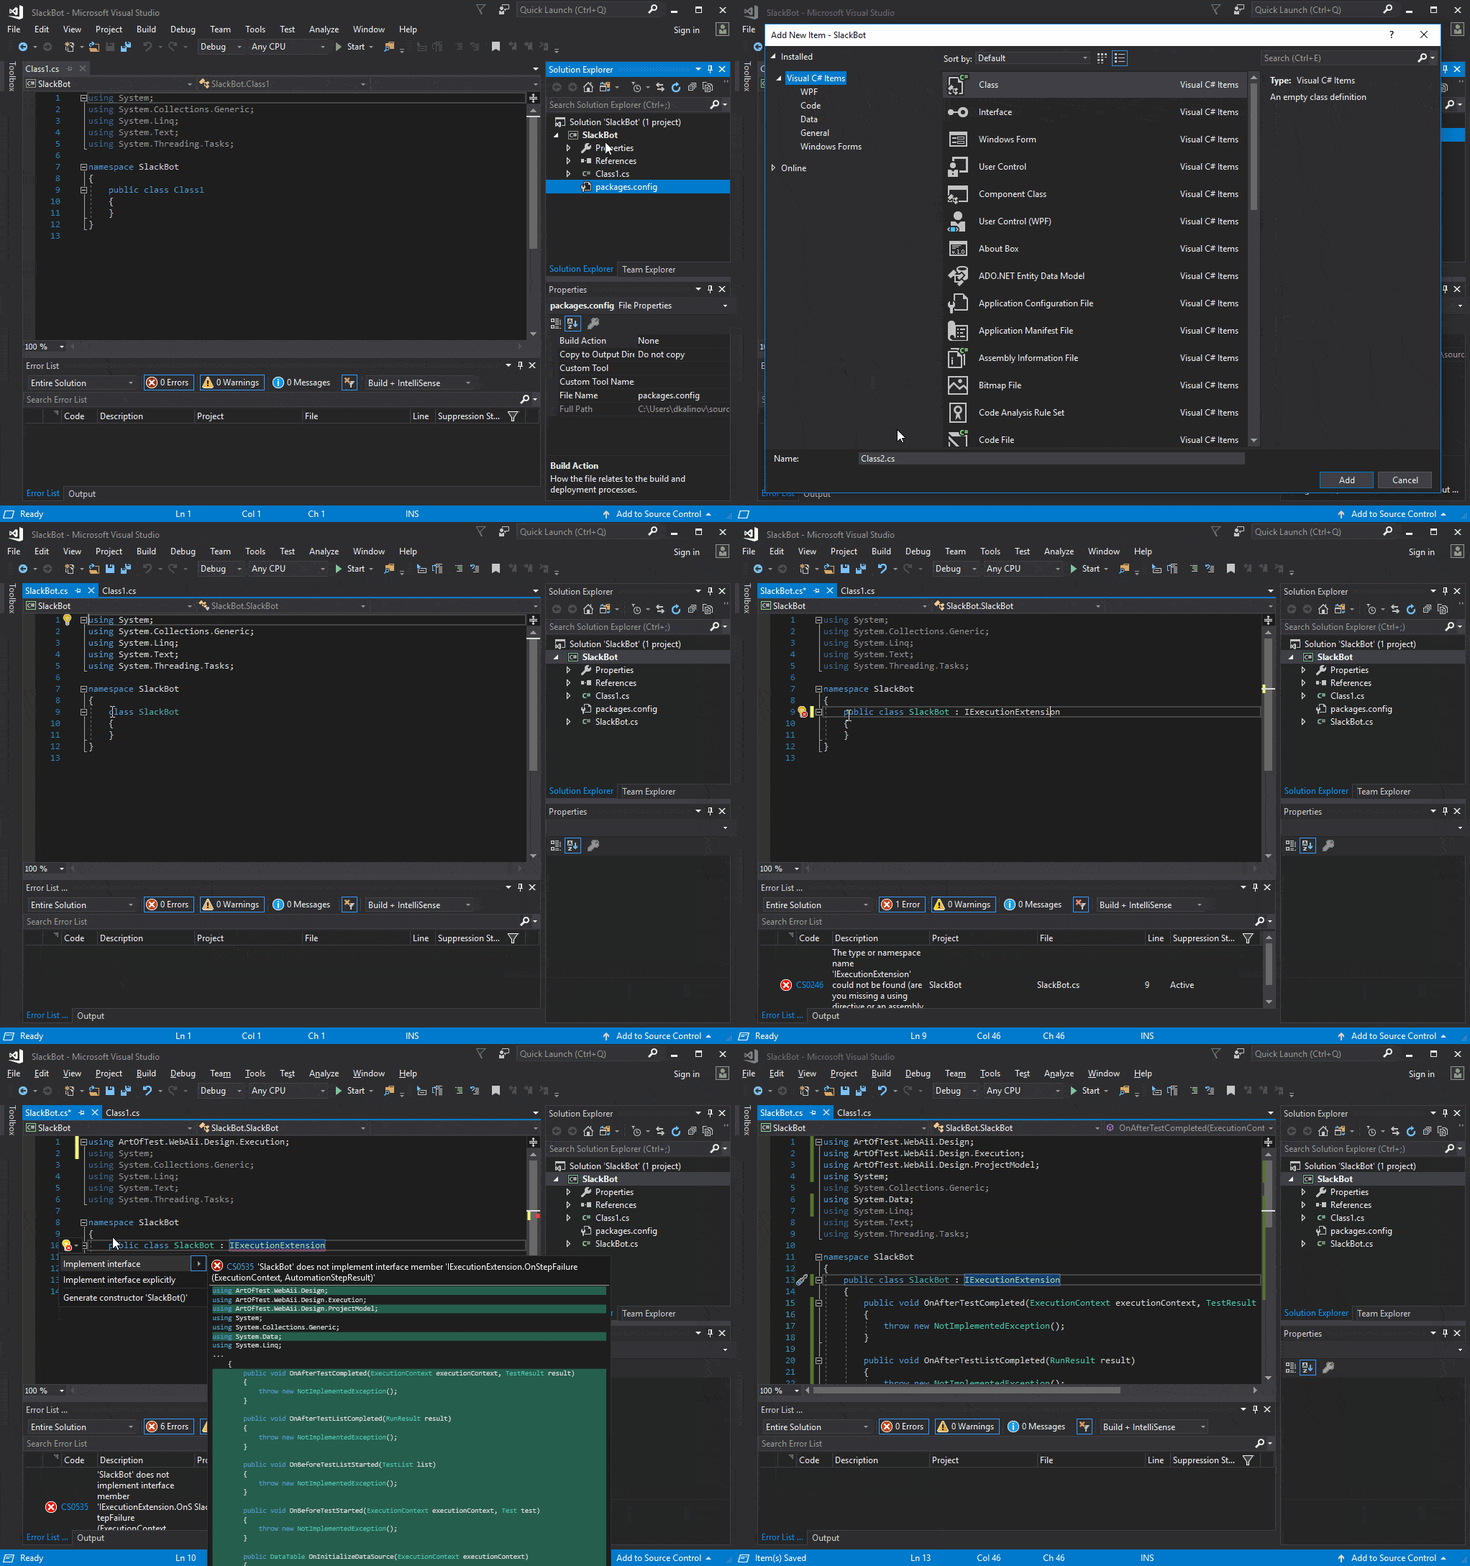
After adding the necessary dependencies, we are ready to start coding our extension. Let's begin with the implementation of the Test Studio run time extension interface. To do that, add a new class file to the project and name it SlackBot.cs. This class should implement the IExecutionExtension interface.
The resulting file should look like this:
using ArtOfTest.WebAii.Design;

using ArtOfTest.WebAii.Design.Execution;

using ArtOfTest.WebAii.Design.ProjectModel;

using Microsoft.Win32;

using SlackBot.Data;

using System;

using System.Data;


namespace SlackBot

{

    public class SlackExtension : IExecutionExtension

    {

        private string urlWithAccessToken = " ";


        // Web hook registry key

        private const string SLACK_BOT_REG_KEY = @"Software\SlackBot";


        public void OnBeforeTestListStarted(TestList list)

        {

            // Get Web Hook URL from Windows Registry

            using (var key = Registry.LocalMachine.OpenSubKey(SLACK_BOT_REG_KEY))

            {

                if (key != null)

                {

                    var url = key.GetValue("URL");

                    if (url != null)

                    {

                        this.urlWithAccessToken = url as string;

                    }

                }

            }

        }


        public void OnAfterTestListCompleted(RunResult result)

        {

            if (!string.IsNullOrEmpty(this.urlWithAccessToken))

            {

                var client = new SlackClient(this.urlWithAccessToken);

                var msg = MessageCreator.GetMessage(result);

                client.PostMessage(msg);

            }

        }


        public void OnAfterTestCompleted(ExecutionContext executionContext, TestResult result)

        {

        }


        public void OnBeforeTestStarted(ExecutionContext executionContext, Test test)

        {

        }


        public DataTable OnInitializeDataSource(ExecutionContext executionContext)

        {

            return null;

        }


        public void OnStepFailure(ExecutionContext executionContext, AutomationStepResult stepResult)

        {

        }

    }

}
Method OnBeforeTestListStarted is called every time before the start of test list execution, and that's the right place for us to read our registry key, which we created earlier in this post.
In OnAfterTestListCompleted, we receive the test list execution result when the run completes. Here we are creating and sending the Slack message.
Now we need to create data classes, needed for serialization/de-serialization. Create a folder in the project and give it a name "Data." In it add one new file named "Message.cs":
using Newtonsoft.Json;

using System;


namespace SlackBot.Data

{

    public class Message

    {

        [JsonProperty("channel")]

        public string Channel { get; set; }


        [JsonProperty("username")]

        public string Username { get; set; }


        [JsonProperty("text")]

        public string Text { get; set; }


        [JsonProperty("attachments")]

        public Attachment[] Attachments { get; set; }

    }


    public class Attachment

    {

        [JsonProperty("fallback")]

        public string Fallback { get; set; }


        [JsonProperty("color")]

        public string Color { get; set; }


        [JsonProperty("pretext")]

        public string Pretext { get; set; }


        [JsonProperty("author_name")]

        public string AuthorName { get; set; }


        [JsonProperty("author_link")]

        public Uri AuthorLink { get; set; }


        [JsonProperty("author_icon")]

        public Uri AuthorIcon { get; set; }


        [JsonProperty("title")]

        public string Title { get; set; }


        [JsonProperty("title_link")]

        public Uri TitleLink { get; set; }


        [JsonProperty("text")]

        public string Text { get; set; }


        [JsonProperty("fields")]

        public Field[] Fields { get; set; }


        [JsonProperty("image_url")]

        public Uri ImageUrl { get; set; }


        [JsonProperty("thumb_url")]

        public Uri ThumbUrl { get; set; }


        [JsonProperty("footer")]

        public string Footer { get; set; }


        [JsonProperty("footer_icon")]

        public Uri FooterIcon { get; set; }


        [JsonProperty("ts")]

        public long Ts { get; set; }


        [JsonProperty("mrkdwn_in")]

        public string[] Mrkdwn_in { get; set; }


    }


    public class Field

    {

        [JsonProperty("title")]

        public string Title { get; set; }


        [JsonProperty("value")]

        public string Value { get; set; }


        [JsonProperty("short")]

        public bool Short { get; set; }

    }

}
Every Slack message can have zero or more attachments and each of those attachments can have zero or more fields.
Create one more class file in the "Data" folder and name it MessageCreator.cs. We will use it to create different messages, depending on the result. Slack allows a great level of message customization. You can learn more about the Slack message format here.
Our messages will have one attachment with two fields in it - the first field will contain the test list name and the second one the run result:
using ArtOfTest.WebAii.Design.Execution;

using System;


namespace SlackBot.Data

{

    static class MessageCreator

    {

        private const string GREEN = "#7CD197";

        private const string RED = "#F35A00";


        internal static Message GetMessage(RunResult result)

        {

            if (result.PassedResult)

            {

                return CreateSuccessMessage(result);

            }


            return CreateFailMessage(result);

        }


        private static Message CreateSuccessMessage(RunResult result)

        {

            var msg = new Message();


            msg.Attachments = new Attachment[1];

            Field[] messageFields = new Field[2];

            messageFields[0] = CreateHeader(result.Name);


            messageFields[1] = new Field

            {

                Title = $"Result",

                Value = $"All tests passed.",

                Short = true

            };


            msg.Attachments[0] = new Attachment

            {

                Title = $"Test list execution done.",

                Color = GREEN,

                Ts = UnixTimeNow(),

                Fields = messageFields

            };


            return msg;

        }


        private static Message CreateFailMessage(RunResult result)

        {

            var msg = new Message();


            msg.Attachments = new Attachment[1];

            Field[] messageFields = new Field[2];

            messageFields[0] = CreateHeader(result.Name);


            messageFields[1] = new Field

            {

                Title = $"Result",

                Value = $"{result.PassedCount}/{result.AllCount} tests passed.",

                Short = true

            };


            msg.Attachments[0] = new Attachment

            {

                Title = $"Test list execution done.",

                Color = RED,

                Ts = UnixTimeNow(),

                Fields = messageFields

            };


            return msg;

        }


        private static Field CreateHeader(string name)

        {

            return new Field

            {

                Title = $"Test list",

                Value = $"{name}",

                Short = true

            };

        }


        private static long UnixTimeNow()

        {

            var timeSpan = (DateTime.UtcNow - new DateTime(1970, 1, 1, 0, 0, 0));

            return (long)timeSpan.TotalSeconds;

        }

    }

}
As a final step we need to create the SlackClient class. In its constructor we will set the web hook URL. We will add one more method to the class - PostMessage, which as its name suggests, will post messages to Slack:
using Newtonsoft.Json;

using SlackBot.Data;

using System;

using System.Collections.Specialized;

using System.Net;


namespace SlackBot

{

    public class SlackClient

    {

        private readonly Uri _uri;


        public SlackClient(string urlWithAccessToken)

        {

            this._uri = new Uri(urlWithAccessToken);

        }


        //Post a message using a Message object

        public void PostMessage(Message message)

        {

            var messageJson = JsonConvert.SerializeObject(message);


            using (var client = new WebClient())

            {

                var data = new NameValueCollection();

                data["payload"] = messageJson;

                var response = client.UploadValues(this._uri, "POST", data);

            }

        }

    }

}
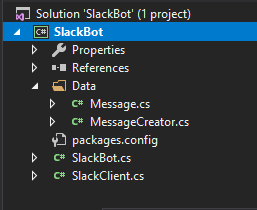
Our final project structure should looks like this:
Using the Extension
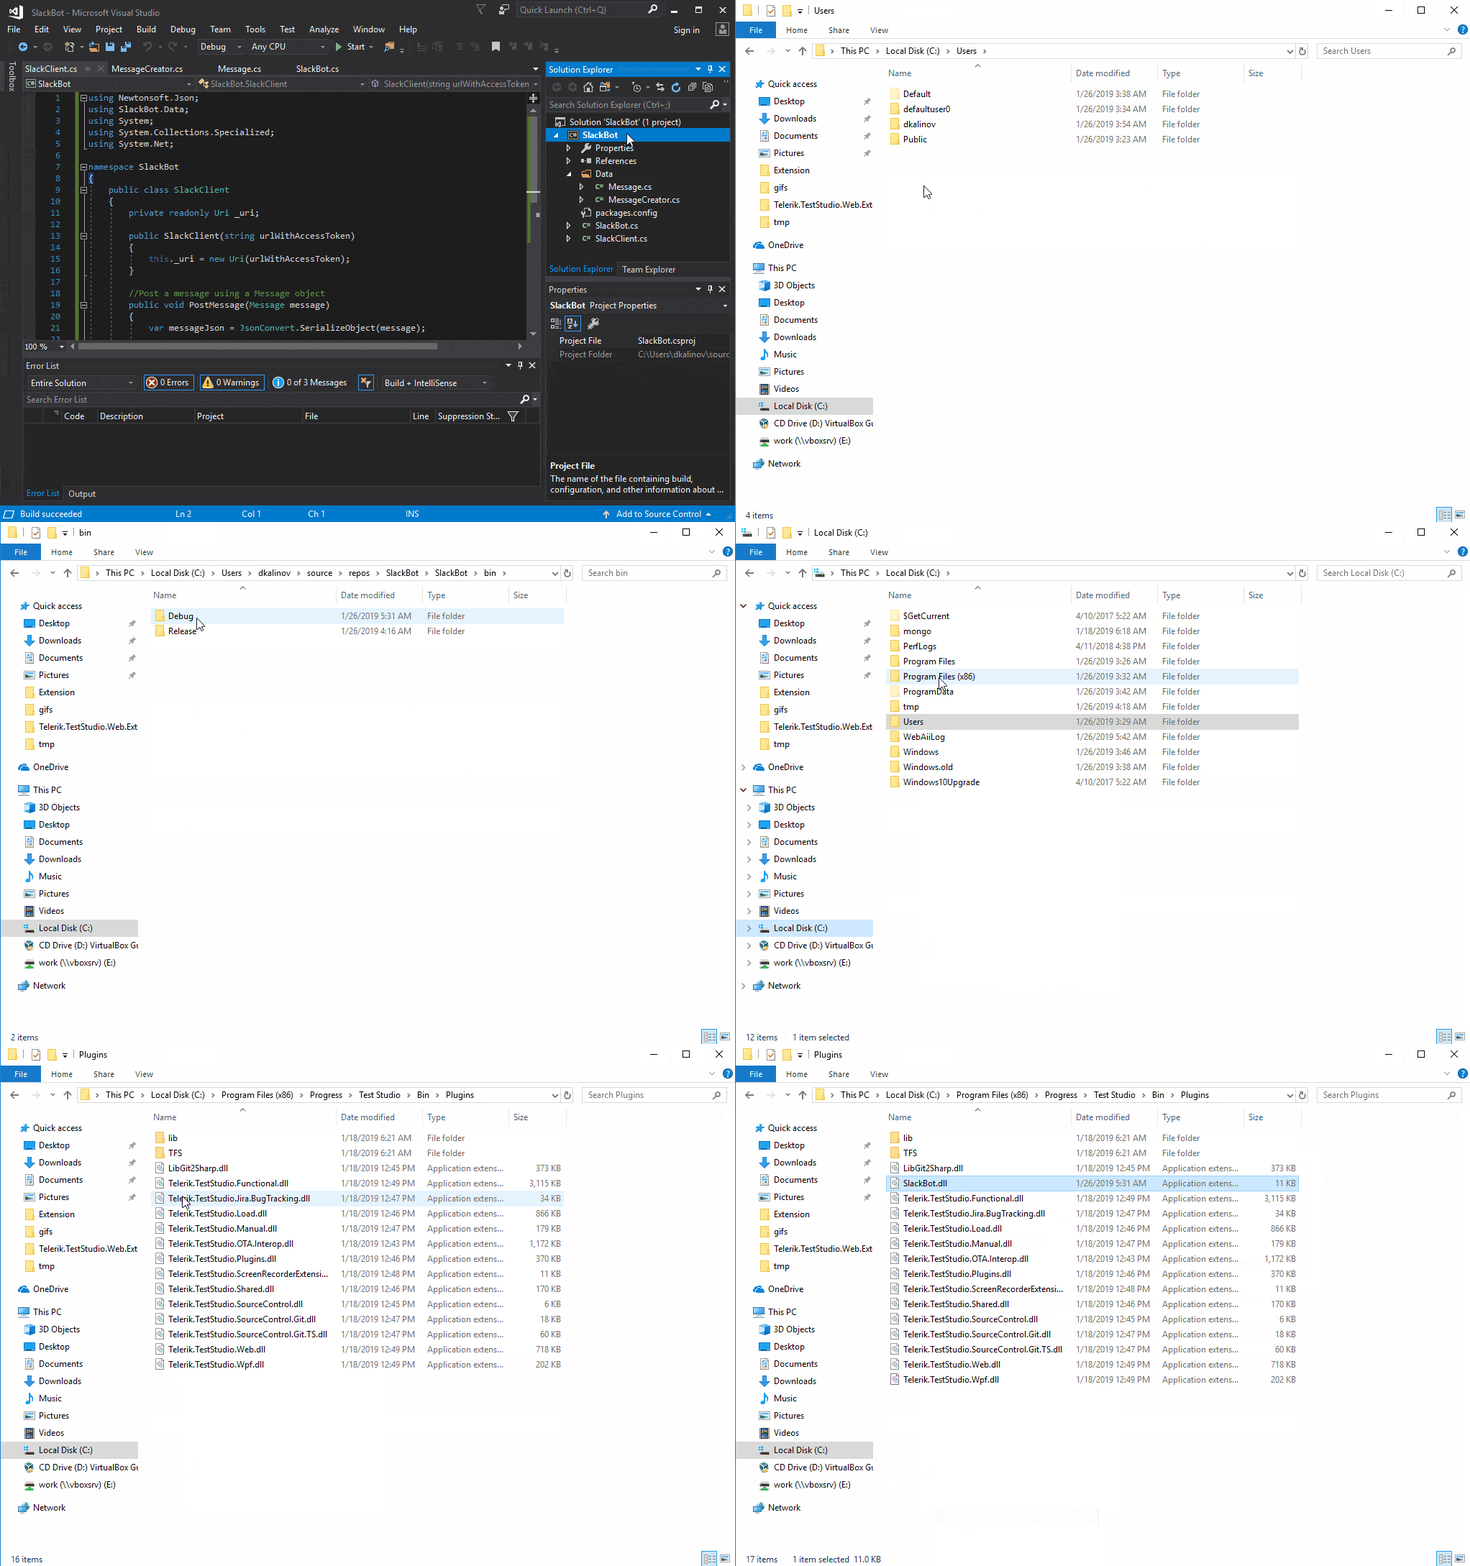
Now we can build our project. In Visual Studio, right click on the project and select "Build." When the build completes, copy SlackBot.dll and paste it into the Test Studio plugin folder (by default it is located in %ProgramFiles%\Progress\Test Studio\Bin\Plugins):
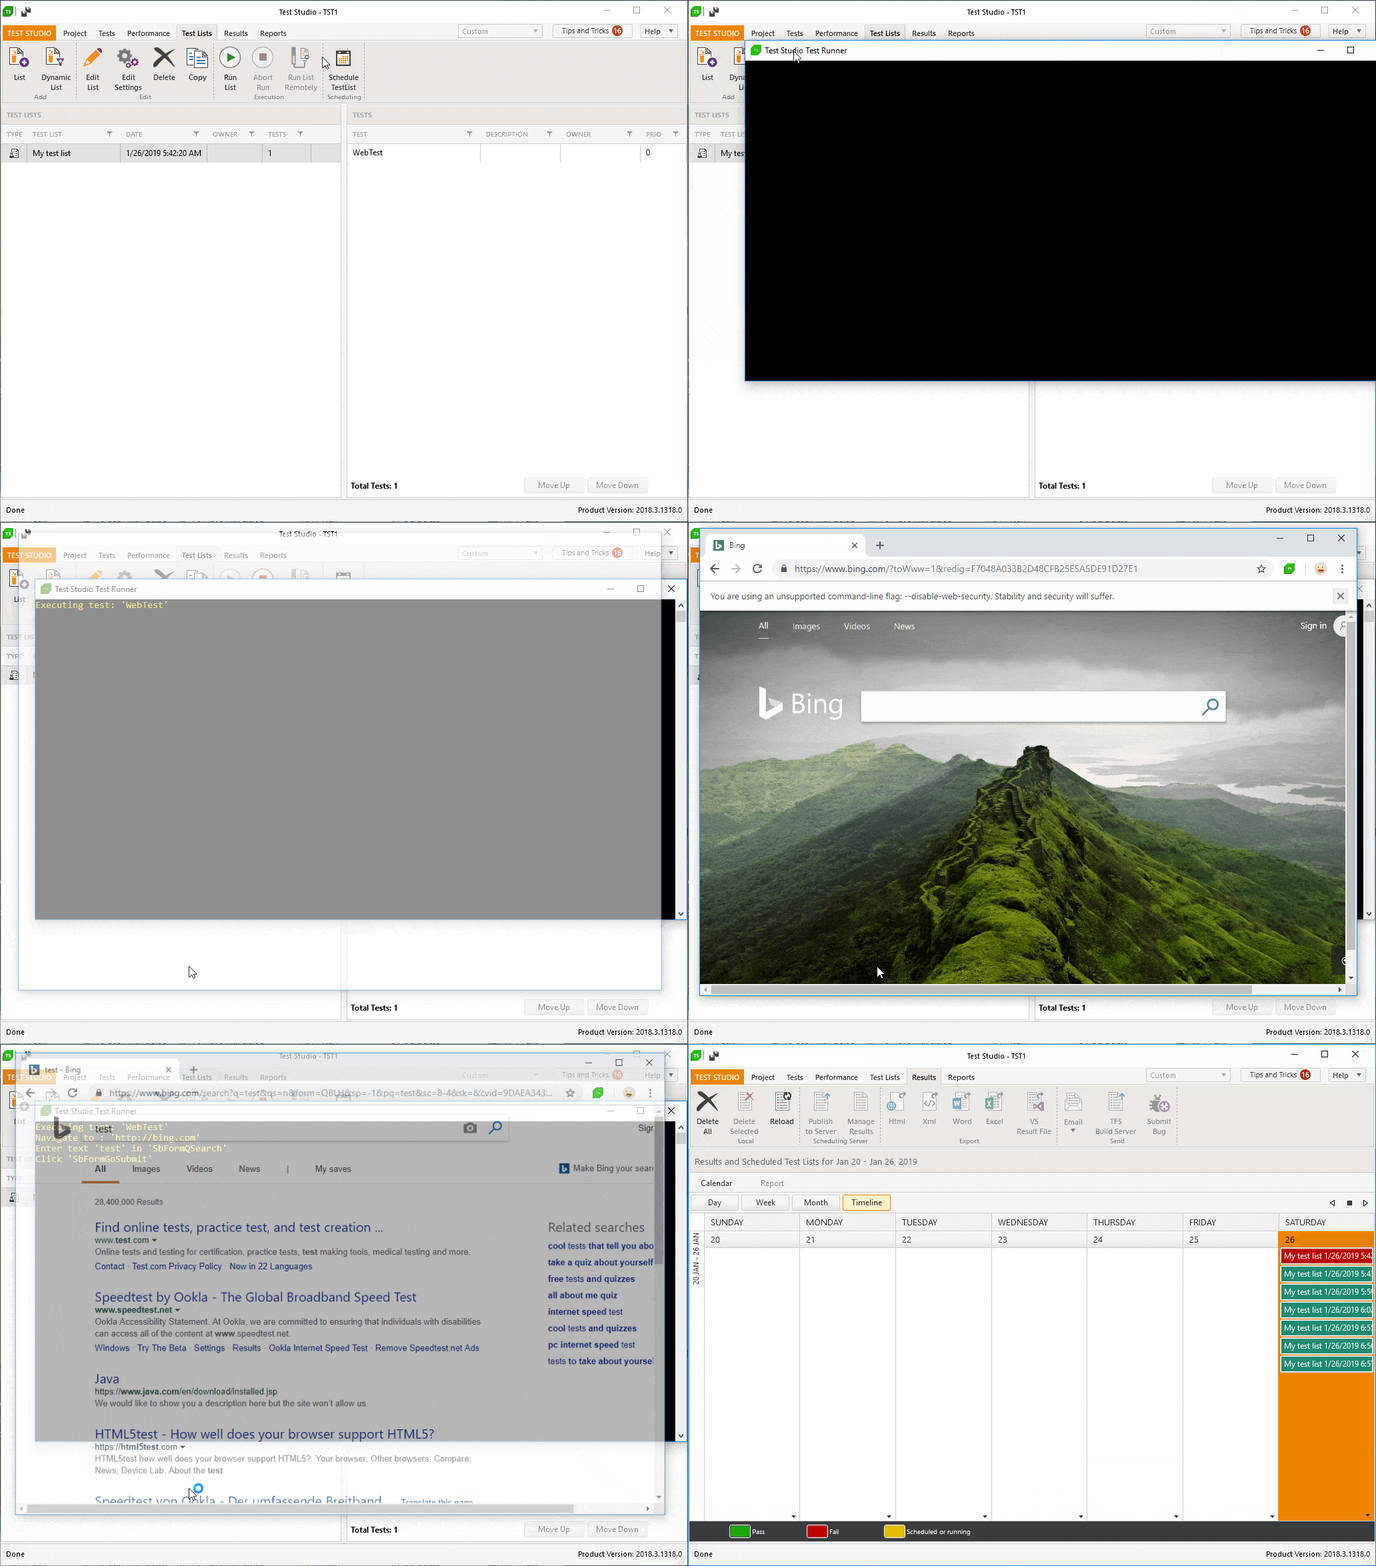
Now we are ready to test our extension. Start Test Studio and run one of your test lists.
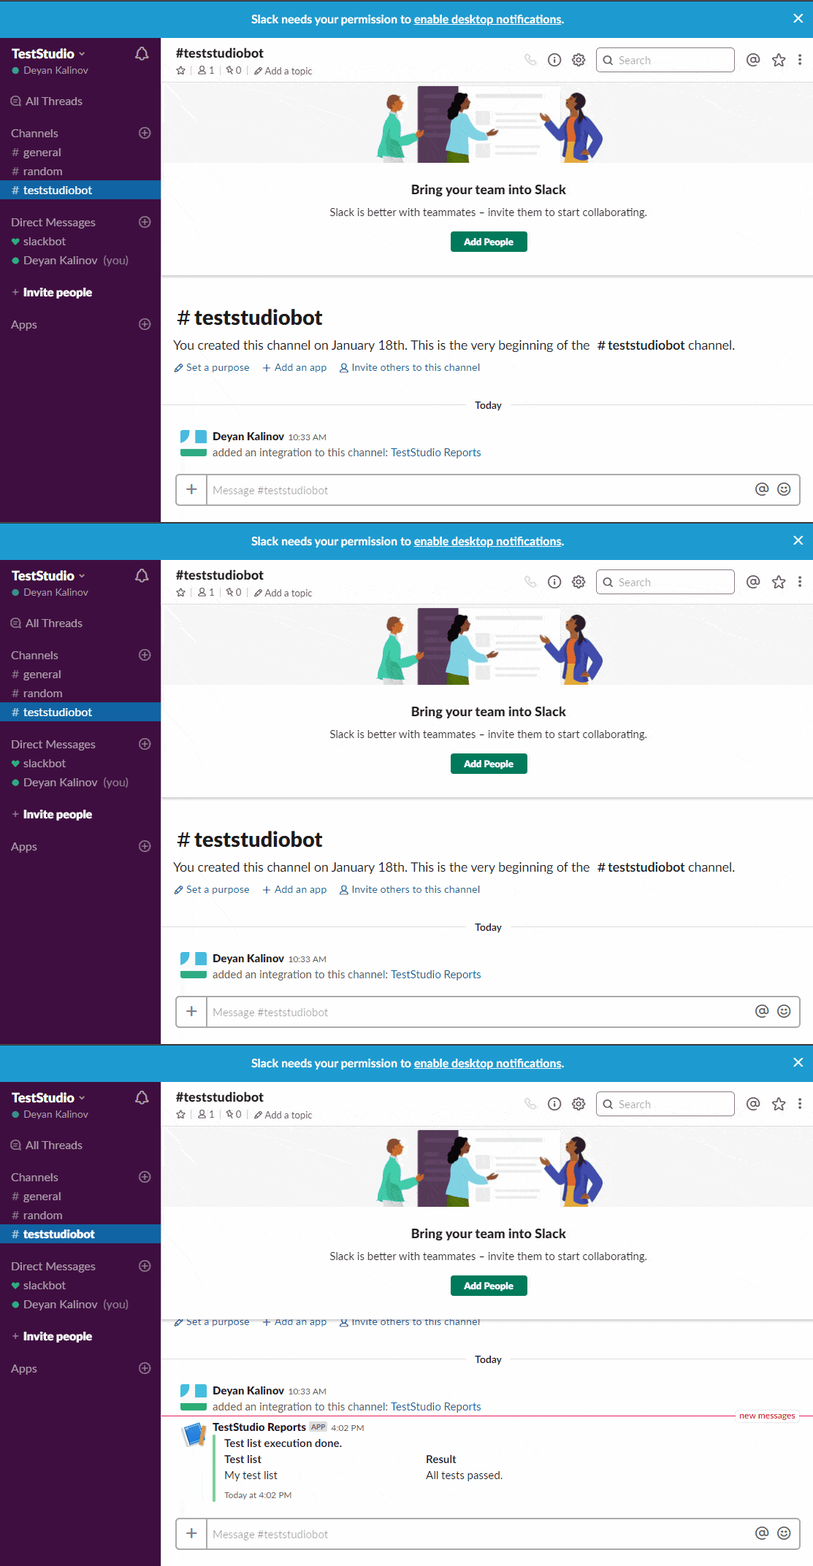
And behold! Your test results are in Slack!
Integrating Your Test Results with Slack
Now you saw how easy it can be to extend Test Studio and integrate it with other products.
If you want to try building this extension or creating your own, you can start a free, fully functional 30-day trial:

Deyan Kalinov
Deyan is software engineer on the Telerik Test Studio Team. As a software engineer he has experience with mobile and desktop applications.

