Keeping Ahead of the Candy Line
Do your team's testers end up getting work late in the iteration/sprint/cycle/whatever? Are they tremendously backed up trying to get automation scripts written, validations done and exploratory sessions completed? Do they look a bit like this?
This "old school" mindset and process leaves your entire team frustrated, and it adds far too much stress and risk to your delivery cycle.
 Recently at TelerikNEXT, I showed the audience how I could avoid this problem by writing a complete functional test before the feature was completed. It took me less than ten minutes—it would have been half that time; however, I had to explain things to the audience.
"But wait, Jim! I can't write UI tests without the UI completed and in place," you say.
Yes you can--especially if you're using Telerik Test Studio solution, 2015 R1 or higher. That's because you can now add elements to the repository manually, then build complete scripts using the Step Builder.
If you're not already doing it, your team should consider adding regular "Three Amigos" conversations to your workflow. The term was coined years ago by George Dinwiddie; he has a recent article on AgileConnection.
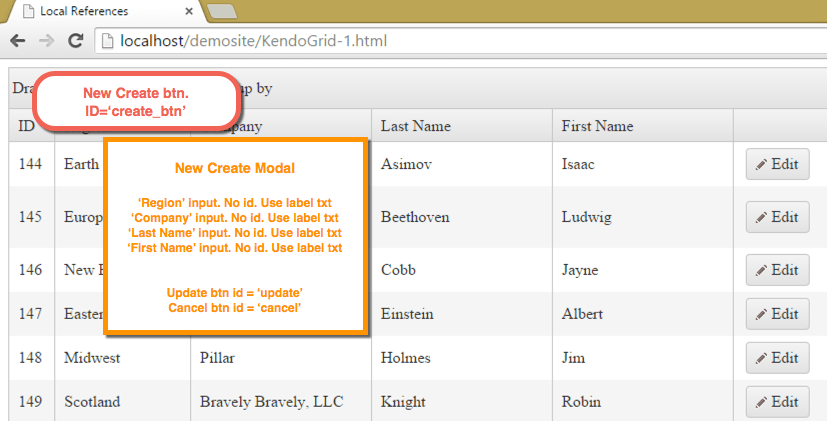
The feature on which I demonstrated this concept was a new "Create Contact" feature added to a simple Telerik KendoUI grid. This same workflow can go on, regardless of what UI technology you're using. Here's what a simple mock-up might look like, including locators you'll need.
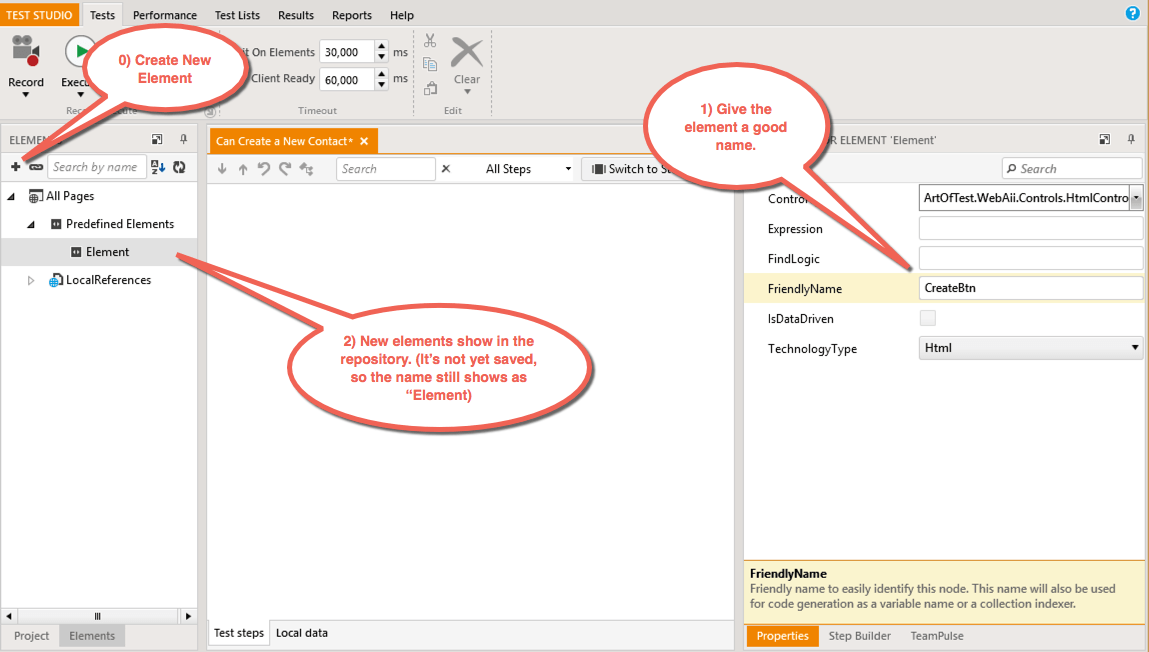
Repeat this for the Region, Company, Last Name, and First Name fields, and finally, the Update button.
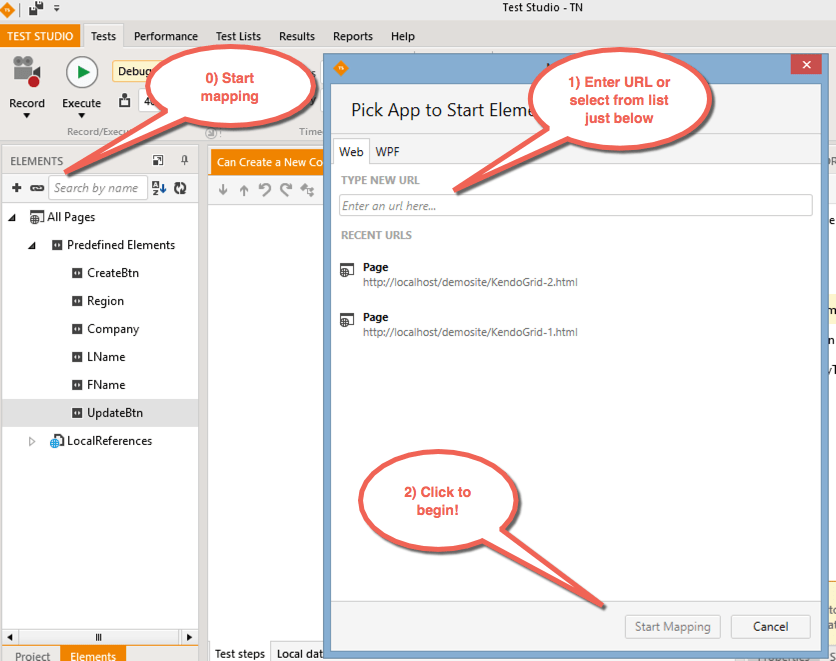
Here's where you can construct your test scenario to fit your needs. Firs, select an element from the left pane. The Step Builder enables you to create actions (clicks, text entry and so on), handle dialogs, build validations or conditional waits, perform navigations, and all the other actions you need to script out a complete test.
Of course, you can use elements you've already added to the repository. In this test I'm using a simple verification on the inner text of the table. This isn't how I'd normally do the validation, but, well, it's a demo.
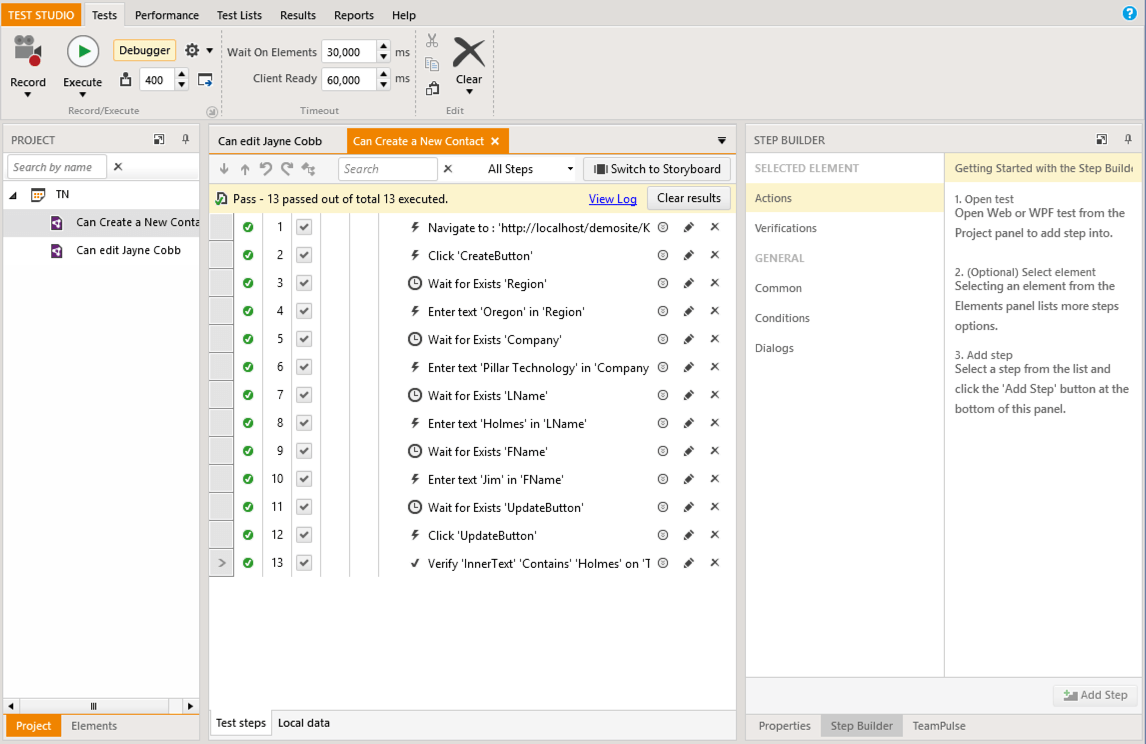
The image below shows my completed test.
Finish out your test as needed. Remember, you can use Test As Step to pull in other test scripts you may have already completed. When you're done, check your work into whatever source control you're using for your tests. You are using source control, right? Of course you are. Now your test is ready and waiting on your developer team to finish up the UI.
In the Elements pane, click the "Element Mapping" icon next to the Add Element icon. You'll be prompted with a starting URL. Notice the great folks at Telerik give you the most recently used URLS.
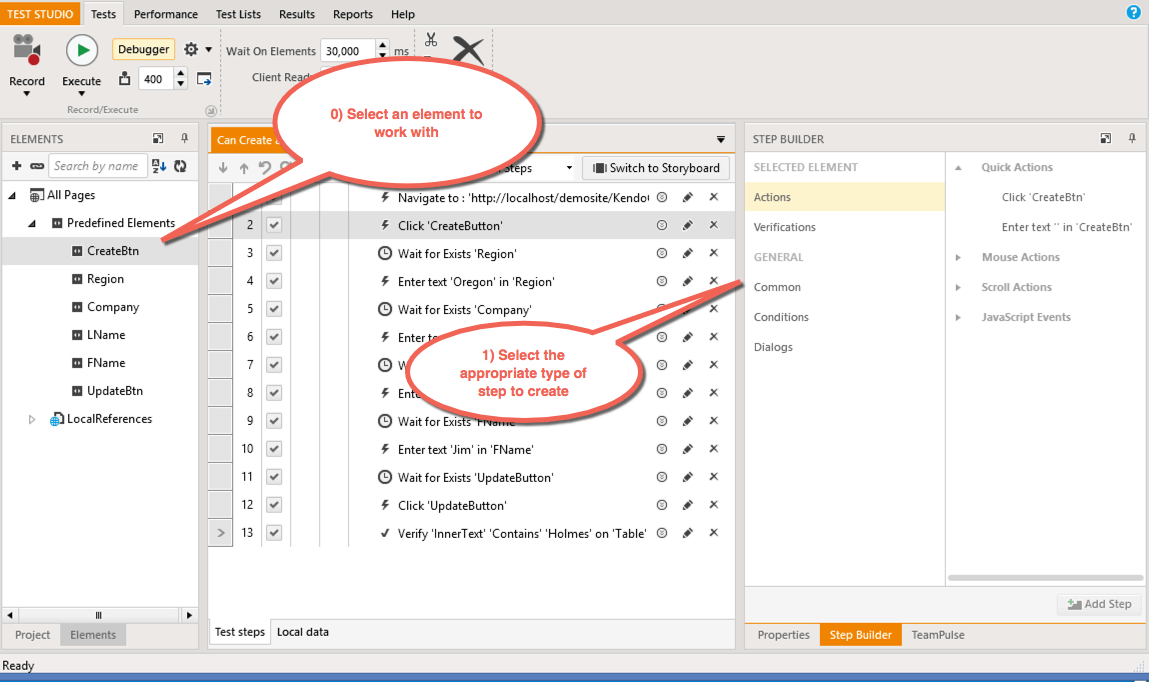
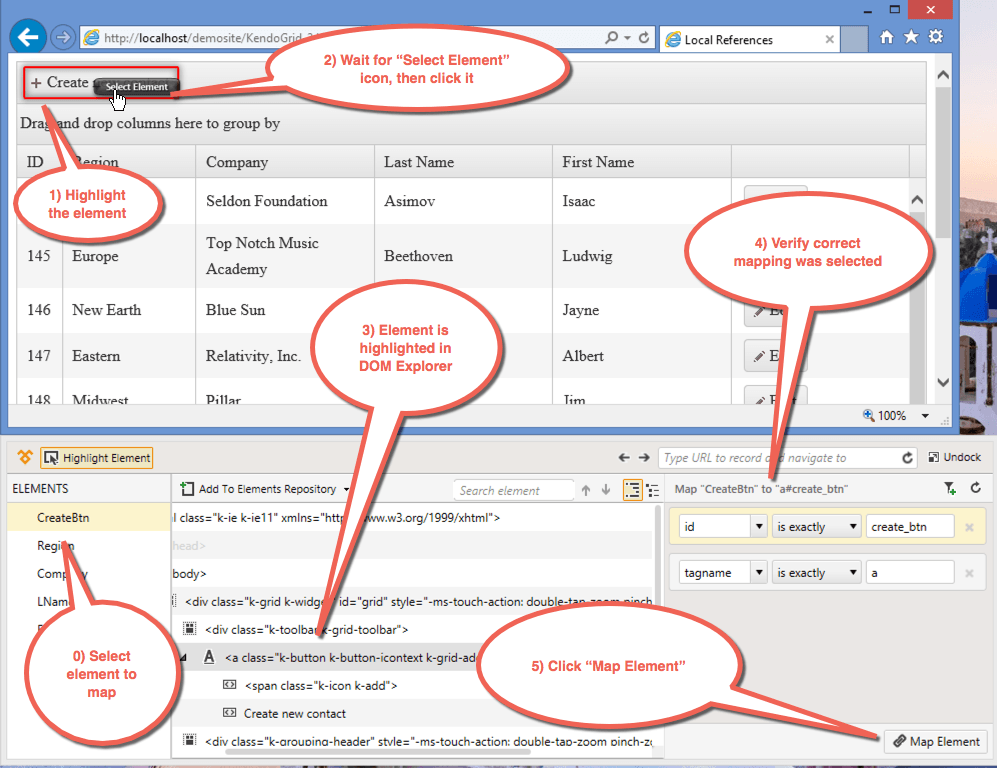
Select a browser, wait for it to start and navigate to the page, then begin mapping. Highlighting is on already when the browser starts. Select the element you want to work with in the Elements pane, highlight it on the screen, then select it once the icon appears. Confirm you've got the right element by checking the DOM Explorer and mapping logic (see below), then click "Map Element" to finish.
The element you've just mapped will disappear from the list. Continue with the rest of the elements.
At this point, you can run the test even if the final functionality isn't live. This will let you make sure you've got everything mapped out correctly, and any additional Tests as Steps work correctly. You could even include coded steps for data setup or test oracles at this point.
An important piece to understand clearly: you only need a live UI. You don't need a functional UI. You can proceed as long as the elements are in place and you can load the page. In this example, I'd only need the Create button wired up to bring up the modal with the additional information. I wouldn't need the UI to actually create the data in the database.
Having just the UI in place lets you work even more in parallel with developers. They build the UI and you can wire up the elements while the developers are finishing the last flows.
Sit back in your chair for a moment and re-read that last sentence. Your automated test is done before the developers finished their work.
If you're in a shop that's already doing some form of test-first development, you're likely stifling a yawn and saying, "Great, we've been doing this for a long time already." Bully for you, I say.
For the majority of you who aren't doing test-first, take a moment to think about a few tremendous benefits here:
This is an incredibly fast workflow, and it will ("will" not "can") bring great productivity and morale boosts to your teams.
Grab the latest Test Studio suite and give it a shot.
This "old school" mindset and process leaves your entire team frustrated, and it adds far too much stress and risk to your delivery cycle.
"But wait, Jim! I can't write UI tests without the UI completed and in place," you say.
Yes you can--especially if you're using Telerik Test Studio solution, 2015 R1 or higher. That's because you can now add elements to the repository manually, then build complete scripts using the Step Builder.
Step 1: Discuss the Feature Before You Build It
In order to make this work, you'll need a quick conversation with the developers (and better yet, your PM/BA) to make sure you understand how the feature will work. You'll also have to let the developers know where you'll need help with element locators.If you're not already doing it, your team should consider adding regular "Three Amigos" conversations to your workflow. The term was coined years ago by George Dinwiddie; he has a recent article on AgileConnection.
The feature on which I demonstrated this concept was a new "Create Contact" feature added to a simple Telerik KendoUI grid. This same workflow can go on, regardless of what UI technology you're using. Here's what a simple mock-up might look like, including locators you'll need.
Step 2: Create Placeholder Elements
Open up Test Studio suite, and create a new test. Now open up the Properties and Elements panes (right and left panels, respectively). Click the "+" icon in the repository, give the element a good name, and save your work&emdash; just like in the image below.Repeat this for the Region, Company, Last Name, and First Name fields, and finally, the Update button.
Step 3: Build Your Test Flow
Now it's time to flesh out the flow of the test by adding appropriate steps. Change the right pane to the "Step Builder" tab.Here's where you can construct your test scenario to fit your needs. Firs, select an element from the left pane. The Step Builder enables you to create actions (clicks, text entry and so on), handle dialogs, build validations or conditional waits, perform navigations, and all the other actions you need to script out a complete test.
Of course, you can use elements you've already added to the repository. In this test I'm using a simple verification on the inner text of the table. This isn't how I'd normally do the validation, but, well, it's a demo.
The image below shows my completed test.
Finish out your test as needed. Remember, you can use Test As Step to pull in other test scripts you may have already completed. When you're done, check your work into whatever source control you're using for your tests. You are using source control, right? Of course you are. Now your test is ready and waiting on your developer team to finish up the UI.
Step 4: Map Elements to Live UI
The final step in this process is wiring up the placeholder elements to your live UI. You can take this step once your developers have a UI in place.In the Elements pane, click the "Element Mapping" icon next to the Add Element icon. You'll be prompted with a starting URL. Notice the great folks at Telerik give you the most recently used URLS.
Select a browser, wait for it to start and navigate to the page, then begin mapping. Highlighting is on already when the browser starts. Select the element you want to work with in the Elements pane, highlight it on the screen, then select it once the icon appears. Confirm you've got the right element by checking the DOM Explorer and mapping logic (see below), then click "Map Element" to finish.
The element you've just mapped will disappear from the list. Continue with the rest of the elements.
At this point, you can run the test even if the final functionality isn't live. This will let you make sure you've got everything mapped out correctly, and any additional Tests as Steps work correctly. You could even include coded steps for data setup or test oracles at this point.
An important piece to understand clearly: you only need a live UI. You don't need a functional UI. You can proceed as long as the elements are in place and you can load the page. In this example, I'd only need the Create button wired up to bring up the modal with the additional information. I wouldn't need the UI to actually create the data in the database.
Having just the UI in place lets you work even more in parallel with developers. They build the UI and you can wire up the elements while the developers are finishing the last flows.
Green Test, Move on to Other Great Testing
The final piece is waiting until development is complete to run your already written test.Sit back in your chair for a moment and re-read that last sentence. Your automated test is done before the developers finished their work.
If you're in a shop that's already doing some form of test-first development, you're likely stifling a yawn and saying, "Great, we've been doing this for a long time already." Bully for you, I say.
For the majority of you who aren't doing test-first, take a moment to think about a few tremendous benefits here:
- Testers aren't playing catch-up at the end. Automation's done; now testers can focus on high-value exploratory testing.
- Developers know their work is correct because the test passes.
It's Faster to Do Than Reading About
It I wrote this test in less than 15 minutes during my session at TelerikNEXT—and I was talking the audience through each and every step. Plus, I had one or two questions. Actual time to do the work I laid out above would likely be in the neighborhood of five to eight minutes.This is an incredibly fast workflow, and it will ("will" not "can") bring great productivity and morale boosts to your teams.
Grab the latest Test Studio suite and give it a shot.

About the Author
Jim Holmes
Jim is an Executive Consultant at Pillar Technology. He is also the owner of Guidepost Systems. He has been in various corners of the IT world since joining the US Air Force in 1982. He’s spent time in LAN/WAN and server management roles in addition to many years helping teams and customers deliver great systems. Jim has worked with organizations ranging from startups to Fortune 100 companies to improve their delivery processes and ship better value to their customers. When not at work you might find Jim in the kitchen with a glass of wine, playing Xbox, hiking with his family, or banished to the garage while trying to practice his guitar.
Comments
Comments are disabled in preview mode.
