
Managing Schedules with the Blazor Scheduler 2: Managing Schedules and Occurrences

Summarize with AI:
The first step in managing recurring events in the Telerik Scheduler for Blazor is managing schedules. Here’s how your user can change (or delete) a schedule.
Progress Telerik UI for Blazor Scheduler lets you create applications where your user can both generate a schedule of recurring events and manage individual events in that schedule.
In a previous post, I walked through configuring the Scheduler and defining the event object that you’ll need to work with the Scheduler. In this post, I’m going to look at allowing the user to change a schedule and its related occurrences (events generated from the schedule).
To work with Scheduler, you need to define an event object with a string property to hold the schedule in RFC5545 format. You also need a List of those objects that you can bind to the Scheduler’s Data property
Here’s some code that would define those data objects:
List<BillingPlan> DataList = new List<BillingPlan>();
public class BillingPlan: Appointment
{
    public BillingPlan()
    {
        Id = Guid.NewGuid();
    }
    public string RecurrenceRuleString { get; set; } = string.Empty;
}
And here’s how Scheduler needs to be configured to use that list and support changes to the schedule generated from whatever’s in the RecurrenceRuleString:
<TelerikScheduler Height="600px"
                  Data="DataList"
                  RecurrenceRuleField="RecurrenceRuleString"

                  AllowUpdate="true"
Allowing the user to modify a schedule or an exception requires you to assign a method to the Scheduler’s OnUpdate property, like this:
<TelerikScheduler Height="600px"
                  Data="DataList"
                  RecurrenceRuleField="RecurrenceRuleString"

                  AllowUpdate="true"

                  OnUpdate="@UpdateExceptionSched">
Scheduler UI: Changing Schedules
A user begins to modify a schedule by double-clicking on one of the schedule’s regularly scheduled occurrences displayed in the Scheduler. When a user double-clicks on one of a schedule’s regularly scheduled occurrences, they’re given the choice between updating the occurrence itself or the schedule it was generated from.

If the user chooses to update the series/schedule, they’re presented with a version of the Scheduler’s Event form that displays all the information from the current schedule so the user can change it.
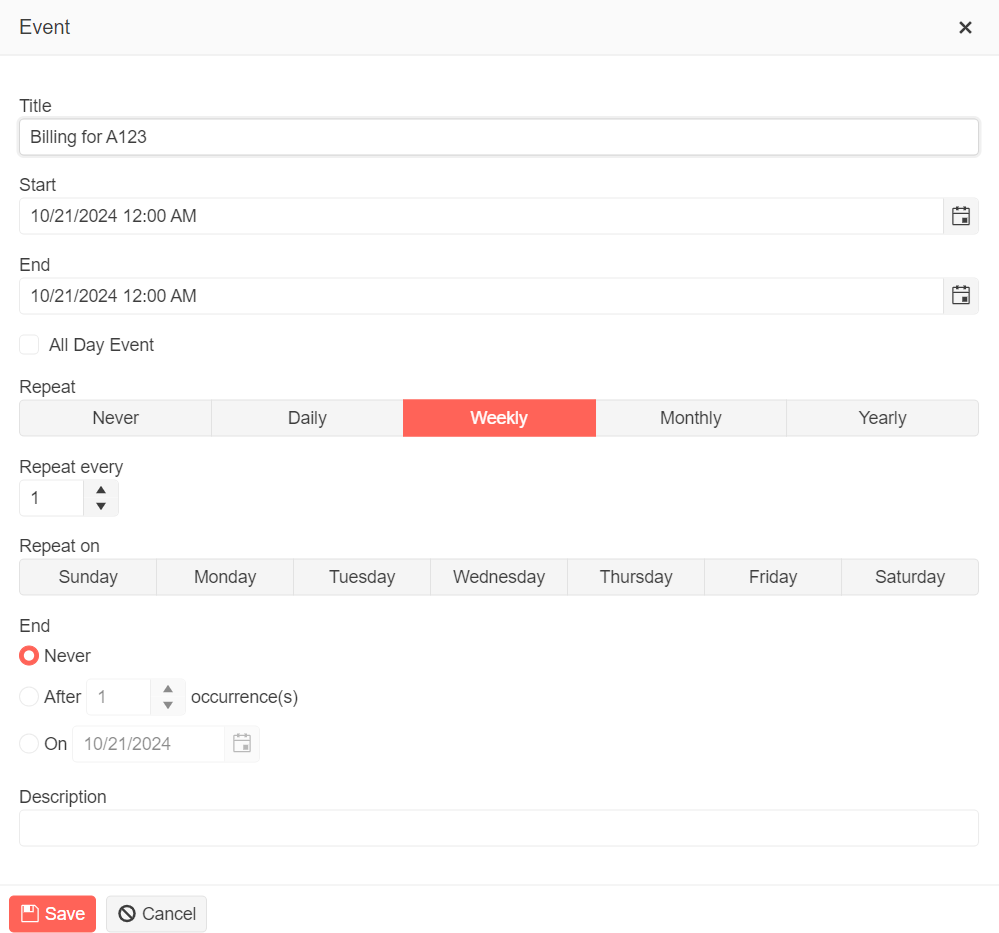
Once the user clicks the Save button on the Event form, your OnUpdate method is called.
Your OnUpdate method will be passed a parameter with an Item property that holds an object with all the data from the Event form. You’ll first need to cast that object to your event object (in my case, a BillingPlan object) so you can access the object’s properties.
Once you’ve cast the Item object, you can find the matching schedule object in the Data property’s List, remove that object from the Data List and replace it with the Item object. However, because the Item object just holds Data from the Event form, you may want to copy some data from the original schedule object (or some other source) to the updated schedule object you’re about to add to the Data List.
This code, for example, copies the DataItem property from the related schedule object to the updated schedule’s DataItem:
IList<BillingPlan> DeletedItems = new List<BillingPlan>();
void UpdateExceptionSched(SchedulerUpdateEventArgs e)
{
    BillingPlan? bpFormData = e.Item as BillingPlan;

    BillingPlan? bpSched = DataList.First(bp => bp.Id == bpFormData.Id);

    //optional
    bpFormData.DataItem = bpSched.DataItem;

    DataList.Remove(bpSched);
    DataList.Add(bpFormData);
}
Supporting the Database
Once you’ve updated your schedule object, Scheduler will generate a new list of occurrences to display in its UI. Using the tools I discussed in my post on recurring events, you can (again, when the user eventually clicks your application’s Save button) generate an equivalent set of event objects to store those occurrences in your database for other applications to access.
However, presumably your database already contains occurrences that you added from the previous version of the schedule—you’ll need to make sure those occurrences are deleted, also. The simplest way to do that is to also add the original schedule object to your list of deleted items. In your database processing, as part of processing that list of deleted items, you can delete both the old schedule and all the occurrences generated from that old schedule.
To support that, you just need check in your OnUpdate method to see if schedule-related data has been changed and, if it has, add the original schedule to a deleted items list:
IList<BillingPlan> DeletedItems = new List<BillingPlan>();
void UpdateExceptionSched(SchedulerUpdateEventArgs e)
{
    BillingPlan? bpFormData = e.Item as BillingPlan;
    BillingPlan? bpSched;

    bpSched = DataList.First(bp => bp.Id == bpFormData.Id);
    if (bpFormData.RecurrenceRuleString != bpFormData.RecurrenceRule.ToString() ||
          bpFormData.Start.ToString() != bpSched.Start.ToString() ||
         bpFormData.End.ToString() != bpSched.End.ToString())
    {
         DeletedItems.Add(bpSched);
     }
    …rest of code…
The Scheduler UI: Deleting Schedules and Occurrences
Once you’ve set the AllowUpdate property on the Scheduler to true, you’ve also enabled the user to delete a schedule or its regularly scheduled occurrences. All a user has to do is click on any occurrence in Scheduler’s UI and press the Delete key to start the delete process. Users will get a dialog asking if they want to delete the occurrence or the series (i.e., delete the whole schedule):

You don’t need to add any code to support deleting an occurrence—that’s handled for you by the Scheduler. But, having said that, to understand some of the code you’ll need when saving your data, it’s helpful to understand what’s happening under the hood when a regularly scheduled occurrence is “deleted.”
As my scare quotes around “deleted” suggest, regularly scheduled occurrences aren’t really deleted. Instead, the start date for that event is added to your schedule object’s RecurrenceExceptions collection—it might be more accurate to say the occurrence is suppressed rather than deleted. So, down the line, when you update your database, you’ll want to use that list of dates when managing the information you store (I’ll discuss this in a little more depth in my last post in this series).
While you don’t need to write any code to support deleting an occurrence, you do, however, need to write some code to support when the user chooses to delete the whole schedule.
To support deleting a series, you’ll first need to set the Scheduler’s OnDelete property to a method (and, as this example shows, you don’t have to provide an OnUpdate method if all you want to support is deleting schedules):
<TelerikScheduler
                   Data="DataList"
                   RecurrenceRuleField="RecurrenceRuleString"

                   AllowUpdate="true"
                   OnDelete="@DeleteSchedException">
As with your OnUpdate method, your OnDelete method will be passed a parameter with a property called Item. This time, however, the Item property contains a reference to the schedule object that’s being deleted.
As before, your first step is to cast that Item property to your event class (in my case, that’s a BillingPlan object). Once you’ve cast the Item object to your event class, you’ll use the Data List’s Remove to remove the schedule object from the Data List, which will also remove the schedule and its occurrences from Scheduler’s UI. To support updating your database later, you’ll also need to add this object to that list of deleted items for later processing.
Your code to delete your schedule ends up looking something like this:
IList<BillingPlan> DeletedItems = new List<BillingPlan>();
void DeleteSchedException(SchedulerDeleteOccurrenceArgs e)
{
    BillingPlan? bpSched = e.Item as BillingPlan;
    DeletedItems.Add(bpSched)
    DataList.Remove(bpSched);
}
And that was simple enough … but this method will need to be enhanced if, in addition to allowing your user to delete items, you also allow your user to modify individual occurrences in the schedule to create exceptions to your schedule. That’s my next post.
Don’t forget: Telerik UI for Blazor comes with a free 30-day trial so you can see it for yourself.

Peter Vogel
Peter Vogel is both the author of the Coding Azure series and the instructor for Coding Azure in the Classroom. Peter’s company provides full-stack development from UX design through object modeling to database design. Peter holds multiple certifications in Azure administration, architecture, development and security and is a Microsoft Certified Trainer.
Related Posts
Comments
All articles
Topics
Web MobileMobile
Desktop
Design
Productivity
People
