
Managing Schedules with the Blazor Scheduler 3: Adding Exceptions to the Schedule

Summarize with AI:
No schedule is perfect—here’s how to let your users override events in your schedule using Telerik UI for Blazor Scheduler.
The Blazor Scheduler from Progress Telerik lets you create an application where your user can both generate a schedule of recurring events and manage occurrences in that schedule—cancelling/deleting individual occurrences, moving events to a new date or just giving an event in the schedule a unique title or description.
In an earlier post, I walked through configuring the Scheduler and defining the single class that you’d need to work with Scheduler. That class represents a schedule that Scheduler will use both to generate occurrences and to represent exceptions to that schedule (“off-schedule” events, events with modified titles or descriptions).
In this post, I’m going to look at both adding new events (“exceptions”) to the schedule and then modifying them. That mostly involves manipulating objects in a list of event objects (my object is called BillingPlan) bound to the Scheduler’s Data property (I’ll call that list the “Data List”).
Here’s what my Data List and event object looks like:
List<BillingPlan> DataList = new List<BillingPlan>();
public class BillingPlan: Appointment
{
    public BillingPlan()
    {
        Id = Guid.NewGuid();
    }
    public string RecurrenceRuleString { get; set; } = string.Empty;
}
In this case study I’ve assumed that, in your application, you’ll need to keep track of the changes that your user makes in your schedule so that you can update your database to share the schedule with other applications after your user has finished making all their changes.
Configuring Scheduler
In any scheduling app, users typically want to modify existing occurrences: move regularly scheduled events to different dates, change their title or description, or make an event an all-day event. To support modifying those regularly scheduled occurrences, in addition to setting the Scheduler’s Data property to a list of schedule and exception objects, you must also set Scheduler’s:
AllowUpdateproperty to trueOnCreateproperty to a method
That means your scheduler will look something like this:
<TelerikScheduler
                  Data="DataList"
                  RecurrenceRuleField="RecurrenceRuleString"

                  AllowUpdate="true"

                  OnCreate="@CreateExceptionSched">
Using OnCreate may seem an odd choice for modifying occurrences but, as you’ll see, you handle modifying occurrences by adding new exception objects to the Data List.
Interacting with the UI
After the user double-clicks on an occurrence, they’re presented with a dialog that lets them choose between modifying the series or the occurrence.

If the user chooses to edit the occurrence, the user is presented with the Scheduler’s Event form that lets them modify the information for the occurrence they’re about to create an exception for.
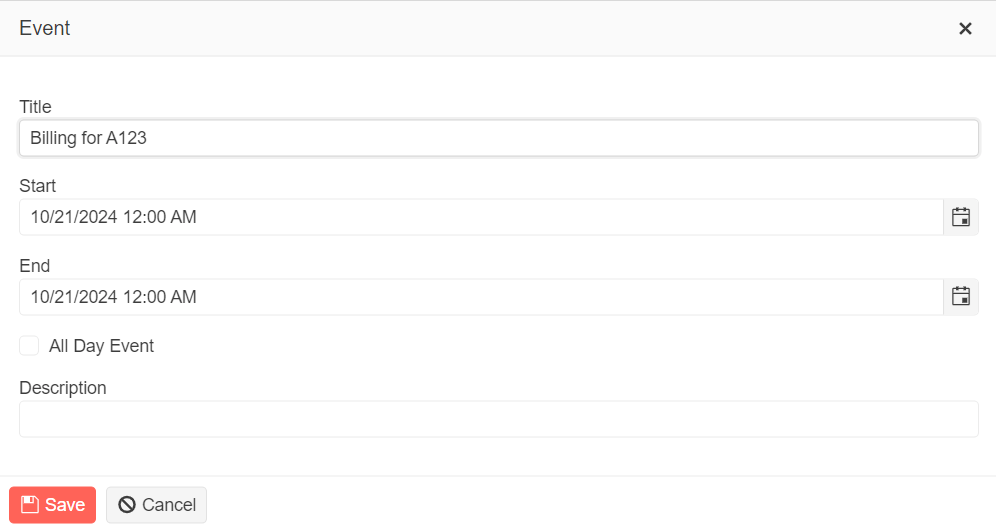
When the user clicks the Save button on the Event form, the method you tied to the Scheduler’s OnCreate method will be called. Your OnCreate method will be passed a parameter with an Item property that holds an exception object (in my case, a BillingPlan object).
Scheduler has loaded that Item object with whatever data the user entered in the update schedule form. In addition, that object’s RecurrenceId property has been set to the Id property of the schedule object that the original occurrence was generated from.
Creating Exceptions
The first step in your OnCreate method is to cast the occurrence’s e parameter’s Item property to your occurrence object (for me, a BillingPlan object) so that you can access the object’s properties.
Because the Item property contains only the data from the Event form, you might want to copy some data from some other source and add it to your new exception object. For example, the original schedule object for your exception object has a DataItem property that you might want to include in your exception object. You can use your object’s RecurrenceId property to find that schedule object in the Data List.
This code creates the new exception object, copies in the DataItem property from the related schedule (that step is completely optional), and adds the exception to the Data List:
void CreateExceptionSched(SchedulerCreateOccurrenceArgs e)
{
    BillingPlan? bpNew = e.Item as BillingPlan;

     //optional
    BillingPlan bpSched = DataList.First(bp => bp.Id == bpNew.RecurrenceId);
    bpNew.DataItem = bpSched.DataItem;

    DataList.Add(bpNew);
}
Scheduler will take care of suppressing the original occurrence by adding the start date for the original occurrence to your schedule object’s RecurrenceExceptions property.
Modifying Exceptions
Your next step will almost certainly be to support allowing the user to modify exceptions (it could happen! The user might not get the exception right the first time). To support that, you’ll need to add a method to the Scheduler’s OnUpdate property:
<TelerikScheduler
                  Data="DataList"
                  RecurrenceRuleField="RecurrenceRuleString"

                  AllowUpdate="true"

                  OnCreate="@CreateExceptionSched"
                  OnUpdate="@UpdateExceptionSched">
Now, when the user double-clicks on an exception in Scheduler’s UI, the user will be presented with a version of the Telerik Event form that lets them modify the data in the exception. When the user clicks the Save button in that dialog, your OnUpdate method will be called.
As before, your OnUpdate method will be passed a parameter that contains an Item property, which, in turn, holds an exception object with all the data the user entered in the form. As before, your code needs to cast that Item property to an event object (BillingPlan for my case study) so you can access the properties of that object. With that object in hand, you can find the corresponding exception object in the Data List, remove it from the Data List, and add in your new Item object.
Because the Item object contains the data from the Event form presented to the user, it may not have values for all the properties on your original schedule object. If so, you can add those values at this point in the processing.
As I discussed in my previous post, this method is also invoked when updating schedules. If you’re going to support both updating schedules and occurrences, you’ll need the following code that checks to see if you’re processing a schedule object (the object’s RecurringStatus property is set to ReccurringStatus.Master) or an exception object (RecurringStatus is set to Recurring.Exception) before making any changes.
This version of the OnUpdate method handles both updating exceptions and schedules:
void UpdateExceptionSched(SchedulerUpdateOccurrenceArgs e)
{
    BillingPlan? bpFormData = e.Item as BillingPlan;
    switch (bpFormData.RecurringStatus)
    {
       case RecurringStatus.Exception:
          BillingPlan bpExcp = DataList.First(bp => bp.Id == bpFormData.Id);
          bpExcp.Title = bpFormData.Title;
          bpExcp.Description = bpFormData.Description;
         bpExcp.Start = bpFormData.Start;
         bpExcp.End = bpFormData.End;
         bpExcp.IsAllDay = bpFormData.IsAllDay
        break;

   case RecurringStatus.Master:
           bpSched = DataList.First(bp => bp.Id == bpFormData.Id);
           if (bpFormData.RecurrenceRuleString != bpSched.RecurrenceRule.ToString() ||
                bpFormData.Start.ToString() != bpSched.Start.ToString() ||
                bpFormData.End.ToString() != bpSched.End.ToString())
              {
                  DeletedItems.Add(bpSched);
              }

           //optional
           bpFormData.DataItem = bpSched.DataItem;

           DataList.Remove(bpSched);
           DataList.Add(bpFormData);
            bpSched = bpFormData;
            break;
    }
}
One caveat: Currently, if you implement both OnCreate and OnUpdate methods, then, when your user creates an exception from an occurrence, Blazor may pop up its “An unhandled error has occurred. Reload” bar at the bottom of your form. This has no effect on your application, which will continue to work just fine.
Deleting Exceptions
You need to consider at least two more scenarios:
- Deleting exceptions
- Deleting schedules with exceptions
Deleting exceptions is straightforward—find the exception object in the Data List and remove it.
That second option is more interesting because, when a user deletes a schedule, exceptions to that schedule are not automatically removed from the Data List. So, if when a schedule is deleted, you want the added/re-scheduled occurrences to also be removed (and you probably do) then you’ll need to handle that.
I discussed adding a method to support deleting schedules object in an earlier post by stuffing a method into the Scheduler’s OnDelete property and setting Scheduler’s AllowDelete property to true. Among other things, that means a Scheduler that supports all the functionality I’ve discussed for far (deleting/modifying schedules, occurrences and exceptions) is going to be configured something like this:
<TelerikScheduler
                  Data="DataList"
                  RecurrenceRuleField="RecurrenceRuleString"

                  AllowUpdate="true"
	   AllowDelete="true"

   OnCreate="@CreateExceptionSched"
                  OnUpdate="@UpdateExceptionSched"
                  OnDelete="@DeleteSchedException">
Your OnDelete method is called both when deleting schedules and when deleting exceptions. Like your OnUpdate method, your OnDelete method is passed a parameter with a property called Item that holds a reference to the exception (or schedule) that the user wants to delete.
You can determine whether your method is deleting an occurrence or an exception by checking the Item object’s RecurrenceStatus property, which will be set to a value from the RecurrenceStatus enum (RecurrenceStatus.Master for a schedule object, RecurrenceStatus.Exception for an exception object).
Finally, if in addition to removing objects from the Data List, you want to support updating your database at the end of a session, you’ll need to add any deleted exceptions to a deleted items list to process later in your application (i.e., when the user clicks your application’s Save button).
This code handles deleting schedules (with any exceptions), deleting individual exceptions and keeping track of those deletions for later processing:
IList<BillingPlan> DeletedItems = new List<BillingPlan>();
void DeleteSeriesException(SchedulerDeleteOccurrenceArgs e)
{
    BillingPlan? bpItem = e.Item as BillingPlan;
    switch (bpItem.RecurrenceStatus)
    {
        case RecurrenceStatus.Master:
            DeletedItems.Add(bpItem);
            DeletedItems.AddRange(DataList.Where(
                                              bpRem => bpRem.RecurrenceId == bpItem.Id));
            DataList.RemoveAll(bpRem => bpRem.RecurrenceId == bpItem.Id);
            DataList.Remove(bpItem);
            break;

        case RecurrenceStatus.Exception:
            DeletedItems.Add(bpItem);
            DataList.Remove(bpItem);
            break;
    }
}
And, if you’ve been wondering why I declared the Data List in my case study as a List, rather than an IList, it’s so I’d be able to access the List’s RemoveAll method which isn’t available through the IList interface.
Now you can deliver an application that will let your users create and manage exceptions to a schedule. And, if you’ve read my previous post, your application can also manage schedules and delete regularly scheduled occurrences. There’s really just some specialized topics left to discuss, and I’ll cover them in my next (and last) post in this series.
Remember, the Telerik UI for Blazor library comes with a free 30-day trial. Give it a try today!

Peter Vogel
Peter Vogel is both the author of the Coding Azure series and the instructor for Coding Azure in the Classroom. Peter’s company provides full-stack development from UX design through object modeling to database design. Peter holds multiple certifications in Azure administration, architecture, development and security and is a Microsoft Certified Trainer.
Related Posts
Comments
All articles
Topics
Web MobileMobile
Desktop
Design
Productivity
People
