
Managing Schedules with the Blazor Scheduler 1: Getting Started

Summarize with AI:
The Telerik Blazor Scheduler will let you create an application that handles everything your users will want to do with recurring events. Here’s how to set it up.
The Progress Telerik Scheduler for Blazor actually supports two kinds of events:
- Recurring events generated from a “schedule object”: Here’s a post that looks at the recurring events functionality.
- Individual events represented by “event objects”: And here’s the start of a series on working with event objects.
That flexibility gives you a lot of power: It’s not hard, for example, to imagine creating an application where your user generates a schedule of recurring events and then needs to manage individual events in that schedule—cancelling/deleting events, changing an event’s title or description, or even moving an event to another (off-schedule) date.
The first post in the bullets above is about one way to handle that scenario: convert your recurring events to individual events generated for some time period into the future … and give up using the schedule object, at least in your UI.
While that gives your user a lot of flexibility in managing events, if your user wants to change the entire schedule (e.g., the start day, how often the event repeats, what day the event occurs on and so on) they’ll need to, effectively, start over and pull the schedule object back into Scheduler. Plus, you still have to store that schedule object somewhere so that you can generate new events when you get to the end of whatever time period you picked when generating events.
But the Scheduler doesn’t force you do that. The Scheduler will let you generate a recurring set of events using a schedule object and then let your user modify that schedule by editing or moving the generated events or even changing the schedule itself, which is still part of Scheduler’s UI. Scheduler will even let your user add new events to existing schedules … and you still get to keep your original schedule to generate events as far into the future as you want.
Before we get started on how to do that, some terminology. I’ll call everything in Scheduler’s UI an “event.” But, to distinguish between the different kinds of events in a schedule, I’ll start referring to:
- Occurrences: Events generated from a schedule object that occur “on schedule”
- Exceptions: Events that are part of the schedule, but have been modified (e.g., moved to a new date, given a separate title or description)
And this isn’t just terminology—there’s an important distinction here at the coding level.
Scheduler’s UI is driven by a list in its Data property that contains both schedule objects and exception objects. Occurrences (i.e., regularly scheduled events happening right on schedule) don’t appear in that list. Exceptions (events that have been modified) do appear in that list. That means your code for handling regularly scheduled events that haven’t been modified (i.e., occurrences) is going to be different from code working with any “modified” events (i.e., exceptions).
I’ll also start referring that list of objects in Scheduler’s Data property as “the Data List” as opposed to “the List that drives Scheduler” (and that is just terminology).
One more thing: As I’ve discussed in previous posts on recurring schedules, you’ll want to share the events shown in Scheduler with other applications or systems by saving those events to a database—both the exceptions in the Data List and the generated occurrences that aren’t in that List. As part of this case study, I’m assuming that you won’t update your database in real time (i.e., you won’t delete occurrences from your database as your user deletes them from the schedule), though you certainly could work in real time.
Instead, I’m going to assume that you’ll give your user a Save button that will push all the user’s changes back to the database when the user is finished with updating the schedule. That approach also lets you implement a “cancel” option so the user can skip saving their changes.
This workflow not only supports letting the user back out of some unfortunate set of changes. It also lets your user experiment with the schedule in your application—adding/removing events, changing when events reoccur, etc. To support that kind of deferred updating, you’ll need to keep track of your changes as your user makes them so you can commit those changes to your database when the user clicks the save button.
In this post, I’m going to cover everything you need to do to set up Scheduler and then, in the following posts, look at everything involved in managing Scheduler’s recurring events.
Defining the Data
You’re going to need an object that will act both as a:
- Schedule object: This is a class that holds a recurring schedule in RFC5545/iCalendar format, along with the title and description for the occurrences generated from that schedule. I discussed this format in my post on recurring events.
- Exception object: This is a class that represents an exception to that schedule—an occurrence that’s been moved to an “off-schedule” date/time or had its title or description modified from what’s set in the schedule object.
You don’t need to create separate classes for those two objects (in fact, I’d argue it’s easier to manage the schedule if you use a single class for both). The Telerik abstract Appointment class defines an event object that function as a base for an event class. Using the Appointment object as a base class lets you add your own application-specific properties to that class (though the Appointment class also has a DataItem property where you can stuff another, related, application-specific object).
To extend that class so that it can also act as a schedule object, you just need to add a string property to hold the RFC5545 schedule that Scheduler uses to generate events.
You want to make sure that any objects created from that class always have a value assigned to their Id property. You can always assign that value to the Id property yourself in your code, but it’s easier to give your class a constructor that puts a unique value in the object’s Id property whenever a new object is created.
So, for this case study, the schedule/exception object that I’ll be using is called BillingPlan and looks like this:
class BillingPlan: Appointment
{
    BillingPlan()
    {
        Id = Guid.NewGuid();
    }
    string RecurrenceRuleString { get; set; } = string.Empty;
}
The Scheduler’s Data property needs to be set to a list of your schedule/exception objects, so I’ve defined a field to hold a list of BillingPlan objects—the Data List for this case study:
IList<BillingPlan> DataList = new List<BillingPlan>();
To have Scheduler generate a list of occurrences for my case study, I just need to add a schedule/exception object (i.e., a BillingPlan object) with its RFC5545 property set to my recurring schedule. In real life, you’d retrieve that object from your database (as I discuss—at a high level—in the last post in this series). For this case study, I’ll just create a dummy object and add it to the Data List (for a discussion of what’s going on here, see my earlier post on creating recurrences):
protected override void OnAfterRender(bool firstRender)
{
    IList<DateTime> FutureDates = new List<DateTime>();
    if (firstRender)
    {
        BillingPlan bp = new();

        bp.DataItem = new Customer("A123", "FREQ=Weekly");
       bp.RecurrenceRuleString = ((Customer)this.DataItem).PaymentSchedule;
       bp.RecurrenceRule = RecurrenceRule.Parse(RecurrenceRuleString);

        bp.Title = "Billing for A123";
        bp.Start = DateTime.Now.Date;
        bp.End = DateTime.Now.Date.AddSeconds(1);
        bp.IsAllDay = false;
        DataList.Add(bp);
    }
    base.OnAfterRender(firstRender);
}
Configuring Scheduler
Configuring Scheduler to generate and manage recurring events requires that you set three properties:
- Data: Set to your Data List of schedule and exception objects
- RecurrenceRuleField: Set to the name of the property on your event object that holds your schedule in RFC5545 format
- AllowUpdate: Set to true to enable the user to add, modify and delete exceptions to the schedule’s occurrences
As a result, a Scheduler set up to let your user manage recurring events looks something like this:
<TelerikRootComponent>
    <TelerikScheduler
                      Data="DataList"
                      RecurrenceRuleField="RecurrenceRuleString"

                      AllowUpdate="true">
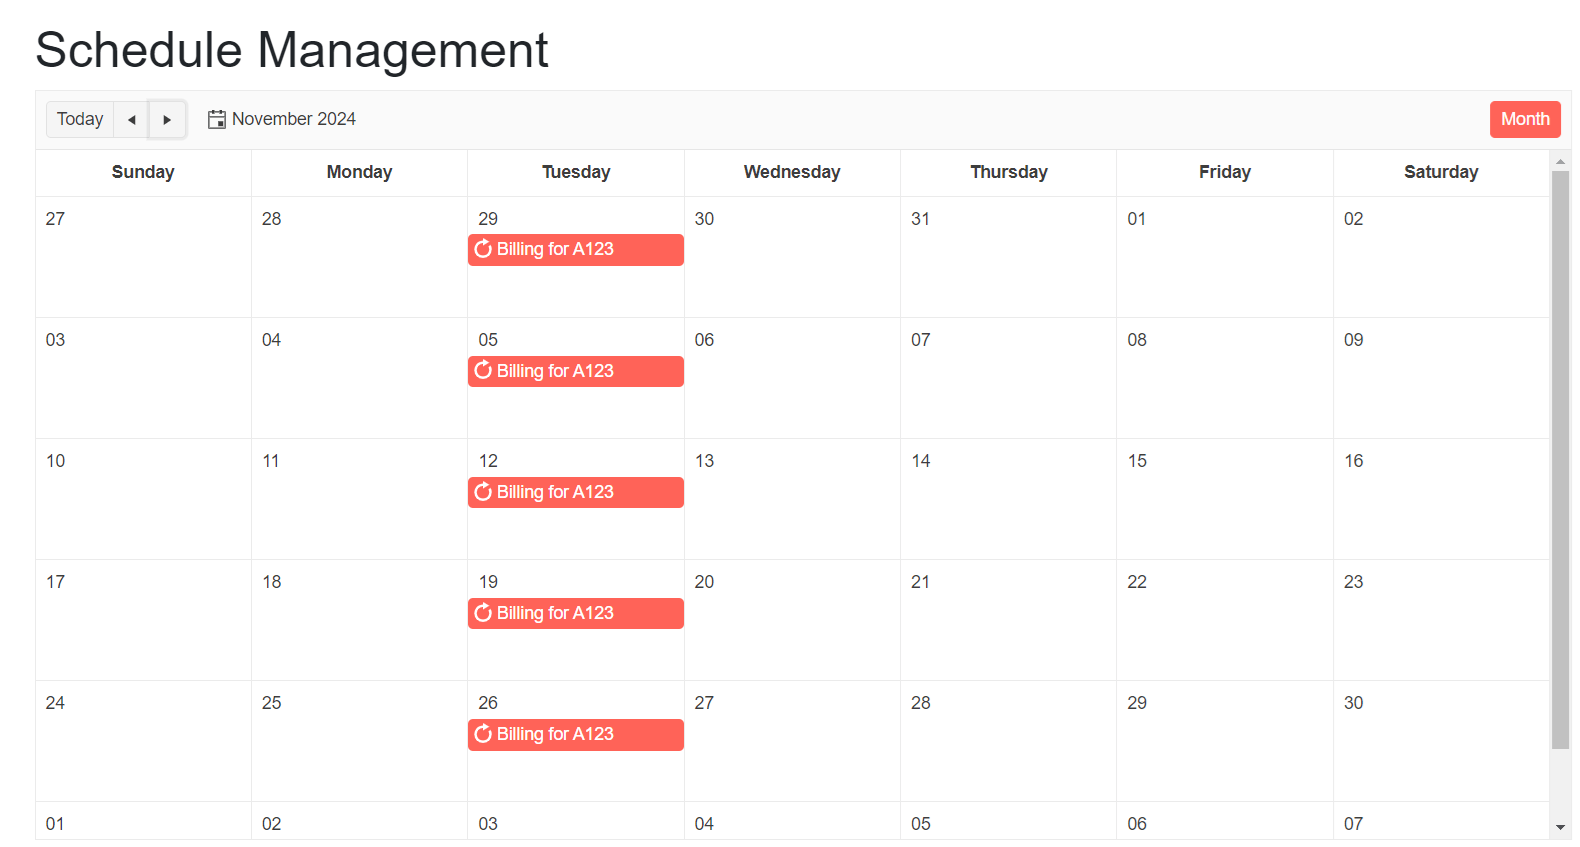
When your application opens, provided that you have a schedule object in the Data List, Scheduler will populate its UI with occurrences—events generated from the RFC5545 schedule.
Now you can start thinking about, for example, letting users change the schedule or create exceptions to the regularly scheduled occurrences. That’s the topic of my next post.
Interested in trying it yourself? The Telerik UI for Blazor component library comes with a free 30-day trial.

Peter Vogel
Peter Vogel is both the author of the Coding Azure series and the instructor for Coding Azure in the Classroom. Peter’s company provides full-stack development from UX design through object modeling to database design. Peter holds multiple certifications in Azure administration, architecture, development and security and is a Microsoft Certified Trainer.
Related Posts
Comments
All articles
Topics
Web MobileMobile
Desktop
Design
Productivity
People
