
Blazor Solar Power Hour Recap

Summarize with AI:
See how to use solar power with MQTT data feed to power a Telerik UI for Blazor ASP.NET Core web application.
Hello again everyone! For today’s post, I’ll be sharing a summary of what Ed Charbeneau, Justin Rice, and I did during a fun 12-part live stream series for Blazor Power Hour. Over the course of the series, we started with File > New and ended up with a production-ready solar power monitoring dashboard. The result is a Blazor app that consumes real-time streaming data from an MQTT broker and renders that data very fast and intuitively.
I also wanted to provide some general know-how by touching on some of the fundamentals of solar power as well as MQTT. This will help you create the same thing, regardless of where your MQTT data comes from.
Source Code
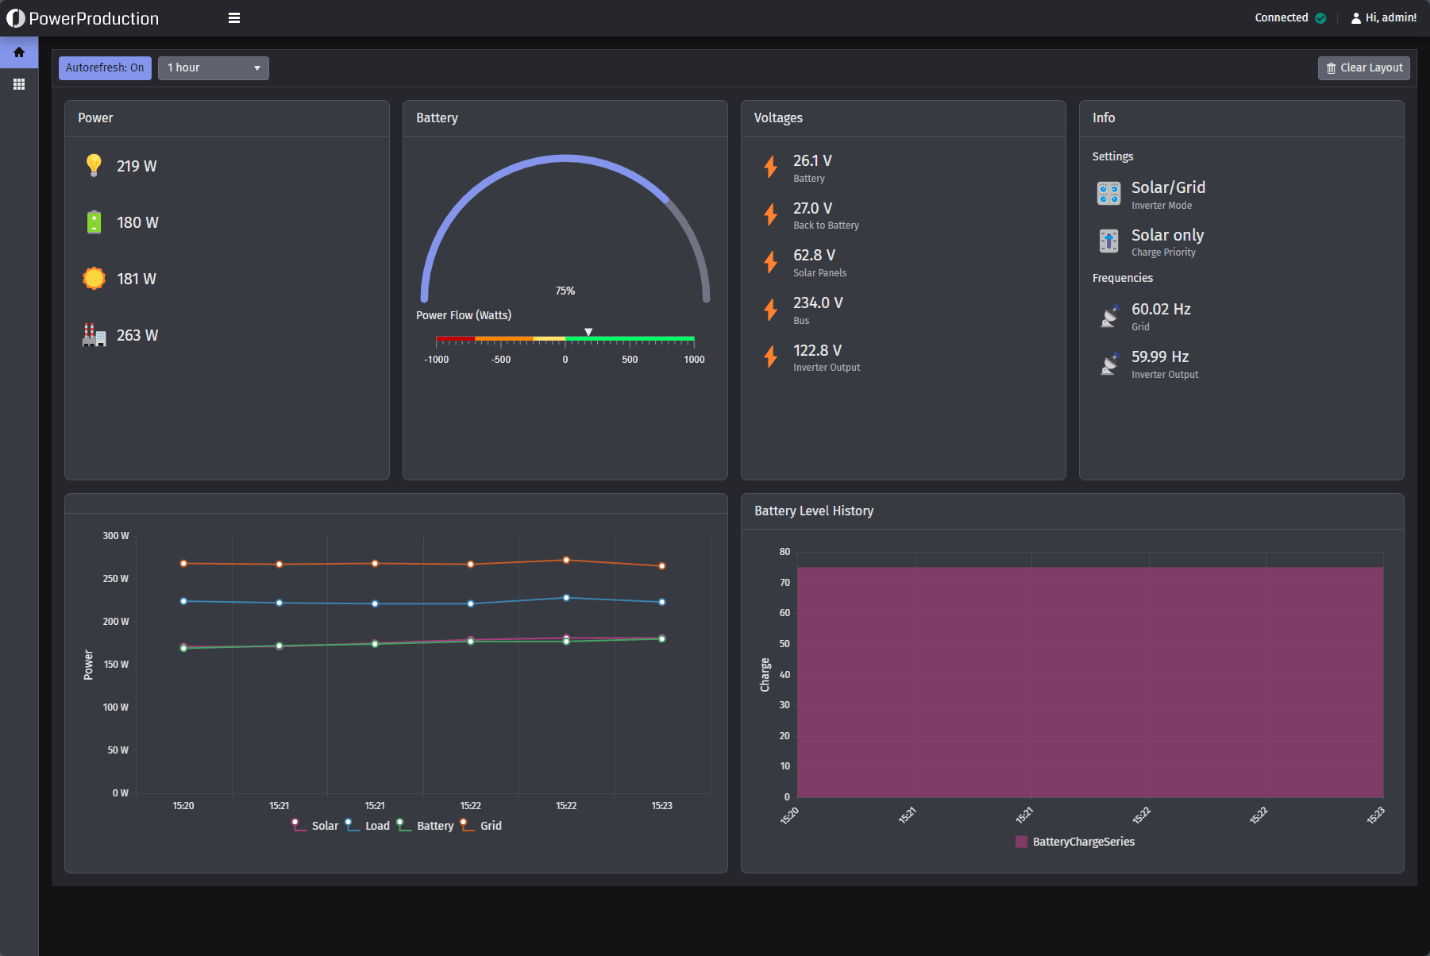
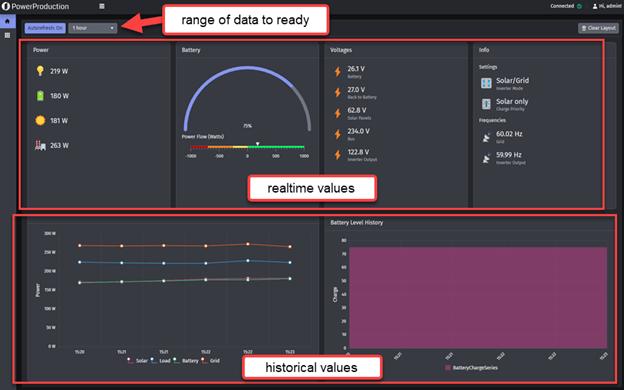
Before we get started, visit the project on GitHub at EdCharbeneau/BlazorSolarPowerHour. Here’s a screenshot of the main page, which contains both individual live values and historical chart data.
The Solar Power Setup
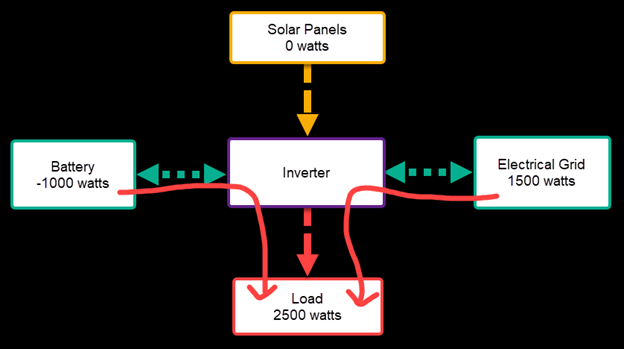
Before we talk about the live data, we’ll want to get an understanding of some basic solar power lingo to set a foundation. To understand what each term means, it’s good to see a diagram.
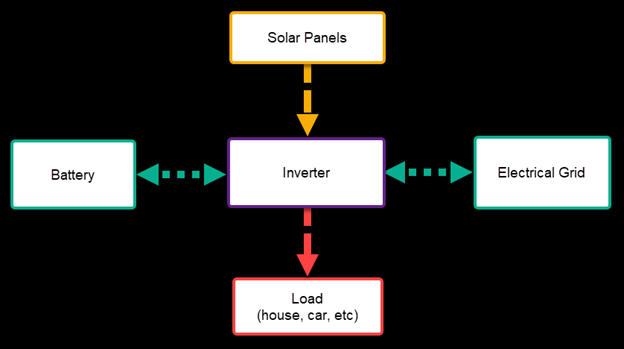
- Solar Panels: These are usually 58v panels.
- Inverter: An energy management system.
- Load: The thing that consumes power.
- Battery: Energy storage, usually 48v lithium battery system.
- Grid: Your utility company and/or a generator.
First, let’s discuss the load. A typical home is connected to a utility meter that is energized by “the grid.” Depending on where you live or what device you’re powering, most houses also require a 240v source. To avoid complicating this post, I’ll just refer to “120v” as the load requirement. Your house’s equipment requires that voltage level to energize the outlets, light sockets and direct wiring.
While a solar panel generates electricity, it cannot be directly connected into a house’s electrical wiring. This is because it generates 58v DC power (like a phone battery), but your house needs AC power. So, a device called an inverter takes DC power from the solar panels, creates an AC power signal and doubles/quadruples the voltage up to 120v.
Now, let’s talk about the battery side. Modern battery systems are usually 48v DC lithium-ion stacks. The inverter can both charge and discharge these batteries. Depending on your configuration, charging can use either the solar panels or the grid. In my setup, I only use solar to charge the batteries.
The grid side is like the battery side in that the inverter can both receive and send power from the grid. The inverter is smart enough to know how much power is being generated by the panels and how much is in the batteries; if the load is higher than what is available, the inverter will take power from the grid. Alternatively, if you are generating an excess of power, you can also sell electricity back to the grid.
This makes more sense when you see it in action in three scenarios: sunny, nighttime, and no charge/high load. Let’s walk through them.
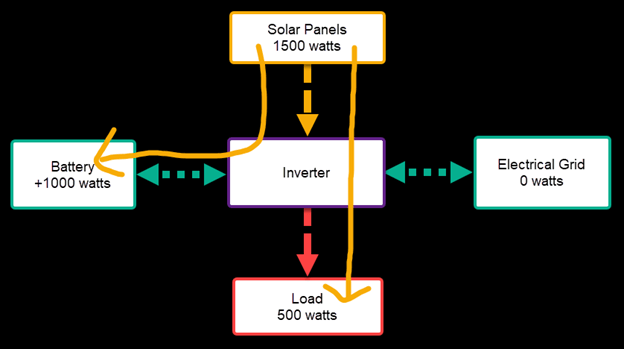
Sunny
- A house has five 100-watt light bulbs plugged in; the load is currently 500 watts.
- It is a very sunny day; the solar panels are generating 1500 watts of power.
This means that the inverter sends the extra 1000 watts to charge the battery (and sell to the grid when the battery is full).
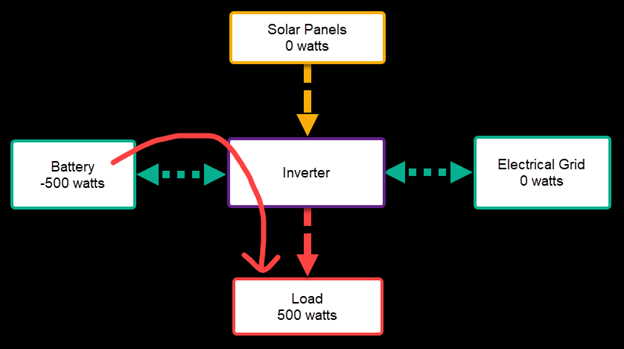
Cloudy/Nighttime
Now, let’s say the panels are not generating power—either the sun has set or it’s bad weather. The house still needs 500 watts of power, so the inverter switches to using the energy stored in the batteries.
No Charge or High Load
So, what happens if the inverter cannot provide enough energy from the batteries and solar? Or what if someone turns on a high-demand appliance that pulls more wattage than the battery+solar can provide? In this situation, the inverter will use automatically the grid for that extra amount.
Note: There are several ways to configure your system. Some people have their systems set to “Solar+Grid first” mode for the house; it only switches to battery if the grid power goes out. While others, like me, always use the “Solar+Battery First” mode and only get power from the grid when necessary.
Live Data
Knowing all this, you might want to have some sort of app or dashboard, to see what’s going on in real time. You’ll also want to be able to see historical data on how much solar you’ve generated, how much battery you’ve used, how many times you’ve had to go to the grid for power, etc.
For example, here is a 32-hour period from one of my systems:
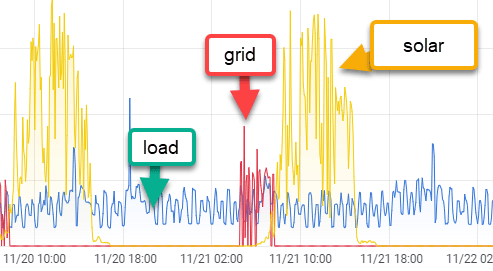
Notice on Nov. 20 it wasn’t a very sunny day (it should be a big smooth arc, not jagged), so the battery wasn’t fully charged. Over the course of that night, the battery ran out a couple hours before sunrise. This is why you see the grid being used a little bit for the solar started generating again.
All this data is great, but how do we get it into our app? This depends on your inverter’s manufacturer. In my case, I got a Raspberry Pi, installed Solar Assistant on it, connected the Pi to the inverter and enabled MQTT broker. This MQTT service is what is critical and what we can build on!
Note: This isn’t an official Progress Software endorsement of Solar Assistant; it is my personal experience because I love the system. You can use whatever MQTT broker or solar monitoring system you prefer.
MQTT
So, what is MQTT? In summary, it’s a standard messaging protocol for IoT and is an extremely lightweight “pub-sub” messaging transport that is ideal for connecting remote devices with a small code footprint and minimal network bandwidth. To cover this completely is outside the of scope of this blog post. See MQTT - The Standard for IoT Messaging docs for more details.
Now, for the even better news: There’s an excellent .NET library available => dotnet/MQTTnet. MQTTnet is a high-performance .NET library for MQTT based communication. This means we can spin up a .NET project and hook into the live firehose!
Project Walk-through
We started with your standard “File > New” and added the required packages for MQTTnet. Note that the library is .NET Standard 2.0, so we can use it for any .NET 9 app, but we chose ASP.NET Blazor and Progress Telerik UI for Blazor to have a nice learning journey of using dependency services (background, singleton and scoped), database usage for long-term stats and a gorgeous UI with charts.
We needed to consider how to write the code for the MQTT service. Yes, we could’ve thrown it in a page code-behind, but then the service is only good for the lifecycle of that page—no long-term data to query. What we really want is a background service that stays connected and logs the live data—an MqttService class (see completed).
public class MqttService(IConfiguration config, IServiceProvider serviceProvider) : BackgroundService, IAsyncDisposable
{
}
The BackgroundService interface requires ExecuteAsync to be implemented, which is fired on service initialization and is where we’ll connect to the MQTT broker.
protected override async Task ExecuteAsync(CancellationToken stoppingToken)
{
    // Phase 1 - Connect to the MQTT broker
    this.mqttFactory = new MqttFactory();
    this.mqttClient = mqttFactory?.CreateMqttClient();

    var clientOptions = new MqttClientOptionsBuilder()
        .WithTcpServer("ip address", 1883).Build();

    mqttClient.ApplicationMessageReceivedAsync += GotMessage;

    // We're connected, but not listening for topics yet
    await mqttClient!.ConnectAsync(clientOptions, CancellationToken.None);

    // Phase 2 - Subscribe to a topic
    var subscriptionOptions = mqttFactory?.CreateSubscribeOptionsBuilder()
        .WithTopicFilter(f => { f.WithTopic("solar_assistant/#"); })
        .Build();

    // Start listening for messages
    await mqttClient.SubscribeAsync(subscriptionOptions, CancellationToken.None);
}
That example is simplified to convey the important parts:
- The host address. This can be an IP address, or a fully qualified domain name.
- The port the broker uses for MQTT (default is 1883).
- We subscribed to the ApplicationMessageReceivedAsync event.
- We subscribed to a topic named “solar_assistant/#” (the octothorp is a wildcard).
As you can see the library uses the builder pattern, we pass in all the required bits, and then can sit back and watch the messages come into the GotMessage event handler:
private async Task GotMessage(MqttApplicationMessageReceivedEventArgs e)
{
    // The topic is a string
    var topic = e.ApplicationMessage.Topic;

    // The value comes in as an ArraySegment, so we'll decode that for visual output
    ArraySegment<byte> bytes = e.ApplicationMessage.PayloadSegment;

    string value = Encoding.ASCII.GetString(bytes.ToArray());

    Console.WriteLine($"{topic}: {value}");
}
The full code can be seen here, but the general idea is this service class will connect to the MQTT broker and receive any topics that have a “solar_assistant/” prefix. How do we start it and use it?
As a background service, we want to register this in a slightly different way. In Program.cs, it needs to first be instantiated as a singleton… but then it must be registered as a HostedService.
// Using MqttService as a background service
builder.Services.AddSingleton<MqttService>();
builder.Services.AddHostedService(sp => sp.GetRequiredService<MqttService>());
For more information, see the Hosted Services documentation.
Storing Data
Excellent, now that we’re getting live data in that background service, what do we do with it? While we could inject that singleton into a razor view, that would only be good for the live data values. We want it to be stored so that we can create charts with historical data.
For this, we can use Entity Framework Core and the SQLite provider to save the incoming values to a database. It is the standard setup in Program.cs and DbContext. For the DbSet, I created a class for MqttDataIem with four simple properties:
public class MqttDataItem
{
    [Key]
    public Guid Id { get; set; }

    // String representation of the MQTT topic.
    public string? Topic { get; set; }

    // Value of the MQTT message.
    public string? Value { get; set; }

    // Time stamp of when the MQTT message was received.
    public DateTime Timestamp { get; set; }
}
Normally, we could stop there and inject the DbContext into the MqttService class, but we also want a service the rest of the app can use to load up that data to show in the UI. To do this, I wrapped the DbContext is an easily consumable service class “MessagesDbService.”
public class MessagesDbService(MeasurementsDbContext dbContext)
{
    public async Task<List<MqttDataItem>> GetAllMeasurementsAsync() { }
    public async Task<List<MqttDataItem>> GetMeasurementsAsync(DateTime start, DateTime end) { }
    public async Task<DataSourceResult> GetMeasurementsRequestAsync(DateTime start, DateTime end, DataSourceRequest dataSourceRequest) { }
    public async Task<MqttDataItem> AddMeasurementAsync(MqttDataItem dataItem) { }
    public async Task UpdateMeasurementAsync(MqttDataItem updatedItem) { }
    public async Task DeleteMeasurementAsync(MqttDataItem item) { }
}
Now, we can go back to the MqttService and update the GotMessage task save each MQTT message.
private async Task GotMessage(MqttApplicationMessageReceivedEventArgs e)
{
    // Get the value from the payload
    var decodedPayload = e.ApplicationMessage.PayloadSegment.GetTopicValue();

    // Important: Create a temporary scope in order to access the DbService in a background operation and add the item.
    using var scope = serviceProvider.CreateScope();
    var dbService = scope.ServiceProvider.GetRequiredService<MessagesDbService>();

    await dbService.AddMeasurementAsync(new MqttDataItem
    {
        Topic = e.ApplicationMessage.Topic,
        Value = decodedPayload,
        Timestamp = DateTime.Now
    });
}
Charts and Gauges
Now comes the fun part! We’ll use Telerik UI for Blazor to render some of this live data in gauges and a couple charts. It would take too long to go through all the parts in code—you can check the Home and History pages in the real app for all the pieces.
Here, let me show you what is going on at a high level. We query the database every few seconds to get the latest live values and update the charts and gauges, the live gauge for the battery level and the power history
On the page we have a dropdown that selects how far back we want to read the database for. We also have a timer function that continuously updates the page every few seconds.
The “tick” for the timer calls the GetValues task, which does the following:
async Task GetValues()
{
    // GET DATABASE DATA
    var items = await DataService.GetMeasurementsAsync(StartDateTime, EndDateTime);

    // Update individual live values
    loadPower = items.GetNewestValue(TopicName.LoadPower_Inverter1, "0");
    pvPower = items.GetNewestValue(TopicName.PvPower_Inverter1, "0");
    gridPower = items.GetNewestValue(TopicName.GridPower_Inverter1, "0");
    batteryPower = items.GetNewestValue(TopicName.BatteryPower_Total, "0");
    batteryCharge = items.GetNewestValue(TopicName.BatteryStateOfCharge_Total, "0");
    // ... and many more values


    // HISTORICAL DATA FOR CHARTS
    foreach (var item in items)
    {
        var topicName = GetTopicName(item.Topic ?? "");

        switch (topicName)
        {
            case TopicName.LoadPower_Inverter1:
                LoadPowerData.Add(new ChartMqttDataItem { Category = topicName, CurrentValue = Convert.ToDouble(item.Value), Timestamp = item.Timestamp });
                break;
            case TopicName.PvPower_Inverter1:
                SolarPowerData.Add(new ChartMqttDataItem { Category = topicName, CurrentValue = Convert.ToDouble(item.Value), Timestamp = item.Timestamp });
                break;
            case TopicName.BatteryPower_Total:
                BatteryPowerData.Add(new ChartMqttDataItem { Category = topicName, CurrentValue = Convert.ToDouble(item.Value), Timestamp = item.Timestamp });
                break;
            case TopicName.GridPower_Inverter1:
                GridPowerData.Add(new ChartMqttDataItem { Category = topicName, CurrentValue = Convert.ToDouble(item.Value), Timestamp = item.Timestamp });
                break;
            case TopicName.BatteryStateOfCharge_Total:
                BatteryChargeData.Add(new ChartMqttDataItem { Category = topicName, CurrentValue = Convert.ToDouble(item.Value), Timestamp = item.Timestamp });
                break;
        }
    }
}
In the UI, we have those values populating various elements:
DataGrid
On the History page, we are not concerned with real-time updates, so we don’t need a timer. Instead, we take advantage of the Telerik Grid’s ability to automatically use the DataSourceRequest and DataSourceResult objects in partnership with the database service:
private async Task OnRead(GridReadEventArgs args)
{
    DataSourceResult result = await DataService.GetMeasurementsRequestAsync(StartDate, EndDate, args.Request);

    args.Data = result.Data;
    args.Total = result.Total;
}
If we peek back at the database service class, you’ll see we have an overloaded method that uses the DataSourceRequest parameter and returns the result using ToDataSourceResult extension method:
public async Task<DataSourceResult> GetMeasurementsRequestAsync(DateTime start, DateTime end, DataSourceRequest dataSourceRequest)
{
    return await dbContext.Measurements
        .Where(i => i.Timestamp > start && i.Timestamp < end)
        .ToDataSourceResultAsync(dataSourceRequest);
}
We can now use the TelerikGrid’s built in filtering, sorting and grouping very easily! Powerful behavior with only a few lines of code thanks to the DataSource wrappers.
Wrapping Up
So where do you go from here? The entire purpose of the CodeItLive series and this blog post was to show you how easy it can be to hook into a live MQTT service in your .NET app and pipe that data into a beautiful UI. It doesn’t have to be a Blazor app—you can use the same code in .NET MAUI, WPF and even WinForms… and Telerik DevCraft has controls for all of them.
Here are some helpful resources where you can learn more about what we’ve discussed:
- Complete source code on GitHub
- YouTube playlist of the 12 episodes
- Telerik UI for Blazor (docs, demos, and more)
- MQTT
- MQTT .NET
- Entity Framework and Blazor
Until next time, keep tinkering!
P.S. Join us on CodeItLive for more fun.

Lance McCarthy
Lance McCarthy is a Senior Manager Technical Support for DevTools & Sitefinity, responsible for the Americas with additional responsibilities in product security and AI tooling. He's also a multiple-awarded Microsoft MVP (.NET & Windows Dev) who enjoys working with the developer community, sharing knowledge, presenting at events, and loves hackathons.
Lance still provides technical support for DevTools customers, answering cases focusing on security, .NET (desktop, mobile, web components), and CI/CD. Say hi the next time he answers one of your support tickets!
Related Posts
Comments
All articles
Topics
Web MobileMobile
Desktop
Design
Productivity
People
