
Things to Know Before You Migrate Your Blazor App to .NET 9

Summarize with AI:
Thinking of upgrading to .NET 9 for Blazor development? Here are a few key things to watch out for.
.NET 8 was a seismic release for Blazor, with new render modes and paradigms for building web applications.
.NET 9 by comparison, takes a lighter touch. Bar a few minor tweaks here and there, the surface area of Blazor’s API remains largely unchanged. Instead, this release brings some improvements to key areas and smooths out some of .NET 8’s rougher edges.
Here’s a quick guide to the main changes, and what you can do to start using .NET 9 today.
Upgrade Your Blazor App to .NET 9
The most notable changes for Blazor in .NET 9 include:
- New static file handling
- Router improvements
- Automatic serialization of authentication state
RendererInfoto see which render mode your components are using- Improved Blazor Server reconnection UX
You can read more about the new static file handling, improved Blazor Server reconnection UX and RendererInfo here.
Upgrade Your Projects
In most cases, upgrading your .NET 8 project to .NET 9 requires a couple of steps.
First you’ll want to change the TargetFramework version from net8.0 to net9.0 in your .csproj file(s).
<PropertyGroup>
    <TargetFramework>net9.0</TargetFramework>
    <Nullable>enable</Nullable>
    <ImplicitUsings>enable</ImplicitUsings>
</PropertyGroup>
Then update any package references pointing to .NET 8.
<ItemGroup>
    <PackageReference Include="Microsoft.AspNetCore.Diagnostics.EntityFrameworkCore" Version="9.0.0"/>
    <PackageReference Include="Microsoft.AspNetCore.Identity.EntityFrameworkCore" Version="9.0.0"/>
    <PackageReference Include="Microsoft.EntityFrameworkCore.Sqlite" Version="9.0.0"/>
    <PackageReference Include="Microsoft.EntityFrameworkCore.Tools" Version="9.0.0"/>
</ItemGroup>
If you have multiple projects (for example a client project because you’re using interactive WASM render mode) you’ll want to do the same in those project files too.
Static File Handling
If you’re upgrading from an earlier version, you can choose to stick with the existing middleware for handling static files or upgrade to the new version.
In your existing project, you will probably have a line like this (in Program.cs):
app.UseStaticFiles();
Once you switch to .NET 9, you can access the new static asset middleware by changing this to call MapStaticAssets().
app.MapStaticAssets();
At this point, everything should still work as before, but you can opt to use the features of the new API, notably:
- Compression of your static web assets
- Automatic ETag generation and fingerprinting
For that to work, you’ll need to change any links to static assets in your App.razor file.
Update Your Links to Static Assets
Say you have existing links like these (to CSS files in this case):
<head>
   	<!-- existing code -->

    <link rel="stylesheet" href="app.css"/>
    <link rel="stylesheet" href="StripeDemo.styles.css"/>

    <!-- existing code -->
</head>
This works, but your linked assets will be served uncompressed and are likely to be cached by the browser.
It can be hard to “bust” the browser cache. You’ve probably seen this in practice when you deploy a new version of your site, having made changes to your CSS files, and notice your app still shows old styles.
To take advantage of automatic compression and the new cache-busting mechanisms, you need to change your static asset references:
<head>
    <!-- existing code -->

    <link rel="stylesheet" href="@Assets["app.css"]"/>
    <link rel="stylesheet" href="@Assets["MyApp.styles.css"]"/>

    <!-- exsiting code -->
</head>
Note the use of the new @Assets directive.
Check out the resulting source code in the browser and you’ll see auto-generated unique filenames for your assets:
<head>
    <link rel="stylesheet" href="app.nbv275bdso.css" />
    <link rel="stylesheet" href="MyApp.x88yoos200.styles.css" />
</head>
This is your confirmation that the new static asset middleware is working.
The unique filenames will automatically change at build-time when you publish your app with updated assets. Under the hood, the combination of this and correctly set ETags ensures the browser cache always serves the latest version.
Note this also works for JavaScript scripts too. For example, say you have a script like this:
MyScript.js
function SayHello(){
    console.log("Hello");
}
You can modify your import to use the @Assets directive to ensure that import uses the fingerprinted version of the script:
App.razor
<head>
	<script src="@Assets["myscript.js"]"></script>

    <script>
    	// call the function
		SayHello();
	</script>
</head>
Don’t Use @Asset to Load the Blazor JS File
One note of caution: It is not possible to use the new @Asset directive to import Blazor framework scripts (blazor.*.js).
Apparently that will break things due to the way blazor.web.js is served.
Instead the Blazor JS script should remain referenced as it usually is, in App.razor.
<body>
<Routes/>

<!-- Keep the following script reference -->
<script src="_framework/blazor.web.js"></script>
</body>
</html>
Map JavaScript Modules Using ImportMap
While the @Asset directive works for basic JavaScript scripts, it doesn’t work for JavaScript Modules (the more modern way to interact with JavaScript). For that you need to use ImportMap.
Take, for example, this simple module.
MyScript.js
function SayHello(){
    console.log("Hello from a module!");
}

export { SayHello };
We can import this module and invoke the SayHello method like this:
App.razor
<head>
    <!-- other imports -->

    <script type="module">
    	import { SayHello } from './myscript.js';
    	SayHello();
    </script>
</head>
However, this would bypass the benefits of the new static file middleware (we wouldn’t get cache busting or compression).
For that we need to use the new <ImportMap /> component.
<head>
    <!-- add this -->
	<ImportMap />
</head>
By default, ImportMap will detect any JS modules in your app, as well as other important framework modules.
For example, in a standard Blazor project you may have Bootstrap configured. If so, in wwwroot you’ll have a bootstrap folder, and in one of its subfolders there will be some *.js files.
ImportMap will automatically detect these modules and render a script element of type importmap which maps these scripts to their fingerprinted filenames.
You can see it in action if you inspect the source code for your Blazor app.
 <script type="importmap">{
  "imports": {
  	"./_framework/dotnet.js": "./_framework/dotnet.fg9wbywt7y.js",
    "./_framework/dotnet.native.js": "./_framework/dotnet.native.hjjnedf5fu.js",
    "./_framework/dotnet.runtime.js": "./_framework/dotnet.runtime.ju77aherdp.js",
    "./lib/bootstrap/dist/js/bootstrap.bundle.js": "./lib/bootstrap/dist/js/bootstrap.bundle.4094rpi4f9.js",
    "./lib/bootstrap/dist/js/bootstrap.bundle.min.js": "./lib/bootstrap/dist/js/bootstrap.bundle.min.hd3gran6i8.js",
    "./lib/bootstrap/dist/js/bootstrap.esm.js": "./lib/bootstrap/dist/js/bootstrap.esm.ltid2c489k.js",
    "./lib/bootstrap/dist/js/bootstrap.esm.min.js": "./lib/bootstrap/dist/js/bootstrap.esm.min.8vyfqsqgz1.js",
    "./lib/bootstrap/dist/js/bootstrap.min.js": "./lib/bootstrap/dist/js/bootstrap.min.4d85u1mtcx.js",
    "./lib/bootstrap/dist/js/bootstrap.js": "./lib/bootstrap/dist/js/bootstrap.u9q1upor1n.js",
    "./myscript.js": "./myscript.e66w4svn1c.js",
    // other imports omitted
  },
  "integrity": {

  }
}</script>
Here ImportMap has picked up a number of JS scripts, including the Bootstrap ones (found in wwwroot) and my simple myscript.js example.
If you’re not familiar with it, ImportMap is a browser feature for controlling how JavaScript modules are resolved. It’s needed here because our apps will try to import JavaScript modules using their original filename (e.g., ./lib/bootstrap/dist/js/bootstrap.js).
The import map will redirect them to the fingerprinted version (with its unique filename, which changes when you publish a new version).
For more information about .NET 9’s ImportMap component (and how to customize it), check out the official docs.
Remove Classes to Serialize Authentication State
If you create a new project using .NET 8, which supports auth and also interactive rendering, you end up with some boilerplate code in your project for serializing auth state.
The relevant files are called PersistingRevalidatingAuthenticationStateProvider.cs and PersistentAuthenticationStateProvider.cs.
This is the mechanism by which Blazor verifies the current authentication state for the user, as determined on the server, is made available to your components when running interactively via Blazor WASM.
It essentially creates a string representing the user’s auth state and embeds it as a comment in the HTML served to the client. When your app spins up using Blazor WASM, it reads this state, making it possible for you to use the information—for example to show different UI for anonymous users (compared to authenticated users).
In .NET 9, you can do away with this class and enable the same behavior in Program.cs.
In your server project, add AddAuthenticationStateSerialization() to the existing call to AddRazorComponents():
builder.Services.AddRazorComponents()
    .AddInteractiveWebAssemblyComponents()
    .AddAuthenticationStateSerialization();
And in the client project:
builder.Services.AddAuthorizationCore();
builder.Services.AddCascadingAuthenticationState();

// add this line
builder.Services.AddAuthenticationStateDeserialization();
With these changes, you can safely delete the two files mentioned above, and your component’s auth logic should work exactly as before.
Take Advantage of the New .NET 9 Blazor Features
Once you’ve completed the steps above, your project should be up and running with .NET 9.
Here are a few things you might notice/be able to use that were different (or didn’t exist) in .NET 8 and earlier.
Better Reconnection UX
If you’re using Interactive Server and lose connection to the server, you should see the new and improved reconnection UI.
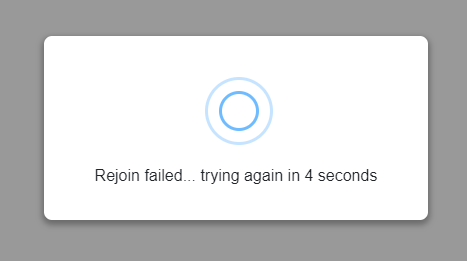
This will attempt to reconnect using an exponential backoff strategy.
Blazor will attempt to reconnect to the original SignalR circuit on the server, meaning users don’t lose any work/progress. If that fails, the app will be refreshed, making sure the state in the browser matches the state on the server.
All told, you should find your users enjoy a better experience when server connection is lost, and a chance to continue where they left off (when the connection comes back).
Drop Down to Static Rendering (When Using Interactive Rendering)
If your app is configured to use interactive rendering (WASM or Server) globally for your entire app you can now drop out of this to use use static server-side rendering for specific components.
You’ll need to decorate the relevant component with an attribute:
@attribute [ExcludeFromInteractiveRouting]
Then add some logic to your App.razor file:
@code {
    [CascadingParameter]
    private HttpContext HttpContext { get; set; } = default!;

    private IComponentRenderMode? PageRenderMode
        => HttpContext.AcceptsInteractiveRouting() ? InteractiveServer : null;
}
With these changes, components decorated with the ExcludeFromInteractiveRouting attribute will be rendered on the server, using static server-side rendering.
Check out this article for a practical example, where we add a static marketing page to an otherwise interactive Blazor app.
Know Your Render Modes
Finally, one of the biggest changes in .NET 8 was the ability to run your components using different render modes.
In practice, this can get confusing if you try to switch from one mode to another. It helps if you can see which mode a given component is using, and with .NET 9 that’s now possible using the new RendererInfo property.
On any given component, you can access the RendererInfo property to find out where your component is running and which mode it’s using.
RendererInfo.Name will tell you where your component is running (Static, Server, WebAssembly).
RendererInfo.IsInteractive will indicate if its currently running interactively (not static).
There’s also an AssignedRenderMode property. This one is useful if your component is pre-rendered, as it will tell you how your component will run after pre-rendering.
In Summary
.NET 9 represents a lighter release for Blazor, after the big changes in .NET 8.
Upgrading from .NET 8 is generally straightforward, requiring some minimal changes to your project files. From there, you can opt in to new features such as the improved static asset handling middleware, and remove some boilerplate code if you opt to use the new auth state serialization mechanism.
Other than that, you should start to see other minor changes such as the improved Blazor Server reconnection UX.
Finally, remember that this is a “Standard Term Support” release, so will be supported (and get patches) for 18 months following its release (.NET 8, which was an LTS release, is supported for three years).

Jon Hilton
Jon spends his days building applications using Microsoft technologies (plus, whisper it quietly, a little bit of JavaScript) and his spare time helping developers level up their skills and knowledge via his blog, courses and books. He's especially passionate about enabling developers to build better web applications by mastering the tools available to them. Follow him on Twitter here.
Related Posts
Comments
All articles
Topics
Web MobileMobile
Desktop
Design
Productivity
People
