Using MongoDB with Mongoose in Nuxt

Summarize with AI:
Learn how to use Mongoose object modeling with MondoDB Atlas and Nuxt.
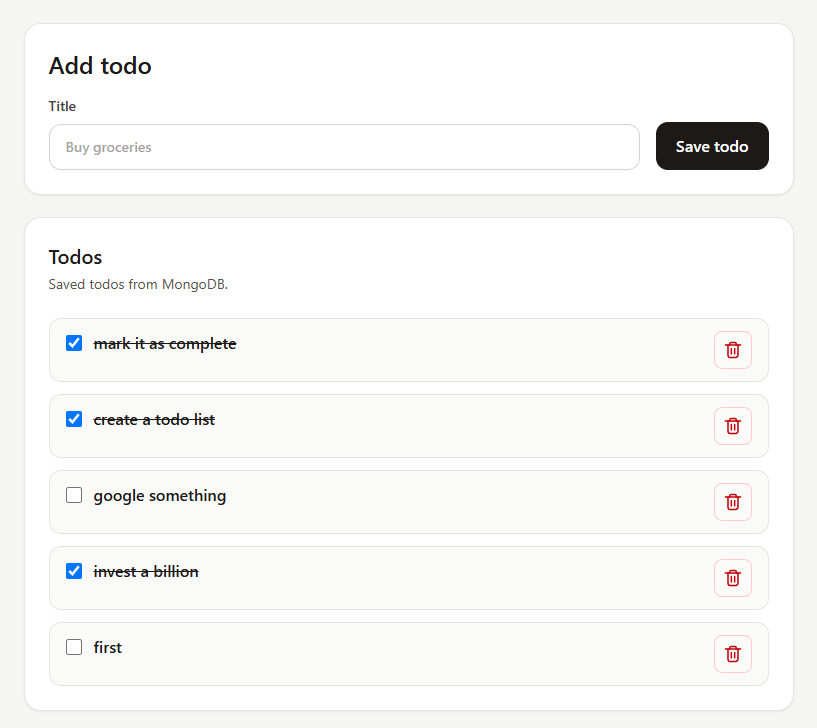
Building a Todo app with Nuxt and Mongoose is extremely easy! I’ve been building with Firebase for years, but this was almost easier!
TL;DR
This app connects to MongoDB Atlas and uses nuxt-mongoose to easily configure a document schema for a todo app. The app is easy to create thanks to the Mongoose JS.
Nuxt App Setup
npm create nuxt@latest
📝 Make sure to install Tailwind.
Create a Mongo Atlas Account
Log in to MongoDB and create an account. You can get your database string under “Connect” once you sign up.
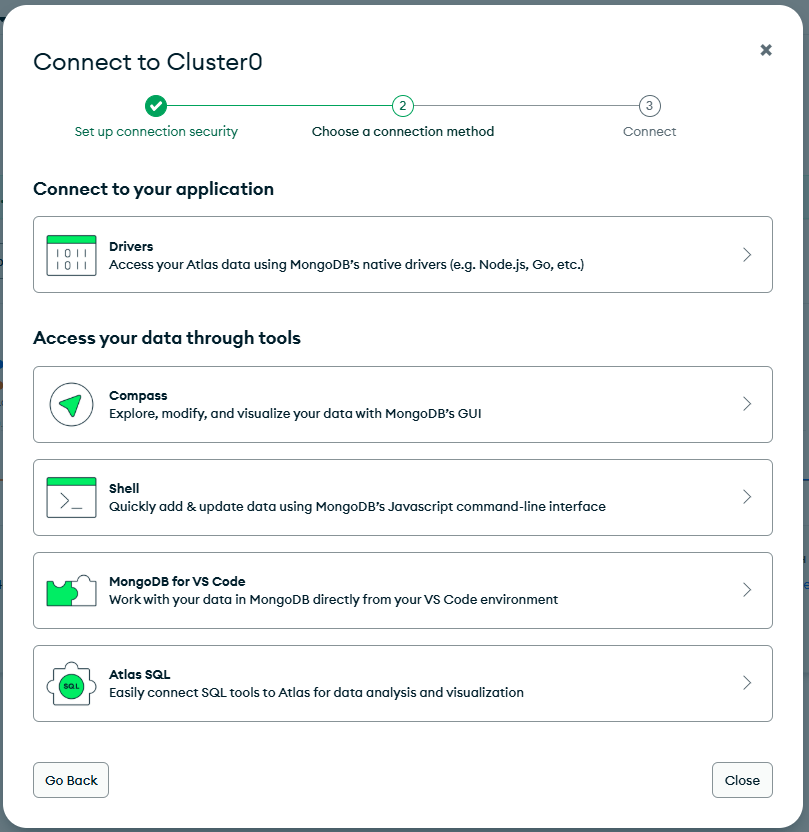
Click the “Drivers” to get your connection string.
.env
Set your connection string in your nuxt enivornment variable inside the .env file at the root.
NUXT_MONGOOSE_URI=mongodb+srv://<db_username>:<db_password>@cluster0.su2uuou.mongodb.net/?appName=Cluster0
Install Nuxt Mongoose
Install Nuxt Mongoose with:
npx nuxi@latest module add nuxt-mongoose
And configure nuxt.config.ts:
import tailwindcss from '@tailwindcss/vite'

export default defineNuxtConfig({
  compatibilityDate: '2025-07-15',
  devtools: { enabled: true },
  css: ['~/assets/css/tailwind.css'],
  modules: ['nuxt-mongoose'],
  mongoose: {
    uri: process.env.NUXT_MONGOOSE_URI,
    modelsDir: 'models',
  },
  vite: {
    plugins: [tailwindcss()],
    optimizeDeps: {
      include: [
        '@vue/devtools-core',
        '@vue/devtools-kit',
      ]
    }
  }
})
Create the Todo Model
// server/models/Todo.ts

import { defineMongooseModel } from '#nuxt/mongoose'

interface TodoDoc {
  title: string
  completed: boolean
  createdAt: Date
  updatedAt: Date
}

export const Todo = defineMongooseModel<TodoDoc>({
  name: 'Todo',
  schema: {
    title: {
      type: String,
      required: true,
      trim: true,
    },
    completed: {
      type: Boolean,
      default: false,
    },
  },
  options: {
    timestamps: true,
  },
})
You can read about the schema at official mongoose guide.
📝 The timestamps options auto configures updatedAt and createdAt for you on each document.
Configure Todo API Routes
We need to CRUD the Todo Documents.
Create Todo
// server/api/todos.post.ts

import { createError, readBody } from 'h3'

import { Todo } from '../models/Todo'

interface TodoBody {
  title?: string
}

export default defineEventHandler(async (event) => {
  const body = await readBody<TodoBody>(event)
  const title = body.title?.trim()

  if (!title) {
    throw createError({
      statusCode: 400,
      statusMessage: 'Title is required.',
    })
  }

  const todo = await Todo.create({
    title,
    completed: false,
  })

  return todo.toObject()
})
The model allows use to easily use the create() command to create a document. The h3 package allows us to handle the errors with createError() and get data with readBody().
Get Todos
// server/api/todos.get.ts

import { Todo } from '../models/Todo'

export default defineEventHandler(async () => {
  const todos = await Todo.find().sort({ createdAt: -1 }).lean()

  return todos
})
We want to sort the data by createdAt descending, and use lean() to only get the field data, not the meta data.
Delete Todo
// server/api/todos/[id].delete.ts

import { createError, getRouterParam } from 'h3'

import { Todo } from '../../models/Todo'

export default defineEventHandler(async (event) => {
  const id = getRouterParam(event, 'id')

  if (!id) {
    throw createError({
      statusCode: 400,
      statusMessage: 'Todo id is required.',
    })
  }

  const todo = await Todo.findByIdAndDelete(id).lean()

  if (!todo) {
    throw createError({
      statusCode: 404,
      statusMessage: 'Todo not found.',
    })
  }

  return { success: true }
})
We delete by ID.
Update Todo
// server/api/todos/[id].patch.ts

import { createError, getRouterParam, readBody } from 'h3'

import { Todo } from '../../models/Todo'

interface TodoUpdateBody {
  completed?: boolean
}

export default defineEventHandler(async (event) => {
  const id = getRouterParam(event, 'id')
  const body = await readBody<TodoUpdateBody>(event)

  if (!id) {
    throw createError({
      statusCode: 400,
      statusMessage: 'Todo id is required.',
    })
  }

  if (typeof body.completed !== 'boolean') {
    throw createError({
      statusCode: 400,
      statusMessage: 'Completed must be a boolean.',
    })
  }

  const todo = await Todo.findByIdAndUpdate(
    id,
    { completed: body.completed },
    { returnDocument: 'after', runValidators: true },
  ).lean()

  if (!todo) {
    throw createError({
      statusCode: 404,
      statusMessage: 'Todo not found.',
    })
  }

  return todo
})
We update the document by ID.
📝 returnDocument: ‘after’ – We want the state after the change.
📝 runValidators: true – The update must match the schema rules.
Todo Composable
We can call the API routes and use good separate of concerns by creating a Todo Composable.
Frontend Types
// types/todo.ts

export interface TodoPayload {
  title: string
}

export interface TodoItem {
  _id: string
  title: string
  completed: boolean
  createdAt?: string
  updatedAt?: string
}
And import them in the composable.
// composables/useTodo.ts

import type { TodoItem, TodoPayload } from "~/types/todo";

export async function useTodos() {
  const message = ref("");
  const isSubmitting = ref(false);
  const togglingId = ref<string | null>(null);
  const deletingId = ref<string | null>(null);

  const {
    data: todos,
    error: todosError,
    refresh: refreshTodos,
  } = await useFetch<TodoItem[]>("/api/todos", {
    default: () => [],
  });

  async function submitTodo(payload: TodoPayload) {
    message.value = "";

    if (!payload.title.trim()) {
      message.value = "Title is required.";
      return false;
    }

    isSubmitting.value = true;

    try {
      await $fetch<TodoItem>("/api/todos", {
        method: "POST",
        body: {
          title: payload.title,
        },
      });

      await refreshTodos();
      return true;
    } catch (error) {
      message.value = error instanceof Error ? error.message : "Failed to create todo.";
      return false;
    } finally {
      isSubmitting.value = false;
    }
  }

  async function toggleTodo(todo: TodoItem) {
    message.value = "";
    togglingId.value = todo._id;

    try {
      await $fetch<TodoItem>(`/api/todos/${todo._id}`, {
        method: "PATCH",
        body: {
          completed: !todo.completed,
        },
      });

      await refreshTodos();
    } catch (error) {
      message.value = error instanceof Error ? error.message : "Failed to update todo.";
    } finally {
      togglingId.value = null;
    }
  }

  async function deleteTodo(todo: TodoItem) {
    message.value = "";
    deletingId.value = todo._id;

    try {
      await $fetch(`/api/todos/${todo._id}`, {
        method: "DELETE",
      });

      await refreshTodos();
    } catch (error) {
      message.value = error instanceof Error ? error.message : "Failed to delete todo.";
    } finally {
      deletingId.value = null;
    }
  }

  return {
    todos,
    todosError,
    message,
    isSubmitting,
    togglingId,
    deletingId,
    submitTodo,
    toggleTodo,
    deleteTodo,
  };
}
📝 deletingId and togglingId are used just like isSubmitting to validate the fetch process.
📝 You could also use Nuxt Form Actions, although I just went straight $fetch here.
Todo Components
Our parent component displays the Todo Form Component and the Todo List Component after Prop Drilling.
Parent
<script setup lang="ts">
const {
  todos,
  todosError,
  message,
  isSubmitting,
  togglingId,
  deletingId,
  submitTodo,
  toggleTodo,
  deleteTodo,
} = await useTodos();
</script>

<template>
  <section class="min-h-screen bg-stone-100 px-4 py-10 text-stone-900">
    <div class="mx-auto grid w-full max-w-3xl gap-6">
      <TodoForm
        :is-submitting="isSubmitting"
        :message="message"
        :on-submit="submitTodo"
      />

      <TodoList
        :todos="todos ?? []"
        :has-error="Boolean(todosError)"
        :toggling-id="togglingId"
        :deleting-id="deletingId"
        :on-toggle="toggleTodo"
        :on-delete="deleteTodo"
      />
    </div>
  </section>
</template>
📝 I usually like to use shared state with useState, but I found prop drilling to be cleaner here.
Todo Form
This displays the add a todo form.
<script setup lang="ts">
import type { TodoPayload } from "~/types/todo";

const props = defineProps<{
  isSubmitting: boolean;
  message: string;
  onSubmit: (payload: TodoPayload) => boolean | Promise<boolean>;
}>();

const form = reactive<TodoPayload>({
  title: "",
});

async function handleSubmit() {
  const isSuccess = await props.onSubmit({
    title: form.title,
  });

  if (isSuccess) {
    form.title = "";
  }
}
</script>

<template>
  <form
    class="rounded-2xl bg-white p-6 shadow-sm ring-1 ring-stone-200"
    @submit.prevent="handleSubmit"
  >
    <h1 class="text-2xl font-semibold">Add todo</h1>

    <div class="mt-4 grid gap-4 sm:grid-cols-[minmax(0,1fr)_auto] sm:items-end">
      <label class="grid gap-2 text-sm font-medium text-stone-700">
        <span>Title</span>
        <input
          v-model="form.title"
          type="text"
          name="title"
          placeholder="Buy groceries"
          class="w-full rounded-xl border border-stone-300 px-4 py-3 outline-none transition focus:border-stone-500 focus:ring-2 focus:ring-stone-300"
        />
      </label>

      <button
        type="submit"
        :disabled="isSubmitting"
        class="rounded-xl bg-stone-900 px-5 py-3 font-medium text-white transition hover:bg-stone-700 disabled:cursor-wait disabled:opacity-70"
      >
        {{ isSubmitting ? "Saving..." : "Save todo" }}
      </button>
    </div>

    <p v-if="message" class="mt-4 text-sm font-medium text-red-700">
      {{ message }}
    </p>
  </form>
</template>
When submitted, we must reset the form and show a message if necessary.
Todo List
Every time there is a refresh, we list the todos.
<script setup lang="ts">
import type { TodoItem } from "~/types/todo";

defineProps<{
  todos: TodoItem[];
  hasError: boolean;
  togglingId: string | null;
  deletingId: string | null;
  onToggle: (todo: TodoItem) => void | Promise<void>;
  onDelete: (todo: TodoItem) => void | Promise<void>;
}>();
</script>

<template>
  <div class="rounded-2xl bg-white p-6 shadow-sm ring-1 ring-stone-200">
    <div>
      <div>
        <h2 class="text-xl font-semibold">Todos</h2>
        <p class="mt-1 text-sm text-stone-600">Saved todos from MongoDB.</p>
      </div>
    </div>

    <p v-if="hasError" class="mt-4 text-sm font-medium text-red-700">
      Failed to load todos.
    </p>

    <ul v-else-if="todos.length" class="mt-6 grid gap-3">
      <li
        v-for="todo in todos"
        :key="todo._id"
        class="rounded-xl border border-stone-200 bg-stone-50 px-4 py-3"
      >
        <div class="flex items-start justify-between gap-4">
          <label class="flex min-w-0 flex-1 items-start gap-3">
            <span class="pt-0.5">
              <input
                type="checkbox"
                class="h-4 w-4 rounded border-stone-300 text-stone-900 focus:ring-stone-400"
                :checked="todo.completed"
                :disabled="togglingId === todo._id || deletingId === todo._id"
                :aria-label="`Mark ${todo.title} as ${todo.completed ? 'incomplete' : 'completed'}`"
                @change="onToggle(todo)"
              />
            </span>

            <span class="min-w-0 flex-1">
              <span
                class="block font-medium text-stone-900"
                :class="{ 'text-stone-500 line-through': todo.completed }"
              >
                {{ todo.title }}
              </span>
            </span>
          </label>

          <button
            type="button"
            class="shrink-0 rounded-lg border border-red-200 p-2 text-red-700 transition hover:bg-red-50 disabled:cursor-wait disabled:opacity-70"
            :disabled="deletingId === todo._id || togglingId === todo._id"
            :aria-label="deletingId === todo._id ? `Deleting ${todo.title}` : `Delete ${todo.title}`"
            :title="deletingId === todo._id ? `Deleting ${todo.title}` : `Delete ${todo.title}`"
            @click="onDelete(todo)"
          >
            <TrashIcon />
          </button>
        </div>
      </li>
    </ul>

    <p v-else class="mt-6 text-sm text-stone-500">No todos yet.</p>
  </div>
</template>
📝 Notice the arial-label and title for accessibility.
📝 deletingId and togglingId are used to handle state changes.
Database
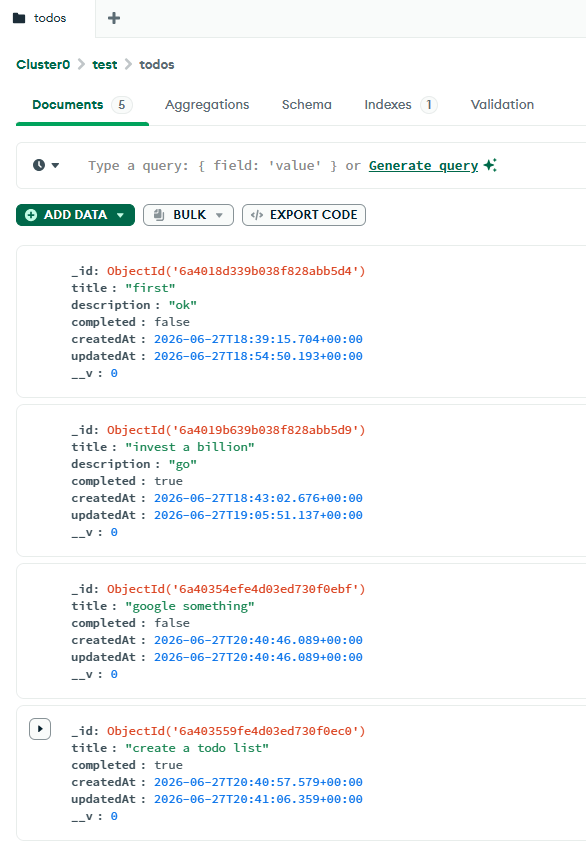
Once you run the app, you will see your data in Atlas.
Final Review
I honestly thought configuring Mongoose was going to be a pain. I have been building with Firebase since Firestore was released, and I thought Mongo DB would be different. Mongoose has come a LONG way, and nuxt-mongoose pretty much configures it for you.
The only negative with mongoose is the lack of built-in authentication support. There is, however, a better-auth adapter. You also can’t do anything on the client/browser like you can with Firebase or Supabase, but these days I’m OK with that!
Honestly, this was fun to build.
Repo: GitHub

Jonathan Gamble
Jonathan Gamble has been an avid web programmer for more than 20 years. He has been building web applications as a hobby since he was 16 years old, and he received a post-bachelor’s in Computer Science from Oregon State. His real passions are language learning and playing rock piano, but he never gets away from coding. Read more from him at https://code.build/.
Related Posts
Comments
All articles
Topics
Web MobileMobile
Desktop
Design
Productivity
People