Learning LangGraph with TypeScript—Part 1: Understanding Nodes, State and Edges

Summarize with AI:
Learn about nodes, edges and state in LangGraph, plus how to build a LangGraph app in TypeScript.
LangGraph is a framework for building AI agents and workflows as stateful graphs. Each step in the workflow is represented as a node. Edges define how execution flows between nodes, and state acts as shared memory throughout the graph.
Built on top of LangChain, LangGraph provides explicit and debuggable control over multi-step LLM applications such as chatbots, tool-calling agents and automated pipelines.
In this article, we will use TypeScript to build a simple LangGraph application from scratch and explore the core concepts, APIs and execution model that form the foundation of more advanced agentic workflows.
LangGraph has three building blocks.
- State
- Node
- Edges
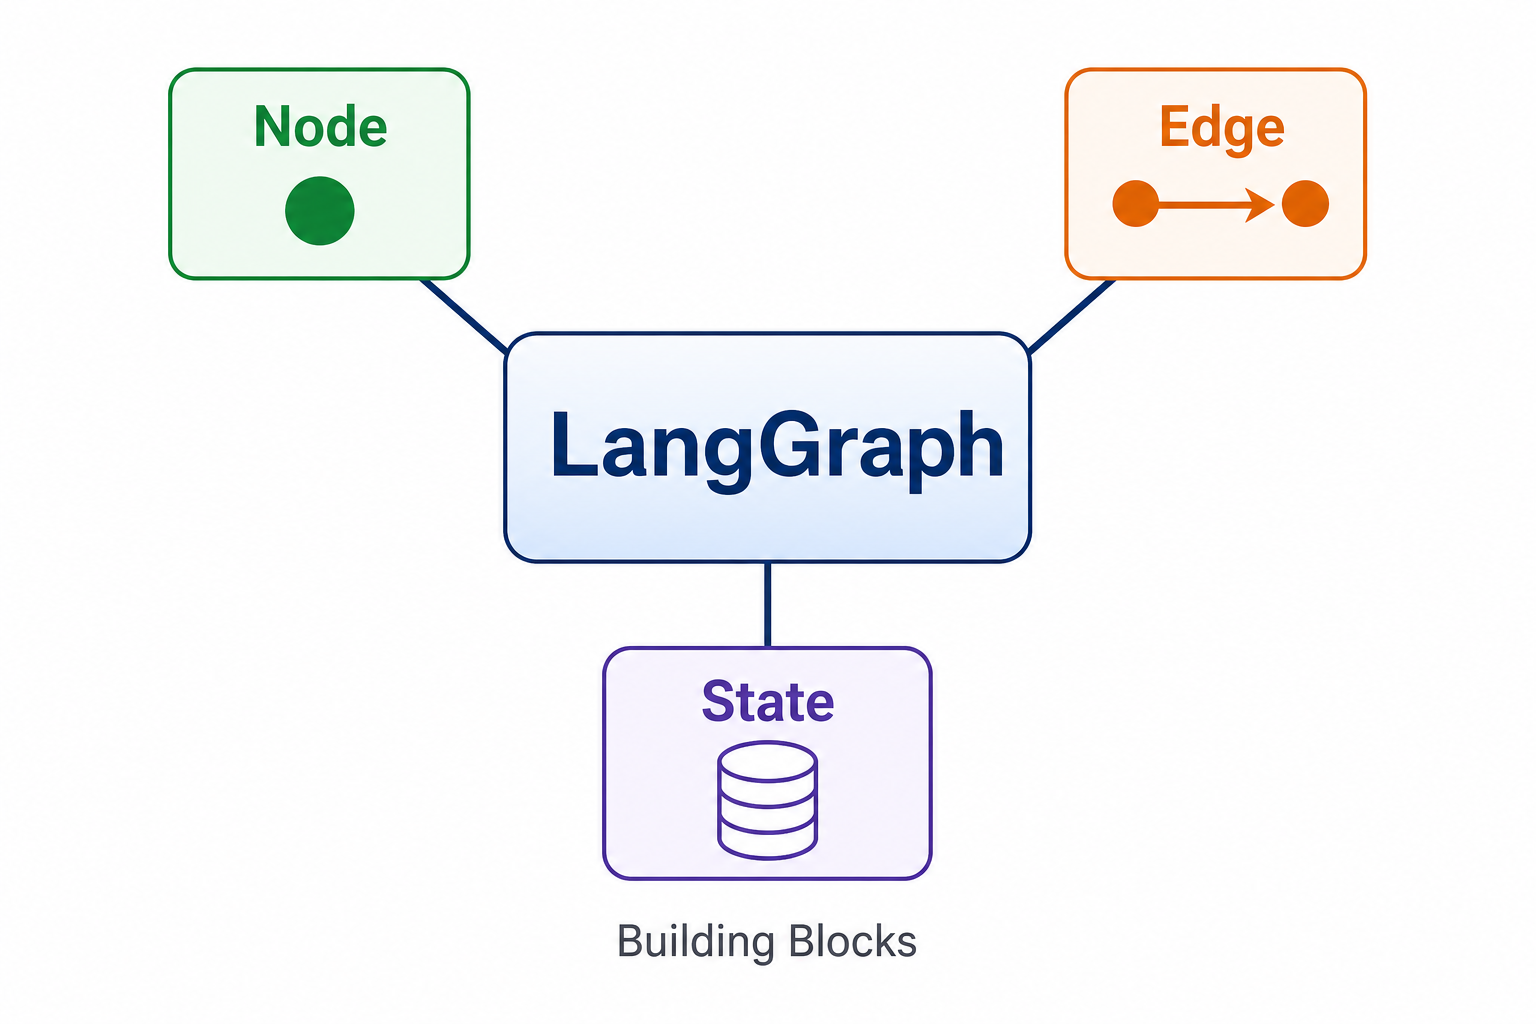
State represents data that is shared by every node. A node represents a function that takes a state as input and returns an updated value for the state. Edges are control flow, which can be serial, parallel or conditional.
To understand how graphs work, we’ll start with a simple counter application that does not require a model. This example will introduce the core concepts of state and node, and by the end of the section, you’ll understand how they form the foundation of a graph.
At the end of the article, we will create a FIFA chatbot using an OpenAI model and LangGraph using nodes, states and edges.
What Is a State?
In LangGraph, a state is a data structure that serves as a shared memory layer that connects the graphs. Nodes consume state, produce incremental updates and rely on it for conditional routing.
Every node in the graph depends on the state. Nodes read data from the state and write partial updates back to it. And conditional edges use the state to determine the next path in the workflow.
StateSchema is the contract that defines the structure and behavior of a state in LangGraph. More than just a TypeScript type, it serves as a runtime specification that determines:
- Which fields exist in the state
- Their types and default values (defined with Zod)
- How updates are merged (reducers vs. last-write-wins)
- Which data nodes can read from and write to
You can create a state using the StateSchema as shown below:
counter-state.schema.ts
import { ReducedValue, StateSchema } from "@langchain/langgraph";
import { z } from "zod";

export const CounterStateSchema = new StateSchema({
  count: new ReducedValue(z.number().default(0), {
    inputSchema: z.number(),
    reducer: (current, next) => current + next,
  }),
});
Every key in a StateSchema can be one of the following:
- Zod Field – A standard state field defined with Zod. Updates follow a last-write-wins strategy, meaning the most recent value replaces the previous one.
- ReducedValue – A field that updates by combining the new value with the existing value instead of replacing it. In the example above,
countis aReducedValue, so each update is merged with the current count rather than overwriting it. - MessageValue – A specialized form of
ReducedValuedesigned for chat applications. Instead of replacing existing messages, new messages are automatically appended to the conversation history.
Once state is defined using the StateSchema, you can work with the three derived types:
- State – Full object during the execution
- Update – Partial object a node may return
- Node – Function signature
counter-state.types.ts
export type CounterState = typeof CounterStateSchema.State;
export type CounterUpdate = typeof CounterStateSchema.Update;
export type CounterNode = typeof CounterStateSchema.Node;
For this example, we will mostly work with the CounterNode. Also, the CounterStateSchema has:
- Initial value set to 0
- Each nodes return the updated value
- Reducer adds current value to the previous value
What Is a Reducer?
Before we move further, let’s discuss the reducer function. It is a simple function that decides how a state field changes when a node returns an update. Multiple nodes can update the same field during a graph execution. Instead of overwriting the existing value, the reducer merges each partial update into the current state.
As nodes returns partial updates, LangGraph would need a rule for conflicting updates. That merge rule is written inside the the reducer function.
reducer: (current, next) => current + next,
The signature of the reducer:
current– value in state before this updatenext– what the node returned for this fieldreturn value– new stored value
Use a reducer only when values need to be combined or accumulated. If each update should simply replace the previous value, a standard field is all you need. As shown in below state schema, each time state will be updated with the last returned value from the node.
lastcount-state.schema.ts
export const LastCountStateSchema = new StateSchema({
  count: z.number().default(0),
});
For LastCountState, derived states can be exported as shown below:
lastcount-state.types.ts
export type LastCountState = typeof LastCountStateSchema.State;
export type LastCountUpdate = typeof LastCountStateSchema.Update;
export type LastCountNode = typeof LastCountStateSchema.Node;
So far, we have defined two state schemas and exported their corresponding TypeScript types. The CounterState uses a reducer to accumulate new values with the existing value, while the LastCountState follows a last-write-wins approach and always stores the most recent value. Next, let’s create the nodes that will operate on these states.
Creating Nodes
In LangGraph, a node is the fundamental building block of a graph. It is usually implemented as a function that takes the current state as input, performs some computation or action, and returns a partial update to the state.
Depending on how the state schema is defined, LangGraph either merges the returned update into the existing state using the configured reducer or replaces the current value with the latest one before passing the updated state to the next step in the workflow.
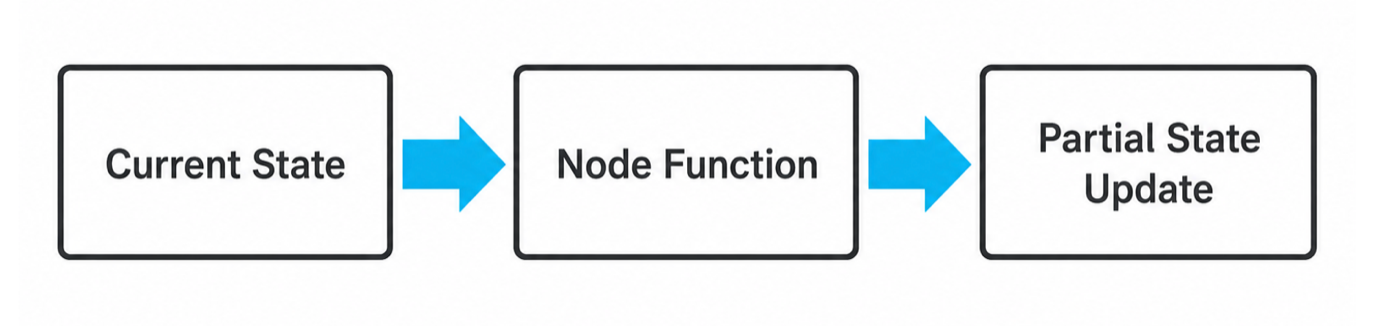
You can create nodes to increment a counter state by 1 and 2 like below:
counter.node.ts
export const incrementNode: CounterNode = () => ({
  count: 1,
});

export const incrementTwiceNode: CounterNode = () => ({
  count: 2,
});
After each node runs, LangGraph:
- Receives the partial state update returned by the node
- Merges the update into the current state using the rules defined in the
StateSchema - Passes the resulting state to the next node, or terminates the graph if execution is complete
For LastCountState, a node can be created as shown below:
export const setOneNode: LastCountNode = () => ({
  count: 1,
});

export const setFiveNode: LastCountNode = () => ({
  count: 5,
});

export const setNineNode: LastCountNode = () => ({
  count: 9,
});
Because LastCountState stores only the latest value, every node overwrites the previous value, and the next node receives the most recent state update.
As we discussed earlier, a node only returns a partial state update. How that update is applied to the state is determined by the StateSchema through its merge strategy (reducers or last-write-wins), not by the node’s implementation.
Also, nodes do not decide where execution goes next; edges do. Nodes only read state and write updates.
There are four types of nodes:
- Synchronous node – Returns an object immediately
- Asynchronous node – Returns a promise
- Stateless node – Ignores the state value and always returns the same value
- Stateful node – Reads the fields from the state and computes the new value from them
All the nodes we have created so far for both CounterState and LastCountState are synchronous and stateless.
We can create a stateful node on CounterState as shown below:
export const doubleCountNode: CounterNode = (state) => ({
  count: state.count,
});
We have created nodes; now see how they are connected using edges.
Creating an Edge
An edge connects two nodes and determines the control flow by specifying which node executes after the current node completes.
An edge can be of two types:
- Fixed edge – Always goes to the same next node
- Conditional edge – Next node depends on state or routing function
To work with nodes and edges, LangGraph provides two special nodes:
- START – Entry node, and it contains no custom code
- END – Exit node, and it also contains no custom code
Building the Graph
The LangGraph graph is where you assemble everything. A graph brings together the state schema, nodes and edges into an executable workflow. You create and run a graph following the steps:
- Create a StateGraph using your state schema.
- Add nodes with addNode() to define the tasks in the workflow.
- Connect nodes with addEdge() to specify the execution order.
- Compile the graph using compile() to generate a runnable workflow.
- Invoke the graph with invoke(), which starts execution at START.
- Execute nodes in the order defined by the graph’s edges.
- Apply reducers after each node runs to update the shared state.
- Continue execution until the graph reaches the END node.
- Return the final state as the workflow’s output.
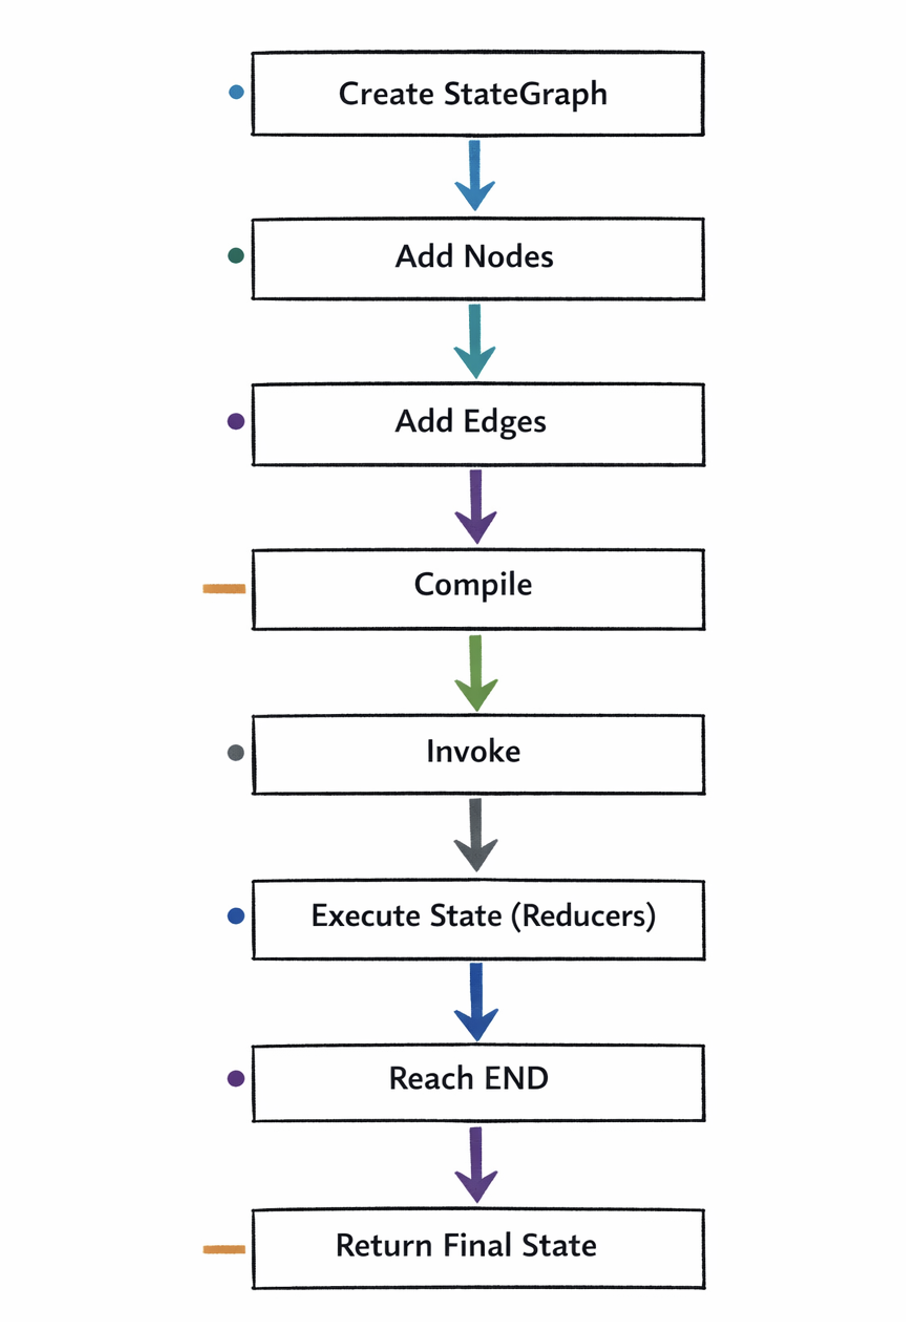
Think of the graph as the orchestrator, the nodes as workers performing tasks, and the state as the shared memory that connects them.
There are three steps to build the graph:
- Create a
StateGraphwith your schema - Register nodes and edges
- Call
.compile()to get a runnable graph
We can create a graph for CounterState as shown below:
counter.graph.ts
export function buildCounterGraph() {
  return new StateGraph(CounterStateSchema)
    .addNode("increment", incrementNode)
    .addNode("incrementTwice", incrementTwiceNode)
    .addNode("doubleCount", doubleCountNode)
    .addEdge(START, "increment")
    .addEdge("increment", "incrementTwice")
    .addEdge("incrementTwice", "doubleCount")
    .addEdge("doubleCount", END)
    .compile();
}
As you can see:
addNode()adds a node to the graph. Each node is a step.addEdge()is used to add an edge to the graph. Edges know the step by the string name, not the node function name.new StateGraph()creates a graph bound to the state schema definition..compile()validates the graph. It checks for:
a. Is there any path from START to END
b. Do node name edge exist
c. Is the schema wired correctly
d. Then returns a compiled graph
In the same way, you can create a graph for LastCountState:
lastcount.graph.ts
export function buildLastCountGraph() {
  return new StateGraph(LastCountStateSchema)
    .addNode("setOne", setOneNode)
    .addNode("setFive", setFiveNode)
    .addNode("setNine", setNineNode)
    .addEdge(START, "setOne")
    .addEdge("setOne", "setFive")
    .addEdge("setFive", "setNine")
    .addEdge("setNine", END)
    .compile();
}
We use addEdge() to connect nodes and define the execution flow within the graph. Key characteristics of addEdge() are:
- The
addEdge(startKey, endKey)creates an unconditional edge. - Once the
startKeynode completes, execution always proceeds to theendKeynode. - Possible values of
startKeyare START or node name or node name []. - Possible values of
endKeyare END or node name.
In the count graph, we start at the increment node and create a linear chain to the doubleCount node.
    .addEdge(START, "increment")
    .addEdge("increment", "incrementTwice")
    .addEdge("incrementTwice", "doubleCount")
    .addEdge("doubleCount", END)
This is a linear chain.

Graph Rules to Remember
When building a LangGraph workflow, keep the following rules in mind:
- Node names must be valid.
Every node referenced in an edge must either be a registered node name or one of the special nodes: START or END. - Use the graph node name, not the function name.
When creating edges, refer to the string name assigned inaddNode(), not the underlying function name. - A graph must have a starting path.
Every runnable graph must contain at least one edge originating from START. - A graph must have a termination path.
Every runnable graph must contain at least one edge leading to END. - Unreachable nodes are dead code.
If a node cannot be reached from START, it will never execute and is effectively dead code within the graph. - addEdge() creates unconditional transitions.
addEdge()does not evaluate the graph state or any conditions. Execution always follows the defined path. If you need conditional routing (for example, “if count > 5 go here, otherwise go there”), useaddConditionalEdges(). We’ll explore conditional routing in the next article.
Invoking the Graph
We can invoke the graph using the invoke() method.
const graph = buildCounterGraph();
const result = await graph.invoke({});
console.log(result);
The invoke method returns the final state, and you should see output {count: 6}. There is another method, stream(), to read the state after each node’s execution, and we will cover it in the next article.
In the same way, you can invoke LastCountGraph as shown below:
const graph1 = buildLastCountGraph();
const result1 = await graph1.invoke({});
console.log(result1);
You should get the result {count: 9}.
In this way, you can create a basic LangGraph graph using state, state schema, edges and nodes.
The following diagram brings together all the concepts we have learned so far and illustrates the main building blocks of a LangGraph.
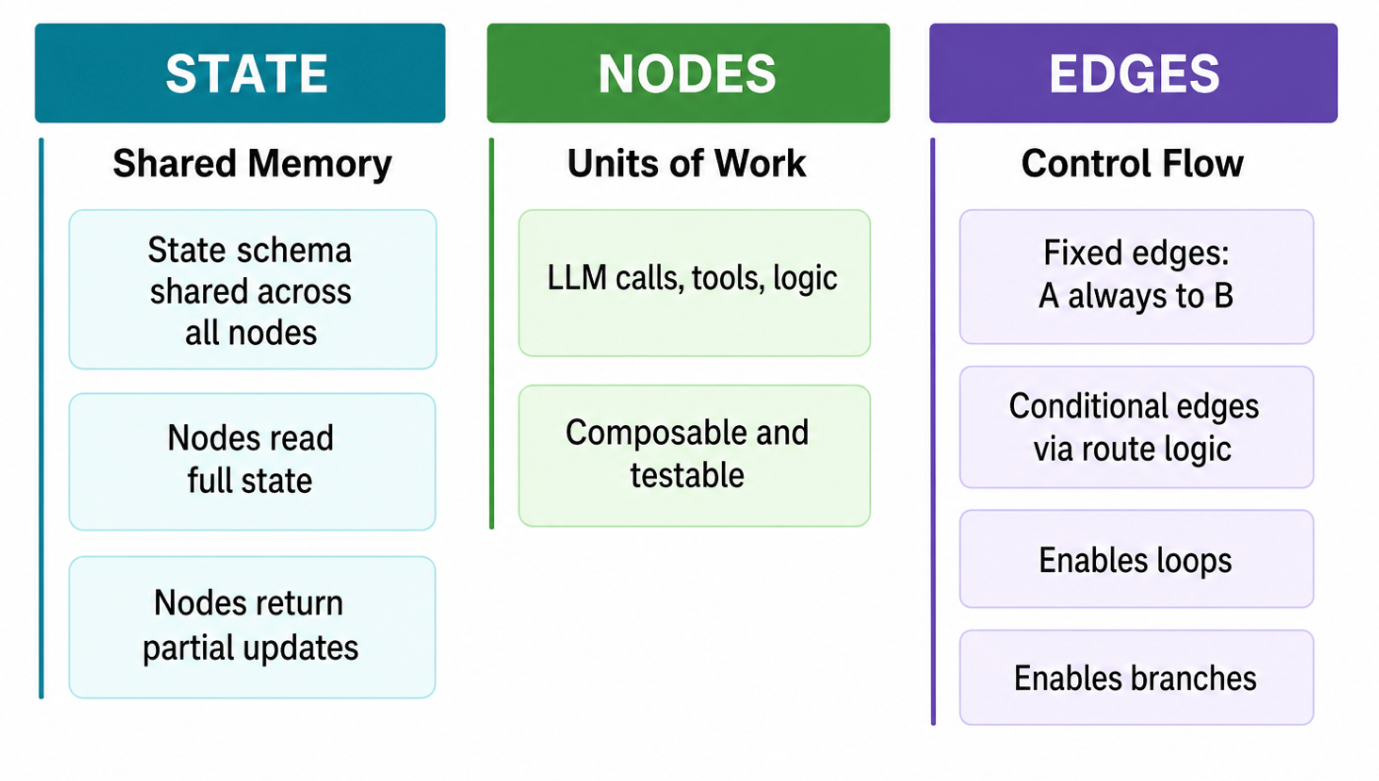
FIFA Chat Example
Now that we’ve covered the core LangGraph concepts, let’s put them into practice by building a chat application that answers questions about the FIFA World Cup.
Let us start by defining the state with MessageValue.
const schema = new StateSchema({ messages: MessagesValue });
Next, create the language model for our FIFA World Cup chatbot using OpenAI’s GPT. Before initializing the model, add your OpenAI API key to the .env file.
const model = new ChatOpenAI({ model: "gpt-4o-mini", temperature: 0 });
Next, set the system prompt such that the model only answers about FIFA and does not answer on other topics.
const SYSTEM = `You are a FIFA World Cup expert. ONLY answer questions about the FIFA World Cup (1930–present): winners, hosts, matches, records, players in World Cup context.
For anything else, reply exactly: "I can only help with FIFA World Cup questions."`;
Next, create the node that acts as an agent. It will read messages, call the models and return the model’s new reply. The MessageValue reducer will append the message to the message history.
const agent: typeof schema.Node = async (state) => ({
  messages: [await model.invoke(state.messages)],
});
Next, let’s build the graph. In this example, the graph consists of a single node with an incoming START edge and an outgoing END edge.
const graph = new StateGraph(schema)
  .addNode("agent", agent)
  .addEdge(START, "agent")
  .addEdge("agent", END)
  .compile();
Then, we seed the state with the SystemMessage:
let state: typeof schema.State = { messages: [new SystemMessage(SYSTEM)] };
Finally, inside the loop, we invoke the graph as below:
  state = await graph.invoke({
    ...state,
    messages: [...state.messages, new HumanMessage(question)],
  });
Here we are using schema.state, which is the full state graph read and write. Putting everything together, FIFA Chat Bot should look like below:
import { stdin as input, stdout as output } from "node:process";
import * as readline from "node:readline/promises";

import { HumanMessage, SystemMessage } from "@langchain/core/messages";
import { ChatOpenAI } from "@langchain/openai";
import { END, MessagesValue, START, StateGraph, StateSchema } from "@langchain/langgraph";
import "dotenv/config";

const schema = new StateSchema({ messages: MessagesValue });

const model = new ChatOpenAI({ model: "gpt-4o-mini", temperature: 0 });

const SYSTEM = `You are a FIFA World Cup expert. ONLY answer questions about the FIFA World Cup (1930–present): winners, hosts, matches, records, players in World Cup context.
For anything else, reply exactly: "I can only help with FIFA World Cup questions."`;

  const agent: typeof schema.Node = async (state) => ({
    messages: [await model.invoke(state.messages)],
  });

const graph = new StateGraph(schema)
  .addNode("agent", agent)
  .addEdge(START, "agent")
  .addEdge("agent", END)
  .compile();

let state: typeof schema.State = { messages: [new SystemMessage(SYSTEM)] };

const rl = readline.createInterface({ input, output });

console.log("⚽ FIFA World Cup Chat — type 'exit' to quit\n");

while (true) {
  const question = (await rl.question("You: ")).trim();
  if (!question) continue;
  if (question === "exit" || question === "quit") break;

  state = await graph.invoke({
    ...state,
    messages: [...state.messages, new HumanMessage(question)],
  });

  console.log(`\nAssistant: ${state.messages.at(-1)?.content}\n`);
}

rl.close();
You have created a FIFA chatbot using Graph, which uses nodes, state and edges. In further articles, we go deeper into creating agents using LangGraph. I hope you find this article useful. Thanks for reading.

Dhananjay Kumar
Dhananjay Kumar is the founder of nomadcoder, an AI-driven developer community and training platform in India. Through nomadcoder, he organizes leading tech conferences such as ng-India and AI-India. He partners with startups to rapidly build MVPs and ship production-ready applications. His expertise spans Angular, modern web architecture and AI agents, and he is available for training, consulting or product acceleration from Angular to API to agents.
Related Posts
Comments
All articles
Topics
Web MobileMobile
Desktop
Design
Productivity
People