
Creating Localized .NET MAUI Applications

Summarize with AI:
Reach more people with your apps: Learn how to localize .NET MAUI applications, including XAML text elements, view models and prebuilt Telerik controls for .NET MAUI.
Making our mobile applications accessible to users who speak a different language than us can make a huge difference in their usage. Fortunately, .NET MAUI offers the power to deliver multi-language applications thanks to the use of resources files.
Likewise, prebuilt controls such as those from Progress Telerik UI for .NET MAUI can be adapted to support localization, allowing you to build and deliver native language experiences quickly. Let’s see how to do it!
Understanding Localization in .NET MAUI Apps
Localization is the process of enabling an application to support different languages and cultures; that is, it’s not only about translating text strings to other languages, but also adapting date formats, numbers, etc.
There are some key elements for localizing applications, the first of which are the resource files .resx, which are XML files composed of key-value pairs for each language.
Likewise, we have the class CultureInfo, which represents the user’s cultural information. Finally, the class ResourceManager is a class that allows us at runtime to retrieve localized strings according to the language selected on the user’s device.
Creating a Sample App to Localize
To show you in a practical way how to integrate localization into your own projects, let’s create a test project. To do so, create a new .NET MAUI project without example content, and follow the installation guide to add Telerik controls for .NET MAUI to the project.
Also install the NuGet package CommunityToolkit.Mvvm to create viewmodels cleanly. Once the project has been configured, create a data model to represent a Product:
public class Product
{
    public string Name { get; set; } = string.Empty;
    public string Category { get; set; } = string.Empty;
    public decimal Price { get; set; }
    public DateTime CreatedDate { get; set; }
}
Next, let’s create a viewmodel that will display information in the UI for a set of fictitious products:
public partial class MainViewModel : ObservableObject
{
    [ObservableProperty]
    private ObservableCollection<Product> products = [];

    [ObservableProperty]
    private DateTime? selectedDate;

    public MainViewModel()
    {
        SelectedDate = DateTime.Now;
        LoadProducts();
    }

    private void LoadProducts()
    {
        Products =
        [
            new Product
            {
                Name = "Laptop Pro 15",
                Category = "Electronics",
                Price = 1299.99m,
                CreatedDate = new DateTime(2026, 1, 15)
            },
            new Product
            {
                Name = "Running Shoes",
                Category = "Clothing",
                Price = 89.95m,
                CreatedDate = new DateTime(2026, 2, 20)
            },
            new Product
            {
                Name = "Organic Coffee Beans",
                Category = "Food",
                Price = 24.50m,
                CreatedDate = new DateTime(2026, 3, 10)
            },
            new Product
            {
                Name = "Wireless Mouse",
                Category = "Electronics",
                Price = 45.00m,
                CreatedDate = new DateTime(2025, 12, 5)
            },
            new Product
            {
                Name = "Winter Jacket",
                Category = "Clothing",
                Price = 159.99m,
                CreatedDate = new DateTime(2026, 1, 28)
            }
        ];
    }
}
In the code above, you can notice that hard-coded strings in English are used to display information to users only in that language. Now, let’s create an example UI, using a .NET MAUI RadDatePicker (which is an enhanced DatePicker) and a MAUI RadDataGrid to easily display data tables:
<Grid
 Padding="16"
 RowDefinitions="Auto,Auto,*"
 RowSpacing="12">
 <!--  Welcome message  -->
 <Label
     FontAttributes="Bold"
     FontSize="20"
     HorizontalOptions="Center"
     Text="Welcome to the app" />
 <!--  Date picker  -->
 <HorizontalStackLayout
     Grid.Row="1"
     HorizontalOptions="Center"
     Spacing="10">
     <Label
         FontSize="16"
         Text="Created Date"
         VerticalOptions="Center" />
     <telerik:RadDatePicker
         Date="{Binding SelectedDate}"
         WidthRequest="250" />
 </HorizontalStackLayout>
 <!--  Product grid  -->
 <telerik:RadDataGrid
     Grid.Row="2"
     AutoGenerateColumns="False"
     ItemsSource="{Binding Products}"
     UserFilterMode="Auto"
     UserGroupMode="Auto"
     UserSortMode="Auto">
     <telerik:RadDataGrid.Columns>
         <telerik:DataGridTextColumn HeaderText="Product Name" PropertyName="Name" />
         <telerik:DataGridTextColumn HeaderText="Category" PropertyName="Category" />
         <telerik:DataGridNumericalColumn
             CellContentFormat="{}{0:C}"
             HeaderText="Price"
             PropertyName="Price" />
         <telerik:DataGridDateColumn
             CellContentFormat="{}{0:d}"
             HeaderText="Created Date"
             PropertyName="CreatedDate" />
     </telerik:RadDataGrid.Columns>
 </telerik:RadDataGrid>
</Grid>
Don’t forget to register both MainPage and MainPageViewModel in the dependency container:
public static class MauiProgram
{
    public static MauiApp CreateMauiApp()
    {
        var builder = MauiApp.CreateBuilder();
        ...
        builder.Services.AddTransient<MainPage>();
        builder.Services.AddTransient<MainViewModel>();
		...
        return builder.Build();
    }
}
Finally, let’s inject the view model into the page’s code-behind, while assigning the injected reference to BindingContext:
public partial class MainPage : ContentPage
{
    public MainPage(MainViewModel viewModel)
    {
        InitializeComponent();
        BindingContext = viewModel;
    }
}
After implementing the above changes, we will have a UI like the following:
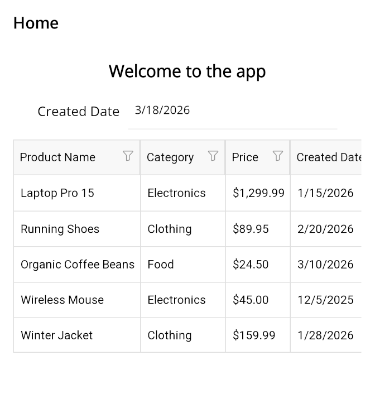
As we anticipated, all the UI content is in English. Some text chunks we might want to internationalize could be the page title, the welcome message, column headers, product categories, etc. Let’s see how to achieve it.
Creating Resource Files to Localize a .NET MAUI App
Localization of .NET applications is based on resource files. To create these files, you must start by creating a file with the extension .resx, which will contain the strings in the original language.
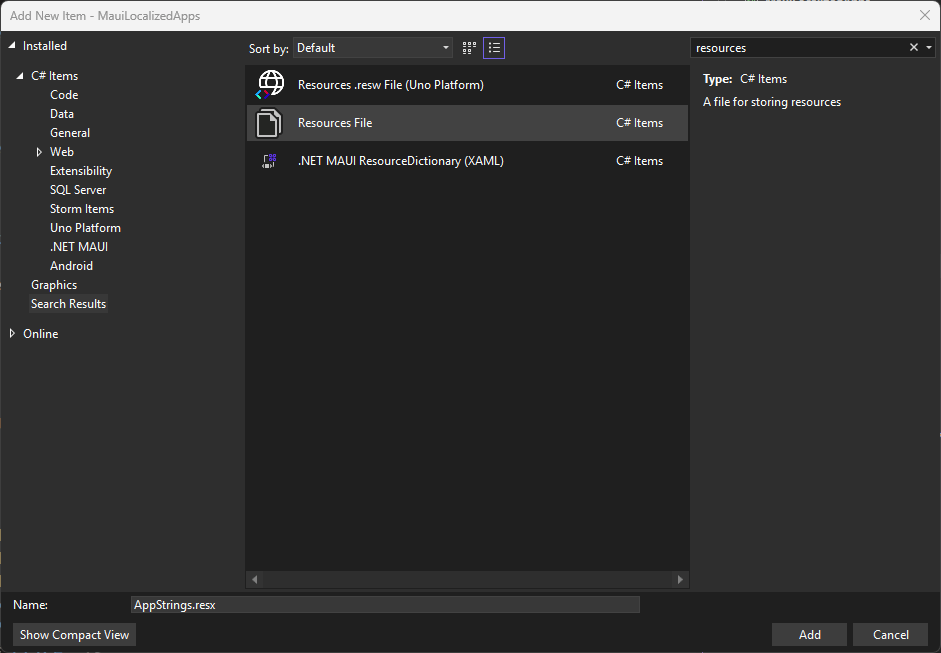
In our example, we are going to create a new folder Resources/Strings, and inside create a file named AppStrings.resx. You can achieve this using the context menu on the created folder, selecting Add | New Item. Then, in the search box enter the term resources, which will filter the template for the resource file:
Once you have created the file, you can open it and start adding the application’s strings in their original language, using the + button. This will open a new window where you can enter information such as the string key, the data type, the value and optionally comments:

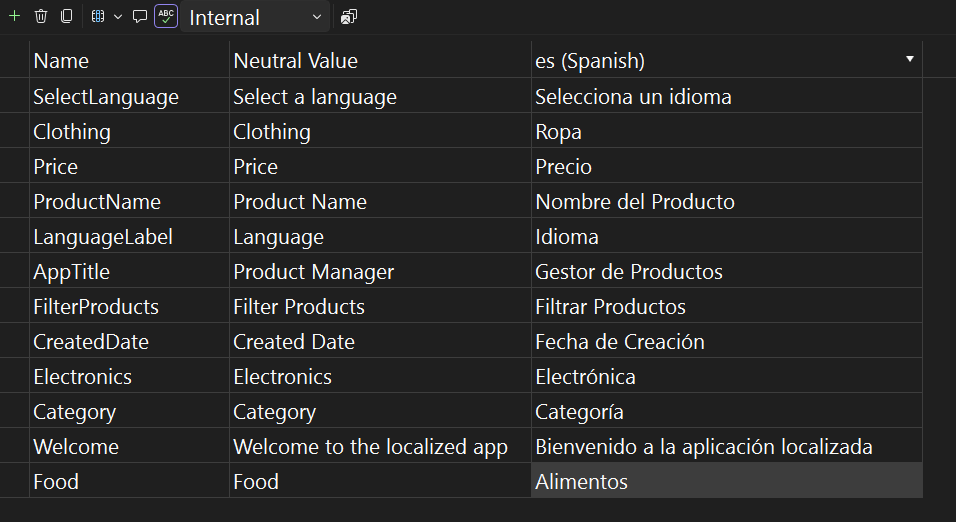
Another way to add strings more quickly is to paste them in the format: Key name + tab + value. For example, you can copy and paste the following content, and paste it directly into the resource editor, which will create a series of rows in the file:
LanguageLabel	Language
ProductName	Product Name
Category	Category
Price	Price
CreatedDate	Created Date
SelectLanguage	Select a language
Electronics	Electronics
Clothing	Clothing
Food	Food
FilterProducts	Filter Products
Welcome	Welcome to the localized app
After having the base file, the next step is to create an additional resource file for each translation you want to perform. For the example, I will create a new file in Resources/Strings called AppStrings.es.resx. You can notice that each new file must be named the same as the main one, adding the ISO code of the language you want to translate to.
When you open the file, you will see that a new column has been added, where you can enter the information of the file, as in the following example:
With the resource files created, it is time to connect the strings with the UI.
Localizing Elements in the UI
With the strings correctly localized, let’s go to the UI page. There, you need to add a namespace for the path where the localized files are located, similar to this:
<ContentPage
    ...
    xmlns:resx="clr-namespace:MauiLocalizedApps.Resources.Strings">
Then, on each element you want to localize you must use the markup extension x:Static, using the key of the resource you want to replace. This is an example of the Label control corresponding to the localized welcome message:
<Label
	...
    Text="{x:Static resx:AppStrings.Welcome}" />
Other strings we will replace will be the creation date and the welcome one, as shown below:
<ContentPage ...
    Title="{x:Static resx:AppStrings.AppTitle}">

 <Grid
     Padding="16"
     RowDefinitions="Auto,Auto,*"
     RowSpacing="12">
     <!--  Welcome message  -->
     <Label
         FontAttributes="Bold"
         FontSize="20"
         HorizontalOptions="Center"
         Text="{x:Static resx:AppStrings.Welcome}" />
     <!--  Date picker  -->
     <HorizontalStackLayout
         Grid.Row="1"
         HorizontalOptions="Center"
         Spacing="10">
         <Label
             FontSize="16"
             Text="{x:Static resx:AppStrings.CreatedDate}"
             VerticalOptions="Center" />
         <telerik:RadDatePicker Date="{Binding SelectedDate}" WidthRequest="250" />
     </HorizontalStackLayout>
     ...
</Grid>
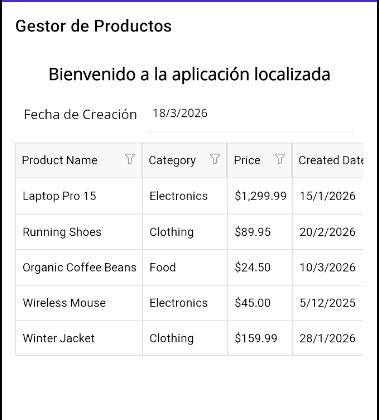
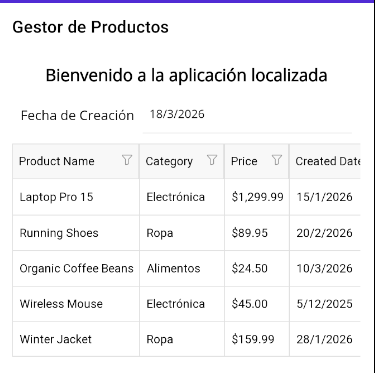
After applying the changes and changing the device language to Spanish, we get the following result:
Now, let’s see how to localize the view model strings.
Localizing Data Strings from the viewmodel
In addition to localizing elements in the XAML file, we can also load translated strings that are found in the view model. For example, suppose we want to translate the names of the categories shown in the DataGrid.
To achieve this, we can use the static class that is created when we create a resource file, which takes the same name as the created file. In our case it is called AppStrings, and we will use it as follows:
private void LoadProducts()
{
    Products =
    [
        new Product
        {
            ...
            Category = AppStrings.Electronics
        },
        new Product
        {
            ...
            Category = AppStrings.Clothing,
        },
        ...
    ];
}
With the previous changes, we have seen how to display translated strings to the user found in XAML files and view models:
However, we still have strings in the graphical controls that have not been localized. Let’s see how to translate them.
Localizing Internal Strings of Telerik Controls for .NET MAUI
In case you also want to localize the strings of Telerik controls, such as those that show options in the DataGrid, you can see all the keys used in the controls on the .NET MAUI globalization and localization page. On that page you will find links for each control and their respective strings.
For example, to localize the .NET MAUI DataGrid, we must copy a series of keys that start with DataGrid_..., such as DataGrid_DistinctValues_SelectAll, DataGrid_Filter_ApplyFilter, DataGrid_Filter_ResetFilter, etc. These are the keys that I will add to the file AppStrings.resx.
After doing this, you must create a class that inherits from TelerikLocalizationManager, like the one shown below:
internal class CustomLocalizationManager : TelerikLocalizationManager
{
    public override string GetString(string key)
    {
        string? localizedValue = AppStrings.ResourceManager.GetString(
            key, CultureInfo.CurrentUICulture);

        if (!string.IsNullOrEmpty(localizedValue))
        {
            return localizedValue;
        }

        return base.GetString(key);
    }
}
In the code above, we use the GetString method to attempt to retrieve a key and its translated value in the device’s language. If a translated string is found it is returned; otherwise the original value is returned.
Finally, you must register the created manager in MauiProgram.cs as follows:
public static MauiApp CreateMauiApp()
{
    var builder = MauiApp.CreateBuilder();
    ...
    TelerikLocalizationManager.Manager = new CustomLocalizationManager();
    ...
    return builder.Build();
}
When running the app, we will get the following result:
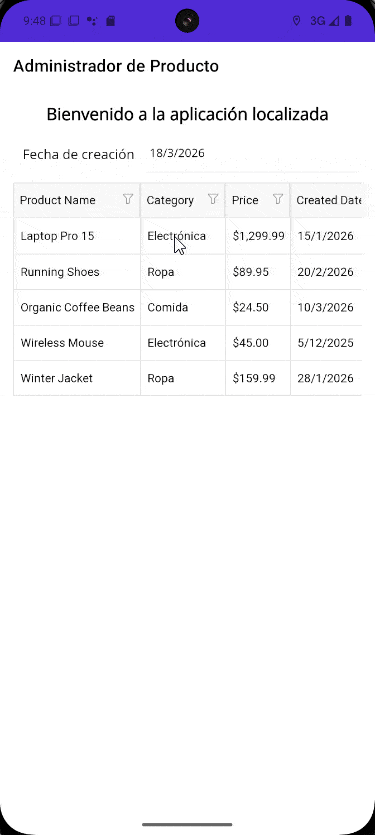
In the image above you can see how the DataGrid options are displayed translated into Spanish. With this, we have finished localizing the strings in our application.
Conclusion
Throughout this article you’ve seen how to localize .NET MAUI applications. You’ve seen how to translate text elements found in XAML files, view models and even prebuilt Telerik controls for .NET MAUI. Now it’s your time to reach more people with your apps by using localization through resource files.
Try out Telerik UI for .NET MAUI free for 30 days.

Héctor Pérez
Héctor Pérez is a Microsoft MVP with more than 10 years of experience in software development. He is an independent consultant, working with business and government clients to achieve their goals. Additionally, he is an author of books and an instructor at El Camino Dev and Devs School.
Related Posts
Comments
All articles
Topics
Web MobileMobile
Desktop
Design
Productivity
People
