
Installing and Basics of Telerik UI for .NET MAUI AI Coding Assistant

Summarize with AI:
Check out the Telerik UI for .NET MAUI AI Coding Assistant, the MCP server native to Telerik controls and MAUI.
Code generation using artificial intelligence has improved impressively over the past few months. One of the features that has helped this growth are MCP servers, which allow connecting an AI to information sources quickly. From consulting Microsoft Learn documentation, to those that perform actions on a calendar, to MCP servers for retrieving information from databases, these servers help improve the accuracy of results by obtaining up-to-date and reliable information.
The team at Progress has released an AI Coding Assistant for .NET MAUI, which helps create and improve graphical interfaces, using the latest features of its UI controls reliably. Let’s see it in action.
What Is Telerik UI for .NET MAUI AI Coding Assistant (MCP Server)?
Telerik AI Coding Assistant for .NET MAUI is an MCP server that allows retrieving information provided directly by Progress, with the purpose of letting users learn about the use of a specific component or, alternatively, create high-quality graphical interfaces using the latest features and capabilities of the controls in the Telerik suite. Some available features are:
- Prompt handling: Handles complex prompts
- Client compatibility: You can use it in different clients, such as VS Code, Cursor, etc.
- Code suggestions: It can suggest code and perform automatic rebuilds to check for errors
- Response focus: Focused on code generation
The above features enable a variety of use cases, including:
- Generation of complex interfaces: You can rely on the MCP server to generate dashboards, specific pages, etc., requesting the use of specific controls to be used
- Advanced Grid configuration: Specify which features you need to include in a DataGrid
- Better testing using mock data: Get a more robust preview by entering test data before connecting to a data source
- Modernization of graphical interfaces: Refactor your UI, improving it for modern times and better user experiences
Let’s see how to use it.
Installing Telerik UI for .NET MAUI AI Coding Assistant (MCP Server)
To be able to use Telerik MCP server for .NET MAUI, you must meet some prerequisites:
- A version of .NET equal or greater than 9
- A client compatible with the MCP protocol, such as VS Code, Visual Studio 2026, Cursor, etc.
- A Telerik account
- An active Telerik license (including a trial account)
- A .NET MAUI app that includes the Telerik UI for .NET MAUI controls
Installing a License Key
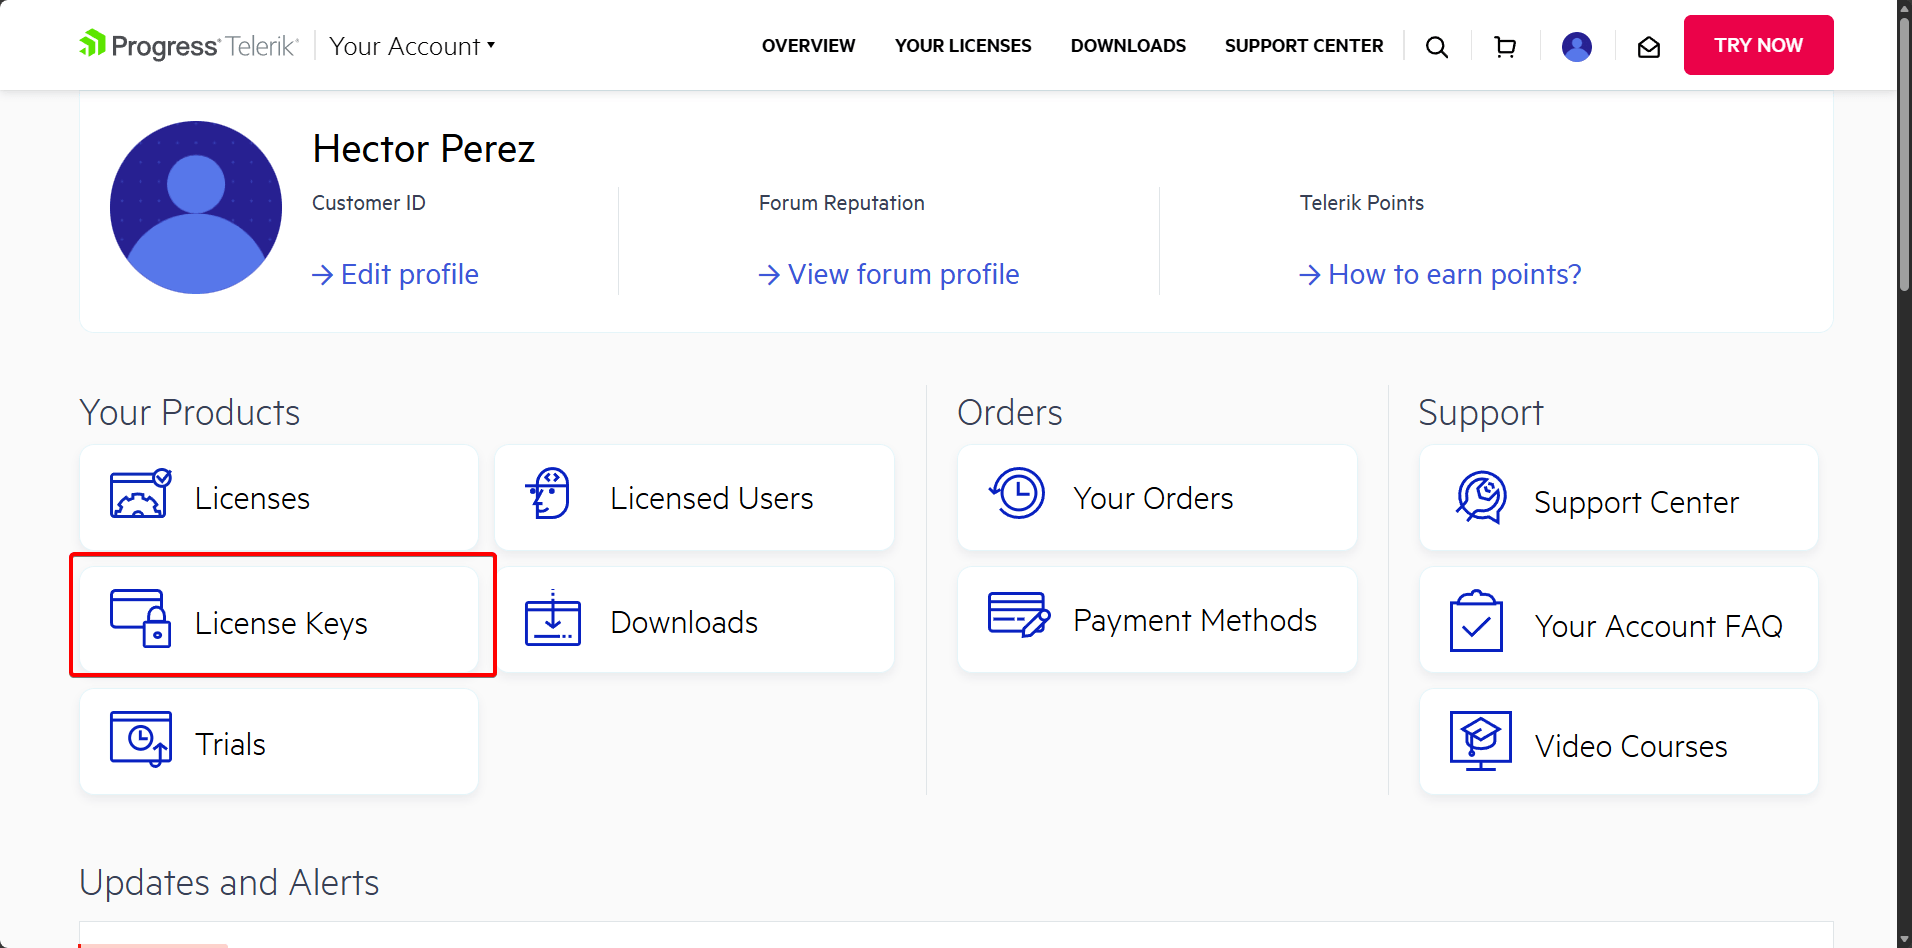
Before running any command, I recommend that you obtain a License Key so your account can be verified and you can use the MCP server. There are several ways to do this. For example, you can go to your Progress account, where you select the License Keys option:
On the License Keys page, click the Download License Key button:
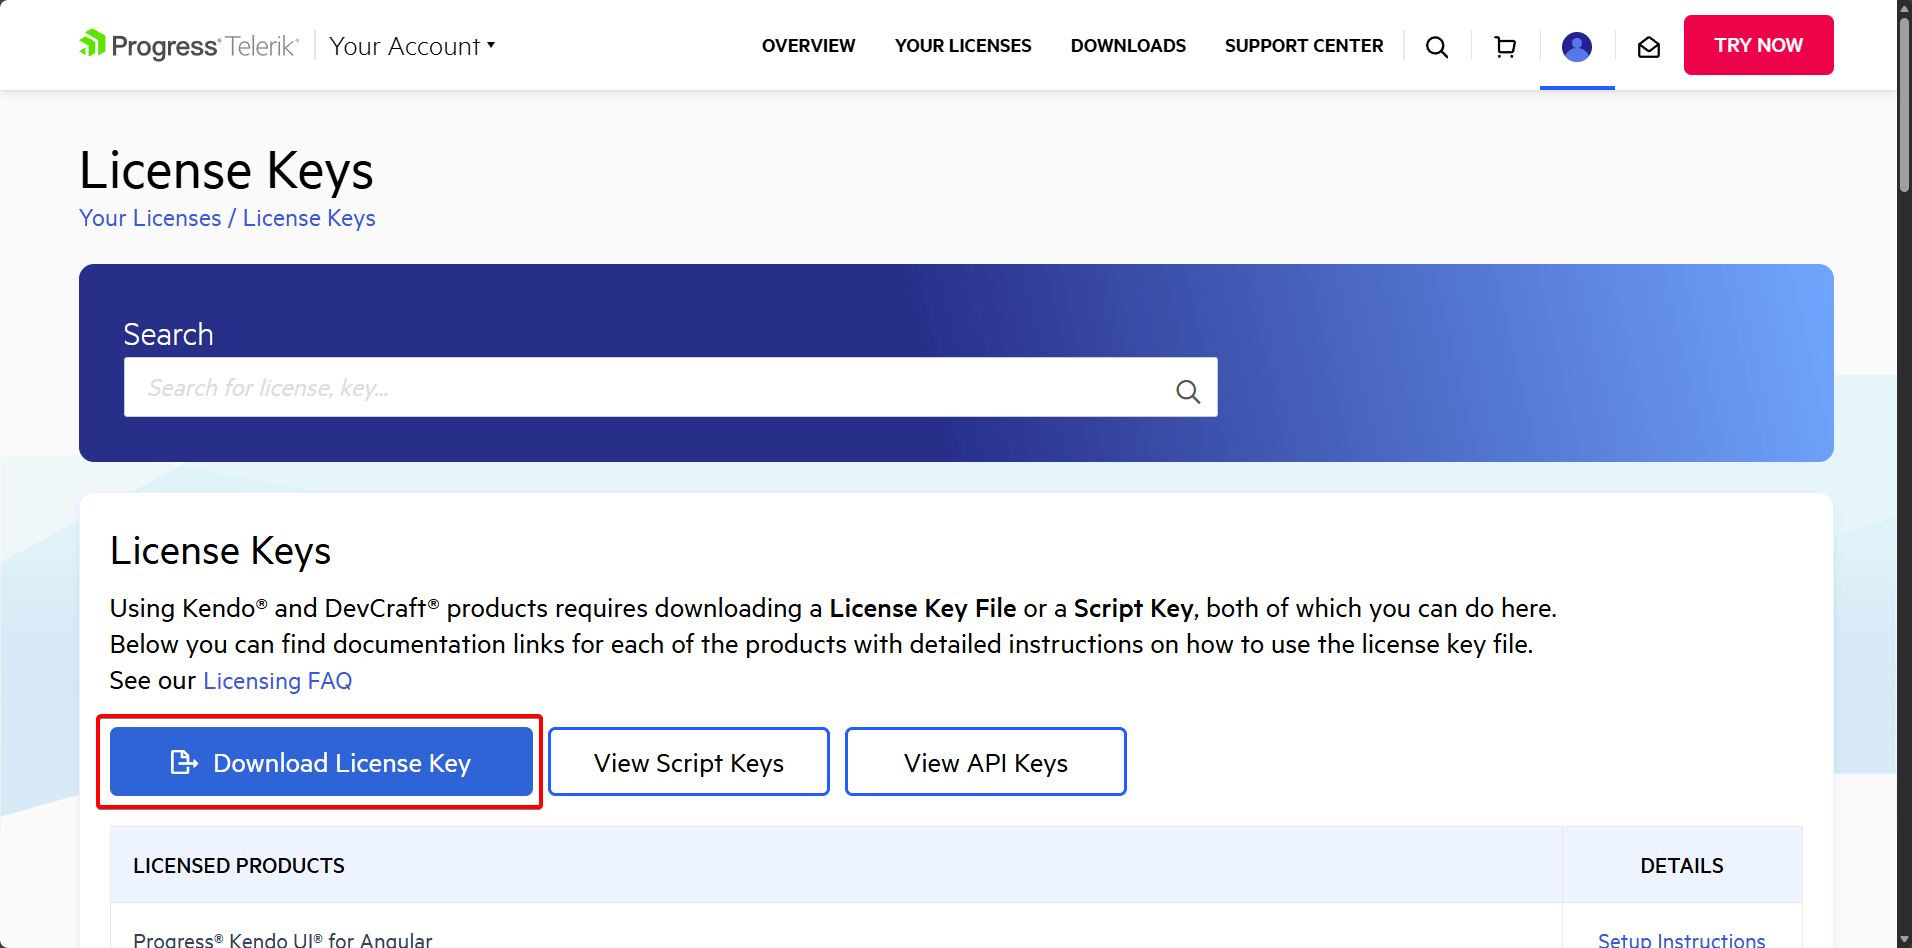
The downloaded file telerik-license.txt should be placed in %AppData%\Telerik\telerik-license.txt if you’re using Windows, as in my case, or in ~/.telerik/telerik-license.txt if you’re on Linux. Now, it’s time to install the MCP server.
Installing the MCP Server
With a License Key on your machine, installing the server is quite simple. In my case I will run the command for .NET 10:
dnx Telerik.MAUI.MCP
Once the Telerik MCP for MAUI is installed, the next step is to configure your preferred editor. In the case of VS Code, you should first open the folder containing the .NET MAUI project you’ll be working on.
Then, create a folder at the root named .vscode, inside which you should create a file mcp.json. This file must be replaced or adapted (if you already have previous MCP servers), adding the following entry valid for .NET 10:
{
  "servers": {
    "telerik-maui-assistant": {
      "type": "stdio",
      "command": "dnx",
      "args": ["Telerik.MAUI.MCP", "--yes"],
    }
  }
}
Alternatively, to use it in Visual Studio, you must create the file .mcp.json at the solution level and add the following content inside:
{
  "servers": {
    "telerik-maui-assistant": {
      "type": "stdio",
      "command": "dnx",
      "args": ["Telerik.MAUI.MCP", "--yes"],
    }
  }
}
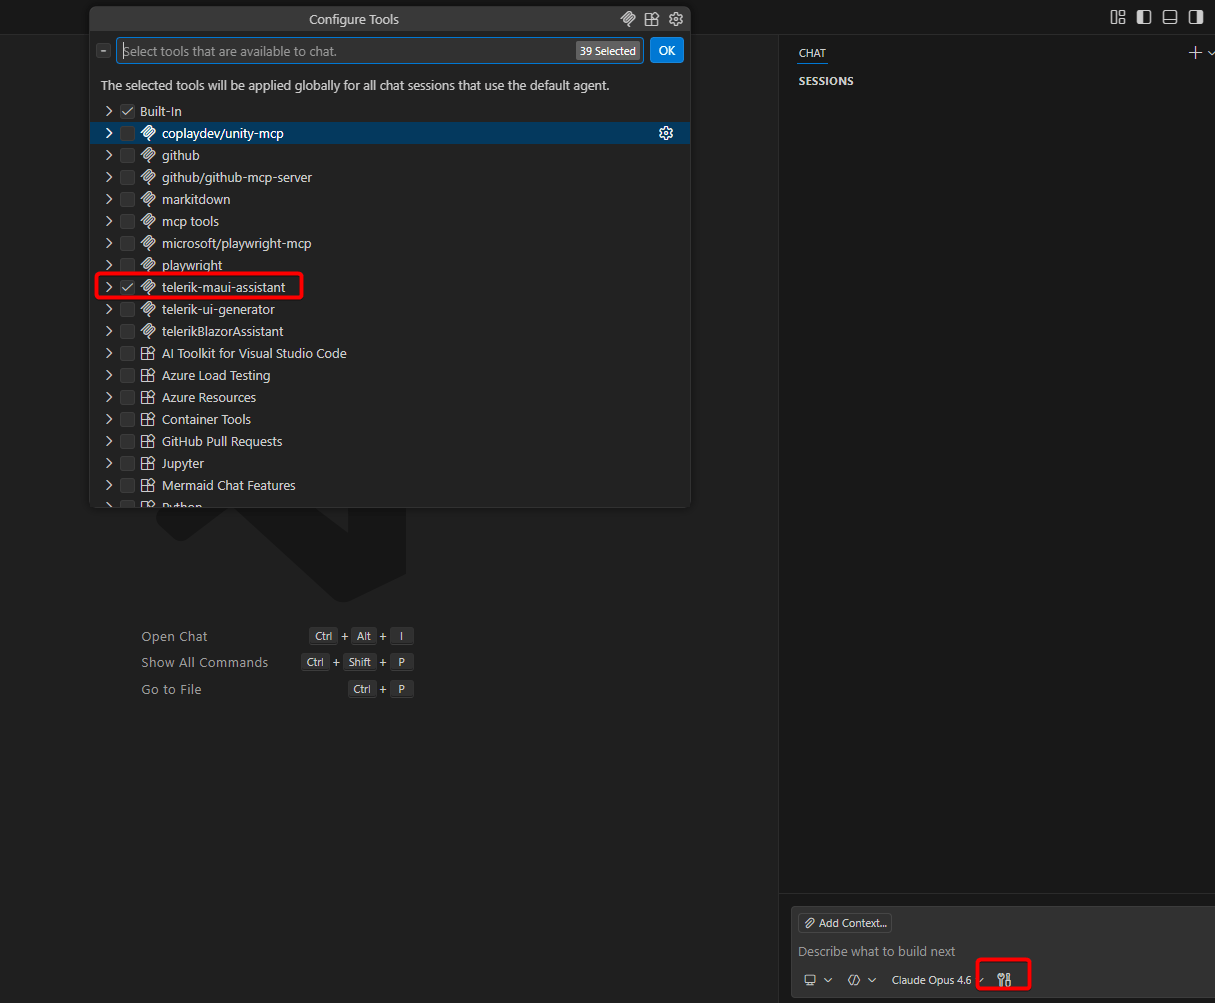
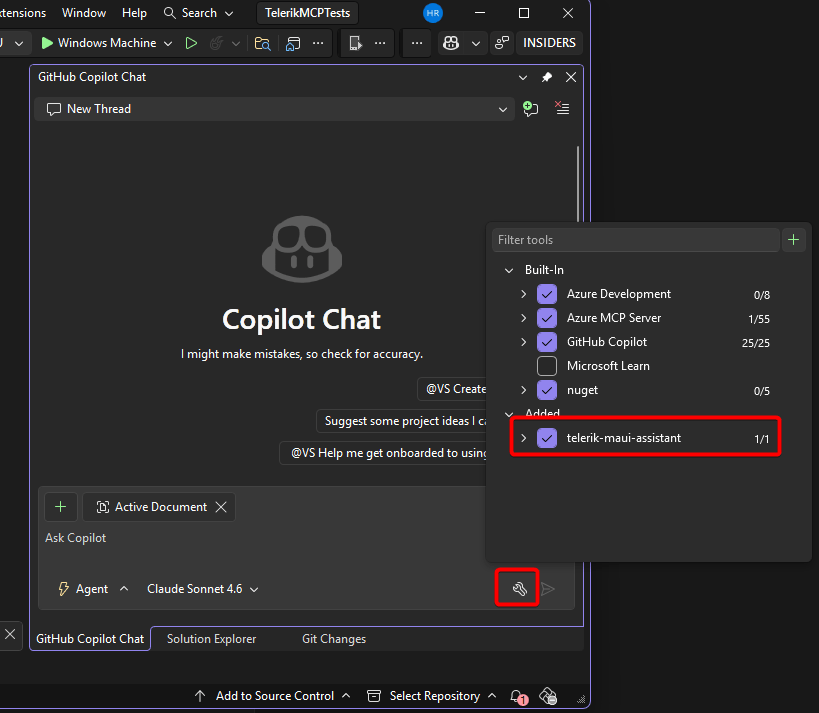
Once done, you will be able to find the new MCP server as part of the tools in both VS Code and Visual Studio 2026:
VS Code
Visual Studio 2026
With the MCP server configured, we’re ready to continue.
Testing the Telerik MCP Server to Create .NET MAUI Apps
As I mentioned before, the Telerik MCP server can help us perform different tasks.
For example, suppose you have a page you made using standard .NET MAUI controls, using code similar to the following:
<Grid RowDefinitions="Auto,*" Padding="16">

    <!-- Header -->
    <Label
        Grid.Row="0"
        Text="Product List"
        FontSize="22"
        FontAttributes="Bold"
        Margin="0,0,0,12" />

    <!-- Loading indicator -->
    <ActivityIndicator
        Grid.Row="1"
        IsRunning="{Binding IsBusy}"
        IsVisible="{Binding IsBusy}"
        HorizontalOptions="Center"
        VerticalOptions="Center" />

    <!-- CollectionView -->
    <CollectionView
        Grid.Row="1"
        ItemsSource="{Binding Products}"
        SelectedItem="{Binding SelectedProduct}"
        SelectionMode="Single">

        <CollectionView.ItemTemplate>
            <DataTemplate x:DataType="models:ProductModel">
                <Border
                    Margin="0,4"
                    Padding="12"
                    BackgroundColor="{AppThemeBinding Light=White, Dark=#1E1E1E}"
                    StrokeShape="RoundRectangle 8"
                    Stroke="#E0E0E0">

                    <Grid ColumnDefinitions="*,Auto" RowDefinitions="Auto,Auto">

                        <!-- Product name -->
                        <Label
                            Grid.Row="0" Grid.Column="0"
                            Text="{Binding Name}"
                            FontSize="16"
                            FontAttributes="Bold" />

                        <!-- Price -->
                        <Label
                            Grid.Row="0" Grid.Column="1"
                            Text="{Binding Price, StringFormat='${0:F2}'}"
                            FontSize="16"
                            FontAttributes="Bold"
                            TextColor="#512BD4"
                            HorizontalOptions="End" />

                        <!-- Category -->
                        <Label
                            Grid.Row="1" Grid.Column="0"
                            Text="{Binding Category}"
                            FontSize="13"
                            TextColor="Gray" />

                        <!-- In Stock badge -->
                        <Label
                            Grid.Row="1" Grid.Column="1"
                            Text="{Binding InStock, Converter={StaticResource BoolToStockConverter}}"
                            FontSize="12"
                            TextColor="{Binding InStock, Converter={StaticResource BoolToStockColorConverter}}"
                            HorizontalOptions="End" />
                    </Grid>
                </Border>
            </DataTemplate>
        </CollectionView.ItemTemplate>

    </CollectionView>
</Grid>
In the previous code there isn’t much customization, because an unmodified CollectionView is being used:
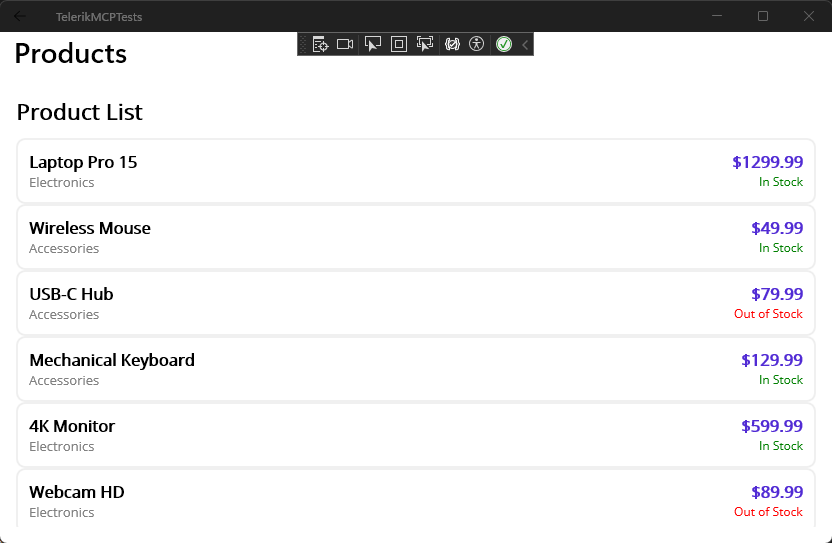
Although it’s true that we could customize it manually through a DataTemplate, most of the time what is required is a quick but robust implementation. Let’s use the MCP server to modify the look and feel by giving the following instruction:
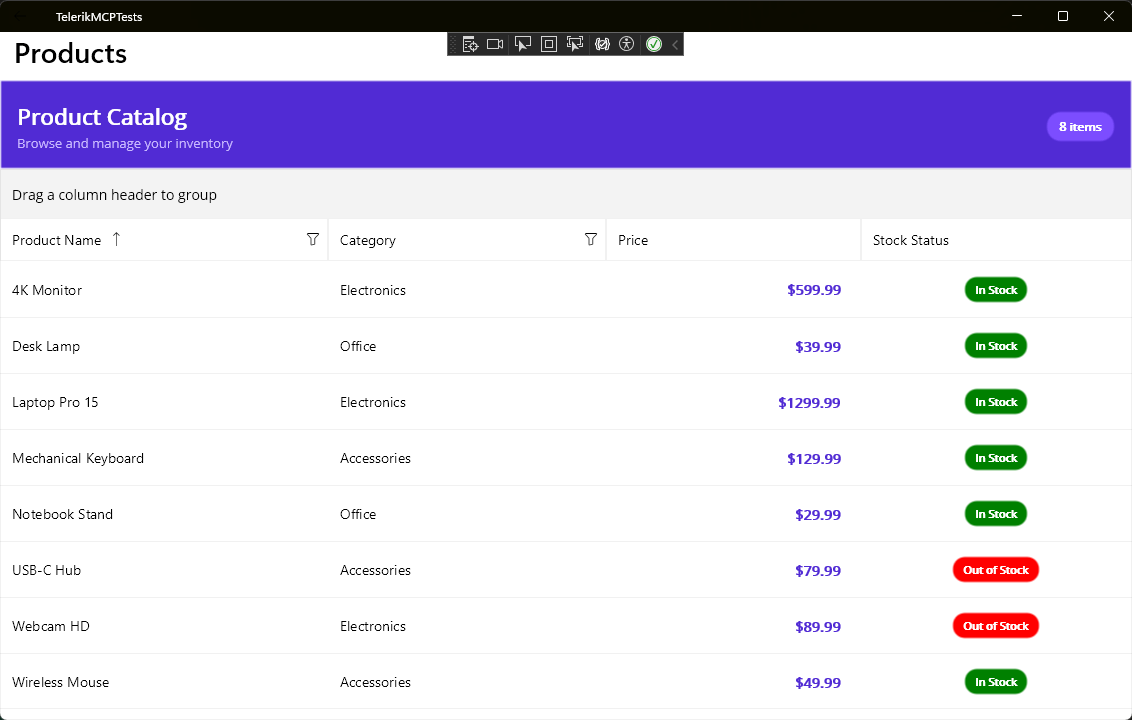
#telerik-maui-assistant I need you to improve the ProductsPageTelerik page. Replace the CollectionView with a DataGrid. I need the page and its controls to look modern and interactive.
When running the instruction and having the Telerik MCP server selected, we will receive a request to run tools, whose information is obtained automatically based on the query made:

With the evolution of AI models, we can achieve that in a single call our instruction is executed, with the GitHub Copilot agent responsible for modifying the code, compiling and testing that everything works correctly. In just a few minutes, the replacement is very precise:
Another thing we can do is use the Telerik Prompt Library, which contains a list of prompts for different use cases.
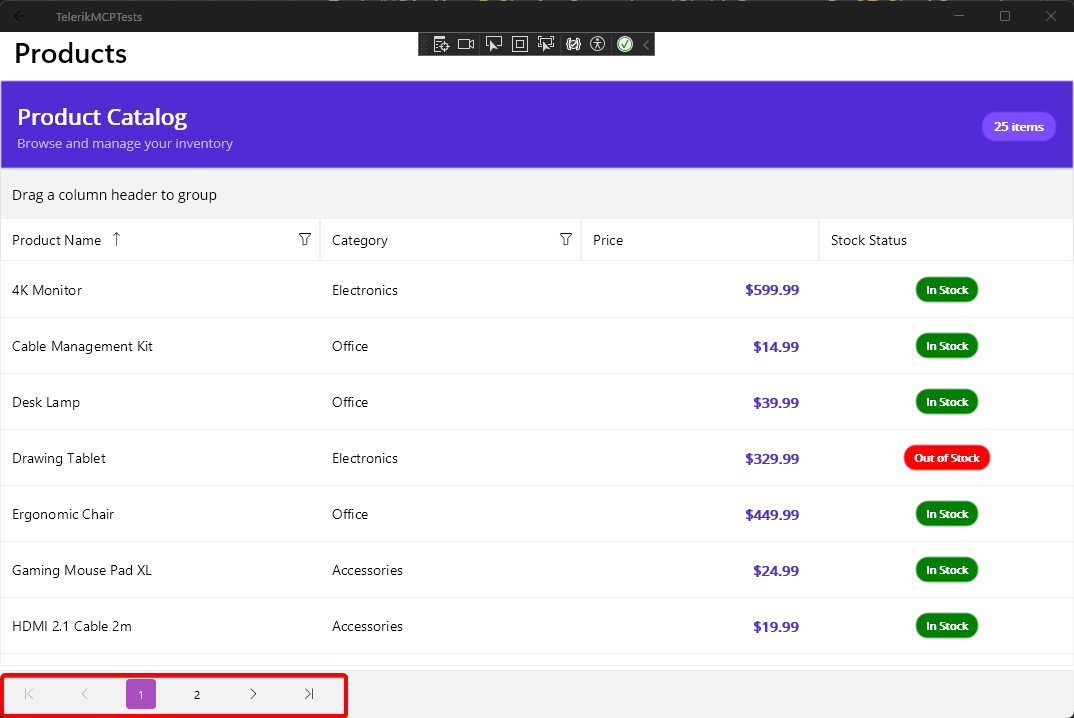
For example, suppose you’d like to add paging to the component. To accomplish this, you can take the prompt DataGrid with Paging and adapt it to your use case, as follows:
#telerik-maui-assistant Modify the DataGrid to include pagination of 20 records per page.
Again, after a few calls to the MCP tool, the change is implemented in just a few minutes:
With the previous exercises, you have been able to verify the power of using the Telerik MCP server for .NET MAUI to create robust graphical interfaces in much less time.
Conclusion
In this article you learned about the Telerik UI for .NET MAUI AI Coding Assistant, a powerful MCP server specialized in using Telerik controls to guide you and implement complex graphical interfaces using artificial intelligence.
Undoubtedly, having this assistant provides a competitive advantage by helping you reduce the time required to create graphical interfaces, while also allowing you to explore design alternatives.
Remember: Telerik UI for .NET MAUI comes with a free 30-day trial.

Héctor Pérez
Héctor Pérez is a Microsoft MVP with more than 10 years of experience in software development. He is an independent consultant, working with business and government clients to achieve their goals. Additionally, he is an author of books and an instructor at El Camino Dev and Devs School.
Related Posts
Comments
All articles
Topics
Web MobileMobile
Desktop
Design
Productivity
People
