
Building Blazor Apps with Agents and Telerik UI AI Coding Assistants

Summarize with AI:
In this article, I will show you how you can accelerate the development of your Blazor-based projects using Telerik UI AI Coding Assistants along with the power of the Visual Studio Code agent mode. Let’s get started!
A Brief History of Vibe Coding
In February 2025, Andrej Karpathy published a tweet where the term vibe coding was mentioned for the first time, describing it as an experience where you could forget about writing code and just go with the vibe of giving instructions and expecting results, accepting all changes without worrying about anything. This was possible because AI models and tools had significantly improved. However, he mentioned that the idea was focused on disposable weekend projects.
Since then, a revolution has been underway where major AI competitors vie each month to enhance their models and tools to enable a better vibe coding experience, aiming for it to be used not only for simple projects but also for large-scale ones.
Agent Mode in VS Code
VS Code is one of the preferred editors for millions of software developers, due to the incredible experience it provides for developing on any platform and programming language, along with the vast number of extensions.
The team’s bet behind VS Code for vibe coding is agent mode, which has been improving with each iteration of the tool. Some features of agent mode include:
- Allows the use of the latest and best AI models
- You can easily revert changes made to a previous point
- You can reference context, both from the project and external resources like images and URLs
- You can define instruction files, reusable prompts and custom modes to speed up code creation
- Among many other features
If additional context needs to be added, it can be done using the # symbol followed by the reference you want to include as an instruction to an AI model. Similarly, mentions can be added using the @ symbol. A mention refers to a specialized assistant that allows you to work in a specific domain within the chat. You can think of them as domain experts to whom you can ask for help with a task in your place.
Some of the most used prebuilt participants in VS Code are:
- @vscode
- @terminal
- @workspace
There are also companies like Progress that have developed their own participants to assist you in your development tasks, as we will see next.
Installing the Telerik Blazor GitHub Copilot Extension
The Telerik Blazor GitHub Copilot extension is part of Progress Telerik UI for Blazor AI Coding Assistant, which provides proprietary context to AI models to generate high-quality code using Telerik UI components for Blazor. In the case of the extension, you can see it as an AI code generator for Blazor that can help you quickly create apps, as well as answer any questions you may have about the components. To use it, there are some prerequisites:
- VS Code/Visual Studio 2022 with an active GitHub Copilot account
- A Telerik account
- A DevCraft/Telerik UI for Blazor license or a Telerik UI for Blazor trial
- A Blazor application you want to work on that already has the Blazor components installed
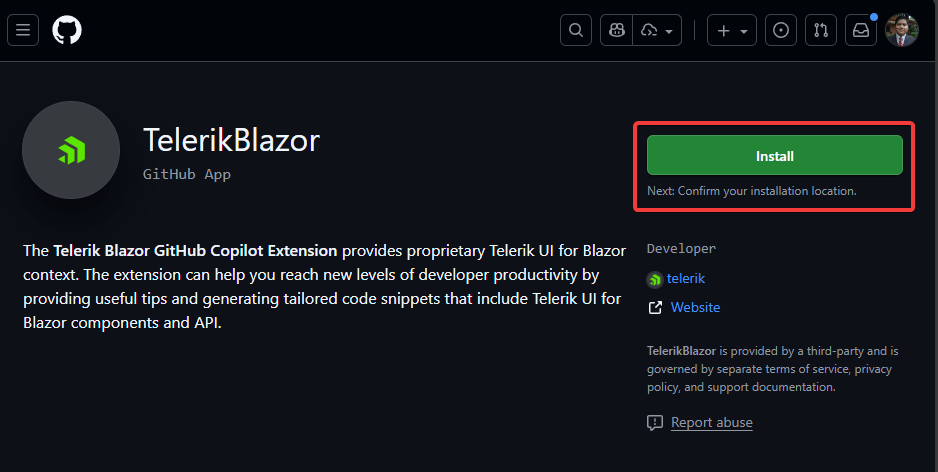
To install the extension, you must first log into GitHub. Next, go to the TelerikBlazor GitHub App page and install the application:
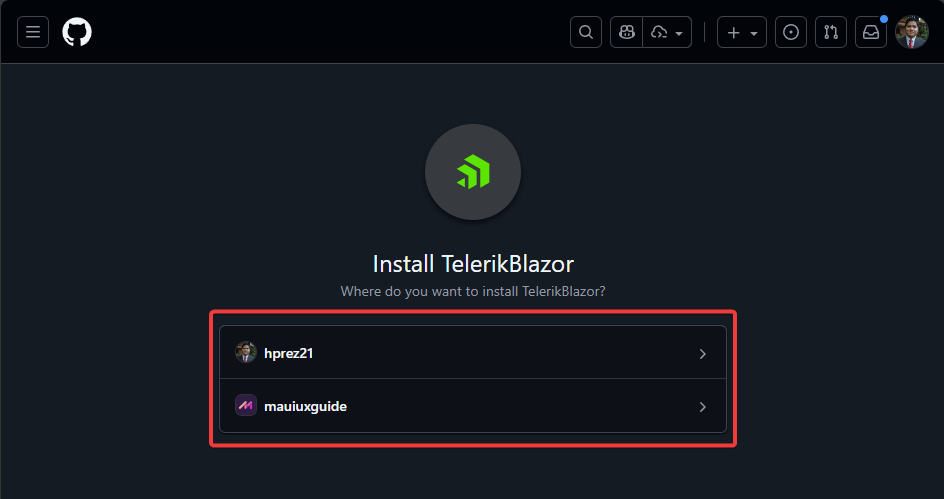
Once you have clicked the installation button, you will be redirected to a new page where you will be asked where you want to install TelerikBlazor. Here you should select the account you plan to use with GitHub Copilot:
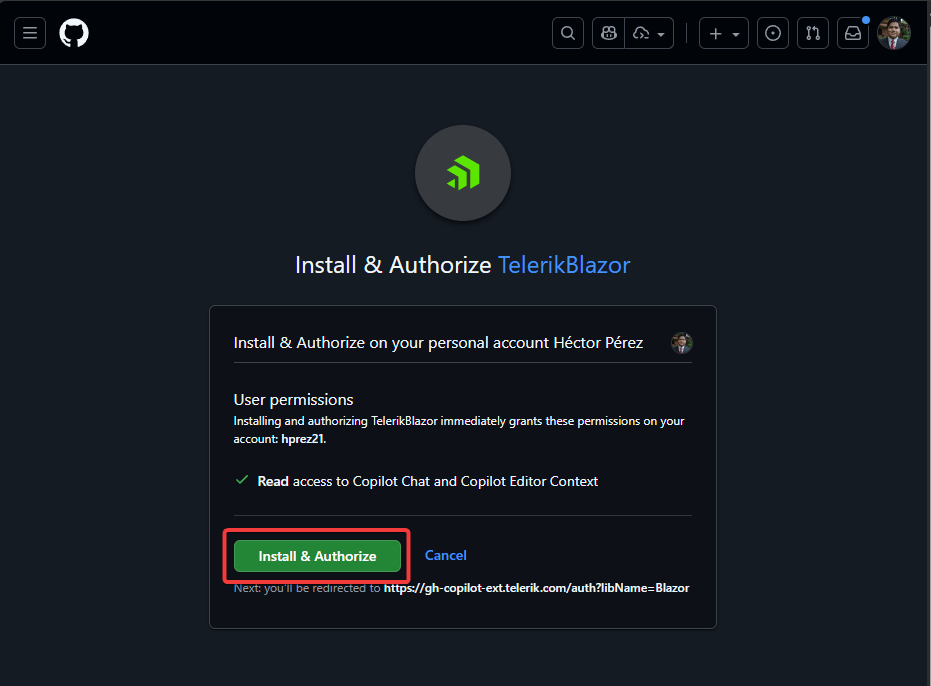
After selecting the account, you will need to complete the installation and authorize its use in your account:
After installing TelerikBlazor on your GitHub account, you will be asked for some form of authentication on GitHub to confirm the installation. Then, you may be redirected to the Telerik authentication page to enter your login details, which will complete the authorization of the GitHub Copilot extension to integrate it with your Telerik account. Once this is done, you will see a message like the following in your browser:
"Authentication successful. You can now use the installed extension."
Finally, restart your development tool and create a new chat session.
Using the Telerik Blazor GitHub Copilot Extension
Using the extension after installing it is really straightforward; you just need to use the Ask mode and mention @telerikblazor, making some inquiry. To make this a little more practical, let’s assume we want to implement an TelerikAvatar using the following prompt:
Generate a TelerikAvatar with an image bound to @UserAvatarUrl and an Alt attribute set to @UserName
Running the prompt without using the mention generates the following incorrect code:
<TelerikAvatar Type="AvatarType.Image"
    ImageUrl="@UserAvatarUrl"
    Alt="@UserName" />
In the previous code, the error is that the properties ImageUrl and Alt do not exist in the component TelerikAvatar, which would cause the application to throw an exception when trying to render the component.
Now, I will execute the same instruction but using @telerikblazor:
@telerikblazor Genera un TelerikAvatar con una imagen asociada a @UserAvatarUrl y un Alt igual a @UserName
With this change, the generated code is as follows:
<TelerikAvatar Type="AvatarType.Image" Bordered="true">
    <img src="@UserAvatarUrl" alt="@UserName" />
</TelerikAvatar>
The previous result will not cause any issues as it follows the guidelines of the documentation:
This demonstrates the power of using the mention @telerikblazor.
Using the Telerik Blazor MCP Server
If you think that the Telerik Blazor GitHub Copilot extension offers an improvement in code generation using Telerik components, the MCP server takes productivity to the next level. Unlike the extension, with the MCP server you can generate code in agent mode through natural language, allowing you to create more complex UIs. For this approach, you need the following:
- Node.js 18 or higher
- An MCP client that supports MCP tools, such as VS Code or Visual Studio.
- A Telerik account
- A DevCraft/Telerik UI for Blazor license or a Telerik UI for Blazor trial
- A Blazor application that you want to work on and that already has the Blazor components installed
I will demonstrate using VS Code, where the easiest way to install the MCP server is by using the Telerik UI for Blazor extension for VS Code. To achieve this, do the following:
- Open Visual Studio Marketplace.
- Search for the extension Telerik UI for Blazor Productivity Tools.
- Select the extension and install it.
- Once the extension status shows as installed, press the key combination Ctrl + Shift + P (Cmd + Shift + P for Mac).
- Enter the term Configure MCP Server.
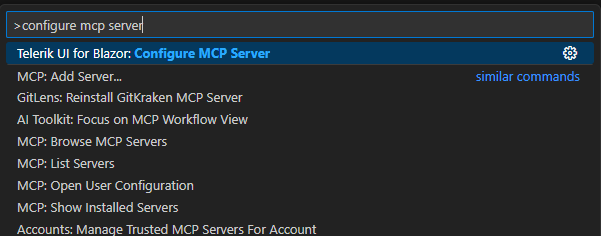
- When clicking on the previous option, you will be prompted to select the installation mode. Workspace will enable the server for the current workspace, while Global will apply the operation across all VS Code workspaces.
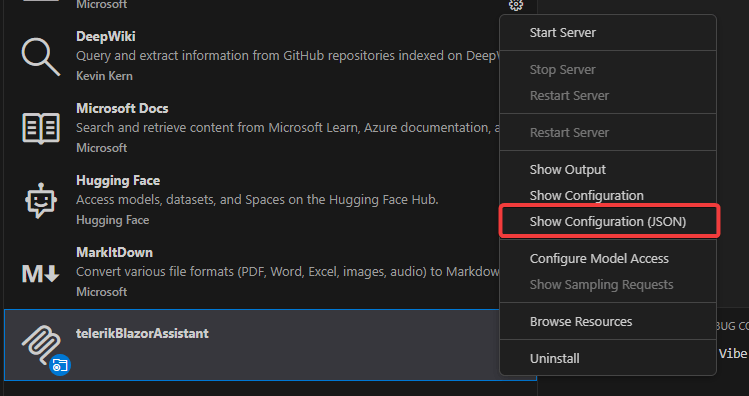
- Once one of the previous options is selected, go to the Extensions section, where you will see the new MCP server named telerikBlazorAssistant installed.
- Click on the MCP server settings button and in the options, select Show Configuration (JSON).
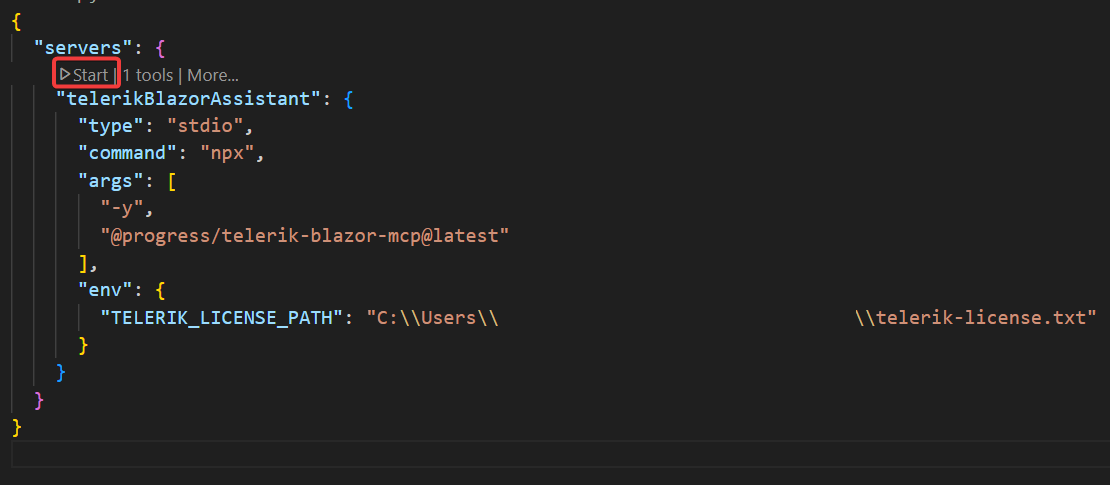
- Review the content of mcp.json and locate the property
TELERIK_LICENSE_PATH, where you need to add the path to your license file. If you instead want to use the license directly, you must replaceTELERIK_LICENSE_PATHwithTELERIK_LICENSE. - Start the MCP server by clicking the Start button that appears above the MCP server name:
Once we have the MCP server ready, the next step is to use it. To do this, click on the tools icon and make sure the MCP server named telerikBlazorAssistant is selected:

With everything set up, we can start creating complex user interfaces using Telerik Blazor components. The first step is to switch to Agent mode in the UI. After that, you can start writing messages like the following:
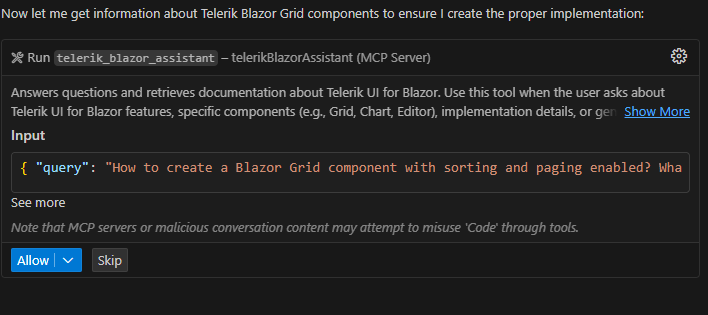
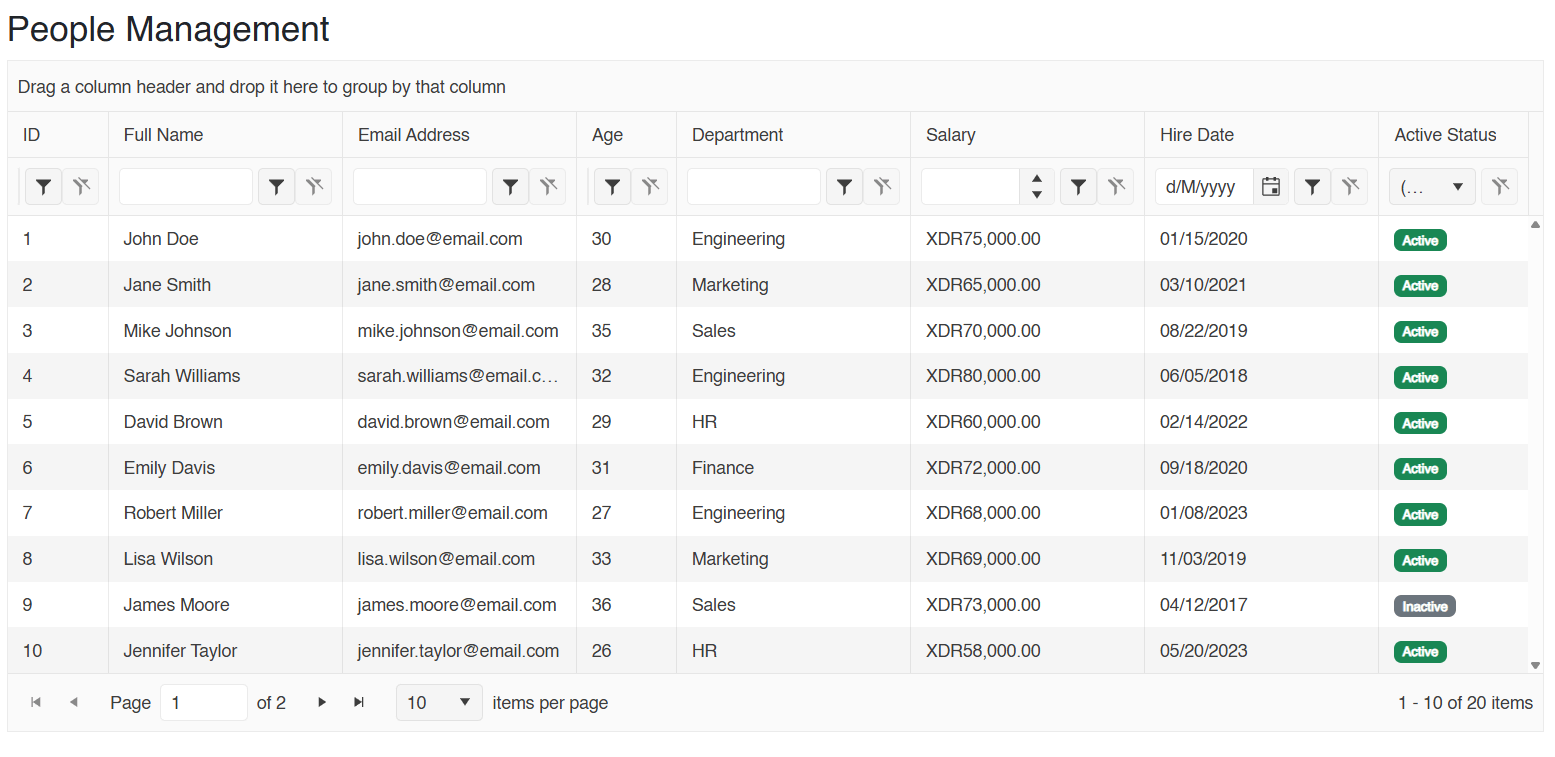
telerik_blazor_assistant Generate a Blazor Grid with sorting and paging enabled. Bind the Grid to a Person model and provide dummy data
One thing that is very important is that you “invoke” the MCP server in some way. One way to do this is by using the tool name telerik_blazor_assistant as shown in the previous text. You will know that the MCP server was used because an indication about the parameters to be used to invoke the MCP server will appear as part of the conversation, as well as an approval for the call:
Once the code generation is complete, you will see code that compiles and runs without any issues, displaying a UI using Telerik UI for Blazor controls, demonstrating the power of the MCP server:
Conclusion
Throughout this article, you have seen how the Telerik AI Coding Assistant can help you in your Blazor-based projects by enabling you to create functional and error-free applications using Telerik components.
Remember, Telerik UI for Blazor comes with a free 30-day trial. So if you aren’t already using it, give it a try:

Héctor Pérez
Héctor Pérez is a Microsoft MVP with more than 10 years of experience in software development. He is an independent consultant, working with business and government clients to achieve their goals. Additionally, he is an author of books and an instructor at El Camino Dev and Devs School.
Related Posts
Comments
All articles
Topics
Web MobileMobile
Desktop
Design
Productivity
People
