Browser Image Conversion Using FFmpeg.wasm

This guide shows how to optimize images for the web by performing image transcoding directly in the browser using the FFmpeg.wasm library.
Image optimization is important, and selecting the appropriate image format significantly determines image file sizes. Each image format provides its unique compression algorithm, encoding and decoding speeds, and specific usage requirements. Therefore, selecting the right image format is critical for performant web applications.
In this article, we’ll focus on some of the most widely used raster image formats on the web today, including JPEG, PNG, GIF, WebP and AVIF.
Here, we will see how to convert images from one format to another using FFmpeg.wasm—a WebAssembly port of FFmpeg. This tool allows us to handle media manipulation directly within our browsers.
Project Setup
Create a Next.js app using the following command:
npx create-next-app ffmpeg-convert-image
Next, we need to install our primary dependency, ffmpeg.wasm. This package has two sub-packages: @ffmpeg/core, which is the FFmpeg module’s primary web assembly port, and @ffmpeg/ffmpeg, which is the library that will be used directly in our app to interact with the former. For now, we will only install @ffmpeg/ffmpeg; subsequently, we will include @ffmpeg/core using a CDN link.
npm i @ffmpeg/ffmpeg
To manipulate media assets, the @ffmpeg/core module uses WebAssembly threads, and to support multithreading, these threads require some shared storage, so they use the browser’s SharedArrayBuffer API.
By default, this API is not available to webpages because of security issues. To ensure everything works fine, we need to explicitly tell the browser that our webpage requires access to this API. We can achieve this by setting the popular COOP (cross-origin-opener-policy) and COEP (cross-origin-embedder-policy) headers on our main document.
To set these response headers, we will need a server. The Next.js framework provides us with several ways to do server-side-related stuff within our application. Update your pages/index.js file with the following:
function App() {
  return null;
}
export default App;

export async function getServerSideProps(context) {
  // set HTTP header
  context.res.setHeader("Cross-Origin-Opener-Policy", "same-origin");
  context.res.setHeader("Cross-Origin-Embedder-Policy", "require-corp");

  return {
    props: {},
  };
}
In the code above, we defined and exported a getServerSideProps function, which will run on the server side whenever we request this page. This function receives a context object which contains the request and response objects. We use the setHeader method on the response object to include the COOP and COEP headers.
For styles relevant to our app, create a file called App.css in your styles directory and add the following styles to it:
* {
  box-sizing: border-box;
  margin: 0;
  padding: 0;
  font-family: -apple-system, BlinkMacSystemFont, "Segoe UI", Roboto, Oxygen,
    Ubuntu, Cantarell, "Open Sans", "Helvetica Neue", sans-serif;
}
input[type="file"] {
  display: none;
}
select {
  padding: 15px;
  font-size: 1.4rem;
  background-color: transparent;
  color: #f1f1f1;
}
.form_g {
  display: grid;
  background-color: #0c050b;
}
.form_g label {
  padding: 10px;
  background-color: #0a57fe;
  color: #f2f2f2;
  font-size: 1.2rem;
}
.file_picker {
  border: 3px dashed #666;
  cursor: pointer;
  display: block;
  display: grid;
  place-items: center;
  font-weight: 700;
  height: 100%;
  padding: 12rem 0;
}
#file_picker_small {
  padding: 3rem 2rem;
}
.deck {
  max-width: 1200px;
  margin: auto;
  display: grid;
  grid-template-columns: repeat(2, minmax(300px, 1fr));
  align-items: start;
  margin-top: 1.4rem;
  gap: 4rem;
}
.deck > * {
  border-radius: 5px;
  align-items: start;
}
.deck > button {
  align-self: center;
}
.grid_txt_2 {
  display: grid;
  gap: 1rem;
}
.flexi {
  display: flex;
  gap: 10px;
  text-transform: uppercase;
  font-size: 25px;
  align-items: center;
  justify-content: center;
}

button {
  border: none;
  cursor: pointer;
}
button:disabled {
  background-color: #f4f4f4;
  color: rgb(155, 150, 150);
}
.btn {
  padding: 1rem 2rem;
  border-radius: 100px;
  font-size: 1.2rem;
}
.btn_g {
  background-color: #24d34e;
  color: #f2f2f2;
}
.col-r {
  color: red;
  font-weight: bolder;
  font-size: 40px;
}
.col-g {
  color: #24d34e;
  font-weight: bolder;
  font-size: 40px;
}
.btn_b {
  background-color: #0a57fe;
  color: #f3f3f3;
}
.bord_g_2 {
  border: 2px solid rgb(230, 220, 220);
}
.p_2 {
  padding: 2rem;
}
.u-center {
  text-align: center;
}
Breaking the App Down
Our application can be broken down into the following components:

We’ll briefly explain each component, create the files that would house their specific logic, and update their contents as needed. At the root of your project, create a folder named components.
The File Picker Component

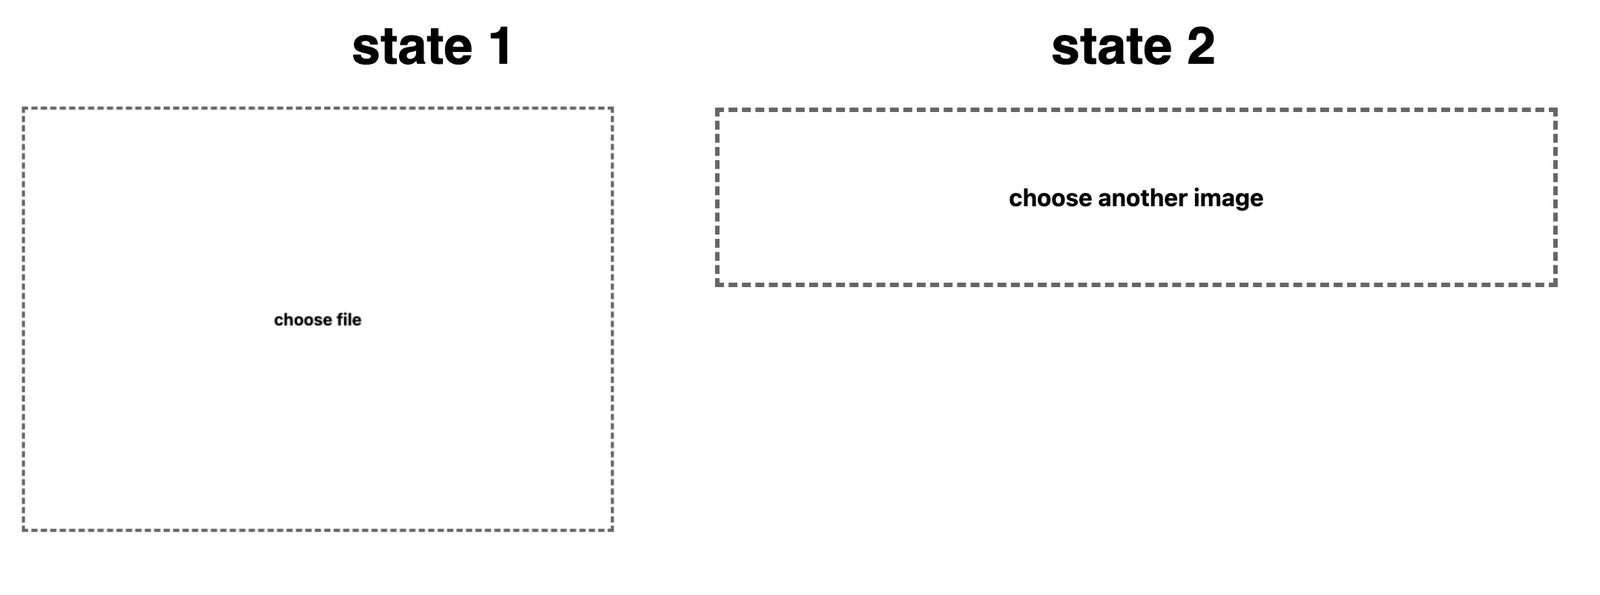
This component will allow the user to select and display image files from their computer. Create a file named FilePicker.js in your components folder and add the following to it:
function FilePicker({ handleChange, availableImage }) {
  return (
    <label
      htmlFor="x"
      id={`${availableImage ? "file_picker_small" : ""}`}
      className={`file_picker `}
    >
      <span>
        {availableImage ? "Select another image" : "Click to select an image"}
      </span>
      <input onChange={handleChange} type="file" id="x" accept="image/*" />
    </label>
  );
}
export default FilePicker;
The FilePicker component accepts two props: a function called handleChange, which is bound to input fields onChange event, and a boolean called availableImage, used to style the file picker.
The InputImagePreviewer Component

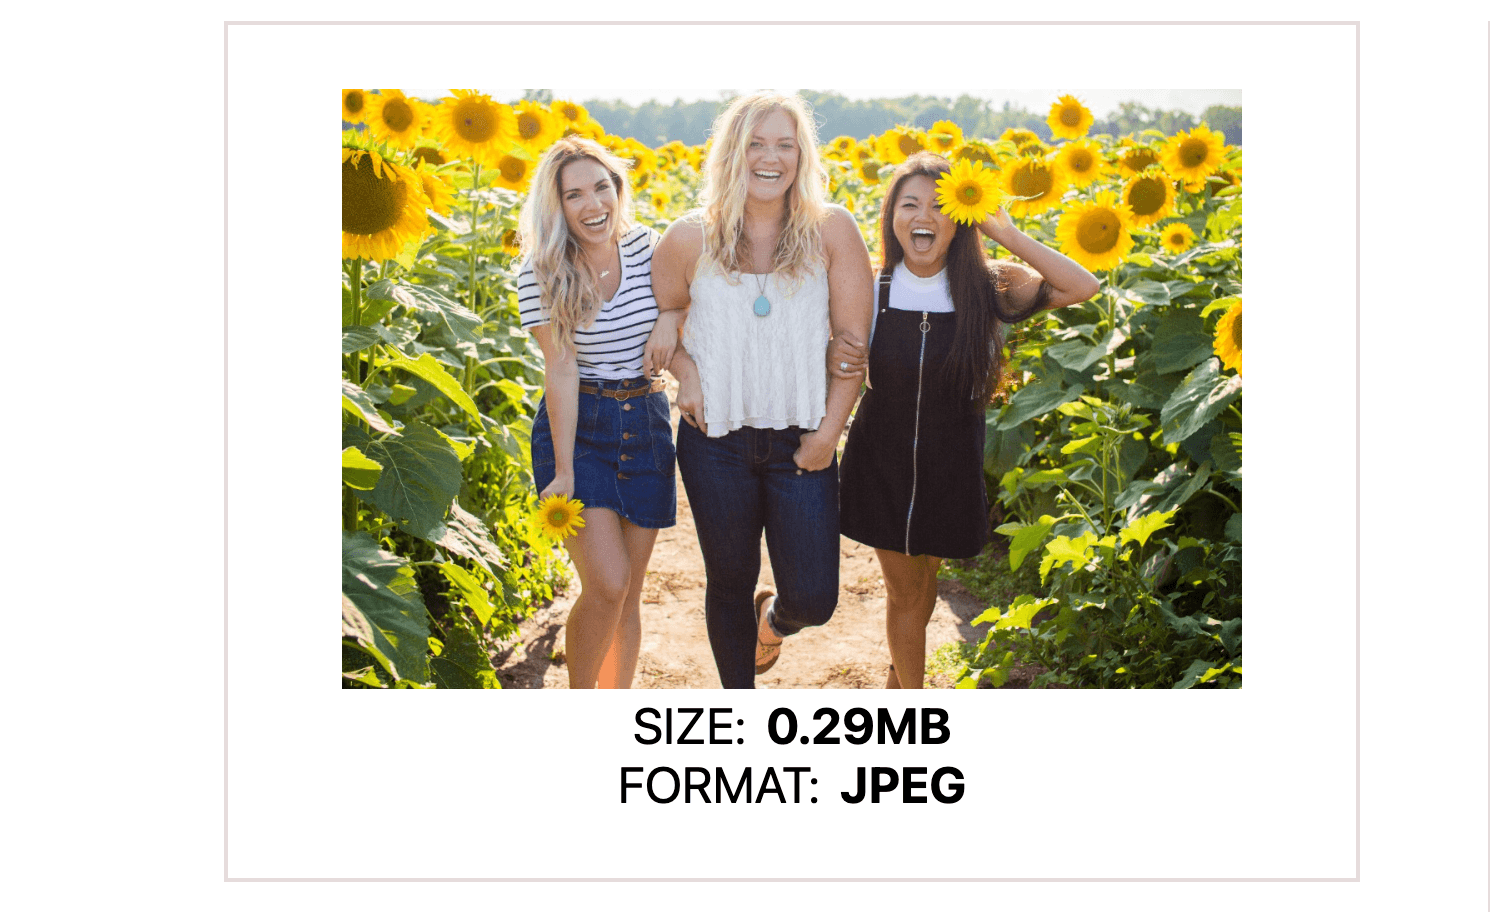
Create a file named InputImagePreviewer.js in your components folder and add the following to it:
export default function InputImagePreviewer({ previewURL, inputImage }) {
  return (
    <div className="bord_g_2 p_2 u-center">
      <img src={previewURL} width="450" alt="preview image" />
      <p className="flexi u-center">
        SIZE:
        <b>{(inputImage.size / 1024 / 1024).toFixed(2) + "MB"}</b>
      </p>
      <p className="flexi u-center">
        FORMAT:
        <b>{/\.(\w+)$/gi.exec(inputImage.name)[1]} </b>
      </p>
    </div>
  );
}
This component accepts two props: inputImage, the image blob selected from the file picker, and previewURL, a data URL representing this blob. It displays the image with some information, like the image size in MB and its format. We display the format by extracting the file extension from the name property on the file blob.
The OutputImageFormatSelector Component
This component will be a simple select dropdown allowing users to select the desired format they want their input image to be encoded.

Create a file named OutputImageFormatSelector.js in your components folder and add the following to it:
export default function OutputImageFormatSelector({
  disabled,
  format,
  handleFormatChange,
}) {
  return (
    <div className="form_g">
      <label> Convert to:</label>
      <select disabled={disabled} value={format} onChange={handleFormatChange}>
        <option value=""> --select output format</option>
        <option value="jpeg">JPEG</option>
        <option value="png">PNG</option>
        <option value="gif">GIF</option>
        <option value="webp">WEBP</option>
      </select>
    </div>
  );
}
This component accepts three props: disabled is a boolean used to enable or disable selecting an image format. This is important to prevent the user from choosing a different format during the image conversion process. The format prop is the selected format, and handleFormatChange is a function bound to the select dropdown onChange event.
As seen above, the select field renders a list of image formats. You may have noticed that the AVIF format isn’t included. The reason for this is that even though the official FFmpeg library included support for the AVIF format on March 13, 2022, the latest version of @ffmpeg/core, which we are using, is not yet configured to support AVIF.
The OutputImage Component

Create a file named OutputImage.js in your components folder and add the following to it:
const OutPutImage = ({
  handleDownload,
  transCodedImageData,
  format,
  loading,
}) => {
  if (loading)
    return (
      <article>
        <p>
          Converting to <b> {format}</b> please wait....
        </p>
      </article>
    );
  const { newImageSize, originalImageSize, newImageSrc } = transCodedImageData;
  if (!loading && !originalImageSize)
    return (
      <article>
        <h2> Select an image file from your computer</h2>
      </article>
    );
  const newImageIsBigger = originalImageSize < newImageSize;
  const toPercentage = (val) => Math.floor(val * 100) + "%";

  return newImageSrc ? (
    <article>
      <section className="grid_txt_2">
        <div className="bord_g_2 p_2 u-center">
          <img src={newImageSrc} width="450" />
          <p className="flexi u-center">
            <span>
              {" "}
              SIZE: {(newImageSize / 1024 / 1024).toFixed(2) + "MB"}{" "}
            </span>
          </p>
          <p>
            <span className={newImageIsBigger ? "col-r" : "col-g"}>
              {toPercentage(newImageSize / originalImageSize)}
            </span>
          </p>
        </div>
        <button onClick={handleDownload} className="btn btn_g">
          {" "}
          Download
        </button>
      </section>
    </article>
  ) : null;
};
export default OutPutImage;
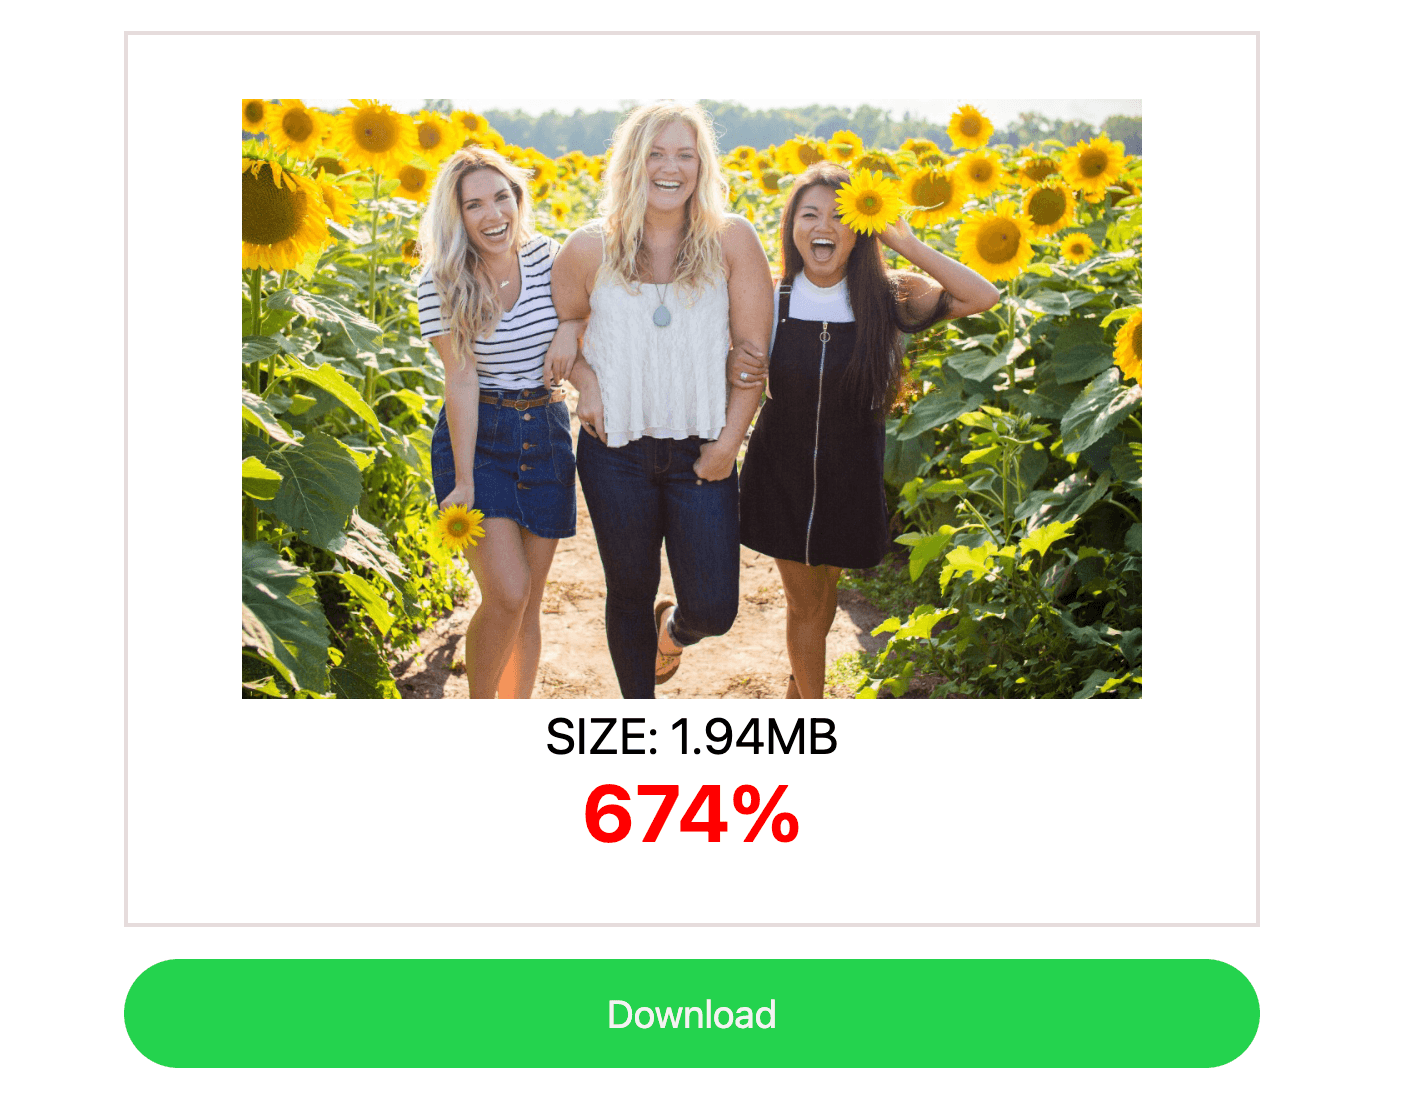
This component does several things. First, it uses the loading prop to react to loading states during the image transcode process. Next, from the transcodedImageData prop, it extracts the necessary properties (newImageSize, originalImageSize and newImageSrc) to render the transcoded image to the screen.
It also renders information about the image, such as its size in MB and a percentage value comparing the size of the transcoded image and the original file size. If the original file size is 10MB and the transcoded file size is 5MB, it renders 5MB and 50%.
The component also renders a button with its click event bound to the handleDownload prop to download the image to the user’s device.
Our application will need some helper functions. Let’s create a file named helpers.js at the root of our application and add the following to it:
const readFileAsBase64 = async (file) => {
  return new Promise((resolve, reject) => {
    const reader = new FileReader();
    reader.onload = () => {
      resolve(reader.result);
    };
    reader.onerror = reject;
    reader.readAsDataURL(file);
  });
};
const download = (url) => {
  const link = document.createElement("a");
  link.href = url;
  link.setAttribute("download", "");
  link.click();
};
export { readFileAsBase64, download };
This file creates and exports two functions: readFileAsBase64 expects a file blob as its input and uses the FileReader API to convert it to a data URL. If the operation is successful, it resolves with the data URL; else, it returns an error.
The download function expects a data URL as a parameter and then attempts to download the file pointed by the URL to the user’s device. It programmatically creates an anchor tag and adds two attributes to it.
The href attribute points to the data URI of the file, while the download attribute makes the file downloadable. Finally, the anchor tag is programmatically clicked to trigger a download to the user’s device.
Rendering the Components
Now that we have understood our app’s main components, let’s use them within our pages/index.js file to complete our application. Add the following to your pages/index.js file:
import { useState } from "react";
import * as helpers from "../helpers";
import FilePicker from "../components/FilePicker";
import OutputImage from "../components/OutPutImage";
import InputImagePreviewer from "../components/InputImagePreviewer";
import OutputImageFormatSelector from "../components/OutputImageFormatSelector";
import { createFFmpeg, fetchFile } from "@ffmpeg/ffmpeg";

const FF = createFFmpeg({
  // log: true,
  corePath: "https://unpkg.com/@ffmpeg/core@0.10.0/dist/ffmpeg-core.js",
});

(async function () {
  await FF.load();
})();

function App() {
  const [inputImage, setInputImage] = useState(null);
  const [transcodedImageData, setTranscodedImageData] = useState({});
  const [format, setFormat] = useState("");
  const [URL, setURL] = useState(null);
  const [loading, setLoading] = useState(false);

  const handleChange = async (e) => {
    let file = e.target.files[0];
    setInputImage(file);
    setURL(await helpers.readFileAsBase64(file));
  };

  const handleFormatChange = ({ target: { value } }) => {
    if (value === format) return;
    setFormat(value);
    transcodeImage(inputImage, value);
  };

  const transcodeImage = async (inputImage, format) => {
    setLoading(true);
    if (!FF.isLoaded()) await FF.load();
    FF.FS("writeFile", inputImage.name, await fetchFile(inputImage));
    try {
      await FF.run("-i", inputImage.name, `img.${format}`);
      const data = FF.FS("readFile", `img.${format}`);
      let blob = new Blob([data.buffer], { type: `image/${format}` });
      let dataURI = await helpers.readFileAsBase64(blob);
      setTranscodedImageData({
        newImageSize: blob.size,
        originalImageSize: inputImage.size,
        newImageSrc: dataURI,
      });
      FF.FS("unlink", `img.${format}`);
    } catch (error) {
      console.log({ message: error });
    } finally {
      setLoading(false);
    }
  };

  return (
    <main className="App">
      <section className="deck">
        <article className="grid_txt_2 ">
          {URL && (
            <>
              <InputImagePreviewer inputImage={inputImage} previewURL={URL} />
              <OutputImageFormatSelector
                disabled={loading}
                format={format}
                handleFormatChange={handleFormatChange}
              />
            </>
          )}
          <FilePicker
            handleChange={handleChange}
            availableImage={!!inputImage}
          />
        </article>
        <OutputImage
          handleDownload={() =>
            helpers.download(transcodedImageData.newImageSrc)
          }
          transCodedImageData={transcodedImageData}
          format={format}
          loading={loading}
        />
      </section>
    </main>
  );
}

export default App;

export async function getServerSideProps(context) {
  // set HTTP header
  context.res.setHeader("Cross-Origin-Opener-Policy", "same-origin");
  context.res.setHeader("Cross-Origin-Embedder-Policy", "require-corp");
  return {
    props: {},
  };
}
In the code above, we start by importing the components we need. As you can see, we’re also importing two functions: createFfmpeg and fetchFile from the @ffmpeg/ffmpeg module.
Using the createFFmpeg function, we create an FFmpeg instance by passing an object parameter that includes the core path option where we specify a URL to the @ffmpeg/core module.
Next, we create a self-invoked async function that calls the load method on our FFmpeg instance. By doing this, we download the @ffmpeg/core script.
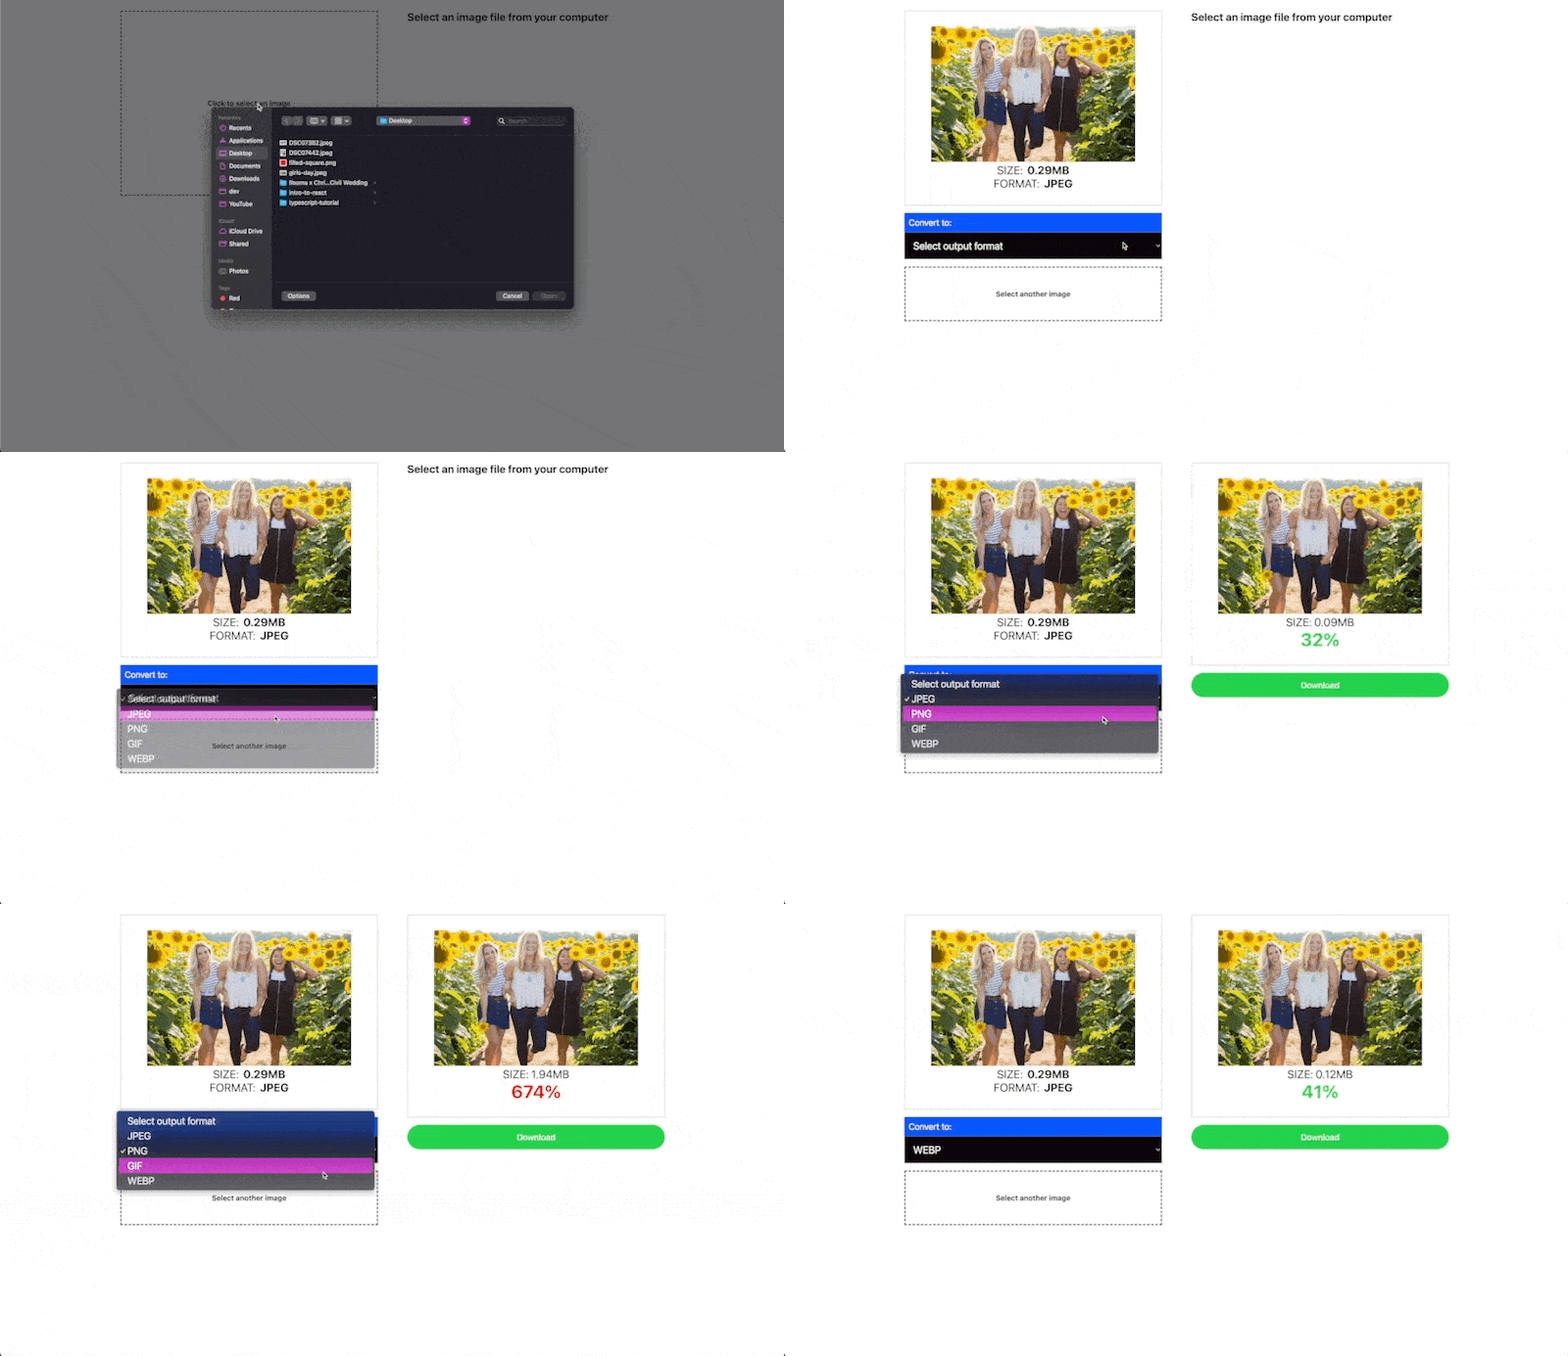
Next, our App component starts by creating several state variables and some functions. To understand the place of every variable and function in this component, we will walk through how the user interacts with the rendered UI and the underlying function calls involved at each point.
First, when the user selects a file from their computer from the FilePicker component, it triggers the handleChange function where the file and its corresponding URL are stored in state using the setInputImage and setURL functions. Then the application re-renders with the selected image.
Next, the user selects the desired format from the select dropdown, which triggers the handleFormatChange function. This function extracts the value prop from the event object and first checks if the selected image format is the same as the one previously selected. If they are the same, it simply returns. However, if the formats differ, it stores the new format in the format state variable and then invokes the transcodeImage function. This function is fed two parameters: the input image blob and the desired format to transcode the image.
The transcodeImage function starts by toggling the loading state (at this point, the app re-renders, and the OutputImage component shows the loading text) and ensures that the FFmpeg instance has loaded successfully; if not, it invokes its load method again.
For FFmpeg.wasm to manipulate any file, we need to store it in its hard drive (this is a memory storage file system used by FFmpeg.wasm based on the MEMFS module that stores files as typed Arrays in particular Unit8Arrays in memory).
So for that, we store the input image file in its file system using the FS method where we specify three arguments. The first—"writeFile"—is the operation we want to perform; in our case, it’s a write. The second is the file name we set using the file blob’s name property. And the third is the file contents, which is the blob, and it is passed to the fetchFile function to convert our blob to the format it expects.
Next, we write a CLI command that does the image file conversion using the run method on our FFmpeg instance. This command looks like so:
await FF.run("-i", inputImage.name, `img.${format}`);
In the code above, "-i" specifies the input file parameter. Next, we specified the image file we wrote to the file system in memory using our inputImage.name property. Finally, we created a string based on the selected image format, img.${format}, representing the output file. Based on the format of this file, the @ffmpeg/core module selects the appropriate codecs from its list of supported codecs, transcodes the image, and stores it in its file system with the filename we specified.
We did two things to render our transcoded image file to the screen. We read its contents from the file system of the FFmpeg.wasm module to a variable we called data. We then converted its contents to a blob and then to a data URL.
The data URL is sufficient to render the transformed image to the screen, but remember our Outputimage component requires more than that. It also renders the size of the contents of the data URL and how it compares to the original image. As a final step, we create and store an object representing what would be fed to the OutputImage component as props.
This object is stored in the transcodedImagedata state variable. Via a call to its setTranscodedData, we define and pass this object which has these names used as object keys: newImageSrc, newImageSize and originaImageSize, representing the transformed image’s URL, its size and the size of the original input image.
At this point, the application re-renders, and the OutputImage component renders the transcoded image, its size, and how it compares to the original image.
To see the running application, run this command in your terminal:
npm run dev

Find the complete project on GitHub.
Conclusion
This guide shows how to leverage different image formats to improve the performance of our applications, given that there is no one-size-fits-all image format. It emphasizes the utility of contemporary image formats such as WebP and AVIF for web image optimization. Additionally, it shows us how to perform image transcoding directly in our browser using the FFmpeg.wasm library.


