
Integrate Biometric Authentication in a Next.js App Using the SimpleWebAuthn Package—Part 1

Summarize with AI:
Integrate biometric authentication in a TypeScript-powered Next.js application using the SimpleWebAuthn package. Part 1 explains the authentication protocols and sets up the project and user signup.
Welcome to this two-part article series! The topic we will be exploring is too vast to cover in just one piece, and thus, the content is divided into two parts to provide a more thorough and detailed examination of the subject. By breaking down the information into manageable sections, you will gain a deeper insight into and appreciation for the subject. So, let’s get started with Part 1!
Thanks to the FIDO (Fast Identity Online) Alliance, various protocols have been developed to provide secured, uniform, passwordless authentication (using public key credentials) across most web browsers on different platforms that support it. To generate public key credentials, it leverages public key cryptography and biometrics such as Face ID, Touch ID or device PIN from respective hardware (authenticators) that support them. FIDO protocols are proven to be faster, easily manageable, and highly secured compared to existing cognitive-based authentication systems using passwords or 2FA systems using email or SMS one-time passwords (OTPs).
This article will begin by briefly examining the FIDO2 protocol (the latest version of FIDO). Since FIDO2 is a standard that encompasses several protocols for password-less authentication, we will also briefly review the two protocols under it: CTAP (client-to-authenticator protocol) and WebAuthn (pronounced “web-auth-n”). Next, we will create a simple MFA authentication system from within a TypeScript-powered Next.js application that will use legacy passwords and biometrics to authenticate, with the latter being our main focus. Our authentication system will allow users to register and login with their regular email and password, as well as with their biometric information.
Although we will discuss some of the nitty-gritty details at each step during the WebAuthn registration and authentication process using biometrics, we will use the SimpleWebAuthn package to abstract the process of interacting with the underlying WebAuthn browser APIs to make our integration process seamless. In part two of the series, we will also provide tips to improve the user’s experience when implementing WebAuthn. This should be a fun and informative read! Part 1 of the series will cover the following:
- Connecting the Dots: FIDO2, WebAuthn and CTAP
- Why We Are Using the SimpleWebAuthn Package
- Test Environment & Project Setup
- The Authentication System
- Storage Requirements
- Handling Basic Signup
Prerequisites
- Familiarity with basic security terms like authentication and authorization
- Basic knowledge of HTTP and RESTful APIs
- Basic understanding of Nest.js API routes
- Basic understanding of ReactJS and TypeScript
Note: No prior knowledge of Fido and WebAuthn is required to proceed in this guide.
Connecting the Dots: FIDO2, WebAuthn and CTAP
As said earlier, the FIDO2 framework consists mainly of two protocols—WebAuthn and CTAP. It defines the standard for these protocols to work hand in hand and remain interoperable in nearly all environments to ensure that uniform passwordless authentication is made possible across implementing browsers. These three concepts are related in the diagram below.
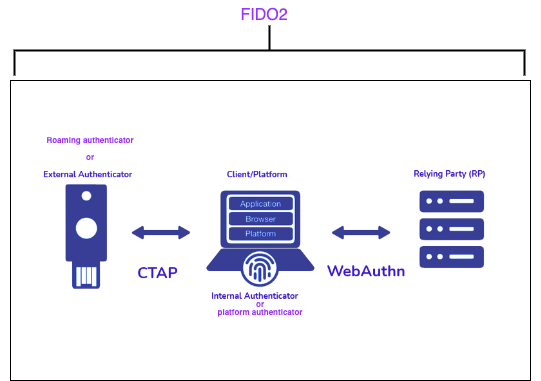
As shown above, there are three critical entities at play which we will discuss more later in this guide:
- Client/Platform: the user operating system and an application(s), e.g., the browser with some client-side JavaScript collectively serving as the WebAuthn client.
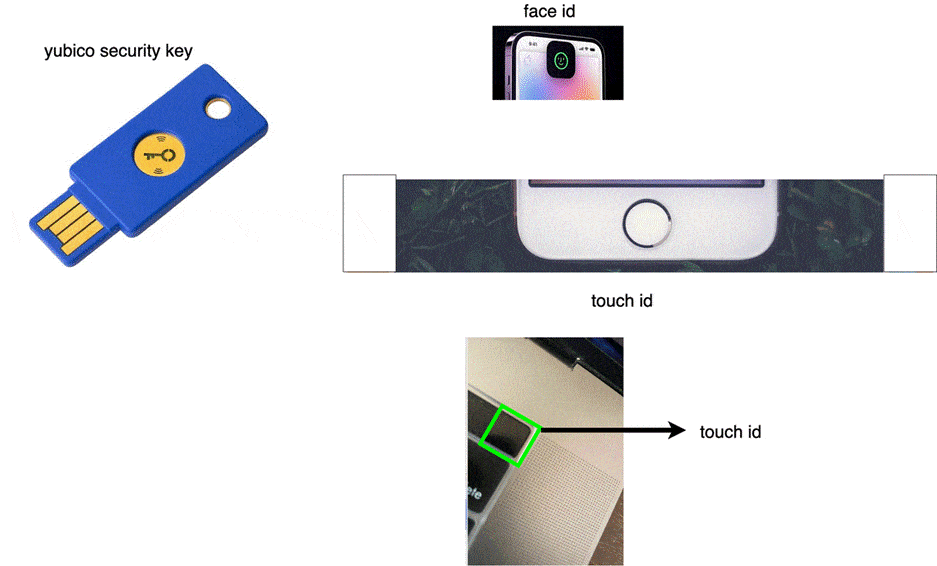
- Authenticator: the actual hardware device that performs authentication; it verifies the user via an authorization gesture, e.g., biometrics, and maintains a collection of public key credentials. Authenticators can either be platform authenticators (i.e., authenticators that are embedded on a device, such as Face ID, Touch ID, etc.) or roaming authenticators (those that are external to the authenticating device, e.g., security keys like those manufactured by companies like Yubico). A platform authenticator can also be used as a roaming authenticator—for example, when a mobile phone’s Touch ID is used to authenticate on a laptop.
- Relying Party: this term will be used quite often in this guide. It refers to the webserver the user wants to authenticate; in our case, this web server will be our Next.js API route.
Now that we are clear about what each entity means, let’s now understand the role of the two main protocols. CTAP (latest is CTAP2.1) is a low-level protocol that allows the WebAuthn client to communicate with the platform or roaming authenticators to generate public key credentials. Depending on the type of authenticator, credential creation may require some form of user interaction with the authenticator, such as a biometric scan, Face ID, or some other authorization gesture. Communication between the client and the authenticator over the CTAP protocol is done using Bluetooth low energy (BLE), USB, NFC or directly for a platform authenticator.
Meanwhile, the WebAuthn protocol focuses on the logic of communicating firstly with the authenticators to generate these public key credentials and defines a set of heuristics managing and securely transmitting relevant parts of the public key credentials between the WebAuthn client and the relying party when registering or authenticating the user. Note that this communication has to be done over a secure HTTPS/TLS connection. Since we will be testing locally on localhost in our mini app, this won’t apply, of course.
It is also important to note that we don’t directly interact with the low-level CTAP protocol to talk to authenticators. Instead, we interact with the WebAuthn API from our browser JavaScript (client), which in turn will interact with the user agent, which will then do that for us.
Why We are Using the SimpleWebAuthn Package
The WebAuthn browser API heavily makes use of Arraybuffers to go about its business of interacting with authenticators and generating and verifying public key credentials/passkeys, so this package makes our life easier to work with these structures, together with the process of serializing and transmitting them between the client and the relying party.
Test Environment
For this guide, we will be testing on a MacBook that comes with a platform authenticator (Touch ID), and we will be testing on the Google Chrome browser.
Note: The WebAuthn protocol is confirmed to be supported by various platform browsers.
Project Setup
Let’s now create our TypeScript-powered Next.js application in any directory of choice. Here, we made ours in biometrics-auth. Open your terminal and run the following command.
yarn create next-app --typescript biometrics-auth
Next, install the dependencies we will need with the following command.
yarn add axios @simplewebauthn/browser @simplewebauthn/server "@simplewebauthn/typescript-types"
Axios will be our HTTP client. At the same time, the simplewebAuthn package will help us abstract unnecessary complexities in creating and managing public key credentials from our frontend code (webAuthnClient script) and our API routes which will serve
as our web server/ relying party. @simplewebauthn/typescript-types package holds some handy type declarations we will need to write type-safe code.
We will need several files in the form of pages on our frontend, API routes for our webServer or relying party, and some utility files; we will defer file creation until necessary as we proceed.
The Authentication System
As said earlier in the introduction, our mini 2FA authentication system will feature two flavors of authentication which are
- Legacy email and password
- Biometrics authentication
Email and password, as you may already know, are based on the cognitive authentication factor (what the user knows), while biometric authentication is based on the possession factor (what the user has, in this case, their device and an authenticator) and the inheritance factor (what the user is, i.e., their fingerprint or Face ID).
Even though this guide focuses on biometric authentication, we have featured legacy email and passwords because this guide was created to mimic simple real-world usage. Since WebAuthn is relatively new and not totally supported by every type of browser, we decided to include email and password authentication to ensure that this guide caters to a broader audience.
With that being established, let’s describe our use case and the steps a user will take to sign up and log in to our app. This flow will be key to all the decisions we make when building our app.
While describing each step, we will create relevant files that we need to match any step that requires it. Additionally, for all terminal commands used to create files while discussing each step, assume that you are in the root folder of our Next.js project.
Note: The flow is customized to our demo app. Please feel free to fine-tune it to meet your own needs.
The user will first visit the signup page (
pages/signup.tsx) during signup. They will enter their email and password to create their account; these details will be submitted to an API route called/signup, which will live inpages/api/signup.tsxfile. Create the file with the following command:touch ./pages/signup.tsx ./pages/api/signup.ts
The signup still needs to be completed. Next, the user gets redirected to another page (pages/register-device.tsx) for them to register their device to complete their signup. It will involve getting the users’ biometrics and performing the WebAuthn registration ceremony, which we will explore later in Part 2 of this article series.
touch ./pages/register-device.tsx
After that, the user gets redirected to the login page (pages/login.tsx ). During the login, they can try either logging in with their email and password (fallback option), which would interact with an API route called
/basic-login, or, more preferably, logging in with their biometrics which will require the user to perform the WebAuthn authentication ceremonytouch ./pages/login.tsx
Once the user is logged in successfully, we redirect them to a profile page (pages/profile.tsx) where they can see basic details about themselves and a button to sign out of the app.
touch ./pages/profile.tsx
You can observe that we did not create any files regarding the WebAuthn registration or authentication—we will defer this to Part 2 of this article series, where we will explore the steps involved in each one, and then we will create the required files.
When implementing an authentication system on the frontend of a Next.js app, it is customary to create and expose an application context that will live in a file called AuthProvider.tsx that provides us with the necessary
functions relevant to each step above to simplify the process of integrating them into our page file (files in the pages folder). Run the following command:
touch AuthProvider.tsx index.d.ts
The above command creates the authentication provider and a declarations file where all the types we’re creating will live. Update the contents of the AuthProvider.tsx file with the code below:
import { createContext, PropsWithChildren, useState, useContext, useEffect } from "react";
import { AuthContextType, authStatus, User } from ".";


const initialState: AuthContextType = {
    status: "loading",
    user: {
        email: "",
    },
    async handleDeviceRegistration() {},
    async handleDeviceAuthentication(email: string, useBrowserAutofill = false) {
        return false;
    },
    async signup(email: string, password: string) {},
    async login(email: string, password: string) {},
    signOut() {},
};

const AuthCtx = createContext<AuthContextType>(initialState);
export const useAuth = () => useContext(AuthCtx);

const AuthProvider = ({ children }: PropsWithChildren<{}>) => {
    const [status, setStatus] = useState<authStatus>("loading");
    const [user, setUser] = useState<User | null>(null);

    const signup = async (email: string, password: string) => {};
    const login = async (email: string, password: string) => {};

    const handleDeviceRegistration = async (username: string) => {
       return false
    };

    const handleDeviceAuthentication = async (username: string) => {
        return false;
    };
    const signOut = async () => {};

    return (
        <AuthCtx.Provider
            value={{
                status,
                user,
                handleDeviceRegistration,
                handleDeviceAuthentication,
                signOut,
                signup,
                login,
            }}
        >
            {children}
        </AuthCtx.Provider>
    );
};
export default AuthProvider;
Apart from the basic imports from the React library and type declarations, this file starts by creating the AuthContext. Next, it exposes a hook we call useAuth() that returns the content
of the AuthContext.
Next, it creates the main wrapper component called AuthProvider that accepts the children prop. Internally it exposes seven properties to the AuthContext via its value prop; these properties
were derived from the authentication flow we explored earlier; for the sake of clarity, we will briefly discuss the few unfamiliar ones:
- Status: This is a string that holds information about the authentication status of the user, which could be “loading,” “authenticated” or “unauthenticated.”
- User: This holds information about the authenticated user.
login, signup, handleDeviceRegistration, signOut and handleDeviceAuthentication functions
are empty for now, but we will update them soon.
Storage Requirements
The nature of our authentication system mandates the need to store and manage some data. While in production, a valid option is to use a database; in this guide, we will use simple JSON files instead and perform crud operations on these files via JavaScript.
Open your terminal from your project’s root and run the following command to create these files.
touch users.json user-authenticators.jsWe are only interested in storing two things which are as follows:
users.jsonholds the first, which is basic user information. Simply put, users.json is an array of Users.
type User = {

id: string;

email: string;

currentChallenge: string;

password: string;

};- Next, the
users-authenticators.json holds user authenticators information, i.e., the public key credential we get from the user’s authenticator when registering their device.
type AuthenticatorType = {

credentialID: Uint8Array | Array;

credentialPublicKey: Uint8Array | Array;

counter: string;

};
When mapped to a user, it looks so:
type singleUserAuthenticator = {
   userId: string;
   authenticators: AuthenticatorType[]
};
Invariably this means that users-authenticators.json holds an array of singleUserAuthenticators.
Note: All type declarations used here and throughout this guide exist in an index.d.ts file in our project’s root. Also, ignore any property names on the types declared above; we will review each one when necessary.
For now, both JSON files hold empty arrays.
[]
Next, create the TypeScript files that will modify the JSON files.
mkdir services
cd services
touch users.service.ts authenticator.service.ts
As you might have guessed, the users.service.ts file manipulates users.json while the authenticator.service.ts file does the same for the users-authenticators.json file.
Update the users.service.ts file with these helper functions:
import { readFileSync, writeFileSync } from "fs";
import path from "path";
import { User } from "../index";
export const UserService = {
  getUsers() {
    return JSON.parse(readFileSync("users.json", "utf-8")) as User[];
  },
  findById(userId: string) {
  },
  findByEmail(email: string) {
  },
  updateUser(user: User) {
  },
  createUser(user: Pick<User, "email" | "password">) {
  },
  saveUsers(users: User[]) {
    writeFileSync("users.json", JSON.stringify(users));
  },
  loginUserBasic(user: Pick<User, "email" | "password">) {
  },
};
Also, update the authenticator.service.ts file with these helper functions:
import { readFileSync, writeFileSync } from "fs";
import path from "path";
import { AuthenticatorType, singleUserAuthenticator } from "../index";

export const CollectionOfUserAuthenticators: Array<singleUserAuthenticator> = [];
export const AuthenticatorsService = {
  getCollectionOfUserAuthenticators() {
    return JSON.parse(readFileSync("users-authenticators.json", "utf-8")) as singleUserAuthenticator[];
  },
  getUserAuthenticatorsIndex(userId: string) {

  },
  getUserAuthenticators(userId: string) {

  },
  async storeUserAuthenticator(userId: string, newAuthenticator: AuthenticatorType) {

  },
  getAuthenticatorByCredentialId(userAuthenticators: AuthenticatorType[], autheticatorCredentialIdB64URL: string) {

  },
};
Again all the empty functions in the users.service.ts file and authenticator.service.ts file will be updated when needed later.
Handling Basic Signup
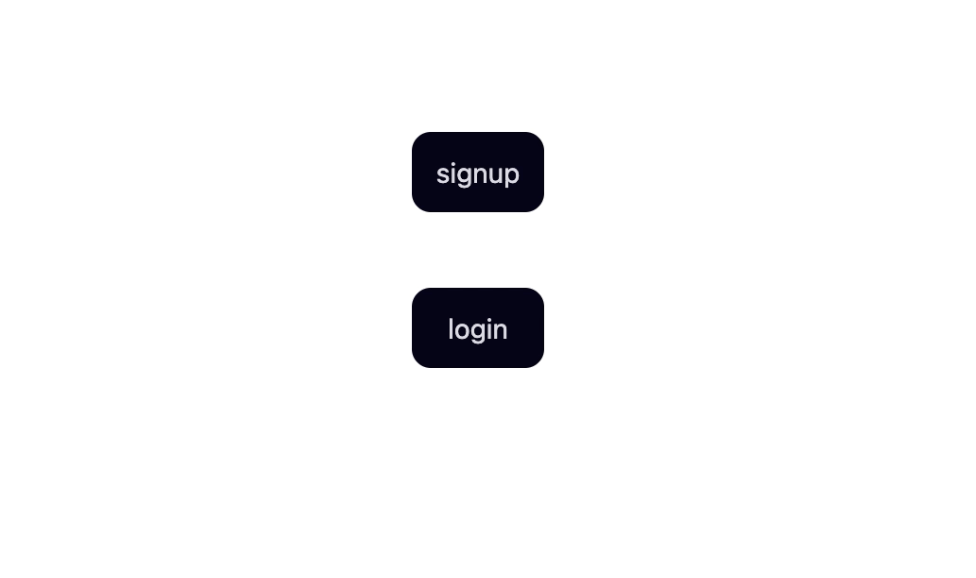
Now, let’s implement user registration using their email and password. First, let’s create our simple landing page with login and signup buttons. Update your index.tsx file with this code.
import Link from "next/link";
import { useRef, useState } from "react";
export default function App() {
  const ref = useRef<HTMLInputElement>(null);
  const [userId, setUserId] = useState("");
  return (
    <div className='App grid_txt_1'>
      <Link className='btn br' href={"/signup"}>
        signup
      </Link>
      <Link className='btn br' href={"/login"}>
        login
      </Link>
    </div>
  );
}
Next, let’s update our signup.tsx file, and include a basic form that accepts the user email and password with a submit button to send this data to our Next.js API route.
// import "./styles.css";
import { useAuth } from "@/AuthProvider";
import { FormEvent, FormEventHandler, useRef } from "react";
export default function App() {
const emailRef = useRef<HTMLInputElement>(null);
const passwordRef = useRef<HTMLInputElement>(null);
const { signup } = useAuth();
const handleSignup: FormEventHandler<HTMLFormElement> = async (e: FormEvent) => {
e.preventDefault();
if (!emailRef.current?.value || !passwordRef.current?.value) return;
const email = emailRef.current.value,
password = passwordRef.current.value;
return await signup(email, password);
};
return (
<form className='App grid_txt_1' onSubmit={handleSignup}>
<h1 className='u-center'><Signup></h1>
<div className='grid_txt'>
<label>email</label>
<input
ref={emailRef}
name='username'
placeholder='enter your email'
type={"email"}
autoComplete=''
/>
</div>
<div className='grid_txt'>
<label htmlFor='password'>password</label>
<input
ref={passwordRef}
type='password'
name='password'
placeholder='enter your password'
autoComplete='new-password'
/>
</div>
<button className='btn'>next</button>
</form>
);
}
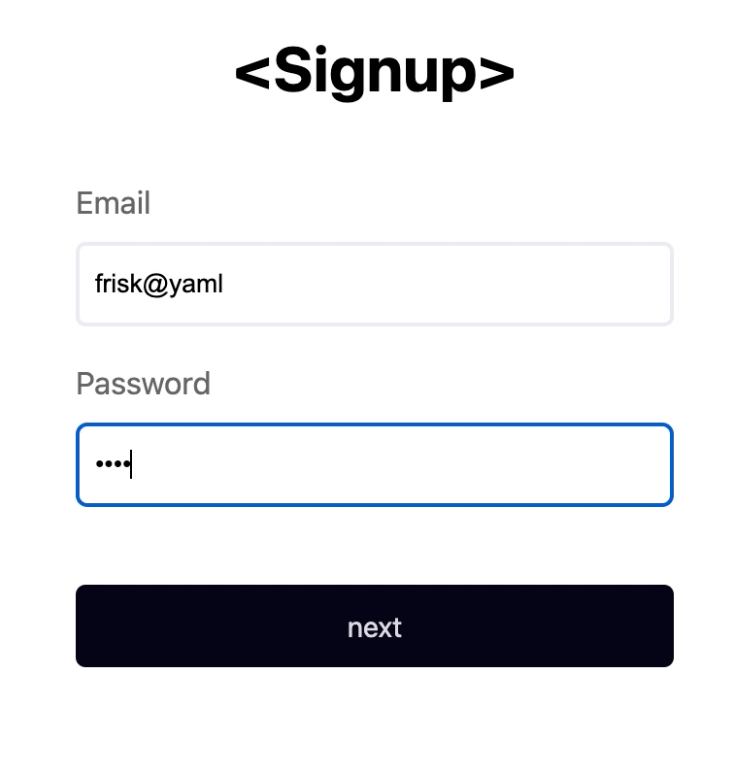
When the form is submitted, it triggers the handleSubmit function, which validates the user’s email and password. It then invokes the signup method on our authentication context and passes the email and password as parameters.
Update the signup function in the AuthProvider.tsx file with the code below:
const signup = async (email: string, password: string) => {
  try {
    const { data } = await axios.post(`/api/signup`, {
      email,
      password,
    });
  } catch (error) {
    console.log(error);
  }
};
The signup function takes the user’s email and password and attempts to submit it to the /signup API route.
Update the /pages/api/signup.ts file to match the following code:
import { UserService } from "@/services/users.service";
import type { NextApiRequest, NextApiResponse } from "next";
type createUserPayload = {
  email: string;
  password: string;
};
export default async function handler(req: NextApiRequest, res: NextApiResponse) {
  const { email, password }: createUserPayload = req.body;
  const existingUser = UserService.findByEmail(email);
  if (existingUser) {
    return res.status(400).end();
  }
  UserService.createUser({
    email,
    password,
  });
  res.status(201).json({
    message: "user successfully created!!",
  });
}
The /signup API route extracts the user’s email and password from the request payload and the userService object’s findByEmail method. It checks
for an existing account with the same email, typical account creation procedures.
findByEmail(email: string) {
  return this.getUsers().find((e) => e.email === email);
},
If the account exists, it returns a 400 (bad request) status code. Otherwise, it creates a new user account again using the createUserAccount on the userService object.
createUser(user: Pick<User, "email" | "password">) {
  const { email, password } = user;
  const users = this.getUsers();
  users.push({
    email,
    password,
    id: String(users.length + 1),
    currentChallenge: "",
  });
  this.saveUsers(users);
  return user;
}
The user creation process gets the existing users’ array. It updates it with the new user data, which includes their email and password, an id and their current challenge (the importance of this field will be explained later), and then we invoke the saveUsers function to persist the user’s data to the users.json file.
saveUsers(users: User[]) {
  writeFileSync("users.json", JSON.stringify(users));
},
If all these function calls succeed, a 201 is returned with a message informing the client that the user was created successfully.
You can also see our newly created user in the users.json file, as shown below.
[
  {
    "email": "frisk@yaml",
    "password": "1234",
    "id": "1",
    "currentChallenge": ""
  }
]
On the client side, here’s the sign-up function:
const signup = async (email: string, password: string) => {
  try {
    const { data } = await axios.post(`/api/signup`, {
      email,
      password,
    });
    setUser({ email });
    router.push("/register-device");
  } catch (error) {
    console.log(error);
  }
};
The function above stores the user’s email in state and local storage (we will explain the reason for this decision later) and then redirects us to a page we are yet to create called /register-device.tsx to begin
their device registration.
Testing
Open your terminal and start your Next.js application by running the following command:
npm run dev
You are now able to create a simple user even though you get an error when you get redirected to the /register-device route/page.
Conclusion
The FIDO (Fast Identity Online) Alliance has developed protocols to provide secured, uniform, passwordless authentication (using public key credentials) across most web browsers on different platforms. These protocols are faster, easily manageable, and highly secured compared to existing cognitive-based authentication systems using passwords or 2FA systems using email or SMS OTPs.
In this first part of the series, we covered the review of the FIDO2 protocol, CTAP (client-to-authenticator protocol), and WebAuthn (pronounced “web-auth-n”). We also covered why we use the SimpleWebAuthn package and finally concluded with implementing user registration using their email and password.
In the second part, we are going to commence with an in-depth explanation of the WebAuthn registration and authentication ceremony. We will also touch on ways to improve user experience in WebAuthn and best practices when implementing WebAuthn.

Chinedu Imoh
Chinedu is a tech enthusiast focused on full-stack JavaScript and Infrastructure engineering.
Related Posts
Comments
All articles
Topics
Web MobileMobile
Desktop
Design
Productivity
People
