
Passwordless Authentication in Next.js Using Auth0

Summarize with AI:
In this post, we will implement passwordless authentication in a Next.js app using Auth0.
Auth0 by Okta is a platform that provides battle-tested authentication solutions that can be easily integrated into any application type. Auth0 includes support for different authentication options, or in Auth0 terms, these are called connections—such as email and password, SSO from federated authentication providers like Google and Facebook, biometrics, and, finally, passwordless authentication, which we will be featuring in this post.
What is Passwordless Authentication?
A user can log into an application using passwordless authentication without the need to enter a password. In addition to using device biometrics (on mobile devices or the web via webAuth) to log the user in, exchanging their email or phone number for an OTP or a magic link is possible. Because passwords don’t need to be memorized, authentication is easier for users, and there is less administrative work to coordinate password recovery procedures or rules.
In this post, from within a TypeScript-powered Next.js app, we will integrate a passwordless authentication system that exchanges email for an OTP to authenticate (log in or sign up) using the Next.js Auth0 SDK.
The demo will feature all the typical things an authentication system includes, such as login, signup and route protection. To round up, we will look at some best practices when using passwordless authentication. Let’s begin.
Prerequisites
To follow along with this tutorial, you will need to have the following:
- A Google account
- A basic understanding of the Next.js framework and TypeScript
- Basic knowledge of Restful APIs, HTTP requests and responses
- A code editor
Project Setup
Firstly, let’s create a Next.js application in a directory called passwordless by running the following command:
yarn create next-app --typescript passwordless
We will install and create dependencies and files when the need arises as we proceed in this guide.
Setting up Auth0
In this section, we will focus on setting up Auth0. The list below contains the steps we will be taking.
- Creating an Auth0 project
- Creating and connecting the passwordless connection to the project
- Configuring Auth0 project settings
- Customizing our login page
We will go over Steps 1 through 3 above and examine the two general ways of implementing authentication in Auth0. That will form the basis for our decisions in Steps 3 and 4.
Creating an Auth0 Project
Log in to your Auth0 dashboard. Locate applications in the Application section on the sidebar, then click on “Create Application.”

In the modal that appears, choose the application name, and for the application type, select web application since we will be integrating it within a NextJS app. Finally, click “create.”
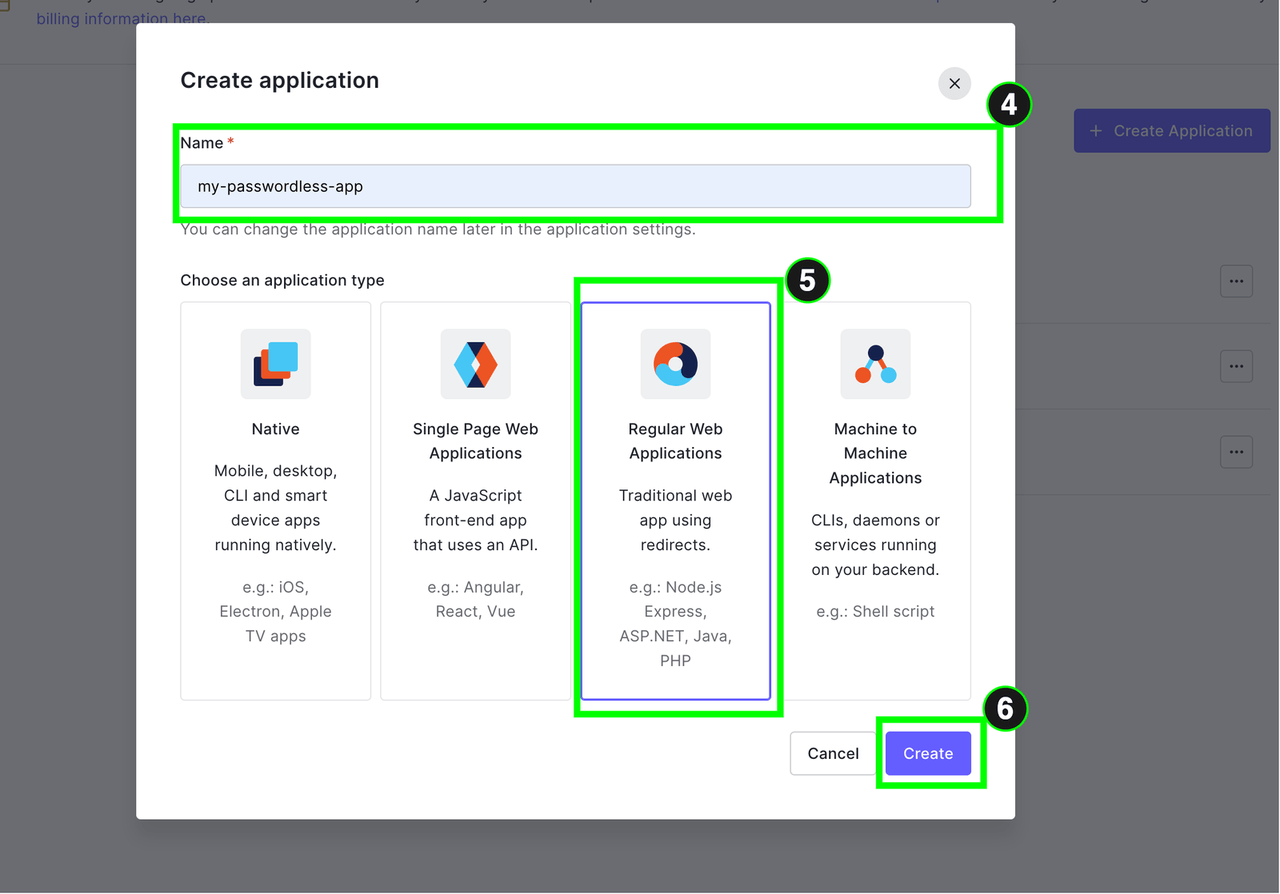
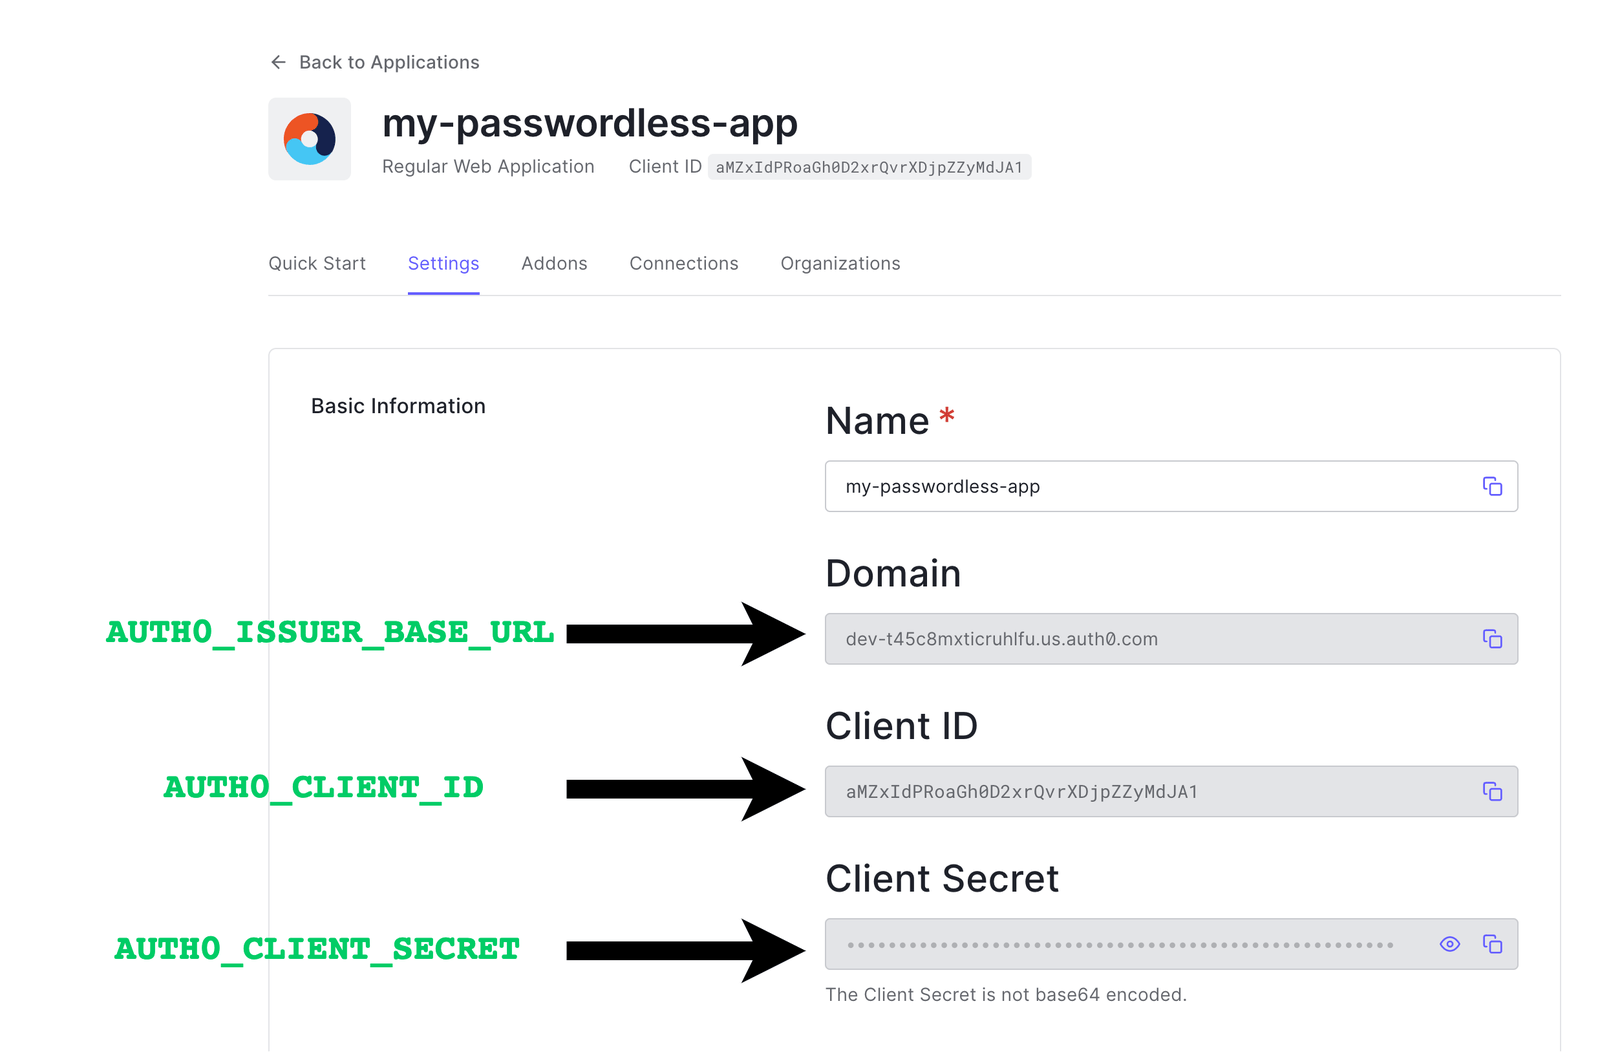
Here we called our app "my passwordless-app,” but it is up to you to select any name of your choice. Once the app has been created successfully, in the settings tab of the app, you can see some information about the app, such as the clientId, client secret and domain, as shown below. We will use them later. For now, keep them in mind.

Creating and Connecting the Passwordless Connection to the Project
We now have our project created. Let’s create and add a passwordless connection to our project via the following steps.
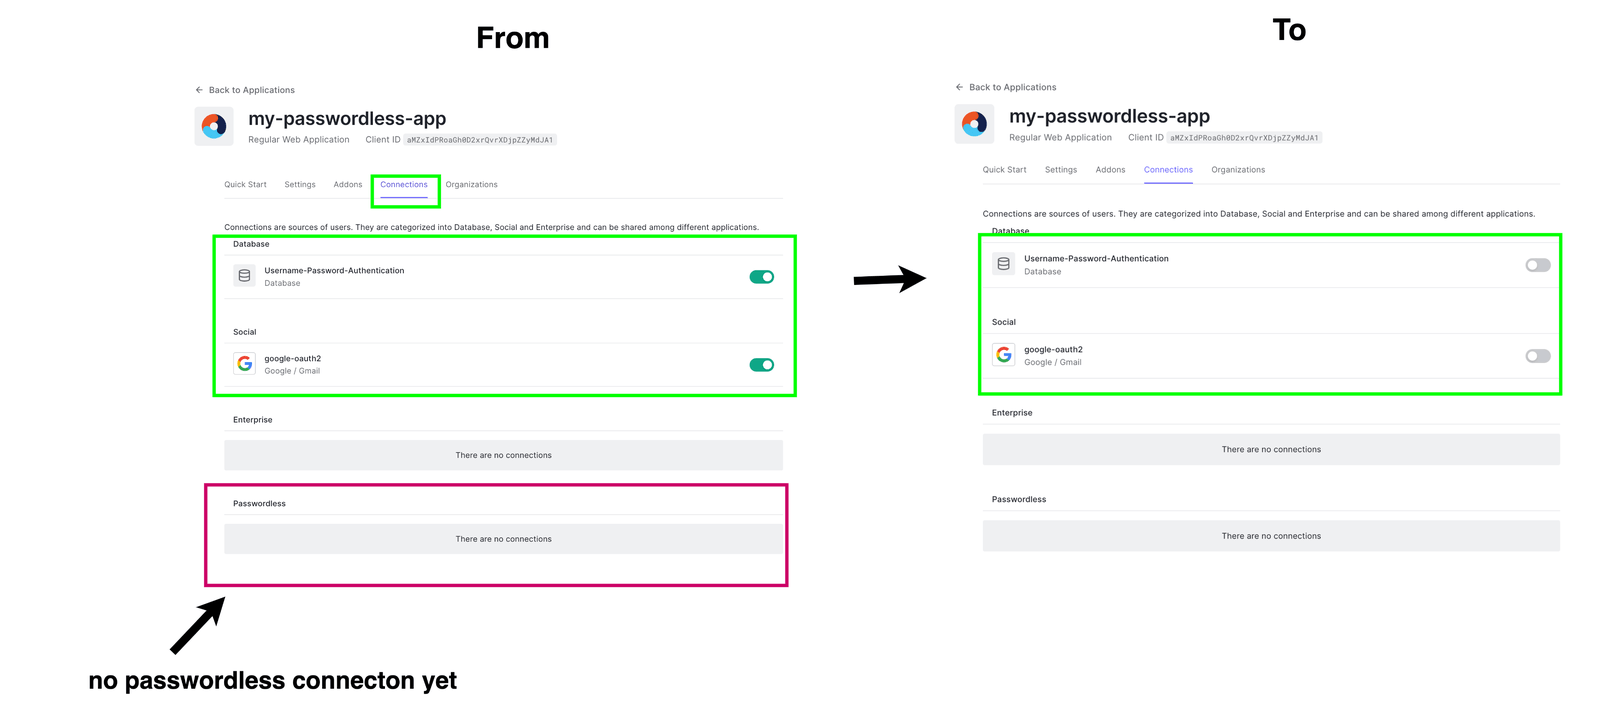
By default when we create an app, all connections enabled globally on your account are enabled for the newly created project. E.g., if App X has connection C1 and App Y uses some connection C2, a newly created app Z by default automatically uses connections C1 and C2.
Head over to the connection section of your project, as shown below. You will observe that, by default, email, password and SSO connections are enabled on the project. But the passwordless connection is not enabled. Well, we need to create this connection.
Let’s disable the existing connections (database and social) since we will not need them.
To create a passwordless connection, on the sidebar, locate authentication and click Passwordless. Select and toggle the email option since that’s what we will need.
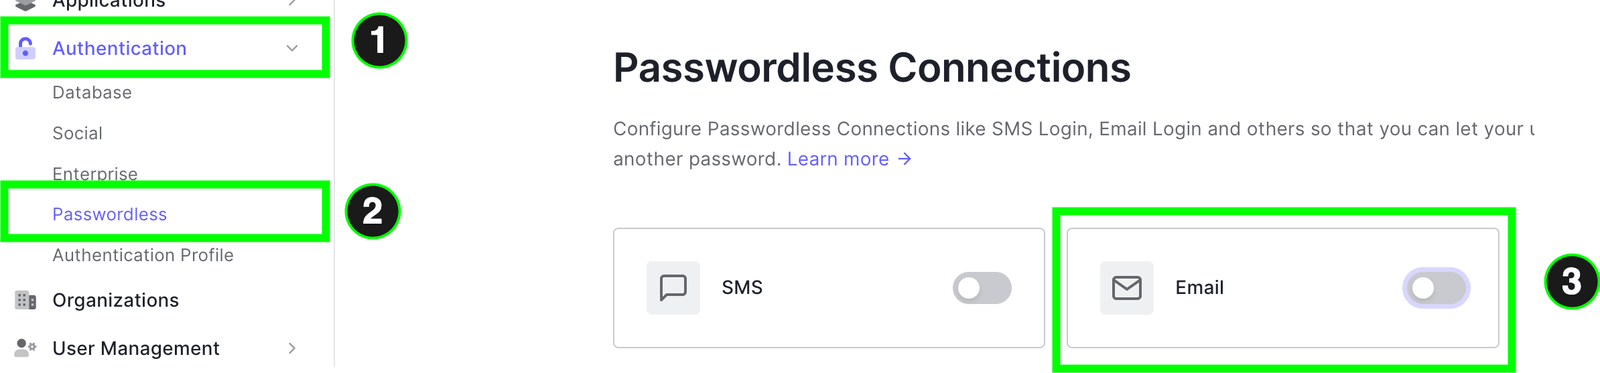
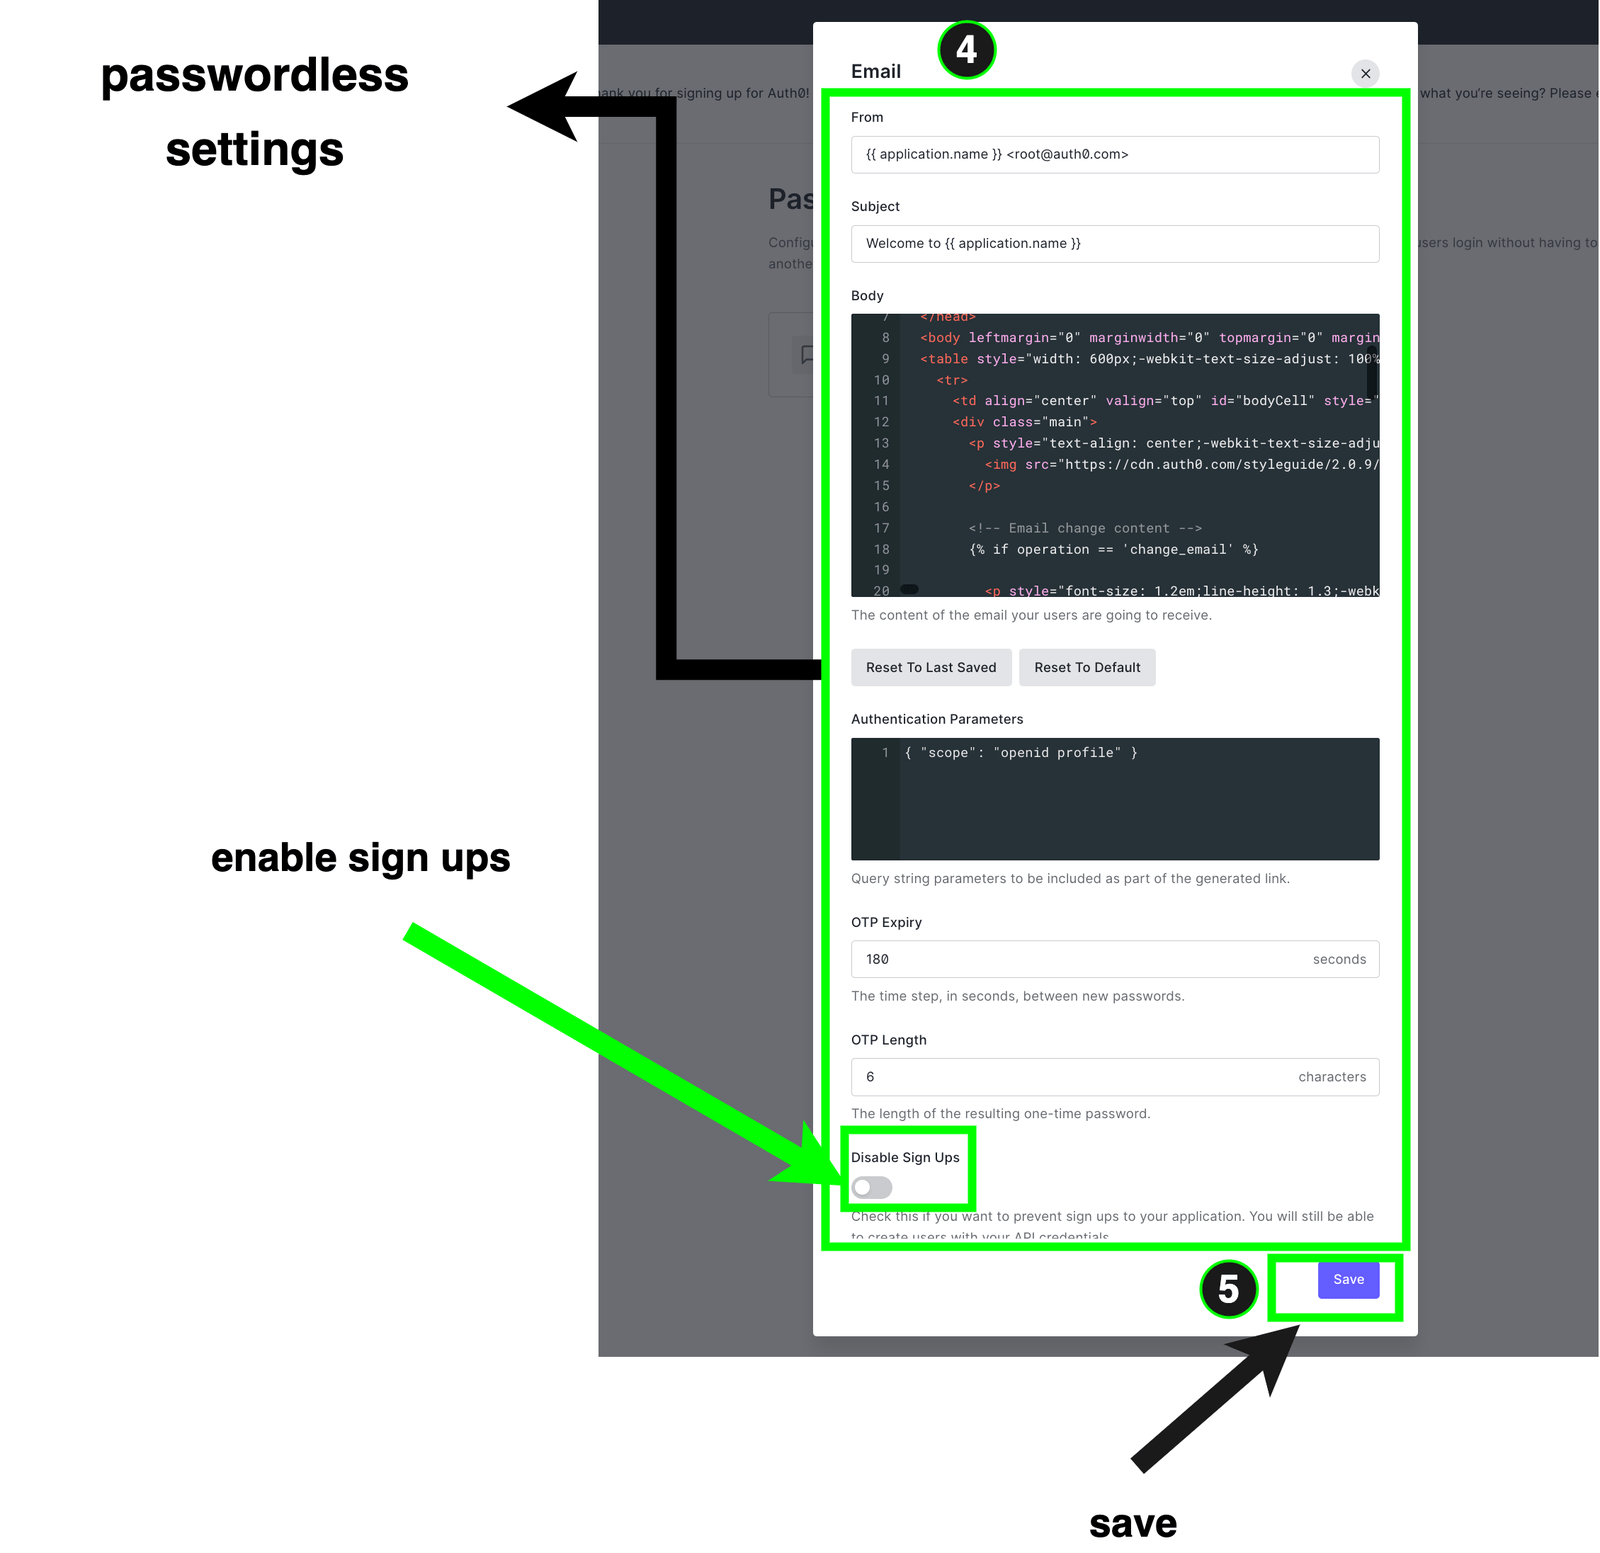
You will be presented with a modal where you can configure several things, such as the email template that will be sent to the user with the OTP.
We can also customize the length and expiry duration of the OTP that will be sent to the user. Here, if you choose shorter OTP lengths, you can also reduce its expiry, and so on.
Another setting worth mentioning is the ability to enable or disable signups. That is desirable for several reasons, such as when you need more details than the user’s email or phone number during registration on your platform. You can interact directly with the Admin APIs to handle user creation in these cases. Let’s enable signups, which is the default, and click save.
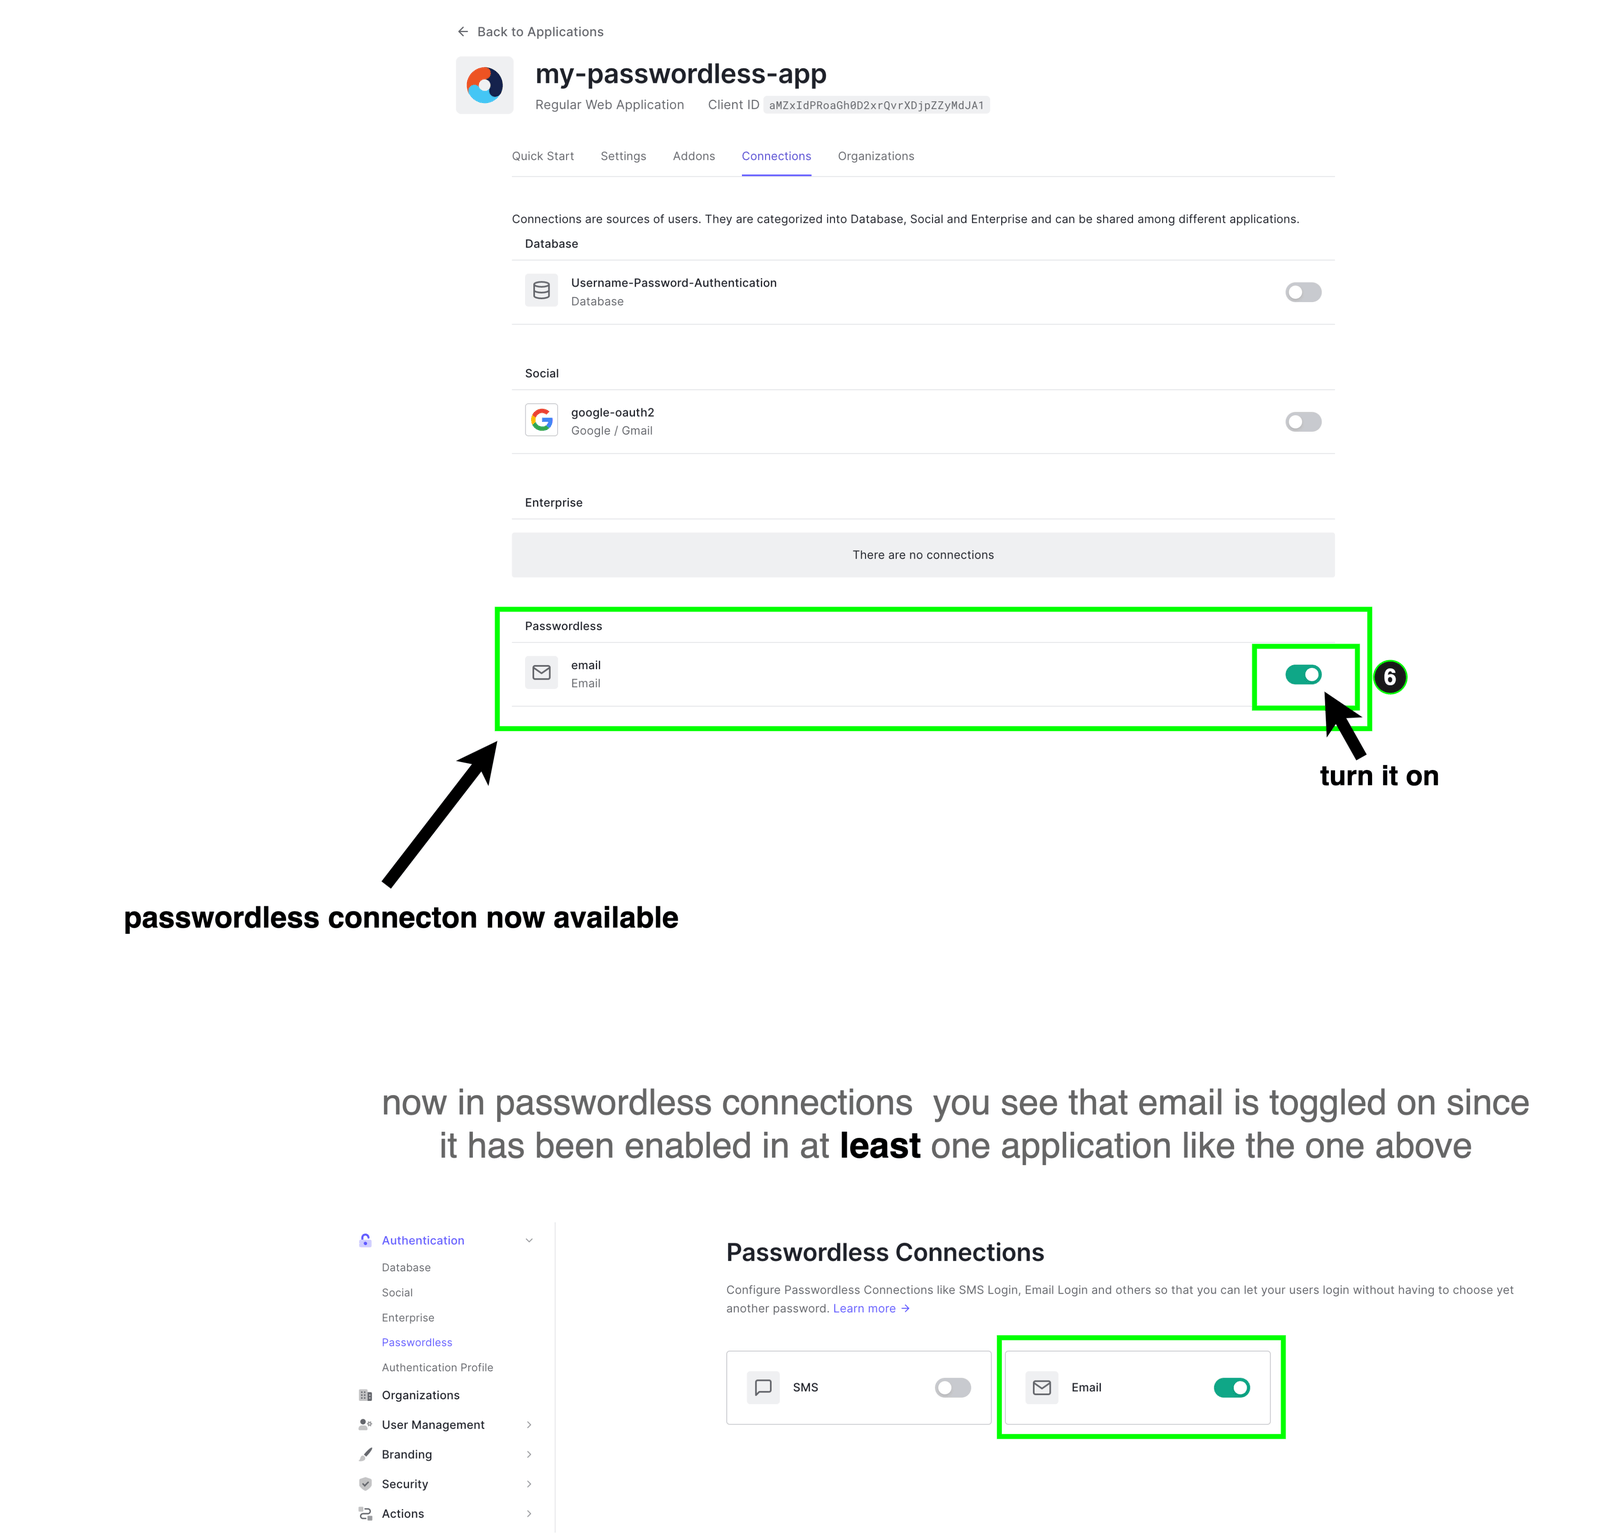
After saving, you can observe that the UI doesn’t look like the passwordless email connection is toggled. That’s because we need to enable it in at least one of our apps.
Let’s go back to the connection settings of our app (my-passwordless-app). Here you will see the passwordless connection. Turn it on as shown below.
At this stage, before we proceed to our next steps, we need to understand the two ways by which authentication is done using Auth0. These are:
Embedded login: This is more challenging to implement. Here we create and manage the page the user uses to authenticate. It requires you to manually write logic using a library like Auth0.js or Lock.js to interact with the Auth0 Authentication server and handle forwarding the users’ credentials manually to log users in. It also requires you (the tenant) to have a domain. It’s desirable mainly in mobile apps.
Universal login: This is the recommended way, which we will be using. Here, when the user wants to authenticate, our app redirects the user to a page that is carefully created and managed by Auth0, and the authorization server does its thing to authenticate the user and returns the tokens and the data our app needs.
For the sake of clarity, we will use a simple diagram showing the general universal login flow.
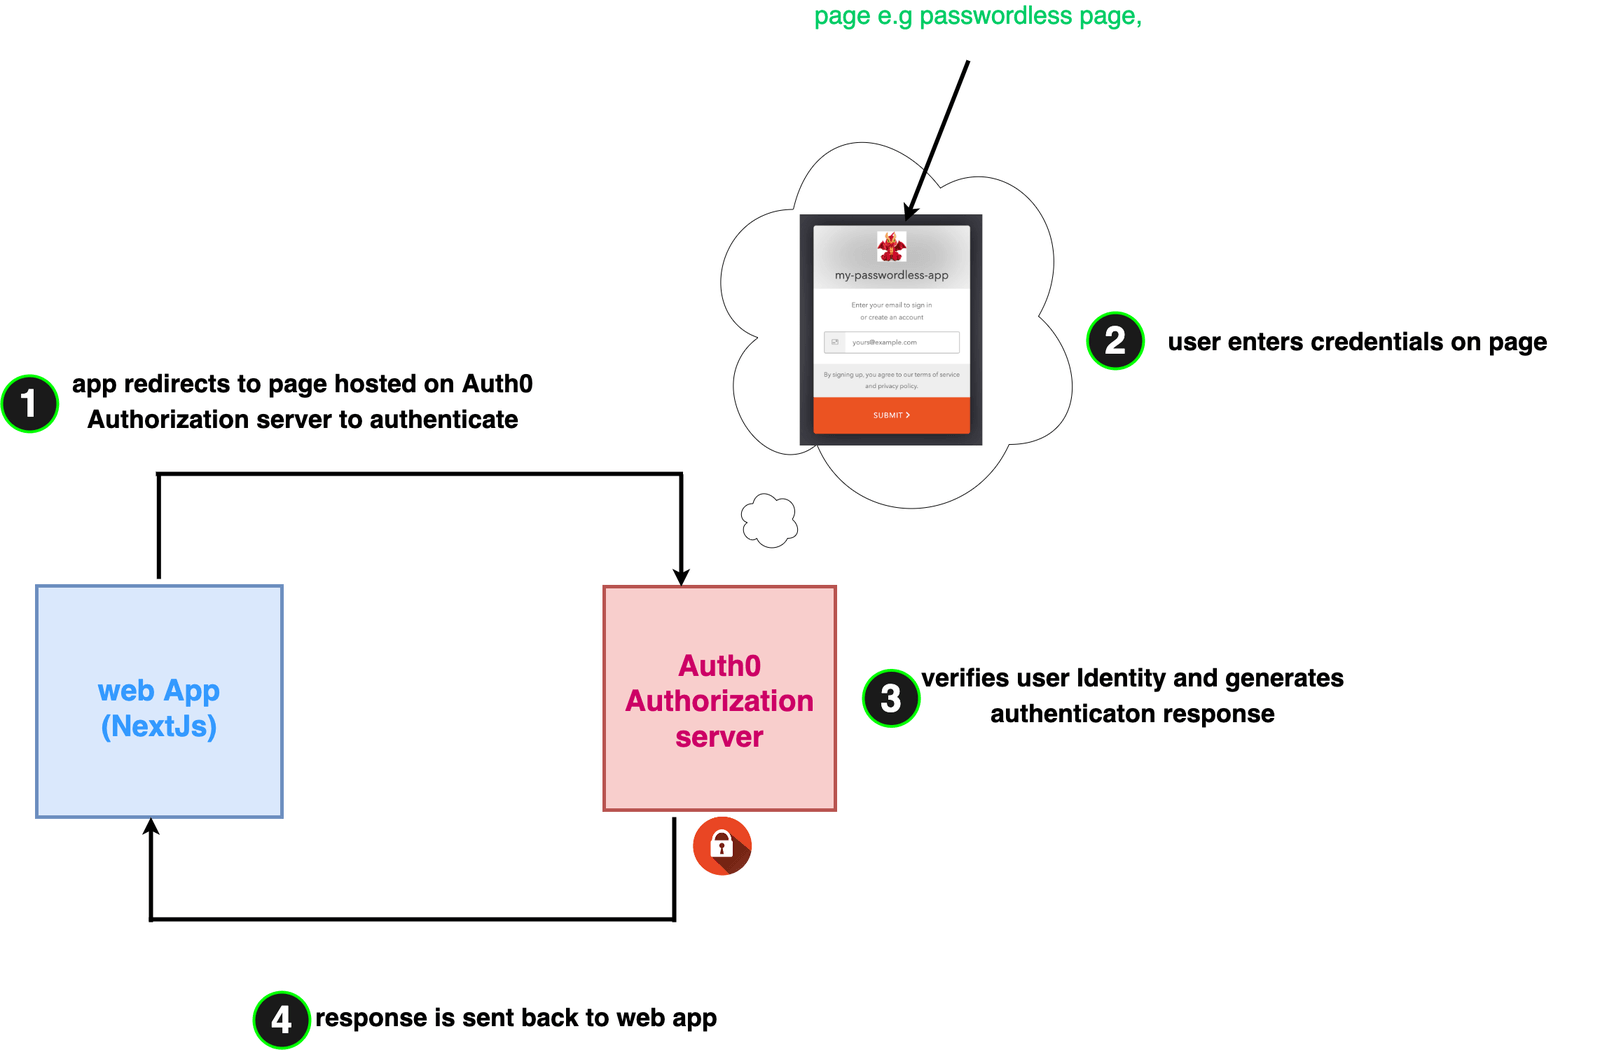
When the user is redirected to the login page at Step 2 for passwordless connections, below are the series of events that occur to get the user authenticated:
- The user enters the email in the form, which is then sent to the authorization server.
- The authorization server sends an email with OTP to user’s email.
- The user retrieves OTP from email and enters it into the form.
- Depending on the validity of the OTP, the user is authenticated, and the appropriate response is sent back to the web app in Step 4.
Configuring Auth0 Project Settings
Everything we do here will be based on the flow diagram in the last section. Head over to the Settings tab of the newly created app.
- In Step 1 of the diagram, the web app makes an HTTP request to the authorization server. We need to add the URL of our app to a set of allowed apps that can make this request. This is defined in the setting tab by the name Authorized Origins (because of course there can be more that one web app using our Auth0 app).
- When the user successfully authenticates, the authorization server again has to call our web app at Step 4 using a URL to pass the authentication response. This setting is identified as the Authorized callback URL.
- Finally, whenever a user logs out, a request is made to the authorization server to clear any authentication data, e.g., tokens. Upon doing that, we need to specify which part of our web app the authorization server calls when this is done. This is defined by the setting called Authorized Logout URLs.
Putting the above points together, let’s update these settings and save them as shown below.
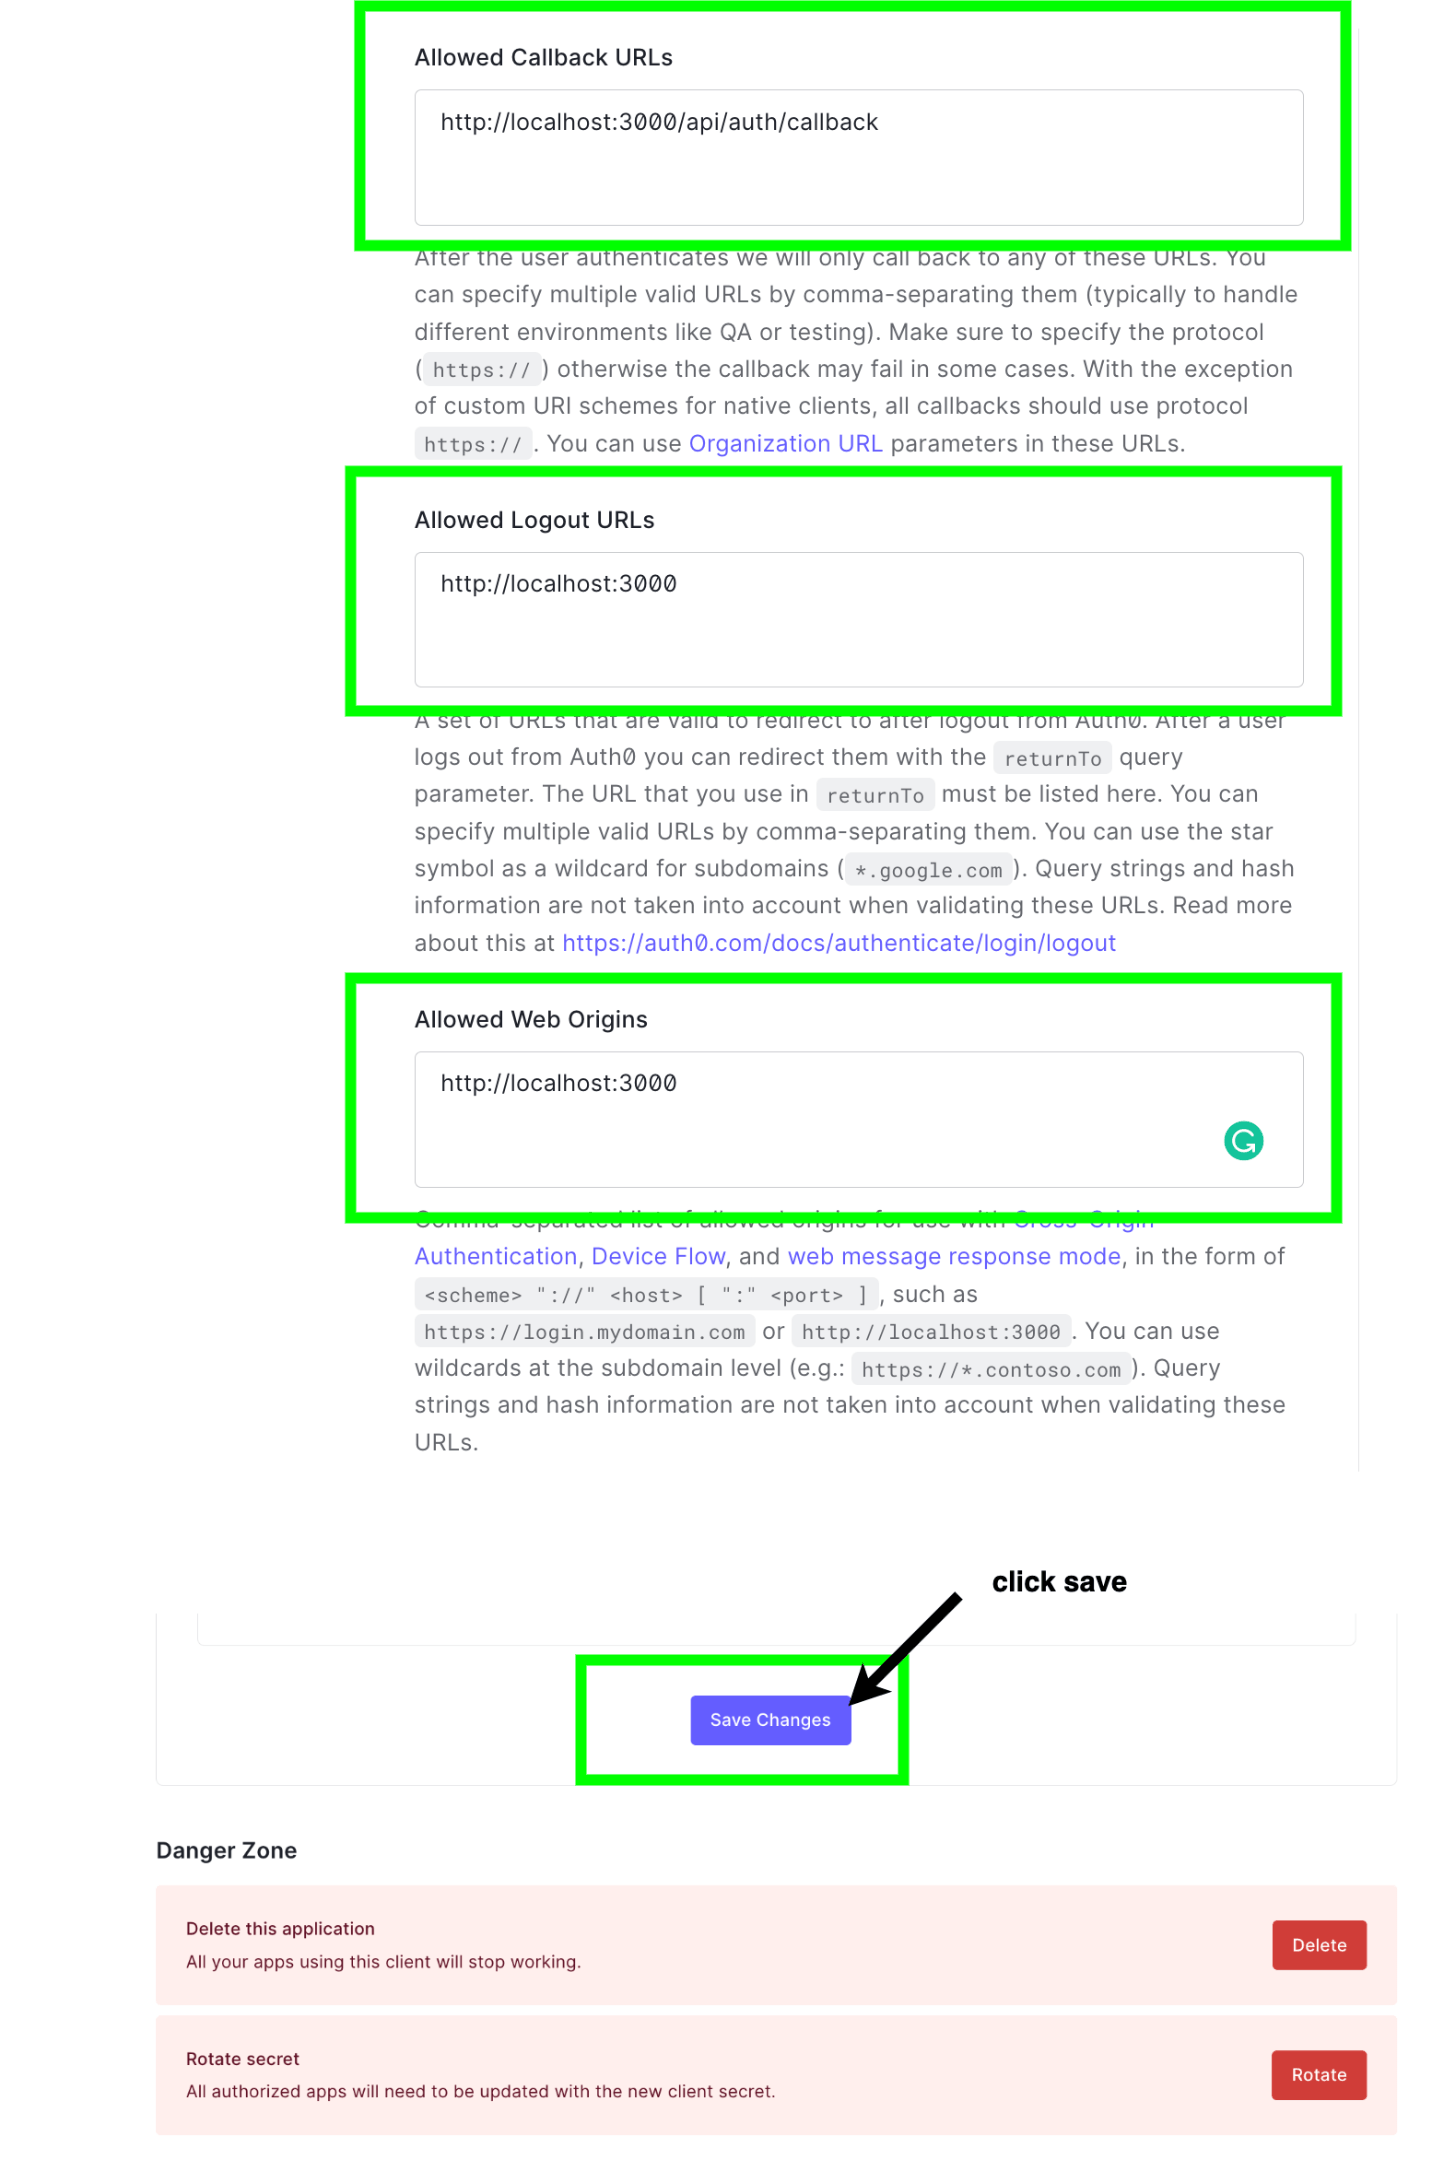
Our Next.js app will be running on http://localhost:3000; that’s why it’s included in most of the URLs used in the settings above.
Customizing Our Login Page
Depending on the connection type that our app supports, Auth0 provides us with several web page templates to choose from. Here we will need to select the template for passwordless authentication, like the one shown below.

The image above shows the Auth0 passwordless template customized with our app name and logo. To set this up, we will need to do the following:
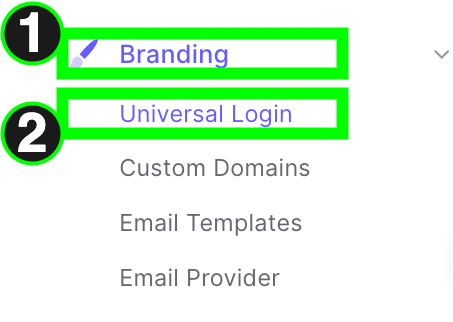
- On the sidebar, head over to Branding.
- Go to Universal Login.
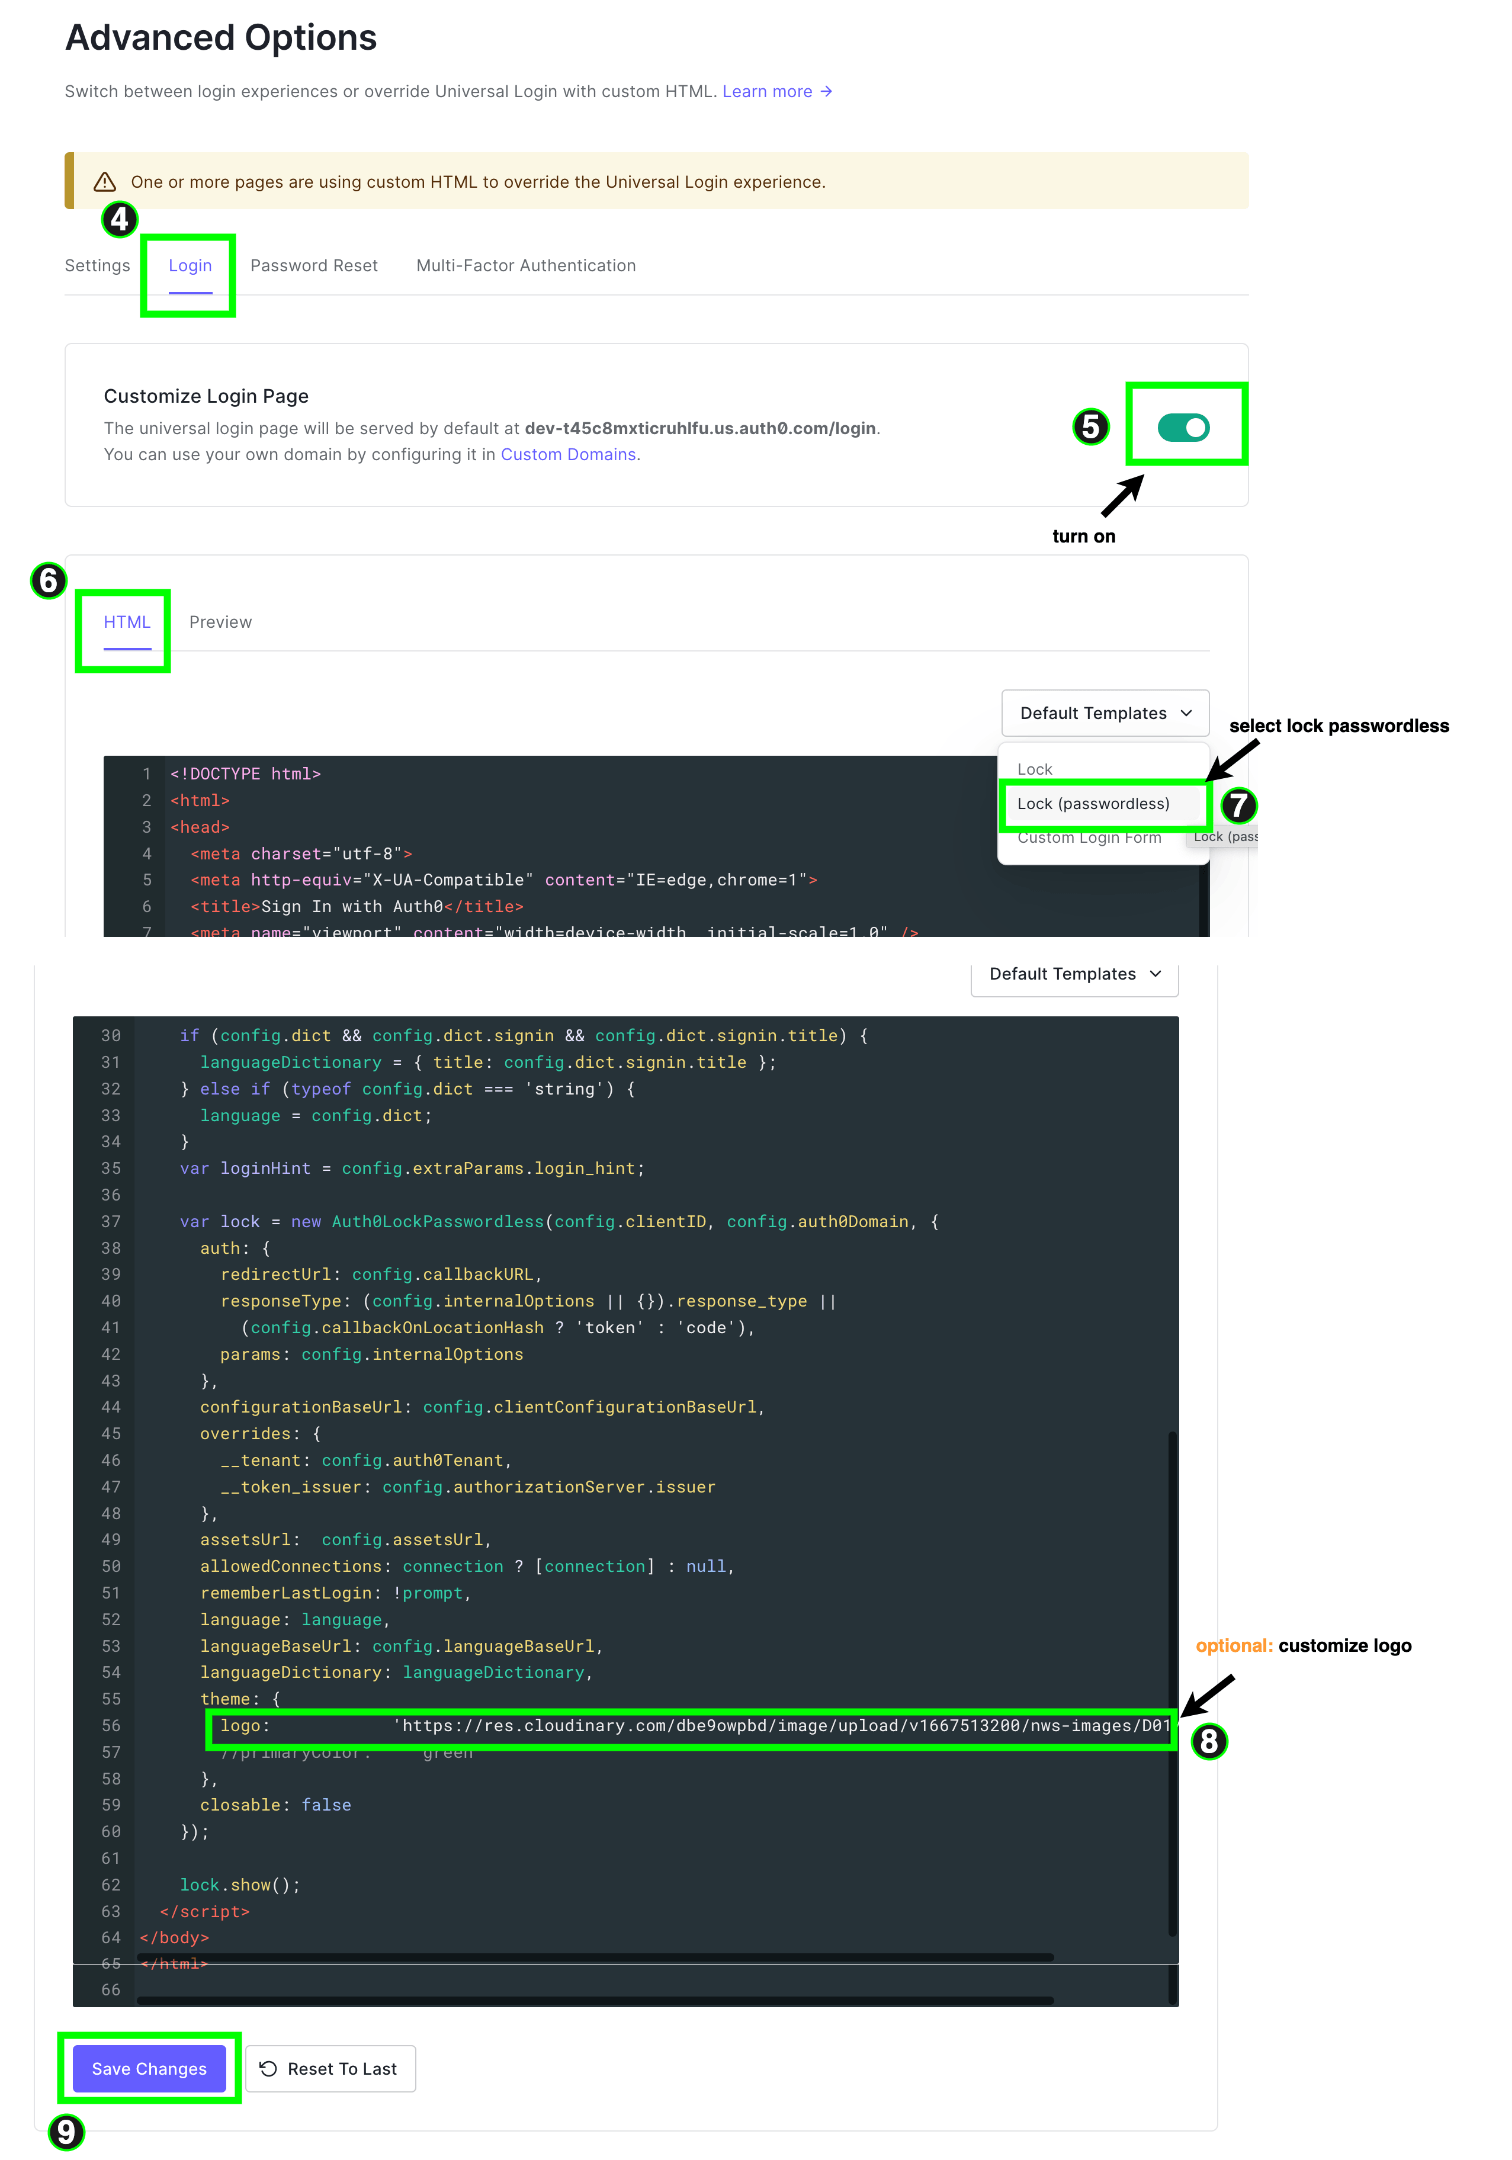
- Next, select advanced options.
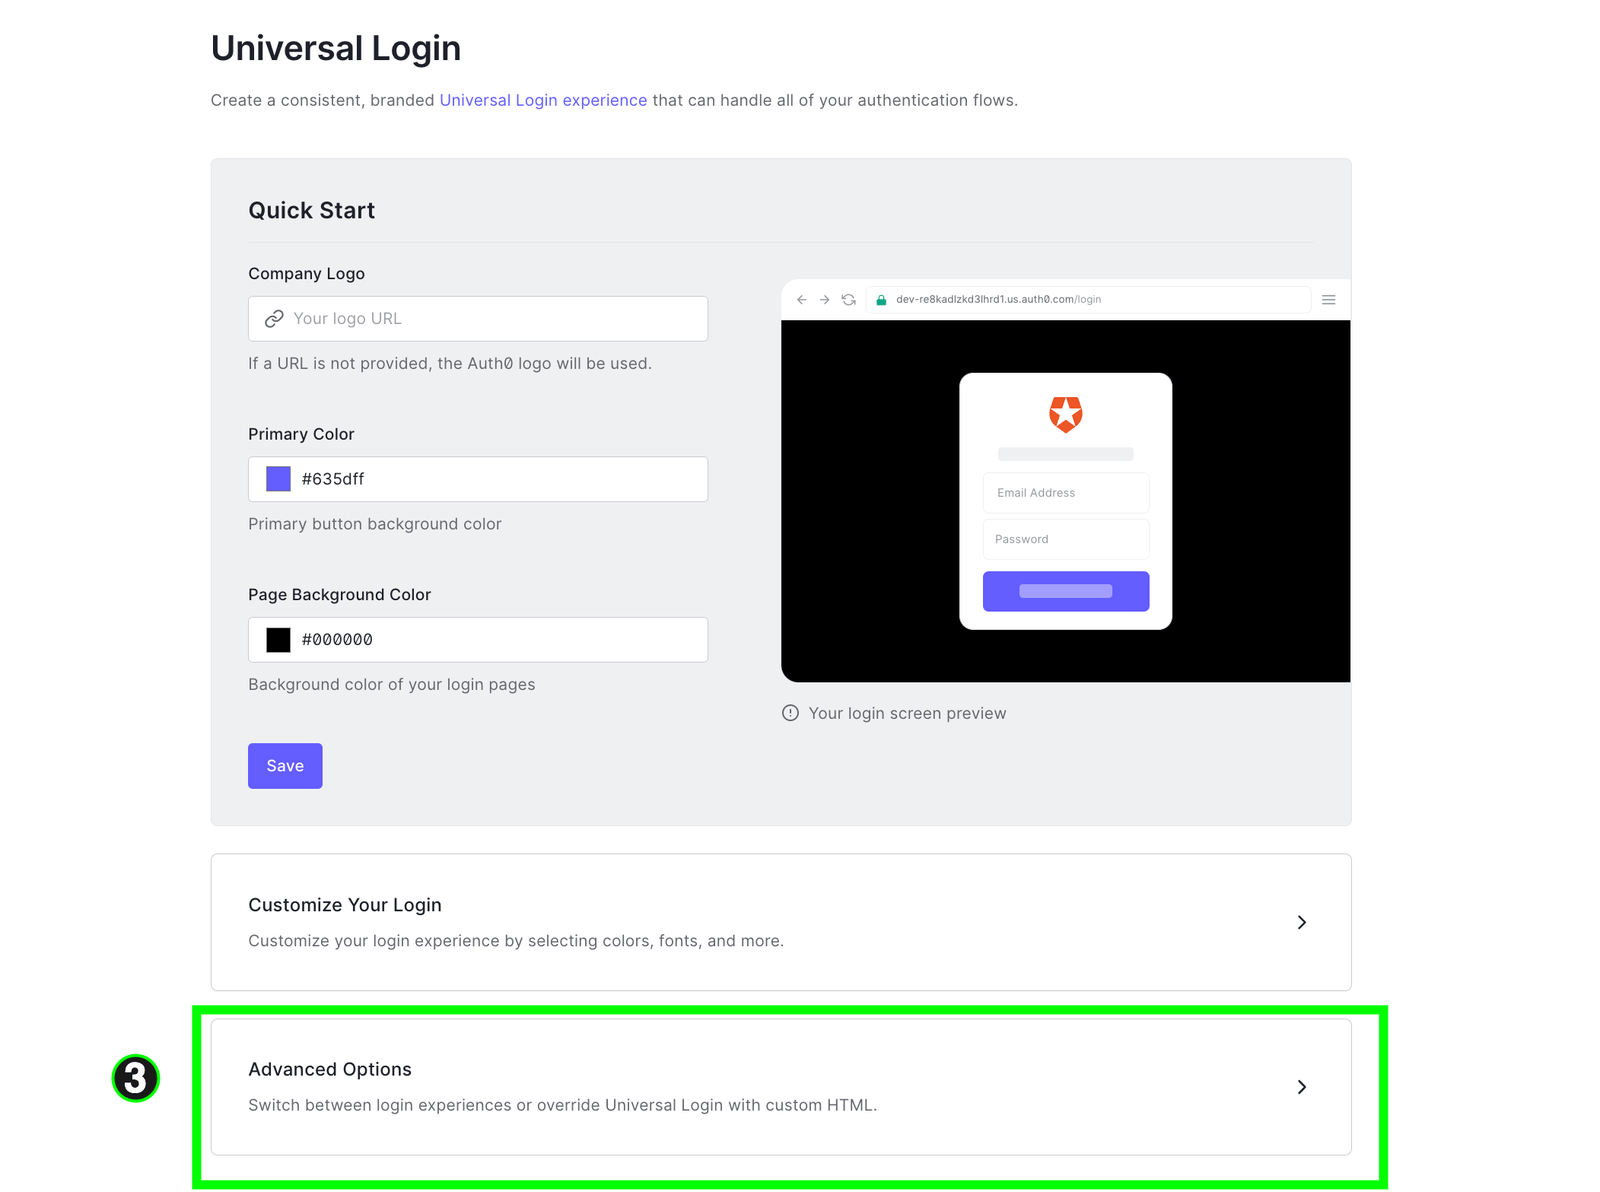
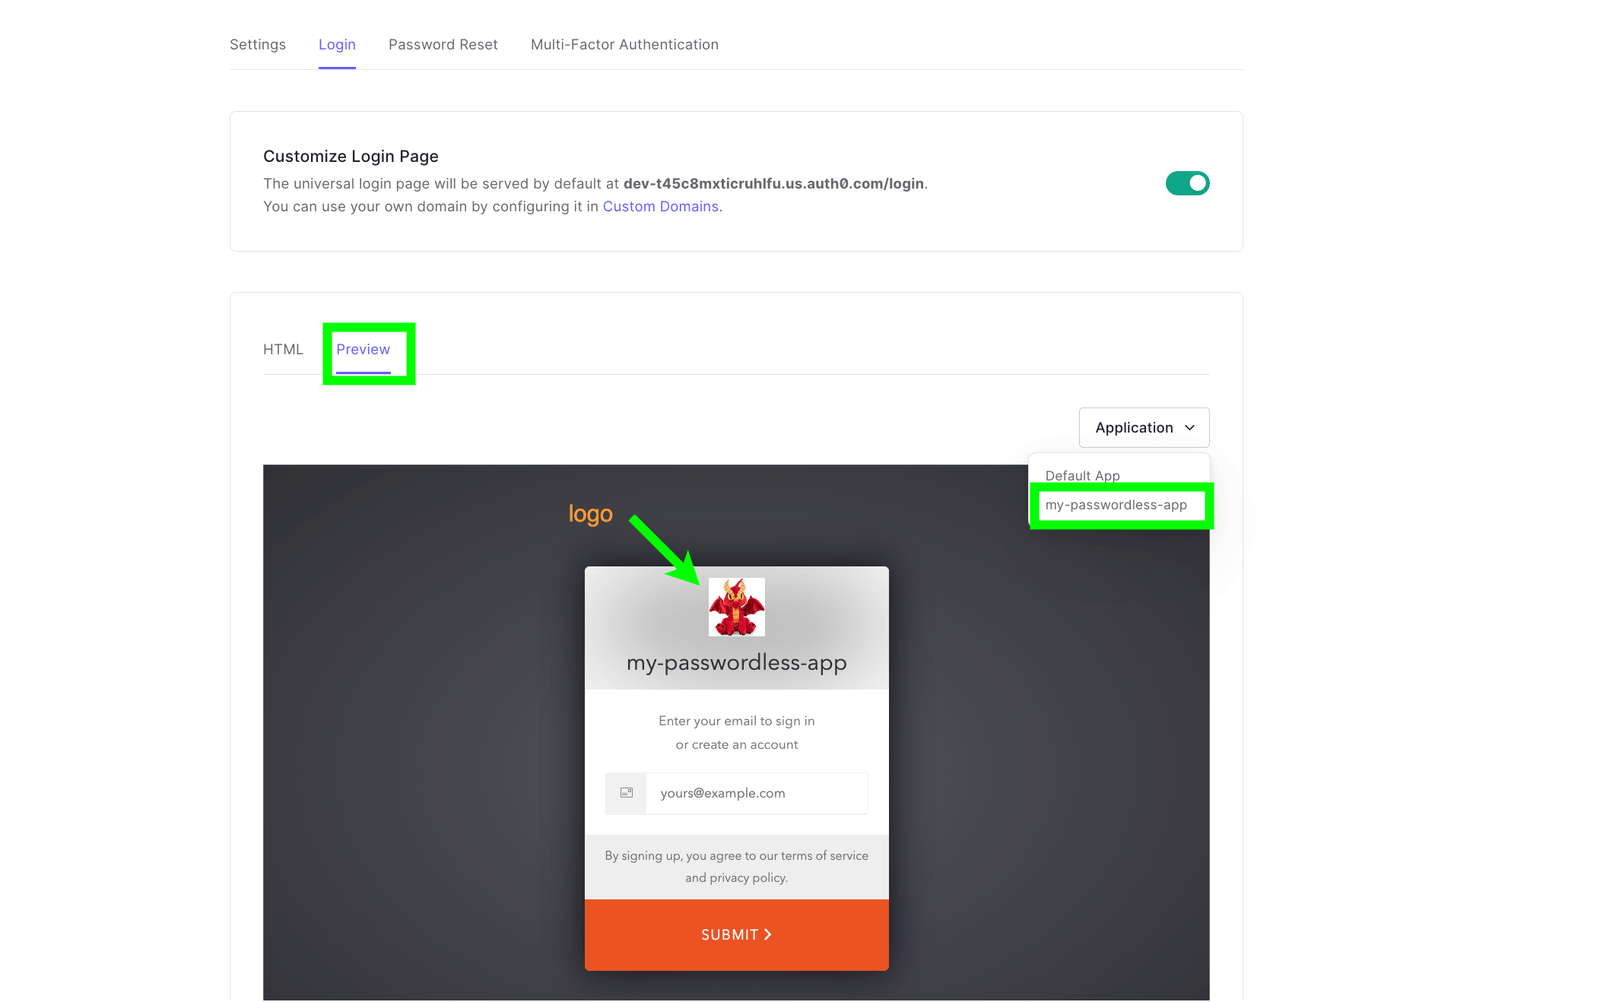
- In the Login tab, toggle the “customize login” toggle. Next, choose the “Lock (passwordless)” option in the HTML templates dropdown. You will be presented with the code associated with the Lock (passwordless) template. In the template, you can customize whatever you want, but here we will only customize the theme object and include our application logo URL, which is just a random image hosted on Cloudinary. Once this is done, click save.
Optionally, you can click on the “Preview” tab to see how our customized Lock (passwordless) template looks, and it exactly matches the one we wanted to achieve in the first place.
Building the Web App
We now have all we need to build our web app. Let’s start this section by installing the dependencies we will need. Open your terminal and enter the following command:
npm i @auth0/nextjs-auth0
The @auth0/nextjs-auth0 SDK provides us with all the necessary tools to integrate the passwordless authentication system in our app.
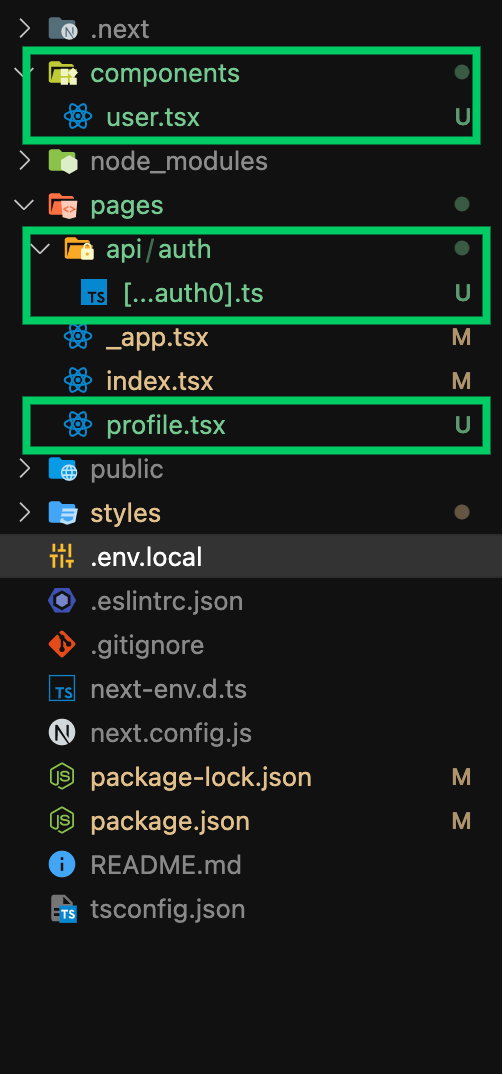
We will also need some files, so we will state the name of each file, its purpose and the necessary commands to create it. The terminal commands assume you are in the root folder of your Next.js project.
The first file we need is called.env.local, which stores the environment variables required to set up the SDK.
touch .env.local
Next is an API route with a slug file name of […auth].ts; this file will be used to configure the SDK and will be stored in the auth folder.
cd ./pages/api
mkdir auth
touch [...auth].ts
For now, our app will contain two pages: the pages/index.tsx file for the homepage and a protected page called a profile.tsx. Let’s create this file:
cd ./pages
touch profile.tsx
We will also need one component file, user.tsx, which will display the user’s profile data.
mkdir components
cd components
touch user.tsx
If everything is done correctly, your folder setup should look like this:
The order in which we build our app will be like this: firstly, we’ll update our environment variables, then our API route, and, finally, update our frontend. Update the .env.local file to match the following:
AUTH0_SECRET=<some-random-string-that-will-be-used-to-encrpt-the-session-cookie>
AUTH0_BASE_URL=http://localhost:3000
AUTH0_ISSUER_BASE_URL=<the-domain-assigned-to-your-auth0-account>
AUTH0_CLIENT_ID=<enter-client-id-of-your-auth0-project>
AUTH0_CLIENT_SECRET=<enter-client-secret-of-your-auth0-project>
Note: The environment variable names have to be the same as the ones above; you can obtain the values of these variables in the settings tab of your Auth0 project.
Next, let’s update our API route to set up our SDK within the […auth].ts file. Paste the following code into the file:
import { handleAuth } from '@auth0/nextjs-auth0';
export default handleAuth();
The handleAuth function returns a basic API route function. It handles login, logout, obtaining the authenticated user’s profile, and redirects and callbacks to and from the Auth0 authorization server in steps 1
and 4 in our universal login diagram. This means our API route is meant to handle calls to the following URLs:
 /api/auth/login
 /api/auth/logout
 /api/auth/callback
 /api/auth/me
Next, head over to our _app.tsx file and use the React components that ship with the SDK to interface with our API route.
import '../styles/globals.css';
import type { AppProps } from 'next/app';
import { UserProvider } from '@auth0/nextjs-auth0';
export default function App({ Component, pageProps }: AppProps) {
  return (
    <UserProvider>
      <Component {...pageProps} />
    </UserProvider>
  );
}
This component uses the UserProvider component to wrap our entire Next.js app. The UserProvider component will interact with our API route to check for an existing session. If one exists,
it attempts to fetch the authenticated user’s profile using (/api/auth/me endpoint).
Next, update pages/index.tsx file with the following code.
import { useUser } from '@auth0/nextjs-auth0';
import Link from 'next/link';
import { useRouter } from 'next/router';
export default function Home() {
  const router = useRouter();
  const { user, error, isLoading, checkSession } = useUser();
  if (!isLoading && user) {
    router.push('/profile');
    return;
  }
  return (
    <section className='container grid_2'>
      <a className='br btn_line' href='api/auth/login'>
        Log In
      </a>
      <a href={'api/auth/login'} className='br btn_line'>
        register
      </a>
    </section>
  );
}
To initiate login, this component renders two anchor tags (not a Link component) that point to our API routes login endpoint.
The Next.js Link component is used for client-side routing. Anchor tags are used instead because we want to make a request to our backend API route.
When any of the links are clicked, it makes a request to the login endpoint on our backend, which in turn redirects the user to our customized passwordless login page that lives on the Auth0 authorization server for them to provide their email in exchange for an OTP.
When this is done, our API route is called back with the authentication response. Next, the UserProvider context provides us with the authenticated user’s profile. This is why our component uses the useUser hook that ships with the SDK to obtain this data.
Here, from within an if statement, whenever we see no loading states and that the user exists—i.e., there is an authenticated user—the app redirects the user to our protected profile page using the NextJS router.
Add the following code to the profile.tsx file:
import { useUser, withPageAuthRequired } from '@auth0/nextjs-auth0';
import React from 'react';
import UserDetails from '../components/user';
function Profile() {
  const { user, isLoading } = useUser();
  if (isLoading) {
    return <h1>loading....</h1>;
  }
  return <section className='container grid_2'>{user && <UserDetails user={user} />}</section>;
}
export default withPageAuthRequired(Profile);
This page again uses the useUser hook again whenever the user is yet to be resolved—i.e., during loading states, it renders a loading message, else it renders our userDetails custom component, which gets fed the
users profile as props before we proceed to update our userProfile component.
Notice that our profile page component is exported and wrapped by the withPageAuthRequired higher-order function that ships with the SDK. This helps to add route protection to our profile page painlessly. Also note the
way withPageAuthRequired is called with the profile page component passed as a parameter to it. This is because our profile page is client-side rendered. For server-side rendered pages, you can assign the getServerSideProps fetcher as shown below.
export const getServerSideProps= withPageAuthRequired()
The userDetails component looks like so; update the user.tsx file with the code below.
import { UserProfile } from '@auth0/nextjs-auth0';
export default function UserDetails({ user }: { user: UserProfile }) {
  return (
    <section className='grid_2'>
      <figure className='prof_img_con'>
        {user.picture && <img src={user.picture} alt={'some-alt-data'} />}
      </figure>
      <div className='user_details_pkg'>
        <UserDetail title={'name'} details={user.name} />
        <UserDetail
          title={'email'}
          details={
            <span className='flexi'>
              <p>{user.email}</p>
              <span className={`dot ${user.email_verified ? 'bg-gr' : 'bg-r'}`}></span>
            </span>
          }
        />
        <UserDetail title={'nickname'} details={user.nickname} />
      </div>
      <a className='br btn_solid' href='/api/auth/logout'>
        logout
      </a>
    </section>
  );
}
function UserDetail({ title, details }: { title: string; details: any }) {
  return (
    <article className='detail_box br'>
      <h6 className='detail_box_heading'>{title}</h6>
      <p>{details}</p>
    </article>
  );
}
The file contains two components, one called UserDetail and the main component called UserDetails which accepts the authenticated user’s profile as props. The userProfile component renders the picture, email, nickname and an anchor tag pointing to our API route’s logout route when clicked. To see the running application, open your terminal and run the following command:
npm run dev
Best Practices When Using Passwordless Authentication for Email and SMS
Listed below are tips to keep in mind when using passwordless authentication for email and SMS:
- Try to keep OTP length and duration optimal.
- Customize email or SMS to carry necessary data such as the application name, the information about the intended recipient, etc.
Conclusion
Even though our guide focuses more on passwordless authentication, be rest assured that Auth0 gives us the necessary tools to build and customize secure, robust and extensible (with actions and rules) authentication systems that span a lot of use cases and give room to customize the flow of events and tailor them to our application needs.

Chinedu Imoh
Chinedu is a tech enthusiast focused on full-stack JavaScript and Infrastructure engineering.
Related Posts
Comments
All articles
Topics
Web MobileMobile
Desktop
Design
Productivity
People
