
Learning Vercel AI SDK—Part 2: Creating Your First Agent

Summarize with AI:
With the Vercel AI SDK project we set up last time, today we will learn how to build our first agent!
If you have not yet read Learning Vercel AI SDK—Part 1, that is the best way to get started to follow along today.
In this article, we will learn how to build your first AI agent using the Vercel AI SDK and OpenAI. We are going to use:
- TypeScript
- Vercel AI SDK
- OpenAI
Before getting started, make sure you have the required setup and OpenAI API key. You can get an API key from here.
Setting Up the Project
To get started, create a new Node.js application and set it up to use TypeScript. For that, in your terminal, run the following commands:
npm install -D typescript @types/node ts-node
npx tsc  -init
Once the commands have been executed, replace the contents of your tsconfig.json file with the configuration shown below.
{
  "compilerOptions": {
    "target": "ES2022",
    "module": "ES2022",
    "moduleResolution": "node",
    "rootDir": "./src",
    "outDir": "./dist",
    "strict": true,
    "esModuleInterop": true
  },
  "include": ["src/**/*"],
  "exclude": ["node_modules"]
}
After that, install the dependencies below:
- npm install dotenv
- npm install -D @types/dotenv
- npm install -D @types/node tsx typescript
- npm i --save-dev @types/json-schema
- npm install ai @ai-sdk/openai zod
Next, add the .env file to the project root and paste the OpenAI key information below inside the file.
OPENAI_API_KEY= ""
Now that you’ve added your API key and installed all the dependencies, you’ll notice that your package.json file has been updated with these changes.
{
  "name":"agent1",
  "main": "index.js",
  "type": "module",
  "scripts": {
    "build": "tsc",
    "start": "tsc && node dist/index.js"
  },

  "devDependencies": {
    "@types/dotenv": "^6.1.1",
    "@types/json-schema": "^7.0.15",
    "@types/node": "^25.0.6",
    "ts-node": "^10.9.2",
    "tsx": "^4.21.0",
    "typescript": "^5.9.3"
  },
  "dependencies": {
    "@ai-sdk/openai": "^3.0.7",
    "ai": "^6.0.27",
    "dotenv": "^17.2.3",
    "zod": "^4.3.5"
  }
}
In your setup, the package name and version may differ. Next, create a src folder in your project and add an index.ts file inside it. In that file, log the value of your OpenAI key to verify that the project has been configured correctly.
import dotenv from 'dotenv';
dotenv.config();
const openaiApiKey: string | undefined = process.env.OPENAI_API_KEY;
console.log(`OpenAI API Key: ${openaiApiKey}`);
When you execute npm run start in your terminal, you should see your OpenAI key printed in the console.
Agents use tools to perform tasks. So let’s start with creating tools.
Creating a Tool
We’ll begin by creating a very simple tool. The Vercel AI SDK makes it very straightforward to create a tool. You call the tool function and pass an object in it. The input object has properties such as, description, inputSchema and asynchronous execute function.
import { tool, zodSchema } from "ai";
import z from "zod";

export const getTimeTool = tool({
    description: 'Returns the current date and time in ISO format.',
    inputSchema: zodSchema(z.object({})),
    execute: async () => {
      return { time: new Date().toISOString() };
    },
});
The above tool returns the time in ISO format. Notice:
- Schema:
z.object({}): That means model is instructed that to call this tool by passing an empty object. inputSchema: zodSchema(z.object({})): That means the tool’s input is an empty object; the model should not pass any arguments, and the SDK will enforce that.
So, the getTimeTool returns an object containing current time in ISO format.
Next, let’s create one more tool to greet the person.
import { tool, zodSchema } from 'ai';
import { z } from 'zod';

export const greetTool = tool({
    description: 'Greets a person by name. Use when the user says hello or asks to greet someone.',
    inputSchema: zodSchema(z.object({
      name: z.string().describe('Name of the person to greet'),
    })),
    execute: async ({ name }) => {
      return { message: `Hello, ${name}!` };
    },
  });
This tool takes person name as input parameter and a prints greeting message.
Creating Agent
We will now use these two tools within an agent to generate a greeting that includes the current time in ISO 8601 format.
To orchestrate tool execution, instantiate an agent using the ToolLoopAgent class. This agent is responsible for iterative tool invocation and model coordination. As shown below, the constructor requires three primary inputs:
model— The underlying LLM responsible for reasoning and tool selectioninstructions— A system-level directive that constrains behavior (e.g., instructing the agent to greet the user and include the current time in ISO format)tools— An array of tool definitions that the agent is authorized to invoke during execution
By injecting the previously defined tools into the tools array, the agent can call them as needed, retrieve the current timestamp, format it in ISO 8601 and construct the greeting deterministically.
var system = `You are a helpful assistant. For this task you MUST:
1. First call the gettime tool to get the current time in ISO format.
2. Then call the greet tool with the person's name (e.g. DJ).
3. After you have called BOTH tools and received their results, write one short final message that greets the person and includes the time in ISO format (e.g. "Hey DJ, here is the time in ISO format: ...").
Do not skip the tools. Call both gettime and greet first, then write your final combined message.`;

const myAgent = new ToolLoopAgent({
    model: openai("gpt-4o-mini"),
    instructions: `${system}`,
    tools: {
      timetool: getTimeTool,
      greettool: greetTool,
    },
    toolChoice: 'auto',
    stopWhen: stepCountIs(3),
});
You can use this agent as shown below, by calling the generate function and passing the user message in the prompt.
const { output } = await myAgent.generate({
    prompt: [
        {
            role: 'user',
            content: "Greet Tom Cruise"
        },
    ],
})
console.log(output);
You should get this output from the agent:

Debugging Agent
You can debug the agent’s behavior by inspecting the steps returned during execution. These steps show each model decision and tool call, making it easier to trace how the agent reached its final output.
const { output,steps } = await myAgent.generate({
prompt: [
{
role: 'user',
content: "Greet Tom Cruise"
},
],
})
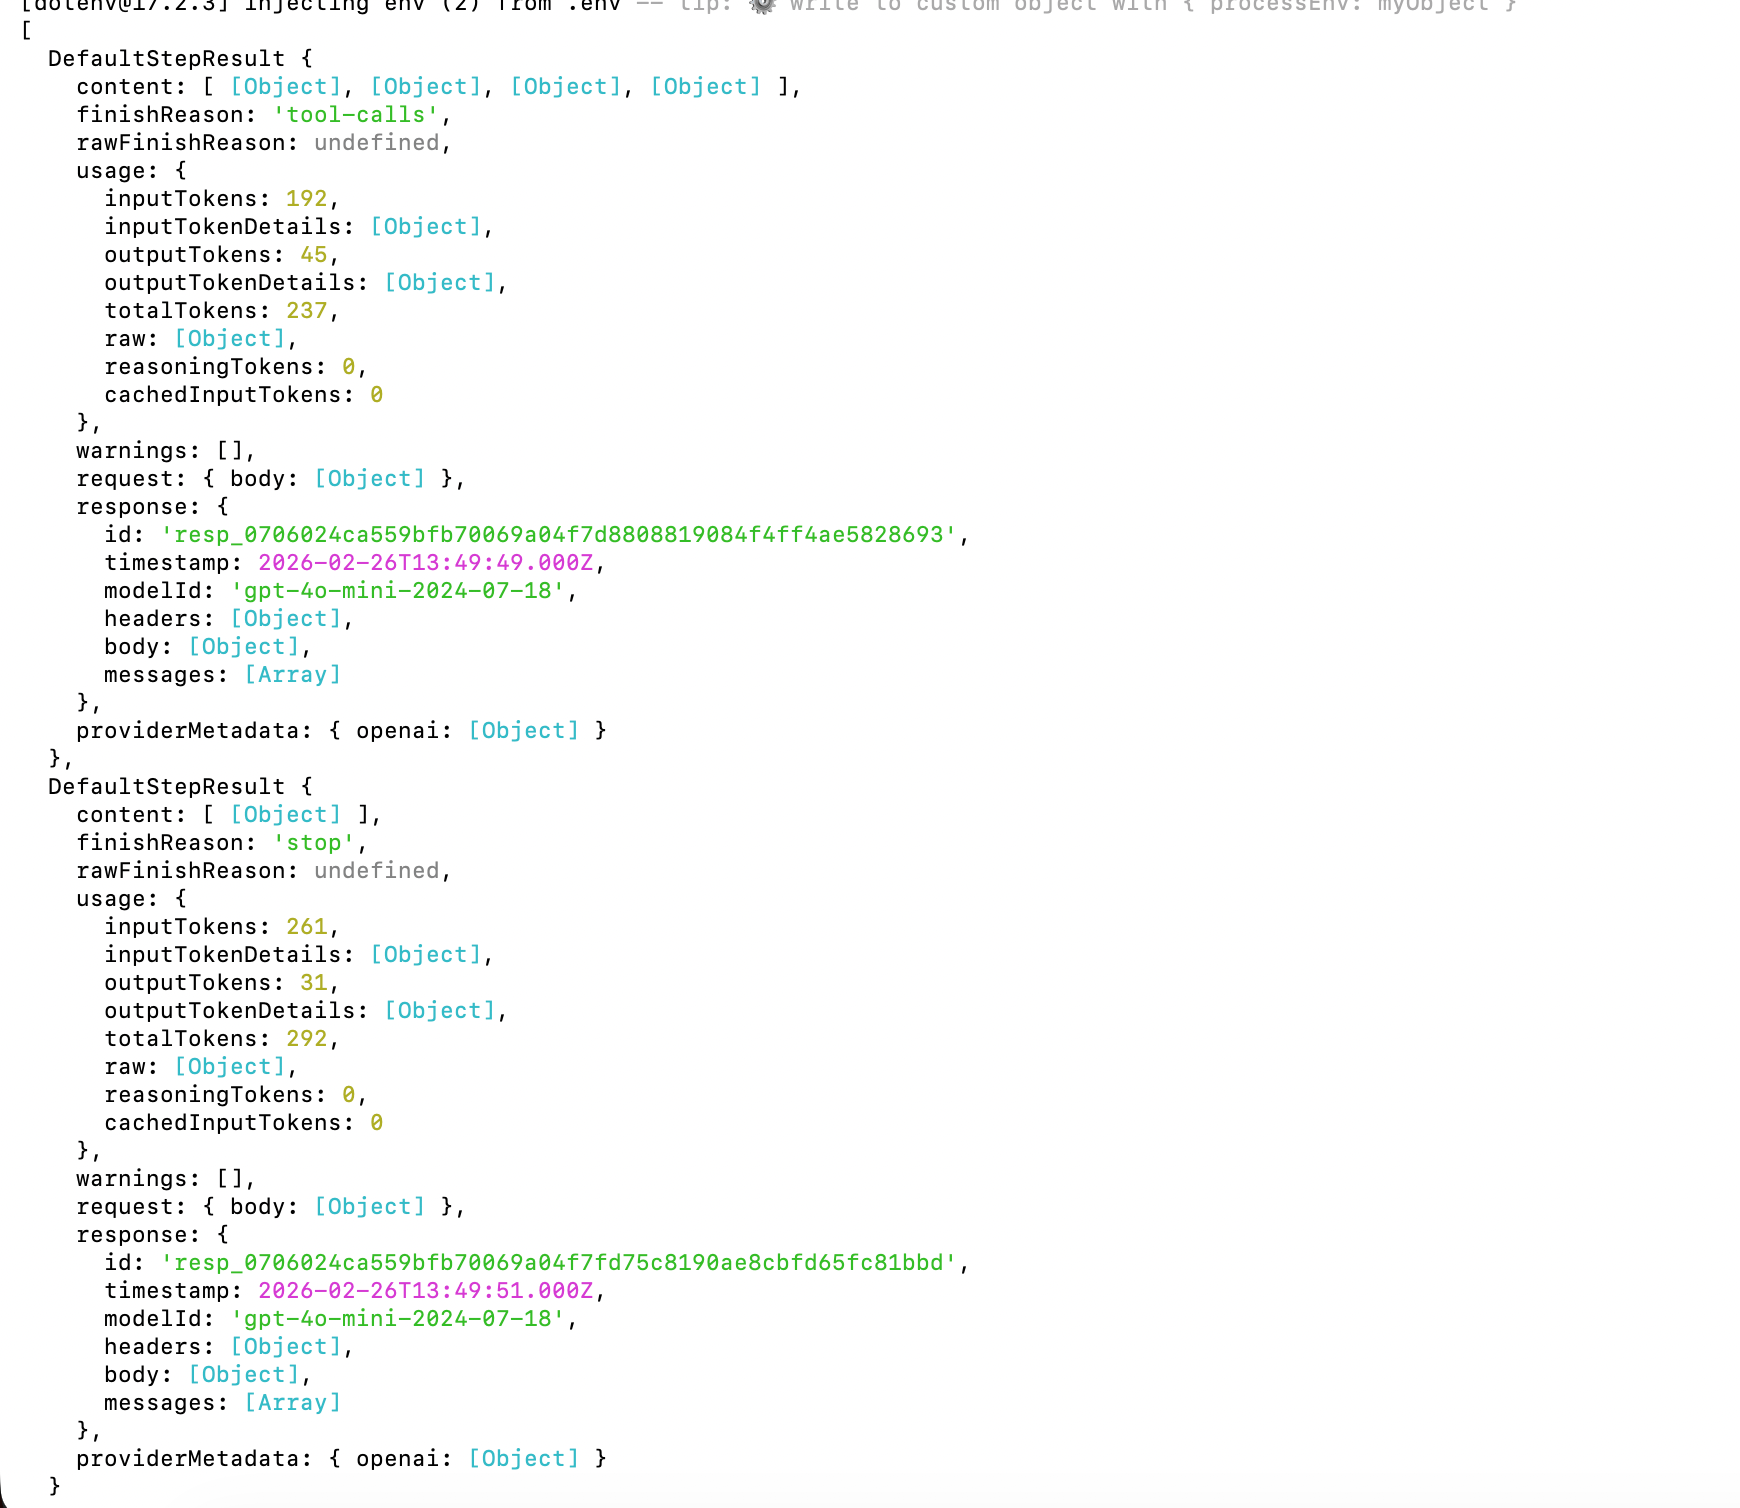
console.log(steps[0].toolCalls[0].toolName);
console.log(steps);
The output should include the name of the first toolName alongside metadata of all tools being invoked.
As you see from the steps output, you can print result of the tool, input and other details. For example, the below snippet prints the first toolName and the output of second tool.
const { output,steps } = await myAgent.generate({
    prompt: [
        {
            role: 'user',
            content: "Greet Tom Cruise"
        },
    ],
})

console.log(steps[0].toolCalls[0].toolName);
console.log(steps[0].toolResults[1].output);
You should get the output:

Agent Loop Control
By default, the agent runs for 20 steps, but we are overriding that for three steps by passing a value to stopWhen property.
const myAgent = new ToolLoopAgent({
    //rest of code
    stopWhen: stepCountIs(3),
});
By default, an agent runs for up to 20 steps. In each step, the model can either generate a final response or call a tool.
If the model generates text, the agent finishes. If it calls a tool, the AI SDK executes that tool and feeds the result back to the model.
To allow the agent to call multiple tools in sequence, we need to increase the stopWhen limit. After each tool execution, the agent starts a new generation step, giving the model another chance to call a tool or produce the final output.
Each step represents one generation that is either generated text or call to the tool. The loop continues until:
- A finish reasoning other than tool calls is returned, or
- A tool that is invoked does not have an execute function, or
- A tool call needs approval, or
- A stop condition is met
To stop the loop, you can combine the multiple stop conditions such as:
stepCountIshasTooCall- custom condition
hasToCall is a built-in stopping condition and stops the agent loop when a particular tool is called. You can combine two stop conditions as shown below:
const myAgent = new ToolLoopAgent({
    model: openai("gpt-4o-mini"),
    instructions: `${system}`,
    tools: {
      timetool: getTimeTool,
      greettool: greetTool,
    },
    toolChoice: 'auto',
    stopWhen: [stepCountIs(3),
        hasToolCall('greettool')
    ]
});
Agent to Send Blog Summary
Putting everything together, let’s build an agent that fetches a blog post, generates a summary and sends it to a specified email address. We’ll use the following libraries:
- Resend – To send the email. You’ll need an API key from Resend to authenticate requests.
- Cheerio – To parse and extract content from the blog’s HTML page.
Before implementing the agent, install the required dependencies in your project:
npm install resend
npm install cheerio
Once installed, the agent can use Cheerio to scrape the blog content, generate a summary via the model and then use Resend to deliver that summary via email.
Let’s start by defining a tool that extracts content from a given webpage. This tool will fetch the page, parse its HTML and return the relevant information needed for further processing.
import { tool, zodSchema } from 'ai';
import { z } from 'zod';
import * as cheerio from 'cheerio';

export const extractWebpageTool = tool({
  description: 'Fetches a webpage URL and returns its main text content.',
  inputSchema: zodSchema(z.object({
    url: z.string().url().describe('Webpage URL'),
  })),
  execute: async ({ url }) => {
    try {
      const res = await fetch(url, { headers: { 'User-Agent': 'Agent/1.0' } });
      if (!res.ok) return { success: false, content: '', error: `HTTP ${res.status}` };
      const html = await res.text();
      const $ = cheerio.load(html);
      $('script, style, nav, footer').remove();
      const content = $('body').text().replace(/\s+/g, ' ').trim().slice(0, 15_000);
      return { success: true, url, content };
    } catch (err) {
      return { success: false, content: '', error: err instanceof Error ? err.message : String(err) };
    }
  },
});
Next let’s create a tool to send an email, as shown below:
import { tool, zodSchema } from 'ai';
import { z } from 'zod';
import { Resend } from 'resend';

const resend = new Resend('key);  // your key

export const sendEmailTool = tool({
  description: 'Sends an email. Pass to and body.',
  inputSchema: zodSchema(z.object({ to: z.string().email(), body: z.string() })),
  execute: async ({ to, body }) => {
    const { data, error } = await resend.emails.send({
      from: 'hello@nomadcoder.ai',
      to: [to],
      subject: 'From Agent',
      html: body.includes('<') ? body : `<p>${body.replace(/\n/g, '</p><p>')}</p>`,
    });
    return error ? { success: false, error: error.message } : { success: true, message: `Sent to ${to}` };
  },
});
Next, combine these two tools and register them with the agent so it can orchestrate their execution as part of its workflow.
var system = `You are a helpful assistant. For this task you MUST:
1. First call the extractwebpagetool to get the content of the webpage.
2. Create a summary of the webpage content.
3. After that call the sendemail tool to send the email to the recipient.
3. After you have called BOTH tools and received their results, write one short final message that greets the person and includes the time in ISO format (e.g. "Hey DJ, here is the time in ISO format: ...").
Do not skip the tools.`;

const myAgent = new ToolLoopAgent({
    model: openai("gpt-4o-mini"),
    instructions: `${system}`,
    tools: {
      extractWebpageTool: extractWebpageTool,
      senemail: sendEmailTool,
    },
    toolChoice: 'auto',
    stopWhen: stepCountIs(3),
});
Next, invoke the agent in loop as shown below:
const { output,steps } = await myAgent.generate({
    prompt: [
        {
            role: 'user',
            content: "Send summary of https://www.telerik.com/blogs/how-to-use-cursor-modern-angular to debugmode@outlook.com"
        },
    ],
})

console.log(output);
This agent will send the summary of the given post to the passed email address.
Summary
In this article, we explored how to build an agent using the Vercel AI SDK and implemented a practical example that generates a blog summary and sends it to a specified email address. I hope you found it helpful. Thanks for reading.

Dhananjay Kumar
Dhananjay Kumar is the founder of nomadcoder, an AI-driven developer community and training platform in India. Through nomadcoder, he organizes leading tech conferences such as ng-India and AI-India. He partners with startups to rapidly build MVPs and ship production-ready applications. His expertise spans Angular, modern web architecture and AI agents, and he is available for training, consulting or product acceleration from Angular to API to agents.
Related Posts
Comments
All articles
Topics
Web MobileMobile
Desktop
Design
Productivity
People
