A Practical Guide to Using Vercel AI SDK in Next.js Applications

Summarize with AI:
This article provides a step-by-step guide on integrating the Vercel AI SDK in Next.js applications. It touches on the various concepts, components and supported providers. To illustrate these concepts, we’ll create a simple demo application using the SDK.
It is the year 2024, and artificial intelligence is undeniably a big deal. We have seen its application across various scopes, from intelligent assistants to self-driving cars. AI is rapidly transforming the way we live and interact with technology.
In the web development field, Vercel, a major player, has made great efforts toward becoming a TypeScript framework for AI applications and, as a result, introduced the Vercel AI SDK.
The Vercel AI SDK abstracts the complexities and simplifies the process of building AI-powered applications with various frameworks like React, Next.js, Vue, Svelte and more. It offers a unified API for AI providers like Google, Open AI, Mistral and Anthropic. It also supports streaming, generative UI and other advanced capabilities.
This article provides a step-by-step guide on integrating the Vercel AI SDK in Next.js applications. It touches on the various concepts, components and supported providers. To illustrate these concepts practically, we’ll create a simple demo application that integrates the SDK.
Understanding the Fundamentals
Before we discuss the Vercel AI SDK, let’s briefly look at some of the fundamental concepts we should be aware of.
What Is an AI Model?
AI models are programs that undergo training using large datasets to identify patterns and make decisions independently without human intervention. Based on the acquired knowledge, they can then make predictions on new and unseen data.
Some common examples of AI models include image recognition models, recommender systems and natural language processing models, among others.
Generative AI
Generative AI models learn the patterns and structure of the data they were trained with and then they can generate new data with similar characteristics.
For example, a generative AI model can generate an image based on given text. They can also create realistic images of people or places that don’t exist.
Large Language Models
A large language model (LLM) is a subset of generative models primarily focusing on text. It is trained on large amounts of text data, including books, articles, conversations and code, allowing it to understand and generate responses in impressive ways.
Due to training in vast amounts of written text, LLMs are more appropriate for certain use cases than others. A model trained on GitHub data would be better at understanding and predicting sequences in source code.
Prompts
A prompt is simply an instruction provided to an LLM that instructs it on what to do—the inputs that trigger the model to generate text.
Imagine giving instructions to a friend. A prompt is like telling your LLM what kind of response you want. The quality and accuracy of an LLM’s output are significantly influenced by how well-constructed the prompt is. The more precise and detailed the instructions are, the better the LLM can understand a request and generate the desired output.
The Vercel AI SDK offers two types of prompts. A text prompt is just a string value, while a message prompt is an array containing more detailed information.
Streaming
Large language models (LLMs) can take some time to generate responses, depending on the model and the prompt you give it. In interactive use cases where users want instant responses, like chatbots or real-time applications, this delay can be annoying.
To solve this problem, LLMs use a technique known as streaming, which involves sending chunks of the response data as they become available rather than waiting for the complete response. This can significantly improve user experience compared to the non-streaming approach.
The Vercel AI SDK
The Vercel AI SDK is a comprehensive toolkit for building AI applications. It simplifies the integration of AI into modern web applications, and it offers many advantages:
- It is compatible with various modern frontend frameworks, including React, Next.js, Vue.js, Nuxt and Svelte, and it provides server-side Node.js support.
- It supports multiple AI models from leading technology companies, including Open AI and Google.
- It allows us to stream response data.
- It provides generative UI capabilities.
- It has strong community support due to its wide adoption.
The SDK is divided into three main parts: AI SDK Core, AI SDK UI and AI SDK RSC. We will take a look at each of these components in the upcoming sections.
AI SDK Core
The Vercel AI SDK Core provides a standardized approach to integrating interactions with LLMs in modern web applications.
Various companies such as Google and OpenAI, referred to as providers, offer access to a range of LLMs with differing strengths and capabilities through their own APIs. These providers also have distinct ways of interfacing with their models.
Vercel AI SDK Core solves this issue by offering a single way of interfacing with the LLMs from the supported providers through a Language Model Specification. The Language Model Specification is a set of specifications published by Vercel as an open-source package that can be used to create custom providers.
Vercel AI SDK Core simplifies the process of switching between providers and makes integrating LLMs easy. It boils down to deciding the type of data to generate and how it should be delivered while abstracting complexities and differences between providers.
This tool offers some core functions to work with LLMs in any JavaScript environment:
generateText: In its most basic form, this function generates an appropriate response when called with an object containing the model type and prompt as arguments.streamText: This function works just likegenerateText, but it streams the response data back instead.generateObject: This function generates a typed, structured object that matches a Zod schema.streamObject: This function streams a structured object that matches a Zod schema.
We’ll see how we can use some of these functions later in this article.
AI SDK UI
The AI SDK UI simplifies the process of building interactive applications like chat applications, handling complex tasks like state management, parsing and streaming data, data persistence and more.
It offers three main hooks, each serving a distinct purpose:
useChat: Provides real-time chat streaming and manages input, message, loading and error state, making it easy to integrate into any UI design.useCompletion: Enables text completions, chat input state management and automatic UI updates as new completions are streamed from an AI provider.useAssistant: Facilitates interaction with OpenAI-compatible assistant APIs, managing UI state and updating it automatically as responses are streamed.
AI SDK RSC
The AI SDK RSC extends the SDK’s power beyond plain text, providing LLMs with rich, component-based interfaces using the React Server components approach employed in Next.js.
It enables streaming user interfaces directly from the server during model generation, eliminating the need to conditionally render them on the client based on the data returned by the language model.
Vercel AI SDK Providers
The SDK provides great support for several LLMs from various providers. The image below is a table from the Vercel AI SDK official documentation highlighting different models and their capabilities:
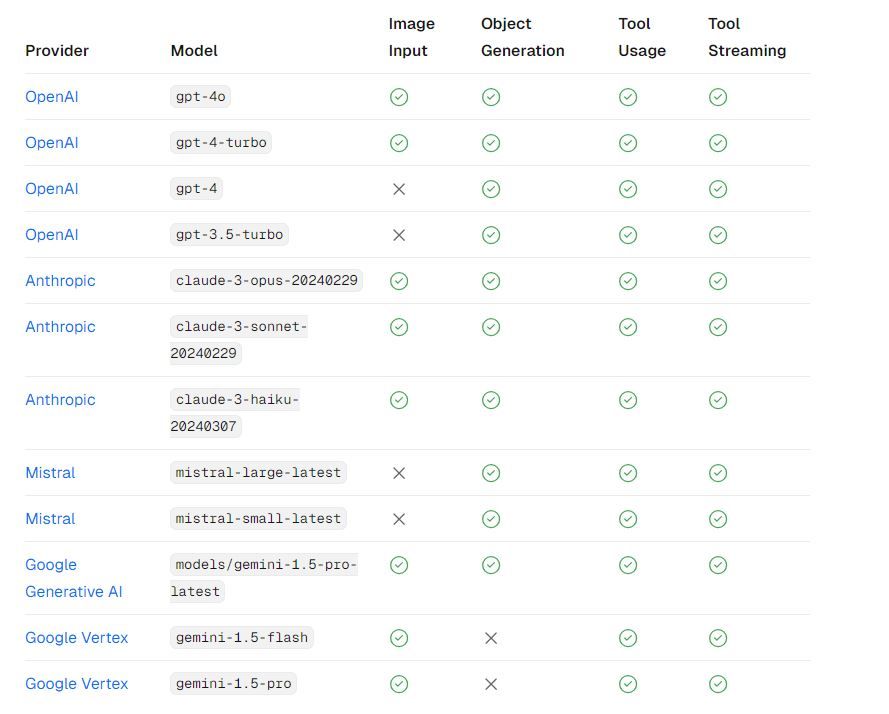
The SDK’s language specification is open source, so you have the option to create your custom provider.
Project Setup
Now that we have some basic knowledge, let’s get hands-on with the Vercel AI SDK.
Run the command below to bootstrap a Next.js application:
npx create-next-app
Enter a name for the project and fill in the rest of the prompts as shown below:

Run the command below to navigate into the newly created project folder:
cd vercel-ai-sdk-demo
Next, run the command below to install the required dependencies:
npm install ai @ai-sdk/google @ai-sdk/react zod
Here, we installed the Vercel AI package, the Vercel AI SDK’s Google provider and Zod, a TypeScript-first schema validation library.
Lastly, since we are using the Google Provider here, we need to configure a Google Gemini API key. While other providers exist, Google offers a free tier that can be a great starting point.
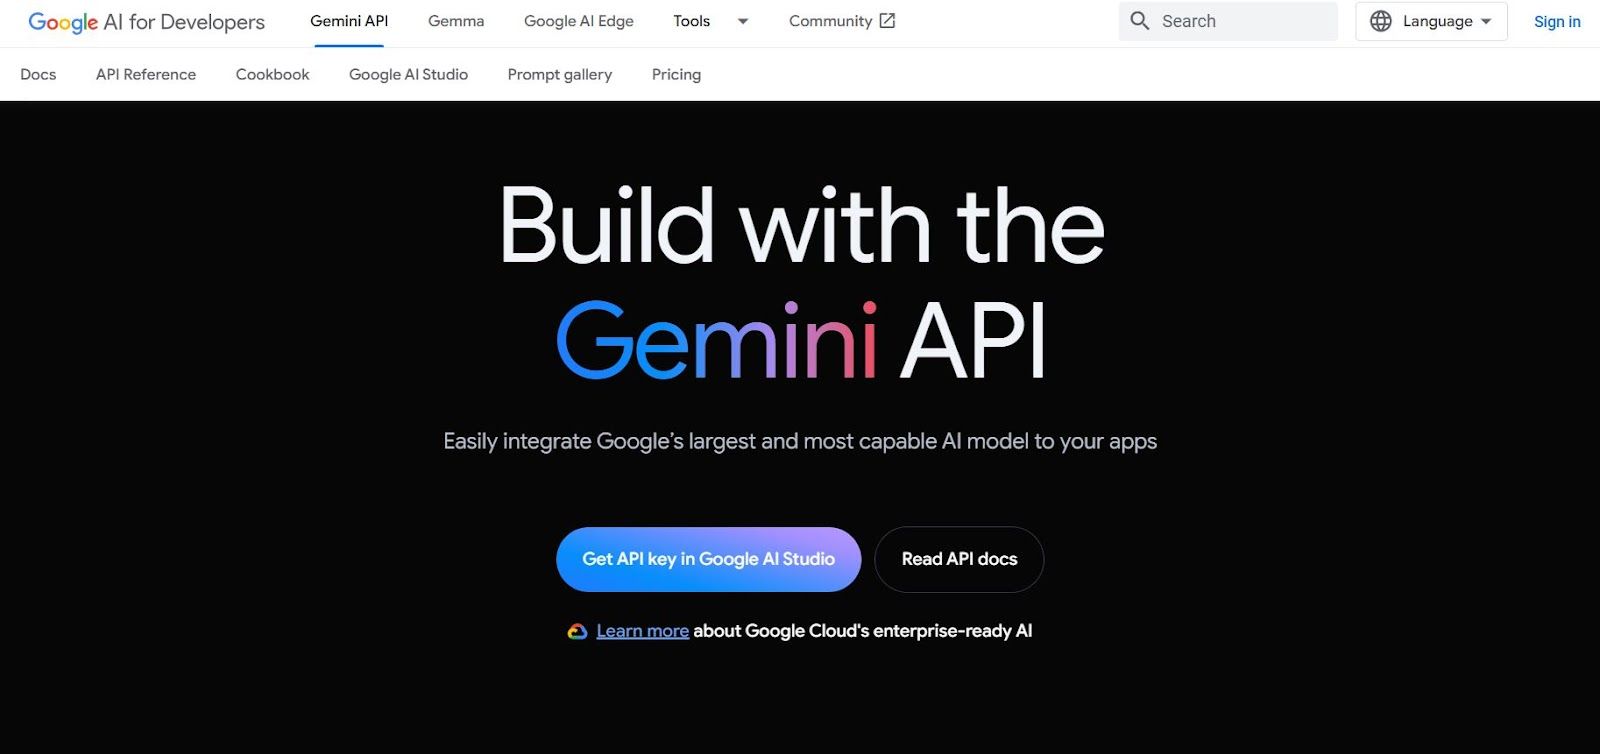
Click on the “Get API key in Google AI Studio” button on the landing page.
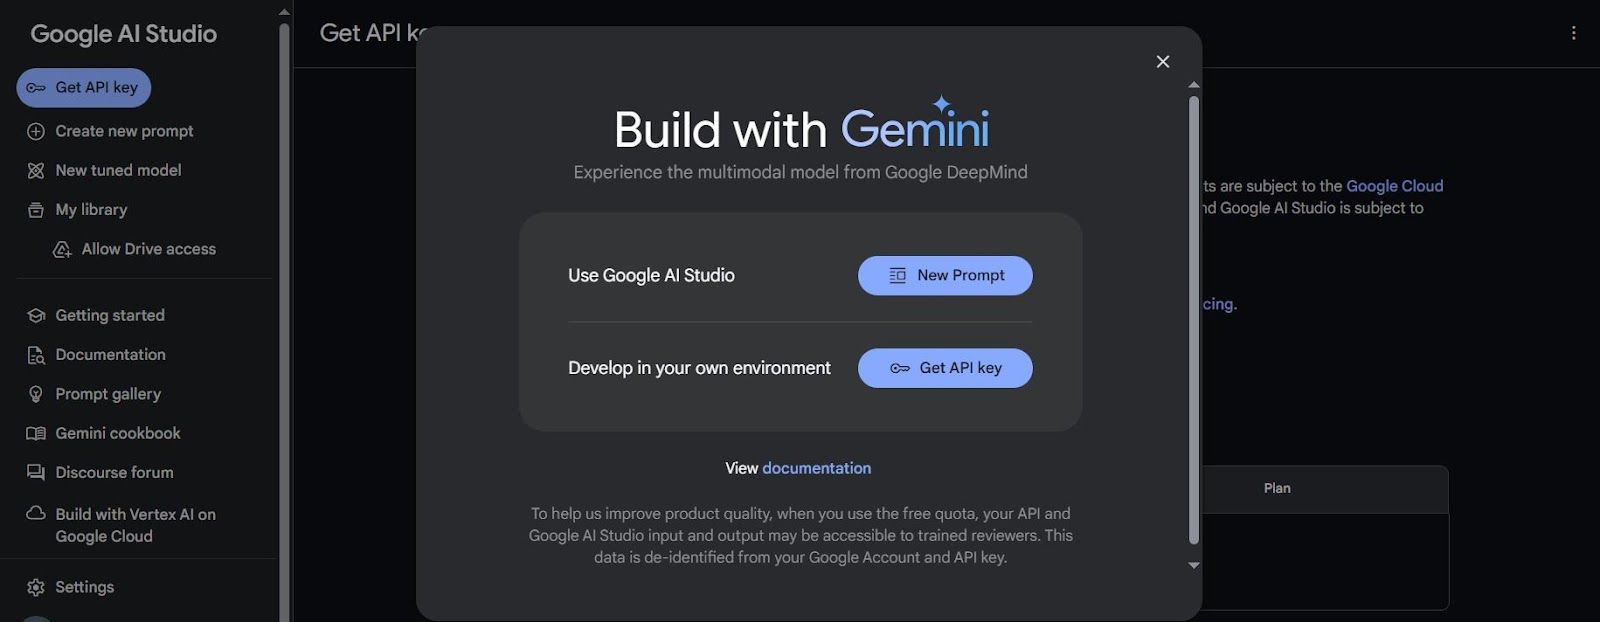
Click on “Get API Key” on the sidebar in the dashboard.
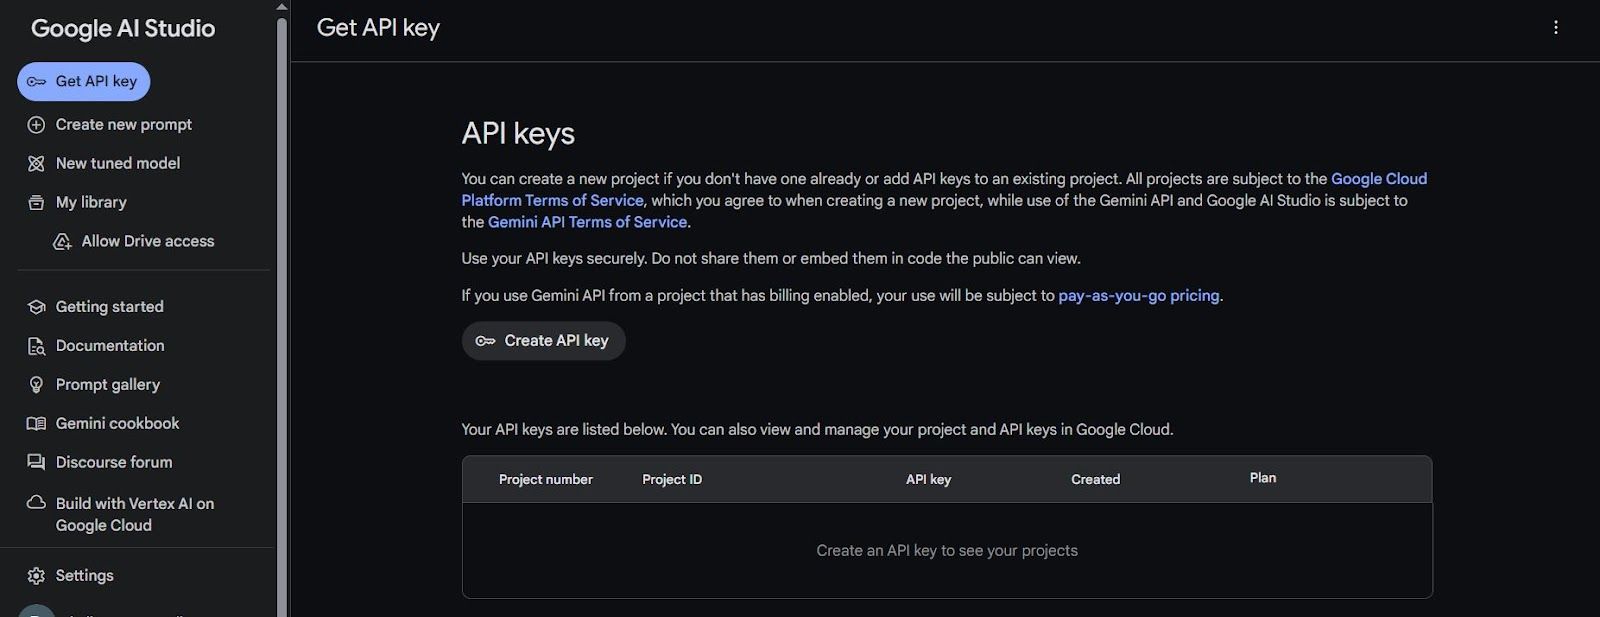
Click on “Create API key” and follow the steps to create the API key accordingly.
Next, create a .env.local file at the root of your project and add the Google Gemini API key as an environment variable:
GOOGLE_GENERATIVE_AI_API_KEY = API_KEY;
Replace “API_KEY” with your actual API key, and run the command below to start the development server:
npm run dev
Text Generation and Streaming
The Vercel AI SDK goes beyond raw response data, providing more options to access response data in a structured format.
The SDK provides a generateObject function that uses Zod schemas to define the shape of the expected data. The AI model then generates data that conforms to that structure. The generated data is additionally validated using the schema to ensure type safety and accuracy.
Replace the code in the src/app/page.tsx file with the following:
import { google } from "@ai-sdk/google";
import { generateObject } from "ai";
import { z } from "zod";

export default async function Home() {
  const result = await generateObject({
    model: google("models/gemini-1.5-pro-latest"),
    prompt: "Who created Java?",
    schema: z.object({
      headline: z.string().describe("headline of the response"),
      details: z.string().describe("more details"),
    }),
  });

  console.log(result.object);

  return (
    <main className="flex min-h-screen flex-col items-center justify-between p-24">
      <p>Hello World!</p>
    </main>
  );
}
In the code above, we called the generateObject function and passed it a schema argument. This structures the response data into a headline and details format.
Save the changes and see the returned response logged to the console.

The SDK also provides a streamObject function to stream a model’s response as it is generated. Below is thesrc/app/page.tsx file reformatted to use the streamObject function:
import { google } from "@ai-sdk/google";
import { streamObject } from "ai";
import { z } from "zod";

export default async function Home() {
  const result = await streamObject({
    model: google("models/gemini-1.5-pro-latest"),
    prompt: "Who created Java?",
    schema: z.object({
      headline: z.string().describe("headline of the response"),
      details: z.string().describe("more details"),
    }),
  });

  for await (const partialObject of result.partialObjectStream) {
    console.log(partialObject);
  }

  return (
    <main className="flex min-h-screen flex-col items-center justify-between p-24">
      <p>Hello World!</p>
    </main>
  );
}
It works similarly to generateObject, except that we now work with a stream of data.
Building a Demo Application
Let’s build a demo application with what we’ve learned so far. We will build a basic chat application that shows how this SDK simplifies the creation of interactive experiences.
To get started, create a src/app/api/chat/route.ts file and add the following to it:
import { google } from "@ai-sdk/google";
import { streamText} from 'ai';

// Allow streaming responses up to 30 seconds
export const maxDuration = 30;

export async function POST(req: Request) {
  const { messages } = await req.json();

  const result = await streamText({
    model: google("models/gemini-1.5-pro-latest"),
    messages,
  });

  return result.toAIStreamResponse();
In the above code, we import the Google provider and the streamText function, which are necessary for using a Gemini model and working with streamed responses. We then define a maxDuration variable to allow streaming responses for up to 30 seconds.
Next, we define a POST API route handler and extract messages from the request body. These messages should contain a history of the conversation between a user and the AI model. We then call the streamText function, passing it the model and messages variables as required.
Finally, we stream the response data back to the client. The result object returned by the streamText function includes a toAIStreamResponse method that converts the response into a streamed response object.
To set up a user interface that calls this API route, open the src/app/page.tsx file and add the following to it:
"use client";
import { useChat } from "@ai-sdk/react";

export default function Chat() {
  const { messages, input, handleInputChange, handleSubmit } = useChat();

  return (
    <main className="w-full">
      <h1 className="text-center mt-12 text-2xl font-semibold">
        Vercel AI SDK Demo
      </h1>
      <div className="flex flex-col gap-4 w-[90%] max-w-md py-8 mx-auto stretch last:mb-16">
        {messages.map((m) => (
          <div
            key={m.id}
            className={`whitespace-pre-wrap ${
              m.role === "user" ? "text-right bg-slate-50 p-2 rounded-md" : ""
            }`}
          >
            {m.role === "user" ? "User: " : "AI: "}
            {m.content}
          </div>
        ))}

        <form onSubmit={handleSubmit}>
          <input
            className="fixed bottom-0 w-full max-w-md p-2 mb-8 border border-gray-300 rounded shadow-xl"
            value={input}
            placeholder="Say something..."
            onChange={handleInputChange}
          />
        </form>
      </div>
    </main>
  );
}
Here, we use the full potential of the useChat hook. When instantiated, it exports:
messages: This is an array of objects representing the chat history.value: This is a state value representing the currently entered user input in the chat.handleInputChange: This is a utility function that maps to theonChangeproperty of the input field.handleSubmit: This is a utility function that handles form submission.
Notice how the code does not include an API call; the useChat hook handles this under the hood. By default, it connects to the POST API we just created.
Then we rendered a form input with the utilities connected, mapped and rendered the conversation history from messages.
Save the changes, and head over to your browser.

The Vercel AI SDK also provides a StreamData function that enables data streaming alongside responses. Update the src/app/api/chat/route.ts file and update it as shown below:
import { google } from "@ai-sdk/google";
import { StreamingTextResponse, streamText, StreamData } from "ai";

export const maxDuration = 30;
export async function POST(req: Request) {
  const { messages } = await req.json();
  const result = await streamText({
    model: google("models/gemini-1.5-pro-latest"),
    messages,
  });
  const data = new StreamData();

  data.append({ test: "value" });

  const stream = result.toAIStream({
    onFinal(_) {
      data.close();
    },
  });

  return new StreamingTextResponse(stream, {}, data);
}
Here, we initialized the StreamData function and appended the data to be streamed along with the response.
Next, we called the toAIStream method on the streamText result object to create a new AI stream while also listening for the onFinal callback on the AI Stream.
Finally, the data gets passed to the new StreamingTextRespojse with the stream.
To reflect this change on the frontend, update the src/app/page.tsx file:
"use client";

import { useChat } from "@ai-sdk/react";

export default function Chat() {
  const { messages, input, handleInputChange, handleSubmit, data } = useChat();
  return (
    <main className="w-full">
      <h1 className="text-center mt-12 text-2xl font-semibold">
        Vercel AI SDK Demo
      </h1>
      <div className="flex flex-col gap-4 w-[90%] max-w-md py-8 mx-auto stretch last:mb-16">
        {data && <pre>{JSON.stringify(data, null, 2)}</pre>}
        {messages.map((m) => (
          <div
            key={m.id}
            className={`whitespace-pre-wrap ${
              m.role === "user" ? "text-right bg-slate-50 p-2 rounded-md" : ""
            }`}
          >
            {m.role === "user" ? "User: " : "AI: "}
            {m.content}
          </div>
        ))}
        <form onSubmit={handleSubmit}>
          <input
            className="fixed bottom-0 w-full max-w-md p-2 mb-8 border border-gray-300 rounded shadow-xl"
            value={input}
            placeholder="Say something..."
            onChange={handleInputChange}
          />
        </form>
      </div>
    </main>
  );
}
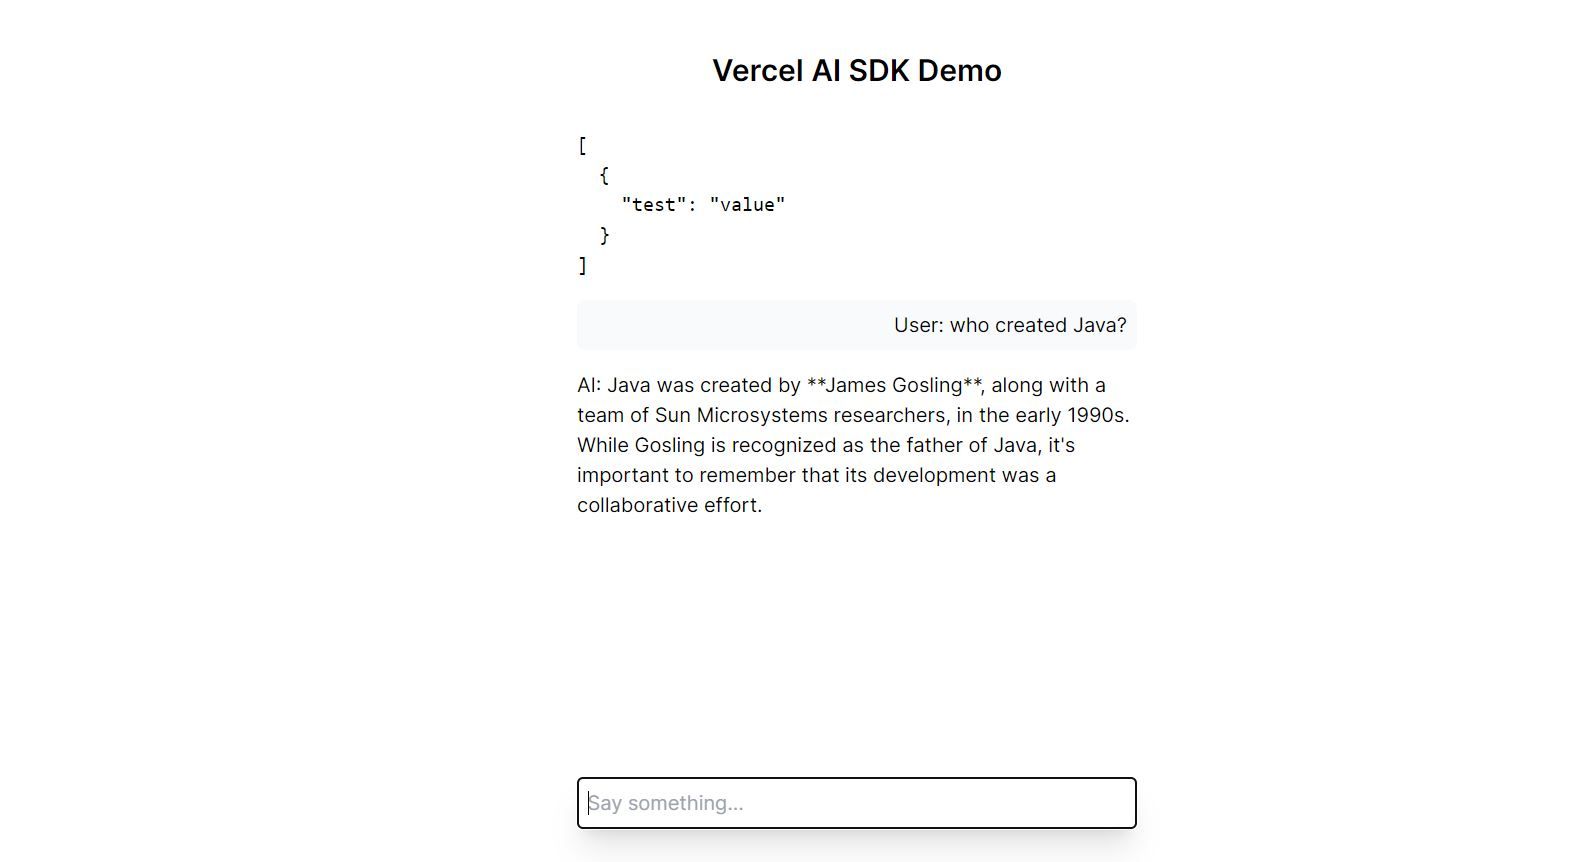
Here, we imported the predefined data and rendered it on the screen.
Save the changes and head over to your browser to preview the application. The predefined JSON data should appear at the top of the conversation.
Conclusion
The future of AI-powered interactions is bright, and with the Vercel AI SDK in your toolkit, you are well-equipped to contribute to its development.
We explored the core concepts, examined the power of the Vercel AI SDK’s components and observed how it simplifies the creation of interactive experiences. While our focus in this article centered on a basic chat application, remember: this is merely the starting point. There is still a lot more we can do with the SDK.

Christian Nwamba
Chris Nwamba is a Senior Developer Advocate at AWS focusing on AWS Amplify. He is also a teacher with years of experience building products and communities.

