Visual Project Management with Blazor Gantt Charts

Summarize with AI:
Learn how to work with the Telerik UI for Blazor Gantt chart to create complex visuals for tasks like project management.
Project management is a necessary discipline when coordination between resources, time and scope is needed to achieve objectives. One of the key diagrams that enables this management is the Gantt chart. If you wanted to create a component that displayed Gantt charts in your web applications, it could take you several months between development and testing.
Fortunately, Progress Telerik UI for Blazor library includes the Blazor Gantt, which is a robust component that enables advanced project management and visualization. Let’s check it out!
What Is a Gantt Chart?
A Gantt chart is a type of diagram that displays two views: a hierarchical list of tasks on the left, and a timeline on the right, where each task is drawn as a horizontal bar, with its position and length representing its duration. On the same timeline, arrows are drawn that connect tasks, indicating dependencies between them.
From that description, you can grasp how such a chart could be complex in operation. The Blazor Gantt control supports Day/Week/Month/Year views, inline or popup editing, custom templates, draggable dependencies and many events that will allow you to customize its behavior.
Understanding the Blazor Gantt Component
To create items and relationships in the Blazor Gantt component, we need two collections:
- Tasks: This first collection will handle the hierarchical tree on the left of the component, as well as the Timeline, which is the right-hand part of the component.
- Dependencies: This second collection manages the dependencies between tasks in the Timeline section, where a dependency is the relationship between two tasks.
Let’s see how to create these collections in code.
Using the Blazor Gantt Component in Blazor Projects
To see the integration of the Blazor Gantt component into a Blazor project in action, let’s start by creating a new project. If you already have a project where you can implement it, you can use that. To do so, follow the getting started with Telerik UI for Blazor guide.
If you have followed the steps correctly, when you open Visual Studio you will see the Telerik Blazor Web App (Progress) template, which is a demo app ready to use Telerik components.
Creating the Project Models
Once we have the project to which we will add the Gantt component ready, the next step is to create the task and dependency models. Let’s start by creating the task model, which looks as follows:
public class ProjectTask
{
    public int Id { get; set; }
    public int? ParentId { get; set; }
    public string Title { get; set; } = string.Empty;
    public double PercentComplete { get; set; }
    public DateTime Start { get; set; }
    public DateTime End { get; set; }
}
The model above defines the minimum properties necessary for a task to be displayed correctly in the component. You can notice that it is possible to create a hierarchy thanks to the ParentId property, which is also nullable for root tasks.
On the other hand, the model to create dependencies is shown below:
public class TaskDependency
{
    public int Id { get; set; }
    public int PredecessorId { get; set; }
    public int SuccessorId { get; set; }
    public GanttDependencyType Type { get; set; }
}
The dependency model allows specifying a predecessor and a successor, creating the relationship between tasks. In addition, a GanttDependencyType type, included in the Telerik package, is used to specify the type of relationship between two tasks. This relationship type can be FinishStart, StartStart, FinishFinish or StartFinish.
Implementing a Data Service
To provide data to the tasks component, we will create a new service that simulates a repository. In it, we will expose methods to read, create, update and delete tasks and dependencies:
public class ProjectTaskService
{
    private readonly List<ProjectTask> _tasks;
    private readonly List<TaskDependency> _dependencies;
    private int _nextTaskId;
    private int _nextDependencyId;

    public ProjectTaskService()
    {
        var today = DateTime.Today;

        _tasks = new List<ProjectTask>
        {
            new() { Id = 1, ParentId = null, Title = "Website Redesign", PercentComplete = 0.40, Start = today,                  End = today.AddDays(14) },
            new() { Id = 2, ParentId = 1,    Title = "Design",           PercentComplete = 0.75, Start = today,                  End = today.AddDays(4)  },
            new() { Id = 3, ParentId = 1,    Title = "Development",      PercentComplete = 0.25, Start = today.AddDays(4),       End = today.AddDays(11) },
            new() { Id = 4, ParentId = 1,    Title = "QA & Launch",      PercentComplete = 0.00, Start = today.AddDays(11),      End = today.AddDays(14) },
            new() { Id = 5, ParentId = null, Title = "Marketing Campaign", PercentComplete = 0.10, Start = today.AddDays(7),     End = today.AddDays(21) },
            new() { Id = 6, ParentId = 5,    Title = "Content Creation", PercentComplete = 0.20, Start = today.AddDays(7),       End = today.AddDays(14) },
            new() { Id = 7, ParentId = 5,    Title = "Ad Distribution",  PercentComplete = 0.00, Start = today.AddDays(14),      End = today.AddDays(21) }
        };

        _dependencies = new List<TaskDependency>
        {
            new() { Id = 1, PredecessorId = 2, SuccessorId = 3, Type = GanttDependencyType.FinishStart },
            new() { Id = 2, PredecessorId = 3, SuccessorId = 4, Type = GanttDependencyType.FinishStart },
            new() { Id = 3, PredecessorId = 6, SuccessorId = 7, Type = GanttDependencyType.FinishStart }
        };

        _nextTaskId = _tasks.Max(t => t.Id) + 1;
        _nextDependencyId = _dependencies.Max(d => d.Id) + 1;
    }

    public List<ProjectTask> GetTasks() =>
        _tasks.Select(Clone).ToList();

    public List<TaskDependency> GetDependencies() =>
        _dependencies.Select(d => new TaskDependency
        {
            Id = d.Id,
            PredecessorId = d.PredecessorId,
            SuccessorId = d.SuccessorId,
            Type = d.Type
        }).ToList();

    public int AddTask(ProjectTask task)
    {
        task.Id = _nextTaskId++;
        _tasks.Add(Clone(task));
        return task.Id;
    }

    public bool UpdateTask(ProjectTask task)
    {
        var existing = _tasks.FirstOrDefault(t => t.Id == task.Id);
        if (existing is null) return false;

        existing.Title = task.Title;
        existing.PercentComplete = task.PercentComplete;
        existing.Start = task.Start;
        existing.End = task.End;
        existing.ParentId = task.ParentId;
        return true;
    }

    public bool DeleteTask(int id)
    {
        var removed = _tasks.RemoveAll(t => t.Id == id || t.ParentId == id) > 0;
        if (removed)
        {
            _dependencies.RemoveAll(d => d.PredecessorId == id || d.SuccessorId == id);
        }
        return removed;
    }

    public int AddDependency(TaskDependency dependency)
    {
        dependency.Id = _nextDependencyId++;
        _dependencies.Add(dependency);
        return dependency.Id;
    }

    public bool DeleteDependency(int id) =>
        _dependencies.RemoveAll(d => d.Id == id) > 0;

    public void ShiftAllTasks(int days)
    {
        foreach (var task in _tasks)
        {
            task.Start = task.Start.AddDays(days);
            task.End = task.End.AddDays(days);
        }
    }

    private static ProjectTask Clone(ProjectTask task) => new()
    {
        Id = task.Id,
        ParentId = task.ParentId,
        Title = task.Title,
        PercentComplete = task.PercentComplete,
        Start = task.Start,
        End = task.End
    };
}
In the service defined above, in addition to the CRUD methods, I have also added the Clone method to clone a task and ShiftAllTasks to shift all project tasks by the specified number of days. Another important point is the GetTasks and GetDependencies methods, which return copies of the data only. We do this because the Gantt component binds by reference, which means that if we modify the service instances, we would lose control of changes and would not be able to validate anything before persisting.
We register this service in Program.cs:
var builder = WebApplication.CreateBuilder(args);
...
builder.Services.AddSingleton<ProjectTaskService>();
var app = builder.Build();
With the data ready, let’s use the Gantt component in the project.
Adding a Blazor Gantt Component to the Project
To see the component in action, I will create a new component called ProjectGantt.razor, in which I will start by adding the component’s state code:
@code {
    private TelerikGantt<ProjectTask>? GanttRef;

    private List<ProjectTask> Tasks { get; set; } = new();
    private List<TaskDependency> Dependencies { get; set; } = new();

    private GanttView currentView = GanttView.Week;

    protected override void OnInitialized()
    {
        LoadData();
    }

    private void LoadData()
    {
        Tasks = TaskService.GetTasks();
        Dependencies = TaskService.GetDependencies();
    }
}
In the previous code, you can see that we added a collection Tasks representing the tasks that will be added to the component, the dependencies collection through Dependencies, as well as a reference to the component using GanttRef, and finally currentView to indicate a weekly view on the timeline.
Next, let’s add the component to see it in action:
<div class="card shadow-sm mb-4">
    <div class="card-body p-0">
        <TelerikGantt @ref="GanttRef"
                      Data="@Tasks"
                      Width="100%"
                      Height="520px"
                      IdField="@nameof(ProjectTask.Id)"
                      ParentIdField="@nameof(ProjectTask.ParentId)"
                      @bind-View="@currentView">
            <GanttViews>
                <GanttDayView></GanttDayView>
                <GanttWeekView></GanttWeekView>
                <GanttMonthView></GanttMonthView>
                <GanttYearView></GanttYearView>
            </GanttViews>
            <GanttColumns>
                <GanttColumn Field="@nameof(ProjectTask.Title)" Expandable="true" Title="Task" Width="220px" />
                <GanttColumn Field="@nameof(ProjectTask.PercentComplete)" Title="Progress" Width="120px" DisplayFormat="{0:P0}" />
                <GanttColumn Field="@nameof(ProjectTask.Start)" Title="Start" Width="140px" DisplayFormat="{0:dd MMM yyyy}" />
                <GanttColumn Field="@nameof(ProjectTask.End)" Title="End" Width="140px" DisplayFormat="{0:dd MMM yyyy}" />
            </GanttColumns>
        </TelerikGantt>
    </div>
</div>
In the component definition, you can see that I have added the use of some features:
- In the
TelerikGantttag we use the model properties to specify the Id and the parent Id if it exists, in addition to bindingDatato the list of tasks. - The
GanttViewssection allows specifying the views that will be available when we use the component. For our example we have used all of them. - In the
GanttColumnssection we specify the columns that will be shown on the left side, being able to indicate the relatedField, theTitle, as well as other formatting properties.
After configuring the above, we will be able to see the Gantt component in action:
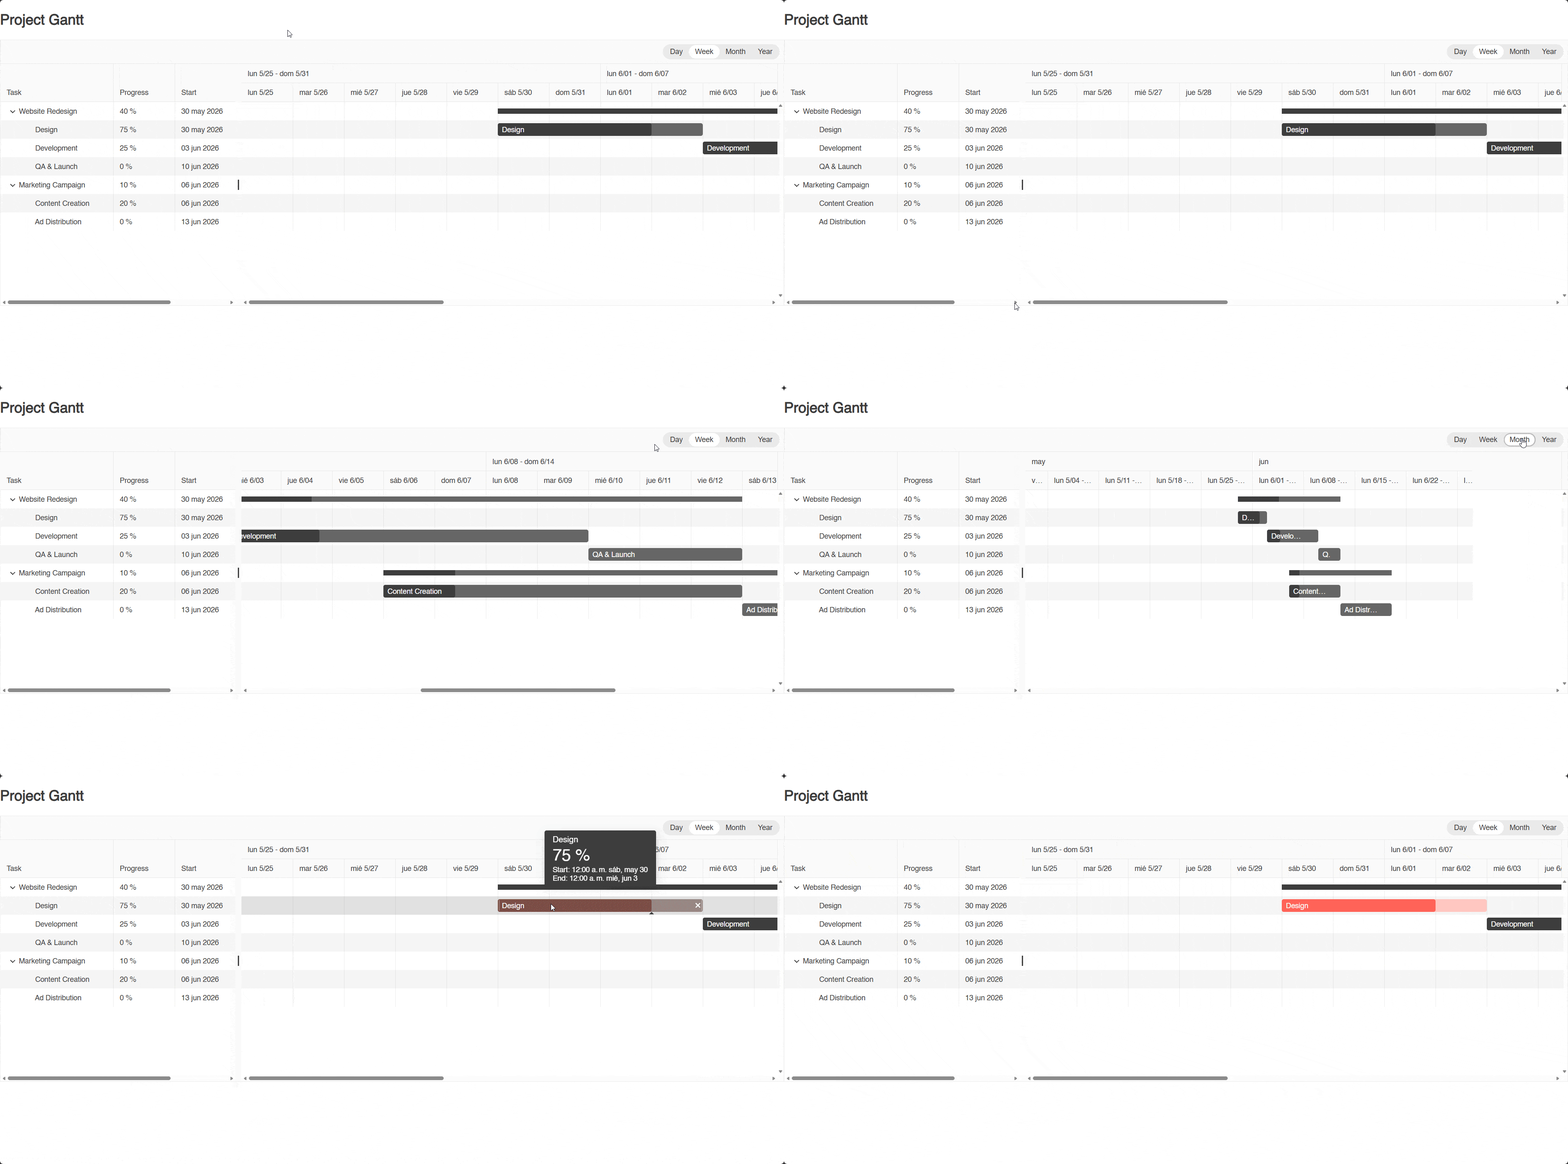
In the image above you can see that the control natively renders the information correctly, as well as allowing switching between views and even showing a task editing panel natively.
Showing Dependencies
If there’s something missing in the implementation we’ve done, it’s showing the dependencies between tasks. To achieve this, we will use the GanttDependenciesSettings tag. In this section we will configure the collection and the fields that map the Ids:
<TelerikGantt @ref="GanttRef"
              Data="@Tasks"
              Width="100%"
              Height="520px"
              IdField="@nameof(ProjectTask.Id)"
              ParentIdField="@nameof(ProjectTask.ParentId)"
              @bind-View="@currentView">
    ...
    <GanttDependenciesSettings>
        <GanttDependencies Data="@Dependencies" />
    </GanttDependenciesSettings>
</TelerikGantt>
When running the application, we can see the list of related tasks correctly:
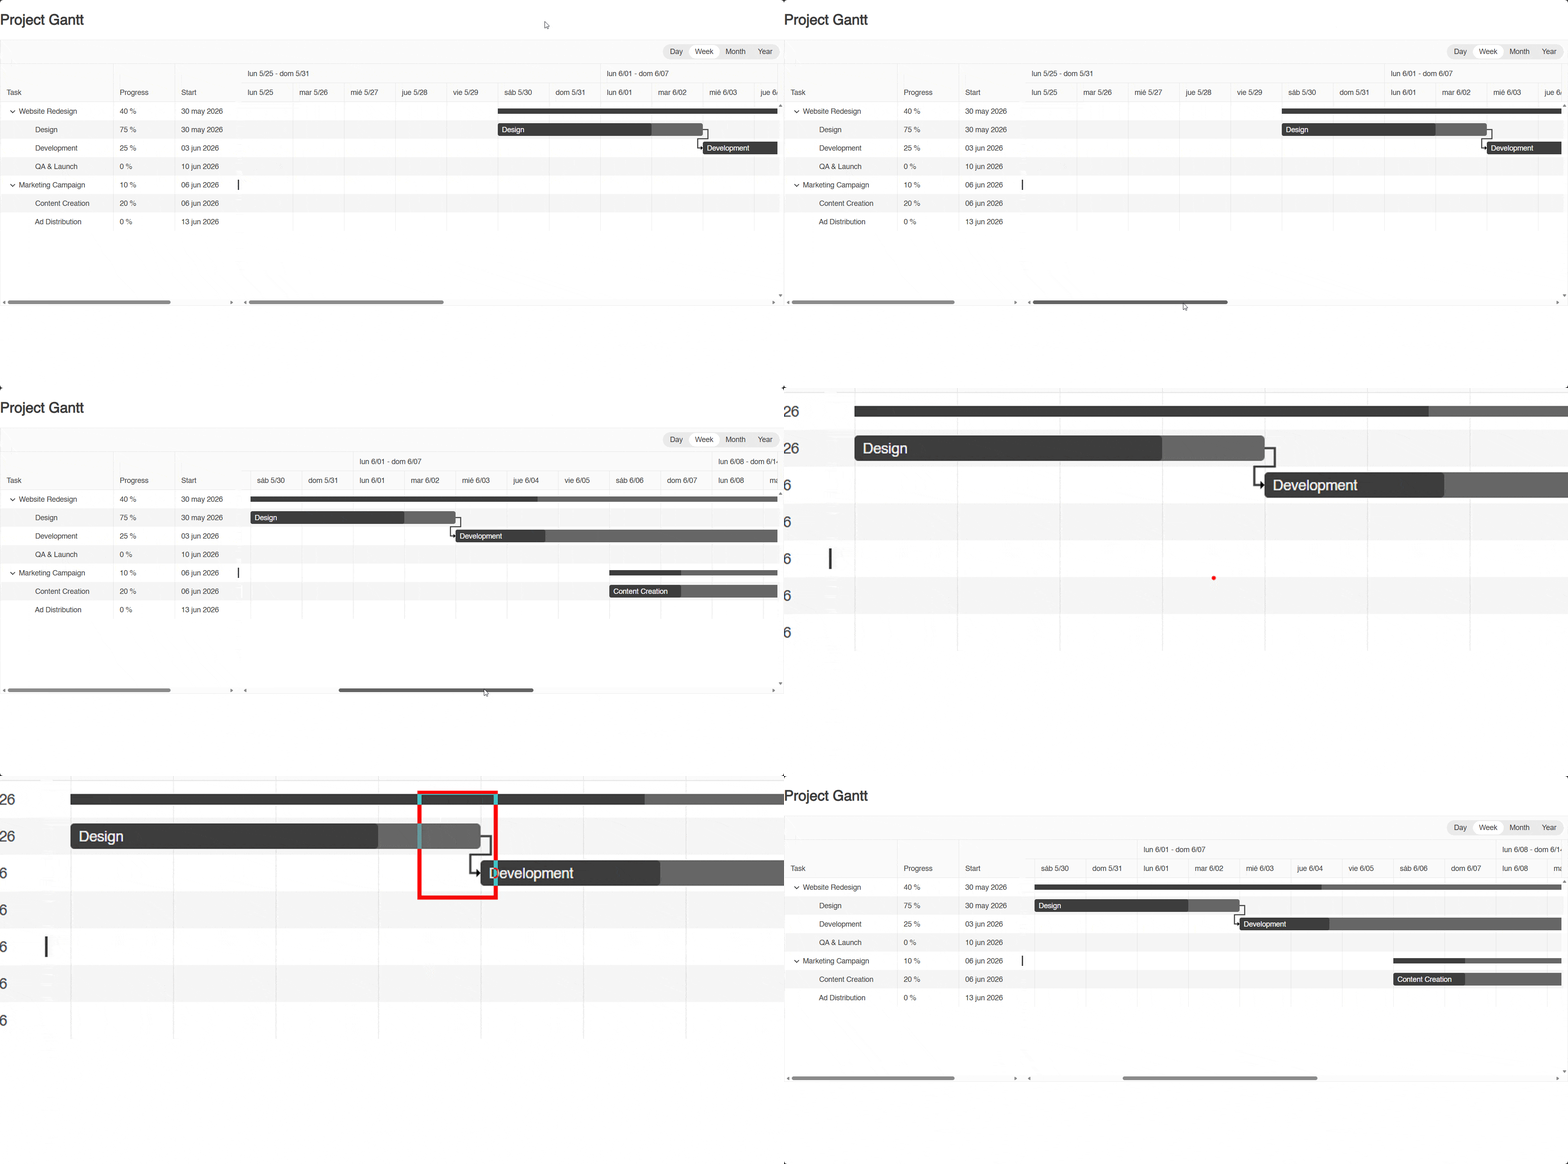
Now, let’s see how to add buttons to modify the appearance of the component at runtime.
Adding Buttons to Modify the Gantt Behavior
The Blazor Gantt component has a fairly powerful API that allows performing different operations from code. For our example we will add four buttons that allow:
- Adding one day to the whole plan
- Refreshing data
- Expanding all tasks
- Collapsing all tasks
To achieve this, let’s add four buttons before the Gantt component:
<div class="d-flex flex-wrap gap-2 align-items-center mb-3">
    <TelerikButton OnClick="@ShiftForward" ThemeColor="@ThemeConstants.Button.ThemeColor.Primary">
        Add 1 Day to Entire Plan
    </TelerikButton>

    <TelerikButton OnClick="@RefreshData" ThemeColor="@ThemeConstants.Button.ThemeColor.Info">
        Refresh Data
    </TelerikButton>

    <TelerikButton OnClick="@ExpandAll" ThemeColor="@ThemeConstants.Button.ThemeColor.Secondary">
        Expand All
    </TelerikButton>

    <TelerikButton OnClick="@CollapseAll" ThemeColor="@ThemeConstants.Button.ThemeColor.Inverse">
        Collapse All
    </TelerikButton>

    <span class="ms-auto badge bg-secondary fs-6">
        Current View: <strong>@currentView</strong>
    </span>
</div>
In addition to the buttons, I have also added a span to show which view is currently selected to display in the Timeline. The next step is to add the methods needed for the buttons to work correctly:
@code{
	...
    private void RefreshData()
    {
        LoadData();
        GanttRef?.Rebind();
    }

    private void ShiftForward()
    {
        TaskService.ShiftAllTasks(1);
        LoadData();
        GanttRef?.Rebind();
    }

    private async Task ExpandAll()
    {
        if (GanttRef is null) return;

        var state = GanttRef.GetState();
        state.ExpandedItems = new HashSet<ProjectTask>(Tasks.Where(t => Tasks.Any(c => c.ParentId == t.Id)));
        await GanttRef.SetStateAsync(state);
    }

    private async Task CollapseAll()
    {
        if (GanttRef is null) return;

        var state = GanttRef.GetState();
        state.ExpandedItems = new HashSet<ProjectTask>();
        await GanttRef.SetStateAsync(state);
    }
}
In the previous code we can highlight some things:
- In
ExpandAllandCollapseAllthe methodGetStateis used to obtain the current state of the Gantt. - The obtained state is used to set the
ExpandedItemsproperty. In the case of expanding items, the property is replaced with the set of tasks that have at least one child. In the case of collapsing, it is replaced with an emptyHashSet. - The
SetStateAsyncmethod applies the state and triggers a rerender.
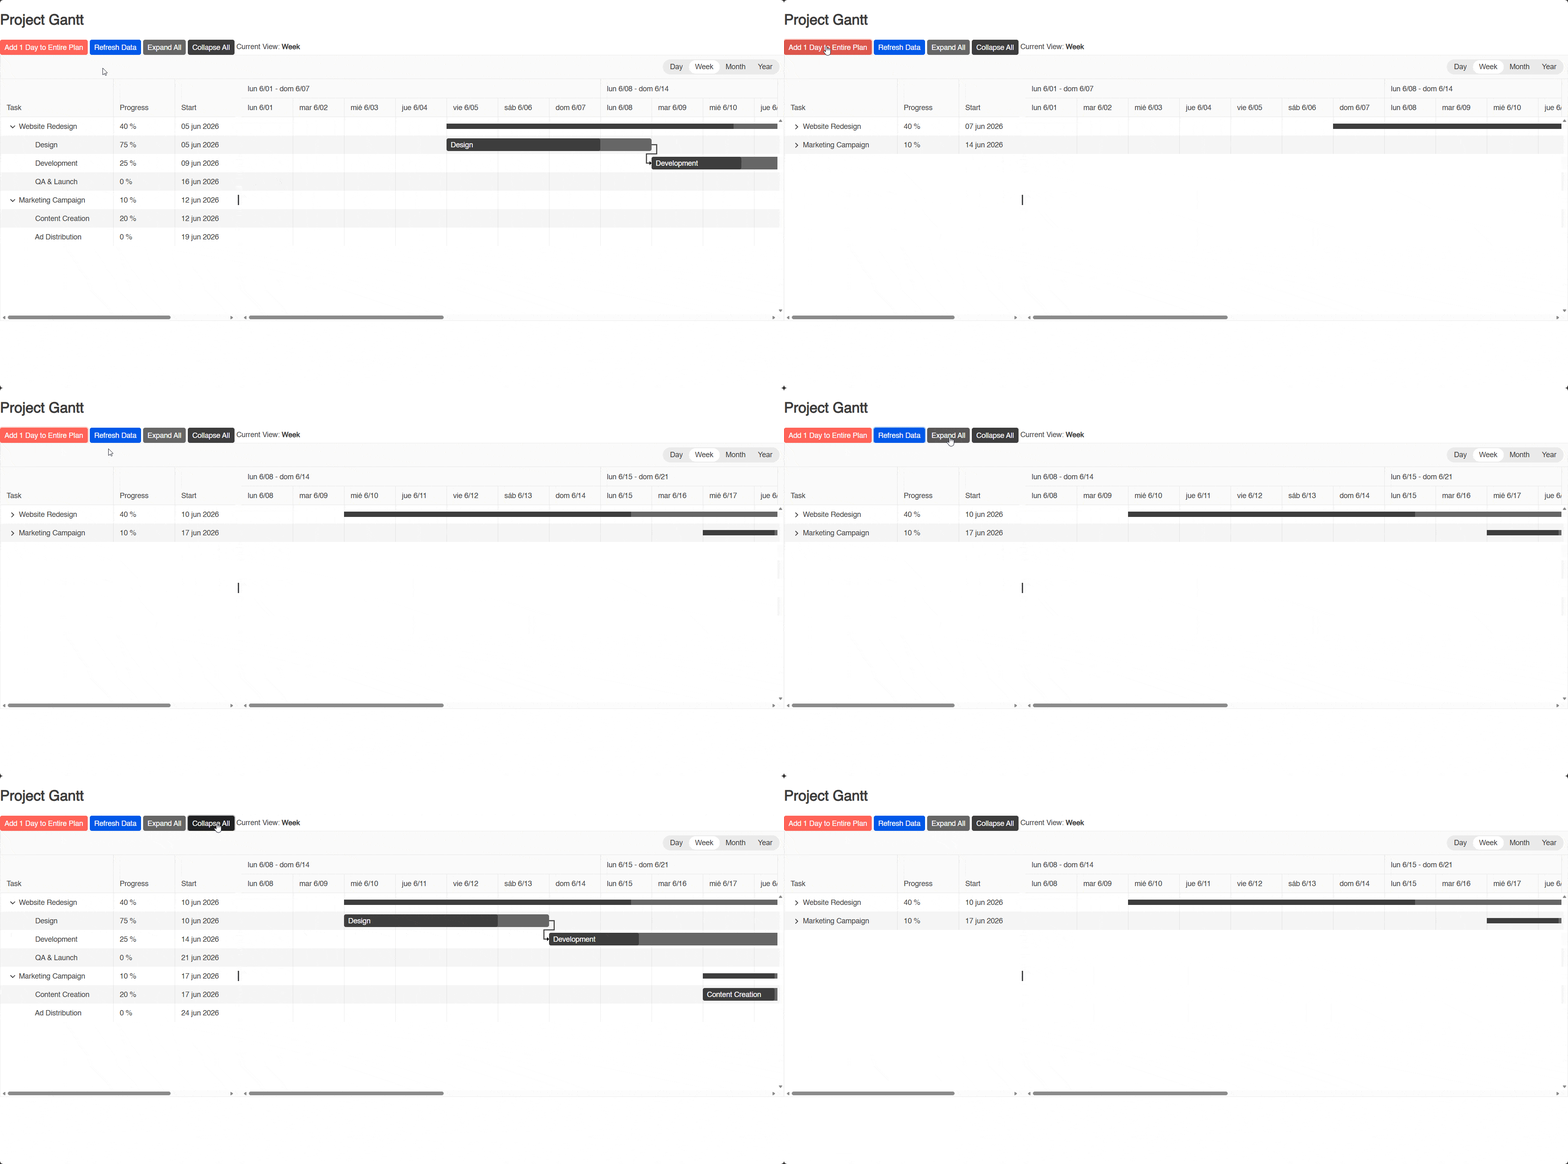
The result of the previous changes looks as follows:
Now, let’s complete the project by adding CRUD operations to simulate actions against a data store.
Handling Gantt Component Events
The Blazor Gantt component exposes several events that we can hook into to handle different operations. In our case, we will add OnUpdate, OnCreate, OnDelete, OnExpand, OnCollapse and OnStateChanged, as follows:
 <TelerikGantt @ref="GanttRef"
               Data="@Tasks"
               Width="100%"
               Height="520px"
               IdField="@nameof(ProjectTask.Id)"
               ParentIdField="@nameof(ProjectTask.ParentId)"
               @bind-View="@currentView"
               OnUpdate="@OnTaskUpdate"
               OnCreate="@OnTaskCreate"
               OnDelete="@OnTaskDelete">
Next, we must create the event handlers that will perform persistence to the store:
@code{
	...
	private void OnTaskUpdate(GanttUpdateEventArgs args)
    {
        var task = (ProjectTask)args.Item;
        TaskService.UpdateTask(task);
        LoadData();
    }

    private void OnTaskCreate(GanttCreateEventArgs args)
    {
        var task = (ProjectTask)args.Item;
        TaskService.AddTask(task);
        LoadData();
    }

    private void OnTaskDelete(GanttDeleteEventArgs args)
    {
        var task = (ProjectTask)args.Item;
        TaskService.DeleteTask(task.Id);
        LoadData();
    }
}
In the previous snippet, we used the service we had created earlier to perform the corresponding CRUD operation. Now, so that the dependencies also respond to user interaction, we need to use OnCreate and OnDelete in the dependencies block, adding their corresponding handlers:
<GanttDependenciesSettings>
    <GanttDependencies Data="@Dependencies"
                       OnCreate="@OnDependencyCreate"
                       OnDelete="@OnDependencyDelete" />
</GanttDependenciesSettings>

...

@code{
...
	private void OnDependencyCreate(GanttDependencyCreateEventArgs args)
	{
	    var dependency = new TaskDependency
	    {
	        PredecessorId = (int)args.PredecessorId,
	        SuccessorId = (int)args.SuccessorId,
	        Type = args.Type
	    };
	    TaskService.AddDependency(dependency);
	    Dependencies = TaskService.GetDependencies();
	}

	private void OnDependencyDelete(GanttDependencyDeleteEventArgs args)
	{
	    var dependency = (TaskDependency)args.Item;
	    TaskService.DeleteDependency(dependency.Id);
	    Dependencies = TaskService.GetDependencies();
	}
}
You may notice that in OnDependencyCreate, a user object is not received, but rather the IDs and the relation type, so we have to create the instance of TaskDependency manually. When running the app, we get the following result:
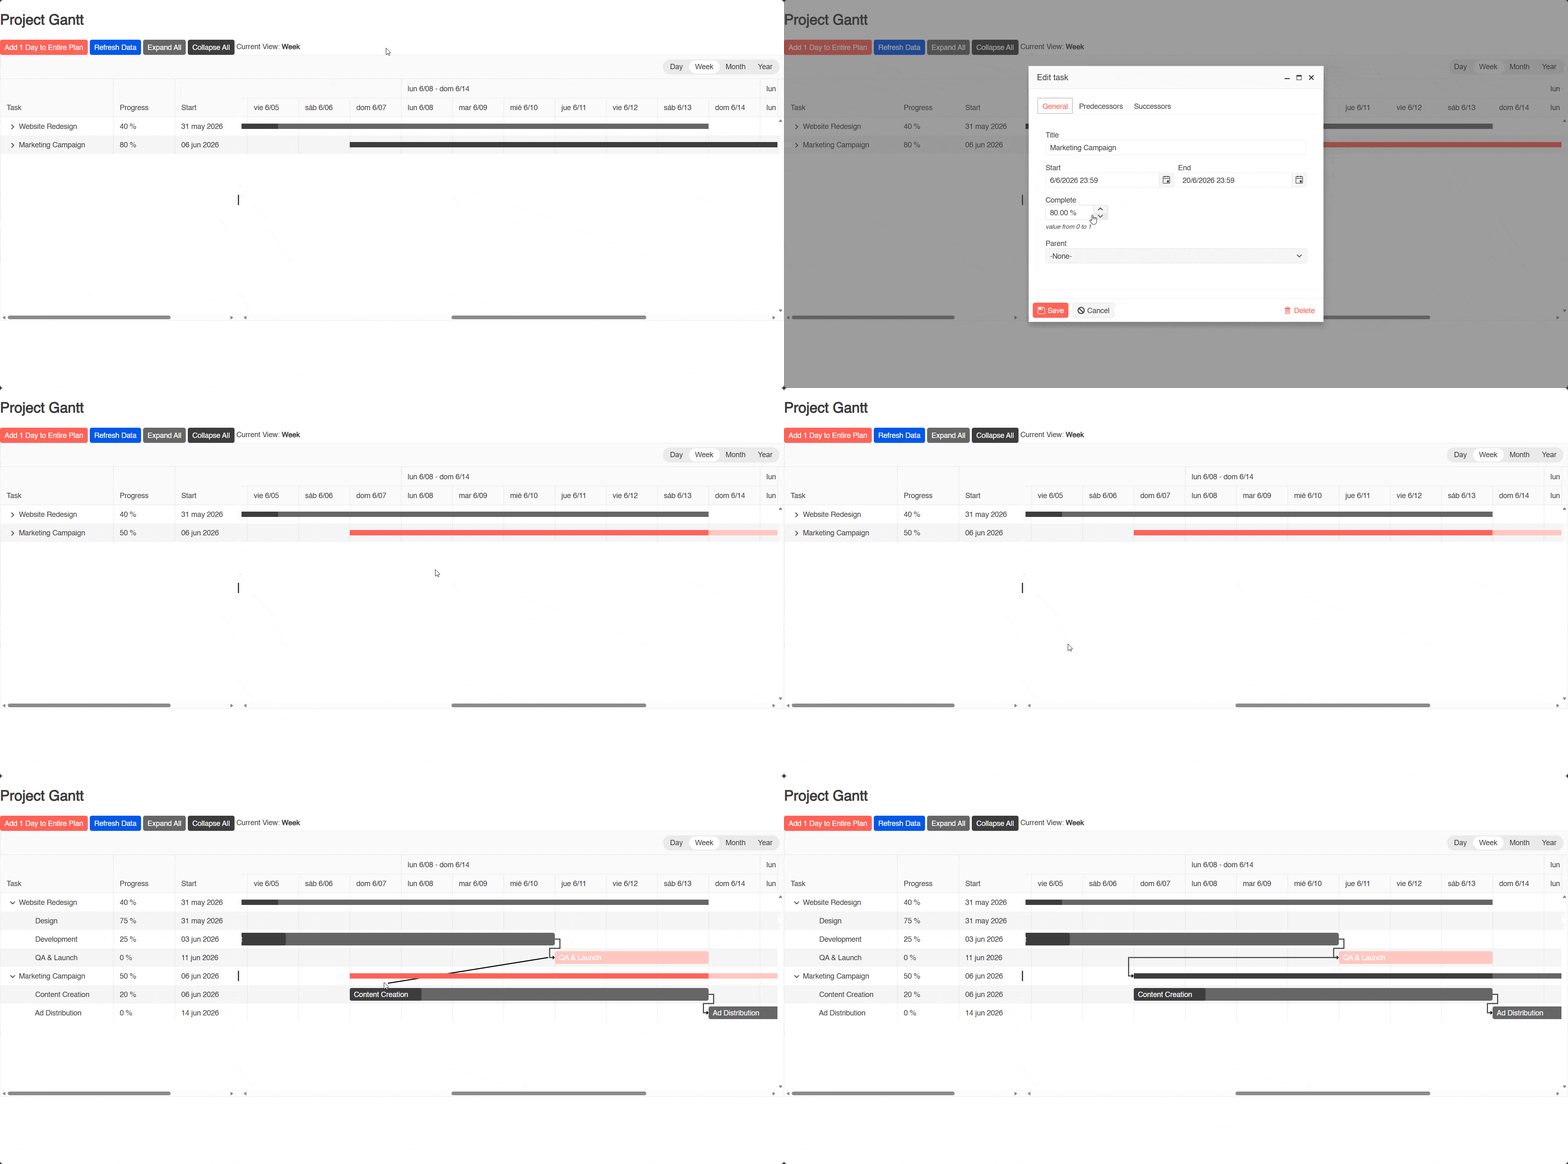
With this, we have finished implementing the Blazor Gantt component in a Blazor project.
Conclusion
Throughout this article you have learned how to integrate the Telerik UI for Blazor Gantt component into a Blazor project, including how you model tasks and dependencies, up to adding CRUD operations.
If you want to learn more about customizing the component or how to perform other related tasks, you can check the Blazor Gantt component documentation. Now it’s your turn to integrate it into your projects and improve your users’ experience.
Remember, Telerik UI for Blazor comes with a free 30-day trial, so you can experiment with the Gantt component plus 120 others!

Héctor Pérez
Héctor Pérez is a Microsoft MVP with more than 10 years of experience in software development. He is an independent consultant, working with business and government clients to achieve their goals. Additionally, he is an author of books and an instructor at El Camino Dev and Devs School.
Related Posts
Comments
All articles
Topics
Web MobileMobile
Desktop
Design
Productivity
People