Telerik UI for Blazor in a PWA—Easy as Pie

Summarize with AI:
(Editor's Note: This post was originally created on January 30, 2020, and has been updated to be accurate with the new Blazor Framework developments and features.)
Curious about using Blazor WebAssembly in Progressive Web Apps? Check out our sample app and what we learned developing it.
Progressive Web Apps (PWAs) can be great, and we wanted to see how building a PWA using Blazor would work. Experience is the best teacher, so we got to work, and are excited to share the results with you.
To build this app, we needed to use the “true” Blazor – the Blazor WebAssembly (or Blazor WASM) flavor (Blazor UI components by Telerik work with both, by the way). WebAssembly is pretty cool and basically lets you run C# in the browser instead of JavaScript, and does not need a round trip to the server for every little bit of logic. The caveat is that the client-side Blazor flavor is still in Preview and has a few kinks to iron out, and performance is one of them. Nevertheless, the potential is immense, so we wanted to try it out in a Progressive Web App.
PWAs have been around for a while, and they can be pretty amazing. If you are not familiar with the term – it means Progressive Web Application, and the shortest intro I can do about PWAs is that they:
- Let you build a web app and then have your mobile users use it almost like a native app (including a shortcut from their home screen)
- Can be used offline when your (mobile) users don’t have an active Internet connection, which you can’t do with a “plain” web app
- Can actually be installed on a Desktop as well (with Chrome), not just on a mobile device, and offer the same benefits
- Are not that different from the basic web app, they are mostly a few extra assets, caching through a service worker, and responsive web design (which should already be in place, it’s 2020)
- Must be an SPA (Single Page Application), making Blazor a perfect candidate for one
For further reading, you can go to the plethora of resources Google offers (they were the ones who advocated heavily for it, so it makes sense to go to them for info): https://developers.google.com/web/progressive-web-apps.
How Did We Build the PWA?
A Progressive Web App is basically a web app with a few extras, so we started out by having a design and creating the layouts, logic and everything else. You know, like you would usually do with any app. We just knew that we need this to run entirely on the client, so we chose the WASM Blazor flavor (I never get tired of saying this together, it’s like a small poem).
Now, to make it into a PWA, what you need is:
- A manifest file – This tells the device that this is actually a PWA and links some resources.
- Icons – Quite self-explanatory, they just need to be with specific dimensions (rather large, because – Apple and Retina displays).
- A service worker – This is where the magic happens, as it's this piece of code that puts all the web assets of the web app into the browser cache so they can be accessed offline. It’s the heart of the PWA.
- A little bit of code that initializes the service worker and adds it to the app. You can consider it part of the service worker API, but I list it separately because for Blazor we need to hook JS Interop here so we can customize the installation prompt.
Doesn’t look too hard, or too long, I trust.
UPDATE: To make this even easier, you can you can use the Microsoft Project Template to generate this for you. You can read more about it in the MSDN: Blazor PWA article.
In order to focus on building the app itself, we dogfood-ed our own components to better see how native components that work in a server-side Blazor app work in a WebAssembly Progressive Web App. Everything went smoothly here, and the Telerik components are, indeed, production-ready and work the same way between WebAssembly and Server scenarios.
We used the following key things for a financial app:
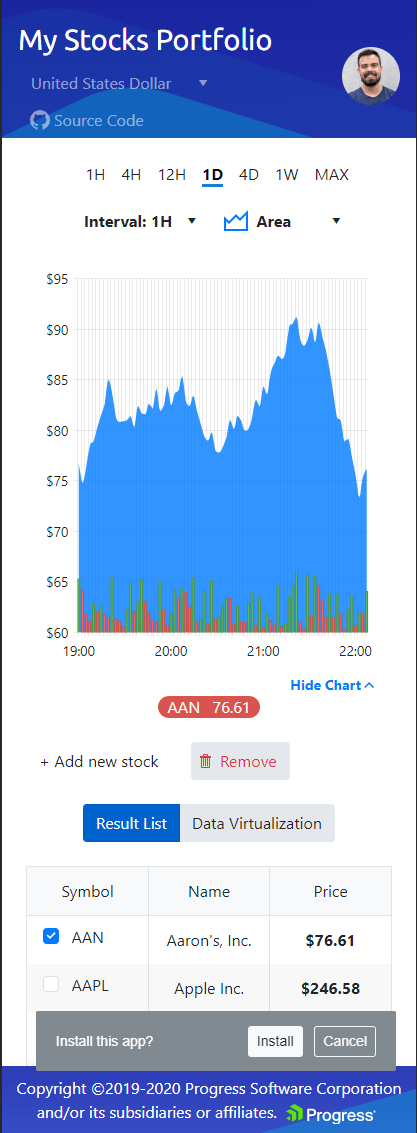
- Grid with sorting, and with a template column for charts. There’s also a virtualized grid that updates every 1.5 seconds – in a real app you would be fetching this data from a live service, here we just generate it.
- Charts – both in the grid, and as the main portion of the app – with a date axis, a few series in place and custom coloring to showcase increases and decreases.
- Dropdowns and date pickers to get some filtering in place so we can have the chart show different data sets with different settings (those settings are the main business logic of this sample app).
Don’t take my word for it – try it out for yourself. Below is a QR code for easy scanning on your mobile:

Here’s what you can expect (yes, no phone is that tall, you’ll have to scroll a little):

Check out the full source code at https://github.com/telerik/blazor-stocks and download a free trial to try it by yourself (if you have a commercial license already, just upgrade the app).
This is just a sample application, so it does not have a full-blown backend, of course – we just decided to have the services generate some data to get the app off the ground. Feel free to rip that out and do your own REST API calls, the Blazor way.
What I Learned in the Process
It was mostly smooth sailing, yet there are a few things that I want to share with you, which will make your experience in building your first PWA better:
- This should go away by May 2020, but until the WebAssembly Blazor gets proper debugging support, consider starting out in a server-side project so you can debug and fix things easily. I can’t count the Console.WriteLine() statements I wrote, cursed at, then had to remember to delete.UPDATE: Blazor WebAssembly now has debugging support, even if a bit limited as of 3.2.0 Preview 3, it will only get better. For the time being, it works best with Visual Studio 2019 Preview.
- Add the PWA bits late in the project lifecycle. They are not the key thing in the app you’re building and can make it a bit harder to debug (see the next points).UPDATE: The original version stepped on a third party NuGet package, right now you should start from Microsoft's project template. If you have an existing app, generate a new template and copy over the relevant bits.
- Test your app in an Incognito (Private) tab while developing. Your first priority is to ensure the app works well, and the PWA functionality caches everything. This includes your app’s assembly where you just fixed a bug, but the service worker caching gives you the old version without the fix and you can spend quite some time fixing it over and over.UPDATE: Microsoft's template does not cache on localhost at all, so you can develop and debug as if this is not a PWA. The caveat is that you need a host with a valid (at least for your machine) SSL certificate in order to really test the PWA capabilities, see below.
- Make sure you have HTTPS set up, as a PWA only works over HTTPS. Self-signed certificates may not always be enough either, so monitor the Network tab to see how things go.
- Host the app on IIS, for example, so you can access it easily from a mobile device, from your dev box, and share it with colleagues. This also lets you practice the publish workflow you’ll need to go live.
- When you are close to ready, test in an actual mobile device. It’s easier to uninstall the PWA from it or to refresh it than it is to remove old cache from the browser without losing all your stored passwords, other site caches and so on.
- When you test in a non-private tab, always do the following before each test:
- Go to the Application tab in the dev tools and Clear the application cache
- Hard-reload the page (Ctrl+F5, or right click the reload button and choose “Clear Cache and hard reset”)
- When you alter the app’s assets (like adding a new image, or removing something), consider updating the cache version of the service worker. If you don’t do that other people who did not clear their cache may still get the old version and may not get a notification that a new version is available.
What’s Next
Now that we know the Telerik UI for Blazor components work seamlessly in a PWA app, you can go and build your own PWA. Or just transform the existing app you have to a progressive one. In a real app, however, you may need to implement caching for data responses and for offline changes, or at least to disable editing features when the app is offline (the “online” and “offline” JS events let you do that, just raise a flag in your app with them).
If you have any other tips, tricks or tools that help you make PWAs with Blazor, put them in the comments down below, or even open a pull request in the source code of ours.
Last but not least – download a free trial now and explore the PWA app and the capabilities we bring yourself.

Marin Bratanov
Marin Bratanov was a Principal Technical Support Engineer in the Blazor division.
