Share Functionality in Your .NET MAUI Apps

Summarize with AI:
Learn how to add share functionality to your .NET MAUI app whether in iOS, Android or Windows.
In recent years, many large companies have decided to rely on technology and move a big part—or even all—of their processes to mobile applications.
For example, not long ago, sending money from one bank account to another meant physically going to the bank and spending hours waiting in line. Today, that same process can be completed in just a few seconds using a mobile app. 🤓
But… What happens next? 🤔
How do we send a confirmation or receipt to the account owner so they can validate the transfer?
To solve this, applications usually include a share functionality, which allows users to send information through the familiar share sheet we all know—via WhatsApp, email, social media and more.
It’s important to design the user experience from start to finish. It’s not just about completing an action, but also about enabling users to easily share or confirm the result of that action.
In this article, you’ll learn how to open the share sheet in your .NET MAUI apps, so you can share information quickly and effortlessly.
What Is IShare?
IShare is an interface that provides an API that allows you to share data such as links, files or text using the system’s share functionality. When invoked, it opens a button sheet where the user can choose how and with whom they want to share that information.
The IShare interface is already available through the Share.Default property and is located in the Microsoft.Maui.ApplicationModel.DataTransfer namespace.
When the user interacts with this feature, they will see something like the following:
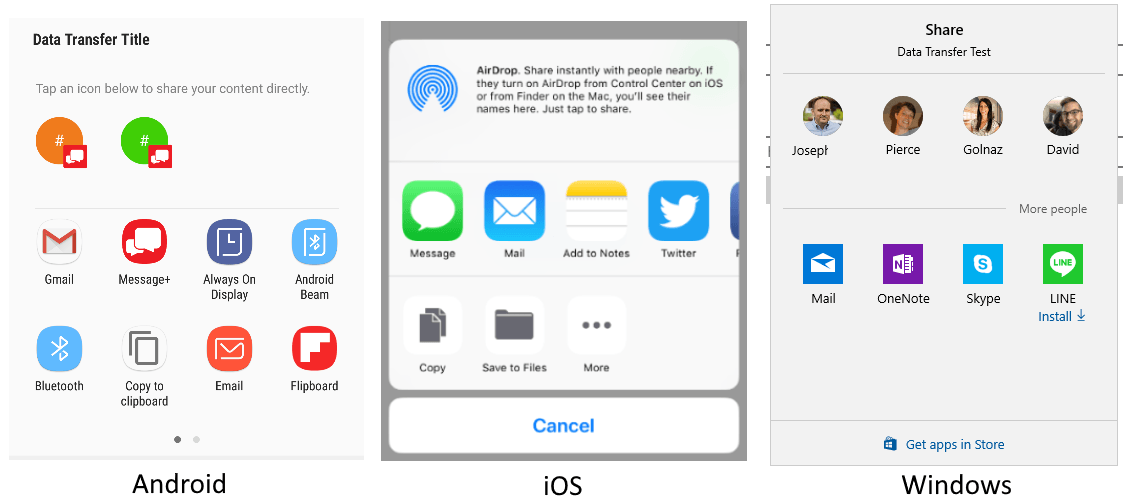
Image obtained from the official documentation.
Platform Settings
To implement the share functionality, some platforms require additional configuration. These are the supported platforms and their requirements:
- Android and Windows: No setup is required.
- iOS / Mac Catalyst: To be able to access photos and videos, you need to add the appropriate permissions. To do this, go to:
- Platforms/iOS/Info.plist
- And Platforms/MacCatalyst/Info.plist
Then add the permission keys along with their descriptions. Keep in mind that this description will be shown to the user when requesting permission, so it’s important to use clear and user-friendly text. Below is an example of how the configuration should look:
<key>NSPhotoLibraryAddUsageDescription</key>
<string>This app needs access to the photo gallery to save photos and videos.</string>

<key>NSPhotoLibraryUsageDescription</key>
<string>This app needs access to the photo gallery to save photos and videos.</string>
What Information Can I Share? 🤓
You can share text, links, files or even multiple files at the same time, depending on your needs. .NET MAUI provides different request types to handle each scenario.
Below are the most common use cases and how to implement them.
📝 Text
To share plain text, you can use the ShareTextRequest class. This allows you to pass the text you want to share along with a title.
public async Task ShareText(string text)
{
    await Share.Default.RequestAsync(new ShareTextRequest
    {
	    Text = text,
	    Title = "I’m the title"
    });
}
🔗 Links
You can also share a link by using the Uri property of ShareTextRequest. Simply provide the URI and a title.
public async Task ShareUri(string uri, IShare share)
{
    await share.RequestAsync(new ShareTextRequest
    {
	    Uri = uri,
	    Title = "I’m the title"
    });
}
📄 Files
.NET MAUI automatically detects the file type (MIME) and handles the sharing process accordingly. However, keep in mind that each operating system may decide whether a specific file type can be shared or not, depending on platform restrictions.
To share a single file, use the ShareFileRequest type, as shown below:
public async Task ShareFile()
{
    string fn = "MyFile.txt";
    string file = Path.Combine(FileSystem.CacheDirectory, fn);
    File.WriteAllText(file, "This is a file");
    await Share.Default.RequestAsync(new ShareFileRequest
    {
	    Title = "Share text file",
	    File = new ShareFile(file)
    });
}
🗂️ Multiple Files
Oh yeah!! 🤩 We also have the option to share multiple files using the ShareFileRequest type. Let’s look at the following example:
public async Task ShareMultipleFiles()
{
    string file1 = Path.Combine(FileSystem.CacheDirectory, "File1.txt");
    string file2 = Path.Combine(FileSystem.CacheDirectory, "File2.txt");
    File.WriteAllText(file1, "Hello 1");
    File.WriteAllText(file2, "Hello 2");

    await Share.Default.RequestAsync(new ShareMultipleFilesRequest
    {
	    Title = "I’m sharing multiple files",
	    Files = new List<ShareFile> { new ShareFile(file1), new ShareFile(file2) }
    });
}
Android Control File Locations
On Android, there are scenarios where a file is located in the app’s private storage. In these cases, Android temporarily copies the file to the app cache and shares it using a FileProvider.
This behavior is very useful, but it’s important to be careful. If it’s not configured correctly, it can expose more information than intended, including data that should not be publicly accessible.
The good news is that this can be prevented by following the steps below.
Step 1: Add the FileProvider Path File
Inside the following folder:
Platforms/Android/Resources/xml
And add a file with the exact name:
microsoft_maui_essentials_fileprovider_file_paths.xml
Step 2: What Will This File Contain?
This file defines the allowed locations from which files can be shared.
Example configuration:
<?xml version="1.0" encoding="UTF-8" ?>
<paths>
    <external-path name="external_files" path="sharing-root" />
    <cache-path name="internal_cache" path="sharing-root" />
    <external-cache-path name="external_cache" path="sharing-root" />
</paths>
What does each line mean?
<external-path>:Allows sharing files from external storage. Useful when the file is stored in a location accessible to the user.<cache-path>:Allows sharing files from the app’s internal cache. This is the most common and safest option, ideal for temporary files such as PDFs, images, or receipts.<external-cache-path>:Allows sharing files from the external cache. It is still a temporary location, but outside the internal storage.- sharing-root: Is a folder that you define and that acts as a secure area for sharing files. Only files located inside this folder can be shared.
iPadOS Presentation Location
When requesting a share or opening launcher on iPadOS, the system displays the action as a popover. To control where this popover appears on the screen and where its arrow points, you must specify a position using the PresentationSourceBounds property.
You can do it in the following way:
Share
await Share.RequestAsync(new ShareFileRequest
{
    Title = Title,
    File = new ShareFile(file),
    PresentationSourceBounds =
    DeviceInfo.Platform == DevicePlatform.iOS &&
    DeviceInfo.Idiom == DeviceIdiom.Tablet
    ? new Rect(0, 20, 0, 0)
    : Rect.Zero
});
Launcher
await Launcher.OpenAsync(new OpenFileRequest
{
    File = new ReadOnlyFile(file),
    PresentationSourceBounds =
    DeviceInfo.Platform == DevicePlatform.iOS &&
    DeviceInfo.Idiom == DeviceIdiom.Tablet
    ? new Rect(0, 20, 0, 0)
    : Rect.Zero
})
Conclusion
And that’s it! 🎉 In this article, you learned how to implement share functionality in your .NET MAUI apps, allowing users to easily share text, links, files and even multiple files across platforms.
You also explored important platform-specific considerations, such as additional permissions on iOS and Mac Catalyst, secure file sharing on Android using FileProvider, and how to properly handle popover presentation on iPadOS to avoid unexpected issues.
With these concepts in mind, you now have a clearer understanding of how to create a complete and secure sharing experience, taking care of both user experience and platform requirements.
If you have any questions or would like me to cover more .NET MAUI topics, feel free to leave a comment—I’d be happy to help! 💚
See you in the next article! 🙋♀️✨
Reference
Sample codes and explanation was based on the official documentation:

Leomaris Reyes
Leomaris Reyes is a software engineer from the Dominican Republic specializing in mobile development. She is a 7-time Microsoft MVP and actively builds mobile applications while sharing practical knowledge through technical articles and developer-focused content.
Through her work, she explains programming concepts, developer tools and real-world development practices to help developers grow in their careers.
You can follow her on Instagram and TikTok at @leomarisreyes.dev, read her articles on AskXammy, and connect with her on LinkedIn, where she shares tutorials, insights and resources for developers.
Related Posts
Comments
All articles
Topics
Web MobileMobile
Desktop
Design
Productivity
People