How to Use NestJS as a Signaling Server for WebRTC Video Chat

Summarize with AI:
Learn about WebRTC and see how to build a peer-to-peer video chat application in NestJS.
In this post, we will build a peer-to-peer video chat application with WebRTC for direct browser communication and NestJS as the signaling server. You will learn how browsers establish direct connections and the role of signaling servers in this process.
Our video chat application will have three key features:
- Both browsers will connect directly without passing video data through the server.
- NestJS (our signaling server) will only help browsers find each other and establish connections.
- No plugins or external APIs will be used.
Why WebRTC?
WebRTC, or Web Real-Time Communication, is a free, open-source project that facilitates direct communication between browsers. This eliminates the need for intermediary servers, resulting in faster and more cost-effective processes. It is backed by web standards and integrates smoothly with JavaScript. It can manage video, audio and other forms of data.
Furthermore, it offers built-in tools that help users connect across various networks. These features make it an ideal choice for real-time web applications.
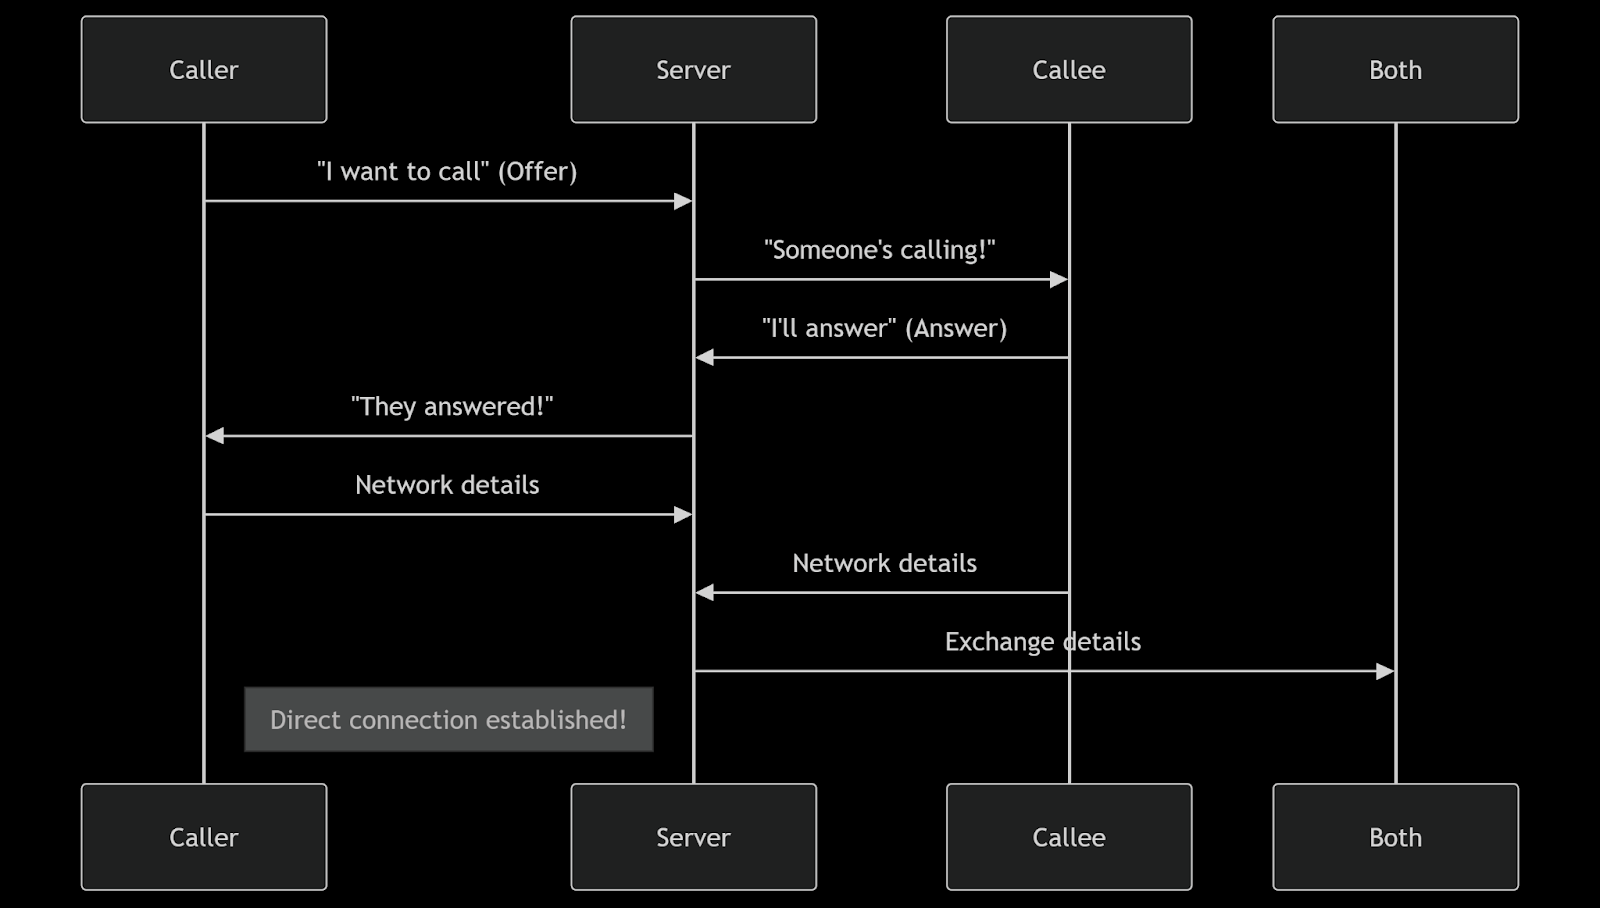
Here is a diagram showing the flow of how our video chat will be created.

The connection process can be broken down into four stages:
- Call initiation: The caller first sends a WebRTC offer to the signaling server. The server then alerts potential recipients by broadcasting this offer.
- Call acceptance: When a callee chooses to answer, they send a WebRTC answer back through the server. The server completes the handshake by notifying the original caller (“They answered”).
- Network preparation: Both devices then share their network details with the server, which relays them to the other party.
- Direct connection: Once enough network details are exchanged, WebRTC establishes a peer-to-peer connection, and the signaling server’s job is done.
Why Do We Need a Signaling Server?
Signaling is needed to establish connections between peers, as it allows the sharing of session details, such as offers, answers and network metadata. Without this, browsers would be unable to locate each other or negotiate the required protocols, because WebRTC does not provide messaging capabilities on its own. Using NestJS, signaling is managed securely through WebSockets, so that all communication is encrypted. It’s easy to overlook, but signaling is crucial for enabling peer-to-peer interactions.
Project Setup
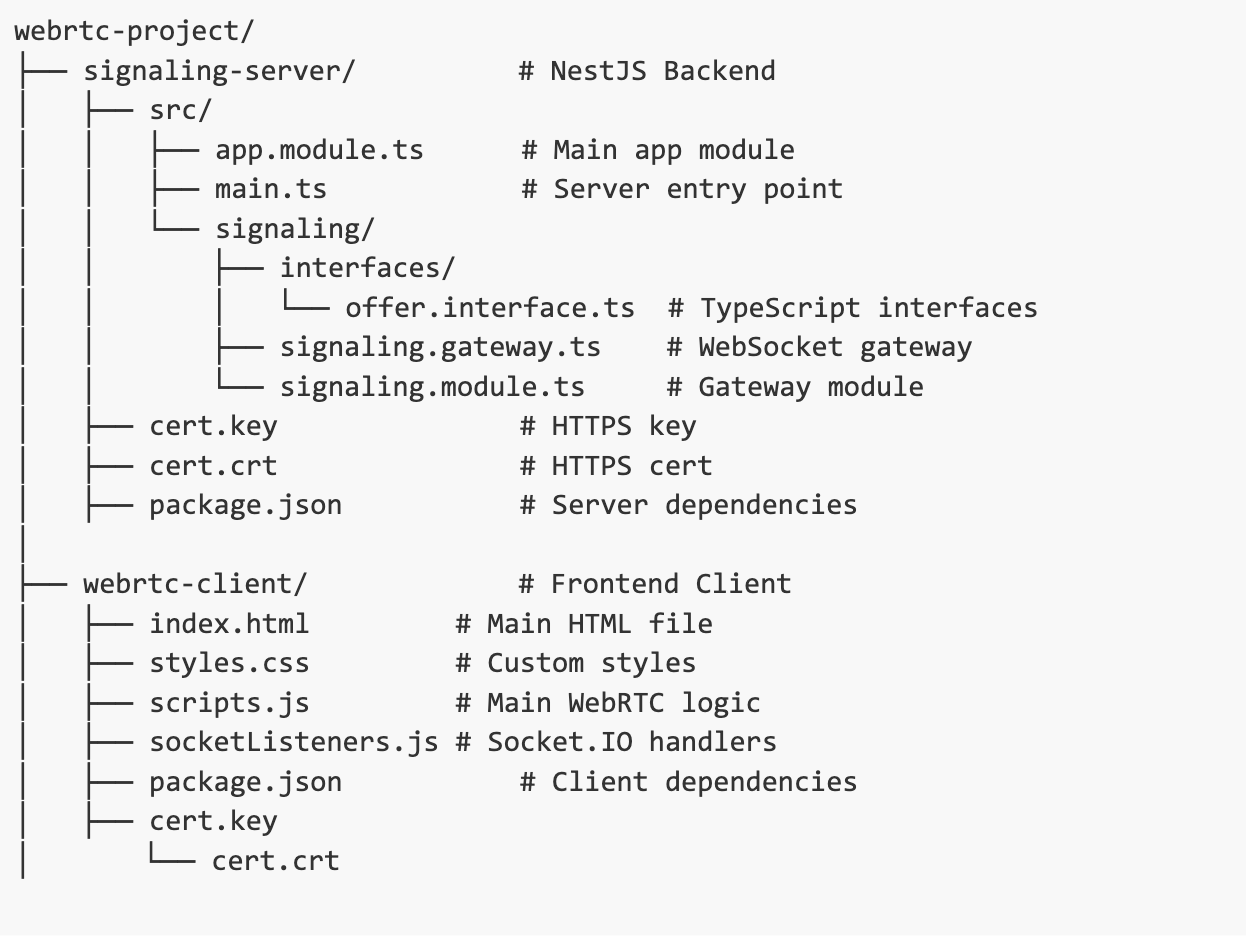
This is what the folder structure for our project will look like.

Backend Setup
Run the following command in your terminal to set up a NestJS project:
nest new signaling-server
cd signaling-server
Next, install the dependencies for the project:
npm install @nestjs/websockets @nestjs/platform-socket.io socket.io
As shown in the project skeleton diagram above, create a signaling module with a signaling.gateway.ts file and an offer.interface.ts file.
WebRTC Requires HTTPS
WebRTC requires HTTPS for secure access to cameras, microphones and direct peer connections. During development, we can bypass security blocks since we are in a controlled environment. To facilitate this, we use mkcert, a tool for creating SSL certificates. We configure our frontend and backend to use these certificates, allowing us to test securely without the full overhead of HTTPS.
To connect our laptop and mobile phone, we will use our local IP address, and both devices should be connected to the same WiFi network.
Now, run the following commands to generate the certificate files.
npm install -g mkcert
mkcert create-ca
mkcert create-cert
Next, update your main.ts file with the following:
import { NestFactory } from "@nestjs/core";
import { AppModule } from "./app.module";
import * as fs from "fs";
import { IoAdapter } from "@nestjs/platform-socket.io";

async function bootstrap() {
  const httpsOptions = {
    key: fs.readFileSync("./cert.key"),
    cert: fs.readFileSync("./cert.crt"),
  };

  const app = await NestFactory.create(AppModule, { httpsOptions });
  app.useWebSocketAdapter(new IoAdapter(app));

  // Replace with your local IP (e.g., 192.168.1.10)
  const localIp = "YOUR-LOCAL-IP-ADDRESS";
  app.enableCors({
    origin: [`https://${localIp}:3000`, "https://localhost:3000"],
    credentials: true,
  });

  await app.listen(8181);
  console.log(`Signaling server running on https://${localIp}:8181`);
}

bootstrap();
In the code above, we set up our signaling server using HTTPS and WebSockets. First, we define an httpsOptions object using our cert.key and cert.crt files, which we use when creating our app in the NestFactory.create method. Next, we configure the app with the IoAdapter, which allows support for WebSocket communication via Socket.IO.
To only allow frontend clients from specific origins access to our backend, we enable CORS with custom origin settings and credentials support. Finally, we start the server on port 8181 and log a message to confirm it’s running and ready to handle secure, real-time communication.
Frontend Setup
To set up our frontend, run the command below:
cd .. && mkdir webrtc-client && cd webrtc-client && touch index.html scripts.js styles.css socketListeners.js package.json
Next, copy the cert.key and cert.crt files from the NestJS project into the webrtc-client folder.
Backend Logic
Update your offer.interface.ts file with the code below:
export interface ConnectedSocket {
  socketId: string;
  userName: string;
}

export interface Offer {
  offererUserName: string;
  offer: any;
  offerIceCandidates: any[];
  answererUserName: string | null;
  answer: any | null;
  answererIceCandidates: any[];
  socketId: string;
  answererSocketId?: string;
}
The signaling.gateway.ts file listens for WebRTC events and connects peers while managing state for sessions and candidates, providing efficient coordination without disrupting media streams.
Let’s set up the core of our Signaling Gateway and then walk through the necessary methods afterward.
import {
  WebSocketGateway,
  WebSocketServer,
  OnGatewayConnection,
  OnGatewayDisconnect,
  SubscribeMessage,
} from "@nestjs/websockets";
import { Server, Socket } from "socket.io";
import { Offer, ConnectedSocket } from "./interfaces/offer.interface";

@WebSocketGateway({
  cors: {
    origin: ["https://localhost:3000", "https://YOUR-LOCAL-IP-ADDRESS:3000"],
    methods: ["GET", "POST"],
    credentials: true,
  },
})
export class SignalingGateway
  implements OnGatewayConnection, OnGatewayDisconnect
{
  @WebSocketServer() server: Server;
  private offers: Offer[] = [];
  private connectedSockets: ConnectedSocket[] = [];
}
The @WebSocketGateway decorator includes CORS settings that restrict access to specific client origins. Setting credentials to true allows cookies, authorization headers or TLS client certificates to be sent along with requests.
The SignalingGateway class automatically handles client connections and disconnections by implementing OnGatewayConnection and OnGatewayDisconnect.
Inside the class, @WebSocketServer() provides access to the active Socket.IO server instance, and the offers array stores WebRTC offer objects, which include session descriptions and ICE candidates.
The connectedSockets array maintains a list of connected users, identified by their socket ID and username, allowing the server to direct signaling messages correctly.
What Are ICE Candidates?
ICE (Interactive Connectivity Establishment) candidates are pieces of network information (like IP addresses, ports and protocols) that help WebRTC peers find the most efficient way to establish a direct peer-to-peer connection. They are exchanged after the offer/answer negotiation and are essential for navigating NATs and firewalls. Without them, WebRTC communication may fail due to network obstacles.
Next, we’ll implement the handleConnection and handleDisconnect methods to authenticate users, register them in memory and remove their data cleanly when they disconnect.
Update your signaling.gateway.ts file with the following:
// Connection handler
handleConnection(socket: Socket) {
  const userName = socket.handshake.auth.userName;
  const password = socket.handshake.auth.password;

  if (password !== 'x') {
    socket.disconnect(true);
    return;
  }

  this.connectedSockets.push({ socketId: socket.id, userName });
  if (this.offers.length) socket.emit('availableOffers', this.offers);
}
// Disconnection handler
handleDisconnect(socket: Socket) {
  this.connectedSockets = this.connectedSockets.filter(
    (s) => s.socketId !== socket.id,
  );
  this.offers = this.offers.filter((o) => o.socketId !== socket.id);
}
The handleConnection method gets the userName and password from the client’s authentication data. If the password is incorrect, the connection is terminated, but if it is correct, the user’s socketId and userName will be added to the connectedSockets array.
If there are offers that haven’t been handled yet, the server sends them to the newly connected user through the availableOffers event.
The handleDisconnect method removes the disconnected socket from both the connectedSockets array and the offers list. This cleanup prevents stale data from accumulating and keeps only active connections retained.
The filtering logic keeps all entries that do not match the ID of the disconnected socket.
Next, we’ll implement methods to handle specific WebSocket events: offers, answers and ICE candidates, which are essential for creating peer-to-peer connections in WebRTC.
Update your signaling.gateway.ts file with the following:
// New offer handler
@SubscribeMessage('newOffer')
handleNewOffer(socket: Socket, newOffer: any) {
  const userName = socket.handshake.auth.userName;
  const newOfferEntry: Offer = {
    offererUserName: userName,
    offer: newOffer,
    offerIceCandidates: [],
    answererUserName: null,
    answer: null,
    answererIceCandidates: [],
    socketId: socket.id,
  };

  this.offers = this.offers.filter((o) => o.offererUserName !== userName);
  this.offers.push(newOfferEntry);
  socket.broadcast.emit('newOfferAwaiting', [newOfferEntry]);
}
// Answer handler with ICE candidate acknowledgment
@SubscribeMessage('newAnswer')
async handleNewAnswer(socket: Socket, offerObj: any) {
  const userName = socket.handshake.auth.userName;
  const offerToUpdate = this.offers.find(
    (o) => o.offererUserName === offerObj.offererUserName,
  );

  if (!offerToUpdate) return;

  // Send existing ICE candidates to answerer
  socket.emit('existingIceCandidates', offerToUpdate.offerIceCandidates);

  // Update offer with answer information
  offerToUpdate.answer = offerObj.answer;
  offerToUpdate.answererUserName = userName;
  offerToUpdate.answererSocketId = socket.id;

  // Notify both parties
  this.server
    .to(offerToUpdate.socketId)
    .emit('answerResponse', offerToUpdate);
  socket.emit('answerConfirmation', offerToUpdate);
}
// ICE candidate handler with storage
@SubscribeMessage('sendIceCandidateToSignalingServer')
handleIceCandidate(socket: Socket, iceCandidateObj: any) {
  const { didIOffer, iceUserName, iceCandidate } = iceCandidateObj;

  // Store candidate in the offer object
  const offer = this.offers.find((o) =>
    didIOffer
      ? o.offererUserName === iceUserName
      : o.answererUserName === iceUserName,
  );

  if (offer) {
    if (didIOffer) {
      offer.offerIceCandidates.push(iceCandidate);
    } else {
      offer.answererIceCandidates.push(iceCandidate);
    }
  }

  // Forward candidate to other peer
  const targetUserName = didIOffer
    ? offer?.answererUserName
    : offer?.offererUserName;
  const targetSocket = this.connectedSockets.find(
    (s) => s.userName === targetUserName,
  );

  if (targetSocket) {
    this.server
      .to(targetSocket.socketId)
      .emit('receivedIceCandidateFromServer', iceCandidate);
  }
}
Offer Handler
This method processes incoming WebRTC offers from callers, creating a new offer object with the caller’s username, session description and empty ICE candidate arrays. The server removes any existing offers from the same user to prevent duplicates, then stores and broadcasts the new offer to all connected clients for potential callees to answer.
Answer Handler
Upon receiving an answer to an offer, the server locates the original offer. It sends existing ICE candidates from the caller to the answering client to speed up the connection. The server updates the offer object with the answer details, including the callee’s username and socket ID. Both parties get notifications: the original caller receives the answer, and the answering client gets confirmation.
ICE Candidate Handler
This method processes ICE candidates from peers. It determines whether each candidate is from an offerer or an answerer using the didIOffer flag, storing it in the appropriate array within the offer object. The server relays each candidate to the corresponding peer by looking up their socket ID and continues until peers establish a direct connection.
Then run this command to start the server:
npm run start:dev
Frontend Logic
Update your Index.html file with the following:
<!DOCTYPE html>
<html>
  <head>
    <meta charset="utf-8" />
    <meta http-equiv="X-UA-Compatible" content="IE=edge" />
    <title>WebRTC with NestJS Signaling</title>
    <meta name="viewport" content="width=device-width, initial-scale=1" />
    <meta
      name="viewport"
      content="width=device-width, initial-scale=1.0, maximum-scale=1.0, user-scalable=no"
    />
    <link
      href="https://cdn.jsdelivr.net/npm/bootstrap@5.3.0/dist/css/bootstrap.min.css"
      rel="stylesheet"
    />
    <link rel="stylesheet" href="styles.css" />
    <script>
      // Request camera permission immediately
      document.addEventListener("DOMContentLoaded", async () => {
        try {
          const stream = await navigator.mediaDevices.getUserMedia({
            video: { facingMode: "user" }, // Front camera on mobile
            audio: false,
          });
          stream.getTracks().forEach((track) => track.stop());
        } catch (err) {
          console.log("Pre-permission error:", err);
        }
      });
    </script>
  </head>
  <body>
    <div class="container">
      <div class="row mb-3 mt-3 justify-content-md-center">
        <div id="user-name" class="col-12 text-center mb-2"></div>
        <button id="call" class="btn btn-primary col-3">Start Call</button>
        <div id="answer" class="col-6"></div>
      </div>
      <div id="videos">
        <div id="video-wrapper">
          <div id="waiting">Waiting for answer...</div>
          <video
            class="video-player"
            id="local-video"
            autoplay
            playsinline
            muted
          ></video>
        </div>
        <video
          class="video-player"
          id="remote-video"
          autoplay
          playsinline
        ></video>
      </div>
    </div>
    <!-- Socket.io client library -->
    <script src="https://cdn.socket.io/4.7.4/socket.io.min.js"></script>
    <script src="scripts.js"></script>
    <script src="socketListeners.js"></script>
  </body>
</html>
Then update your styles.css file with the following:
#videos {
  display: grid;
  grid-template-columns: 1fr 1fr;
  gap: 2em;
}
.video-player {
  background-color: black;
  width: 100%;
  height: 300px;
  border-radius: 8px;
}
#video-wrapper {
  position: relative;
}
#waiting {
  display: none;
  position: absolute;
  left: 0;
  right: 0;
  top: 0;
  bottom: 0;
  margin: auto;
  width: 200px;
  height: 40px;
  background: rgba(0, 0, 0, 0.7);
  color: white;
  text-align: center;
  line-height: 40px;
  border-radius: 5px;
}
#answer {
  display: flex;
  gap: 10px;
  flex-wrap: wrap;
}
#user-name {
  font-weight: bold;
  font-size: 1.2em;
}
We’ll divide the code for the script.js file into two parts: Initialization & Setup and Core Functionality & Event Listener.
Update your script.js file with the code for the initialization and setup:
const userName = "User-" + Math.floor(Math.random() * 1000);
const password = "x";
document.querySelector("#user-name").textContent = userName;
const localIp = "YOUR-LOCAL-IP-ADDRESS";
const socket = io(`https://${localIp}:8181`, {
  auth: { userName, password },
  transports: ["websocket"],
  secure: true,
  rejectUnauthorized: false,
});
// DOM Elements
const localVideoEl = document.querySelector("#local-video");
const remoteVideoEl = document.querySelector("#remote-video");
const waitingEl = document.querySelector("#waiting");
// WebRTC Configuration
const peerConfiguration = {
  iceServers: [{ urls: "stun:stun.l.google.com:19302" }],
  iceTransportPolicy: "all",
};
// WebRTC Variables
let localStream;
let remoteStream;
let peerConnection;
let didIOffer = false;
The code creates a secure WebSocket connection to the NestJS signaling server. The WebRTC configuration includes essential ICE servers for network traversal and aims for maximum connectivity. It also initializes variables to manage media streams and track the active peer connection.
Now, let’s add the core functions and the event listener:
// Core Functions
const startCall = async () => {
  try {
    await getLocalStream();
    await createPeerConnection();
    const offer = await peerConnection.createOffer();
    await peerConnection.setLocalDescription(offer);
    didIOffer = true;
    socket.emit("newOffer", offer);
    waitingEl.style.display = "block";
  } catch (err) {
    console.error("Call error:", err);
  }
};
const answerCall = async (offerObj) => {
  try {
    await getLocalStream();
    await createPeerConnection(offerObj);
    const answer = await peerConnection.createAnswer();
    await peerConnection.setLocalDescription(answer);
    // Get existing ICE candidates from server
    const offerIceCandidates = await new Promise((resolve) => {
      socket.emit(
        "newAnswer",
        {
          ...offerObj,
          answer,
          answererUserName: userName,
        },
        resolve
      );
    });
    // Add pre-existing ICE candidates
    offerIceCandidates.forEach((c) => {
      peerConnection
        .addIceCandidate(c)
        .catch((err) => console.error("Error adding ICE candidate:", err));
    });
  } catch (err) {
    console.error("Answer error:", err);
  }
};
const getLocalStream = async () => {
  const constraints = {
    video: {
      facingMode: "user",
      width: { ideal: 1280 },
      height: { ideal: 720 },
    },
    audio: false,
  };
  try {
    localStream = await navigator.mediaDevices.getUserMedia(constraints);
    localVideoEl.srcObject = localStream;
    localVideoEl.play().catch((e) => console.log("Video play error:", e));
  } catch (err) {
    alert("Camera error: " + err.message);
    throw err;
  }
};
const createPeerConnection = async (offerObj) => {
  peerConnection = new RTCPeerConnection(peerConfiguration);
  remoteStream = new MediaStream();
  remoteVideoEl.srcObject = remoteStream;
  // Add local tracks
  localStream.getTracks().forEach((track) => {
    peerConnection.addTrack(track, localStream);
  });
  // ICE Candidate handling
  peerConnection.onicecandidate = (event) => {
    if (event.candidate) {
      socket.emit("sendIceCandidateToSignalingServer", {
        iceCandidate: event.candidate,
        iceUserName: userName,
        didIOffer,
      });
    }
  };
  // Track handling
  peerConnection.ontrack = (event) => {
    event.streams[0].getTracks().forEach((track) => {
      if (!remoteStream.getTracks().some((t) => t.id === track.id)) {
        remoteStream.addTrack(track);
      }
    });
    waitingEl.style.display = "none";
  };
  // Connection state handling
  peerConnection.onconnectionstatechange = () => {
    console.log("Connection state:", peerConnection.connectionState);
    if (peerConnection.connectionState === "failed") {
      alert("Connection failed! Please try again.");
    }
  };
  // Set remote description if answering
  if (offerObj) {
    await peerConnection
      .setRemoteDescription(offerObj.offer)
      .catch((err) => console.error("setRemoteDescription error:", err));
  }
};
// Event Listeners
document.querySelector("#call").addEventListener("click", startCall);
This section manages the entire WebRTC call process. It sets up a peer connection, creates session descriptions and works with the signaling server to share offer/answer SDP packets.
The answer process syncs ICE candidates to exchange network path details. It also tracks additions, generates ICE candidates, monitors connection states and updates the user interface.
Next, add the following to your socketListeners.js file:
// Handle available offers
socket.on("availableOffers", (offers) => {
  console.log("Received available offers:", offers);
  createOfferElements(offers);
});
// Handle new incoming offers
socket.on("newOfferAwaiting", (offers) => {
  console.log("Received new offers awaiting:", offers);
  createOfferElements(offers);
});
// Handle answer responses
socket.on("answerResponse", (offerObj) => {
  console.log("Received answer response:", offerObj);
  peerConnection
    .setRemoteDescription(offerObj.answer)
    .catch((err) => console.error("setRemoteDescription failed:", err));
  waitingEl.style.display = "none";
});
// Handle ICE candidates
socket.on("receivedIceCandidateFromServer", (iceCandidate) => {
  console.log("Received ICE candidate:", iceCandidate);
  peerConnection
    .addIceCandidate(iceCandidate)
    .catch((err) => console.error("Error adding ICE candidate:", err));
});
// Handle existing ICE candidates
socket.on("existingIceCandidates", (candidates) => {
  console.log("Receiving existing ICE candidates:", candidates);
  candidates.forEach((c) => {
    peerConnection
      .addIceCandidate(c)
      .catch((err) =>
        console.error("Error adding existing ICE candidate:", err)
      );
  });
});
// Helper function to create offer buttons
function createOfferElements(offers) {
  const answerEl = document.querySelector("#answer");
  answerEl.innerHTML = ""; // Clear existing buttons
  offers.forEach((offer) => {
    const button = document.createElement("button");
    button.className = "btn btn-success";
    button.textContent = `Answer ${offer.offererUserName}`;
    button.onclick = () => answerCall(offer);
    answerEl.appendChild(button);
  });
}
This file handles the client-side of the WebRTC signaling process using Socket.IO events. It listens for incoming call offers (“availableOffers” and “newOfferAwaiting”) and dynamically generates “Answer” buttons that allow the user to respond and establish a connection.
When an answer is received (“answerResponse”), the remote peer session description is set and the waiting indicator is hidden.
ICE candidates are handled in two parts:
- Real-time candidates by “receivedIceCandidateFromServer”
- Previously exchanged candidates by “existingIceCandidates”
Both are added to the current RTCPeerConnection, with error handling included.
Finally, update your package.json file with the following:
{
  "name": "webrtc-client",
  "version": "1.0.0",
  "scripts": {
    "start": "http-server -S -C cert.crt -K cert.key -p 3000"
  },
  "dependencies": {
    "http-server": "^14.1.1"
  }
}
Then install and run:
npm install
npm start
Testing
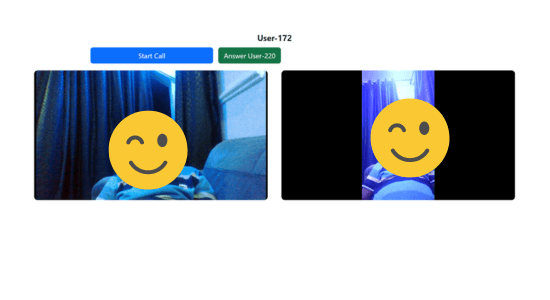
On both browsers, open https://YOUR-LOCAL-IP-ADDRESS:3000, then start a call on one and answer it on the other.

Common Issues
Make sure your camera is working by allowing browser permission to access it, and verify you’re using HTTPS. Some networks might block STUN servers, preventing direct peer-to-peer connections. If this happens, you may need to implement a TURN server for connection. If the socket IDs aren’t the same on both ends, it can cause problems with signaling, so check for this when troubleshooting.
Conclusion
We’ve created a basic signaling server and client for peer-to-peer video calls, covering key functions like offer/answer negotiation and ICE candidate exchange. This setup shows fundamental WebRTC concepts and how signaling servers help establish direct connections without handling media streams, thereby optimizing both performance and privacy. To improve the app, consider adding text chat via WebRTC data channels and enabling screen sharing.

Christian Nwamba
Chris Nwamba is a Senior Developer Advocate at AWS focusing on AWS Amplify. He is also a teacher with years of experience building products and communities.

