
How Much Will It Hurt? The 10 Things You Need to Do to Migrate Your MVC/Web API App to ASP.NET Core

Summarize with AI:
It is possible to migrate your .NET Framework ASP.NET MVC application to any version of .NET/.NET Core—including the latest version. Some parts of the process are more ... challenging ... than other parts, though, so you need to be prepared.
Table of Contents
- Migrating Your ASP.NET MVC 5 Application to ASP.NET Core
- Application Specific
◦ Class libraries and Third-Party Packages
◦ Data Access - The Easy Stuff
◦ Configuring Your Application
◦ Controllers, Views and Models
◦ Routing - The Hard Stuff
◦ Web.config configuration
◦ Cache
◦ Session
◦ Authorization/Authentication
◦ Handlers and Modules (Middleware) - After the Migration
Migrating Your ASP.NET MVC 5 Application to ASP.NET Core
Before you migrate your perfectly good ASP.NET MVC 5/.NET Framework 4.5+ app to ASP.NET Core … is this something you really need to do? Migrating your application won’t necessarily be challenging, but it can involve a lot of time consuming/repetitious/grunt work (which means it can be expensive). Since that’s the case, you should migrate your application only if:
- There’s some functionality you want to add to your application that can only be done in ASP.NET Core (e.g., creating a cross-platform app)
- You want to reduce the size of your toolkit by having nothing but ASP.NET Core applications in your application portfolio
- You’re paid by the hour and want to drive up your billable time
If you’re committed to migrating then here are the 10 areas that you’ll need to migrate, each with its varying degrees of pain and suffering. While the reason you’re migrating may be to take advantage of new features in ASP.NET Core (Razor Pages, Tag Helpers, faster Web services and so on), I’m going to assume that you’ll take advantage of those new features after you’ve got your application up and running in ASP.NET Core. Quite frankly, for an application of any size, you’ll have enough problems just doing that.
Application Specific
There are some migration issues that you may not have to deal with because they will depend on what features your application uses that aren’t part of the base ASP.NET framework.
Class Libraries and Third-Party Packages
This category is, potentially, your biggest headache. Or not. You could be lucky.
For example, if your application is using only class libraries that you’ve created and those libraries don’t contain any Windows-specific code or use any third-party packages, then you can probably just reference those libraries’ DLLs from your ASP.NET Core project and carry on with your life.
If you wanted to future-proof your application or position your application to run on any platform, then you could also:
- Create a Visual Studio 2022 project using the “Class Library that targets .NET or .NET Standard” template
- Copy your class library code files into that new project
- If your code compiles, reference that new project’s DLLs from your web application
If, however, your project is using a third-party package or a class library with Windows-specific code (and you want to create a cross-platform app), then you’re going to need to upgrade to a .NET Core equivalent. What could possibly go wrong?
Well, first, of course, there may not be a .NET Core equivalent to the package for you to upgrade to. Even if there is, the .NET Core version may have a significantly different interface than the package your old application was built with. If either of those cases is true, then you’re going to have hunt down and rewrite the relevant code in your project, ideally without introducing any new bugs.
And if the new package actually behaves differently than the old package, then you are potentially in for a significant rewrite to accommodate/compensate for the new behavior.
Presumably, your new package’s vendor can provide you with some guidance on migrating to the new package so, with one exception, I’m going to ignore this category because all your issues will be package-specific. I will say that your best friend here is a library of regression tests that will let you see if the new version of your application works the same as your old version.
The one exception I’ll make is if you’re using a dependency injection/inversion of a control container (an IoC). If you’re not using an IoC, then you can continue to new up your classes as you need them. If you’re using an IoC, you should know that ASP.NET Core comes with its own IoC (the ASP.NET Core Services collection). You’ll need to look at the differences between ASP.NET Core’s built-in IoC and the ASP.NET Core version of your existing IoC (assuming an ASP.NET Core version exists) before deciding which will require the least work when migrating.
Data Access
If you’re converting a business application, you’ll have a lot of data access code in your application. If your application uses ADO.NET, you can continue to use it.
If you’ve used Entity Framework 6 (EF6) in a code-first mode (EF6), you can continue to use that also. If, on the other hand, your application is using an EDMX file and its related visual designer, then you’ll need to move to the code first approach by creating your own entity and DbContext files before migrating. In all these cases, you’ll just need to add the relevant NuGet packages to your ASP.NET Application and you’ll be ready to move on.
If you’re considering upgrading to Entity Framework Core from EF6 and used a code-first approach, then you’ll find that much (perhaps all) of your application is “code-compatible” with Entity Framework Core—most of your changes will be around instantiating the DbContext object and setting its connection string.
However Entity Framework Core is … different and, while your EF6 code may be compatible, the rules for processing that code have changed. You’ll need to do extensive testing to make sure that your application still works as it did before (it probably will).
The smart move, though, is to stick with your existing data access technology and defer upgrading to Entity Framework Core to a later date (assuming you ever want to—remember that “working” is a feature). If you do decide to upgrade, Microsoft has a guide that you should review.
Having said all that, regardless of your choice, you’ll need to change how you store your connection strings—see the section on the Web.config file further along.
The Easy Stuff
Some areas of your application should be relatively easy to migrate. For these areas, the effort involved will be controlled primarily by the size of your application (i.e., the more Controllers/Views/Models/Routes you have, the longer you’ll have to spend on migrating them).
Configuring Your Application
The single biggest difference between an MVC 5 and an ASP.NET Core project is how the project is configured. In ASP.NET Core 6 and later, configuration is handled entirely in the Program.cs file. The simplest solution for creating an MVC 5-compatible project in ASP.NET Core is to pick Visual Studio 2022’s “ASP.NET Core Web App (Model-View-Controller)” template when creating your ASP.NET Core project. That template also supports mixed MVC 5/Web API projects.
Telerik DevCraft can make development easier with access to UI for ASP.NET MVC and UI for ASP.NET Core, plus embedded reporting, automated testing, debugging tools, and more.
For a pure Web API project, create your new project with Visual Studio 2022’s “ASP.NET Core Web API” template.
Three tips:
- If you can give your new ASP.NET Core project the same name/namespace as your old project, you can save yourself a couple of global search-and-replaces later on.
- When working through the template wizard that creates your project, you’ll probably want to leave the HTTPS support option turned on because your app is probably using HTTPS in production.
- For Web API projects, make sure that the UseControllers option is checked when creating your project (and you might as well keep the the OpenAPI option checked, too—you’ll thank me later when someone asks for documentation on your Web service).
Controllers, Views and Models
For both MVC and Web API projects, your next step is, in File Explorer, to drag the contents of your old project’s Controllers, Views and Models folders to the equivalent folders in your new ASP.NET Core project. ASP.NET Core projects don’t use the .csproj file to track project members, so if you drop your files into your new project’s folders using File Explorer, those files will show up in Visual Studio’s Solution Explorer in your new project.
Here’s the good news: With Views, HTML Helpers still work and, if you’ve been good about not injecting third-party libraries into your Views, your View should work just fine as is. The same is true of your Models.
The news is almost as good for your Controllers (ignoring any problems with class-libraries): The bulk of your Controller code is probably completely compatible with ASP.NET Core. Where it isn’t (and also ignoring the problems I’ll discuss later), you can handle the problems with a global search and replace.
For your MVC Controllers, you’ll need to update the using statements because the base ASP.NET Core Controller class is in a different namespace than the MVC 5 Controller class. A global search and replace that swaps “using System.Web.Mvc” with “using Microsoft.AspNetCore.Mvc” should do the trick.
For your Web API controllers, you’ll need to update both the base class (from “ApiController” to “ControllerBase”) and your using statements (from “using System.Web.Http” to “using Microsoft.AspNetCore.Mvc”). Again, global search-and-replace is your friend here.
If you have Web API Controllers and are using CORS, you’ll need to make two changes to your Project.cs file. First, right after the statement that sets the builder variable, add this code to configure CORS:
builder.Services.AddCors(options =>
{
    options.AddDefaultPolicy(
        policy =>
        {
            policy.WithOrigins("…url…",
                                             "…url…");
        });
});
Further down in Program.cs, right after the app.UseRouting statement, add this line to enable CORS:
app.UseCors();
If you’re not happy with the default CORS policy, Microsoft has a guide for configuring a custom CORS policy.
Now would also be a good time to do another global search-and-replace to update all the using statements that reference your old project’s namespace to your new project’s namespace (unless, as I said, you’ve been clever enough that your ASP.NET Core project has the same namespace as the old one).
Routing
If you’ve been using nothing but attribute-based routing, I have more good news for you: Virtually everything still works. The only exception here is that there is no longer a separate RoutePrefix attribute in ASP.NET Core—the Route attribute takes care of that functionality. Another global search-and-replace swapping “[RoutePrefix” to “[Route” will fix that.
If you’ve been using conventional routing (i.e., defining all your routes in the RouteConfig file), the news is still pretty good: You’ll need to copy your MapRoute statements to your new project’s Program.cs file and paste them above the app.MapControllerRoute statement that you’ll find there. And then you’ll need to rewrite them.
Your existing routes will look something like this:
routes.MapRoute(
                name: "routename",
                url: "routetemplate",
                defaults: new { controller = "controllername", action = "actionname", etc. }
            );
You’ll need to convert them into the new syntax which looks like this (note the asterisks to mark the differences):
*app.MapControllerRoute*(
name: "routename",
               *pattern*: "routetemplate",
               defaults: new { controller = "controllername", action = "actionname", etc. });
Selecting the MapRoute statements you just pasted and doing some careful search-and-replaces within that selection should take care of most (maybe, all) of the required changes.
The Hard Stuff
And this is where things start getting ugly. The following changes will require some thought and effort and will be controlled by how often you use each of these features. If, for example, you’ve got the MemoryCache object wound through your application, then you’ll have to track down every place you’ve used it and rewrite that code. Sorry about that.
Web.config Configuration
The XML-based Web.config file and the ConfigurationManager object are both gone in ASP.NET Core. This isn’t a problem that’s going to be handled by search-and-replace.
By default, application settings are kept in a JSON file in your project called (somewhat obviously) appsettings.json. While you can coerce your ASP.NET Core project into using an XML configuration file, in my opinion it’s easier to convert to using the new appsettings file.
Your first step, then, is going to be converting the entries in the appSettings and connectionString sections in your Web.config file. Currently, those sections will look something like this:
<appSettings>
    <add key="…" value="…" />
    …more…
  </appSettings>
  <connectionStrings>
    <add name="db" connectionString="…" providerName="..."/>
    …more…
  </connectionStrings>
The equivalent JSON would look like the following. You should add it to the default appsettings.json file after the existing AllowedHosts line and before the file’s final closing French brace:
  "AllowedHosts": "*",
  "key": "value",
      …more…,
  "ConnectionStrings": {
      "db": "connectionString": "…",
     …more…
    }
}
Next, track down any Controller that instantiates an ADO.NET *Connection or Entity Framework DbContext object. For each of those Controllers, you’ll need to extend its constructor (or add a constructor if the Controller doesn’t have one) to have it accept an IConfiguration object from ASP.NET Core’s default IoC. You can then read your connection string from that object using the IConfiguration object’s GetConnectionString method, passing the name of your connection string in appsettings.json.
That code would look something like this:
private readonly string? db;
public HomeController(…any existing parameters…, IConfiguration config)
{
   db = config.GetConnectionString("db");
}
Now you can pass that connection string to your DbContext or ADO.NET connection objects as you need it.
Similarly, you’ll need to find wherever you’re reading your appsettings section and rewrite that code. To retrieve your appsetting values, you can use the IConfiguration object’s GetValue<T> method
like this:
private readonly string? setting;
public HomeController(…any existing parameters…, IConfiguration config)
{
   setting = config.GetValue<string>("key");
If you’ve been transforming your Web.config file to create development/test/production versions, you can do a similar thing by creating versions of the appsetting.json file called appsettings.development.json, appsettings.staging.json and appsettings.production.json. The version of your appsetting.*.json file that will be used by your application is based on how your application is started and is configured in your project’s launchsettings.json file.
The easiest way to work with the launchsettings file is to select your project’s Properties, then select the Properties’ Debug tab, and (in the General section) click on the “Open debug launch profiles UI” link. That will display the Launch Profiles dialog.
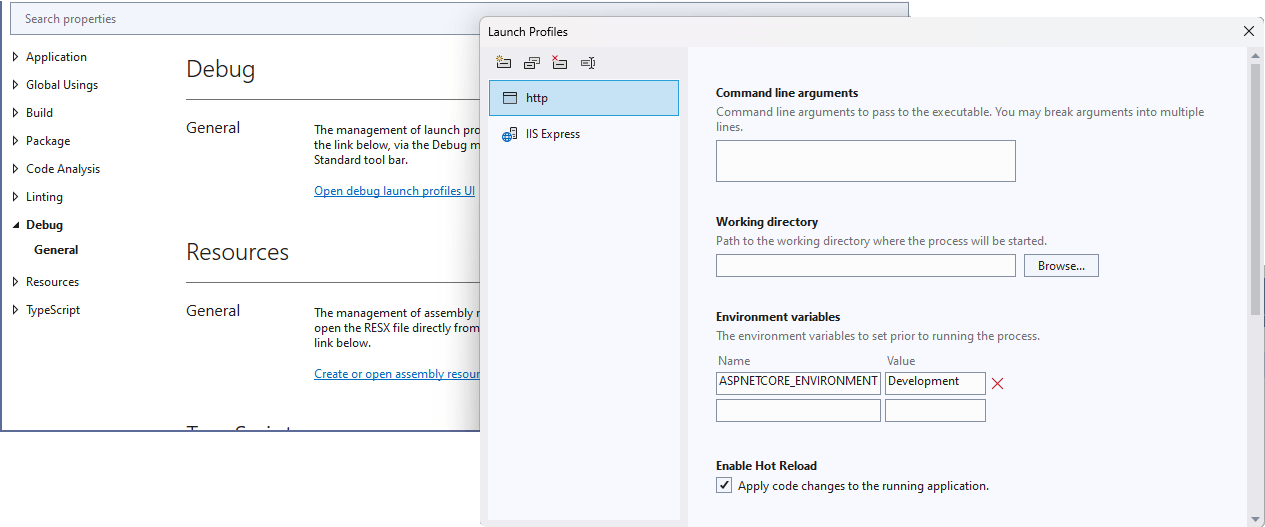
That dialog lets you set the ASPNETCORE_ENVIRONMENT environment variable which controls which appsettings.*.json file your application will use, based on how your project is started. The two default settings you’ll find already set up both set the environment variable to “development.” Again, Microsoft has a useful guide for configuring these settings.
Session
The Session object is no longer included by default in ASP.NET Core and you’ll need to add and configure it in your Program.cs file (this includes any configuration settings for this object that you have set in your Web.config file).
In your Program.cs file, you need this line following the statement that sets the builder variable to configure a basic Session object:
builder.services.AddSession();
To configure the Session object, you follow a common pattern for objects configured in Program.cs: The AddSession method accepts a lambda expression that it passes an options object to. You can configure the Session object by working with the options object passed to the lambda expression.
This example sets the Session object’s timeout to 10 minutes:
builder.services.AddSession(options =>
{
  options.IdleTimeout = TimeSpan.FromMinutes(10);
});
There are multiple options you can set through this options object.
Further down in Program.cs after the call to UseRouting and before the call to MapControllerRoute, add this line to enable the Session object:
app.UseSession();
Using centralized session state with SQL Server is supported through distributed caching with Microsoft.Extensions.Caching.SqlServer.
With that configuration taken care of, you can now access the Session object through the Controller’s HttpContext property through that object’s Session property (the HttpContext always has a Session property … but if you don’t configure the Session object in Program.cs, there’s nothing behind that Session property to make it work).
The ASP.NET Core Session object has a new, method-based syntax that supports a more limited set of datatypes than the .NET Framework Session object: you can only store strings, 32-bit integers and byte arrays (the relevant methods are GetString/SetString, GetInt32/SetInt32 and Get/Set). For example, storing and retrieving a string in the Session object looks like this in ASP.NET Core:
HttpContext.Session.SetString("TransactionId", "X001");
string? tId = HttpContext.Session.GetString("TransactionId");
You can store objects if you convert them to JSON strings (Microsoft has some sample extension methods that add generic Set and Get methods for storing objects).
Obviously, you’re not going to be able to convert from your existing Session code to this new syntax using a global search-and-replace. So, some time back, I wrote a an extension method that attaches to the new Session object and uses a custom class that mimics the old Session syntax with the ASP.NET Core Session object. If you add that class and extension method to your application, you can probably convert your existing code to ASP.NET Core using a search-and-replace.
The result isn’t pretty, though—your converted code will look something like this:
Session.AddIndexer()["TransactionId"] = "X001";
This code may prove mysterious to the next programmer who has to deal with it but, if you have a lot of Session code, it’s a hack that might save you some time during migration.
Cache
Like the Session object, the Cache object (in either its original form or as the .NET Framework MemoryCache) is no longer included by default in ASP.NET Core—you need to add and configure it in your Program.cs file (and, again, this includes setting any configuration settings you have in your Web.config file).
You just need to add this line to Program.cs after the line that sets the builder variable:
builder.services.AddMemoryCache();
As with AddSession, you can configure the Cache by passing AddMemoryCache a lambda expression that accepts the MemoryCacheOptions object. You can then use that options object to configure the cache.
This example sets the number of entries allowed in the cache to 100:
builder.Services.AddMemoryCache(opt => opt.SizeLimit = 100);
To use the Cache object in your code, you’ll need to grab it from ASP.NET Core’s IoC in the constructor for your Controller. Code like this would work:
public class Home : Controller
   {
     private IMemoryCache Cache;
     public HomeController(IMemoryCache cache)
     {
        Cache = cache;
     }
Again, as with the Session object, the syntax for storing and retrieving has changed—you’ll then need to rewrite all the code where you use the Cache to use the new syntax. The simplest methods to use are the Get and Set which, unlike the Session object’s base methods, can store any data type. Caching options are set by configuring a MemoryCacheEntryOptions object and passing it as the third parameter to the Cache’s Get method.
Typical code using the new syntax would look like this:
Cache.Set(“key”, “value”, new MemoryCacheEntryOptions()
                                                      .SetSlidingExpiration(TimeSpan.FromSeconds(3)));
Again, you’re not going to be able to handle this conversion with a search-and-replace. Plan your time accordingly.
Authorization/Authentication
The bad news here is that your existing authentication code won’t work and you’ll need to configure authentication in your Program.cs file from scratch (plus, there’s no longer an option to pick your authentication configuration as part of creating your application).
First, somewhere after the code that sets the builder variable in Program.cs, you’ll need to add this code (assuming it isn’t present) to support the anonymous user:
builder.services.AddDefaultIdentity<IdentityUser>()
                            .AddRoles<IdentityRole>();
Further down in Program.cs, after the app variable is set, you need to add this code to turn on authentication and authorization (again, assuming this code isn’t present):
app.AddAuthentication();
app.AddAuthorization();
After making those changes, you’ll still need to configure your code to work with your designated identity provider (I’m assuming that you’re no longer allowed to create your own authentication system but have to integrate with your organization’s system). As Microsoft’s guide makes clear, this is a non-trivial task.
There is one bit of good news, though: Once you have the right authentication code in Program.cs, your Authorize attributes should still work, as should your ClaimsPrincipal code.
Handlers and Modules
If you’ve used handlers or modules to customize your ASP.NET application’s processing pipeline then the nearest equivalent for you to replace them is ASP.NET Core’s middleware. The best solution is to move your code to a class with this structure:
public class <classname>
{
  private readonly RequestDelegate rd;
  public <classname>(RequestDelegate next)
  {
    rd = next;
  }
  public async Task Invoke(HttpContext ctxt)
  {
    //…work with HttpContext in handling request…
    await rd.Invoke(ctxt);

    //…work with HttpContext in handling response…

  }
}
Your class’s constructor will be passed a RequestDelegate that points to the next module in the ASP.NET Core pipeline. Your class’s Invoke method will be called when it’s your module’s turn for processing. Your Invoke method will be passed an HttpContext information with information about the current request and (later) your application’s response.
Inside your Invoke method, you should call the RequestDelegate’s Invoke method to pass control to the next module in the pipeline. Code in your class’s Invoke method before your call to rd.Invoke will normally handle requests on their way to your Controllers (a good place to reject requests or add headers). Code after the call to rd.Invoke will normally handle responses on their way back to the client (a good place to add or remove headers).
For example, code like this before the call to rd.Invoke would allow you to check for a specific authorization header and reject any requests that don’t have it:
string value = ctx.Request.Headers[HeaderNames.Authorization];
if (string.IsNullOrEmpty(value) || !value.Contains("ABC123"))
{
   ctx.Response.StatusCode = 401;
   await ctx.Response.WriteAsync("Invalid or missing contract id");
   return;
}
In code following the rd.Invoke call, you can use the RequestAborted property on the HttpContext object passed to your Invoke method to determine if the original request was rejected.
To add your new middleware to your application’s processing pipeline, return to your Program.cs file and after the line that sets the app variable, call the UseMiddleware method, specifying the type of your class. This example adds a class called CheckPhoto to the pipeline:
app.UseMiddleware<CheckPhoto>();
The higher in Program.cs that you call UseMiddleware, the earlier in the processing that your middleware will be called.
After the Migration
If you address all 10 of these areas in your .NET Framework application, then you should end up with a working ASP.NET Core application. You’re now in a position to take advantage of all the new features available in ASP.NET Core (and let me recommend the ASP.NET Core Migration course I wrote for Learning Tree International that covers all the new stuff and none of the old stuff).
In the meantime and as far as your migration effort goes: Best of luck. Hope you live.
Next up: Modern Cross-Platform ASP.NET Core Controls.

Peter Vogel
Peter Vogel is both the author of the Coding Azure series and the instructor for Coding Azure in the Classroom. Peter’s company provides full-stack development from UX design through object modeling to database design. Peter holds multiple certifications in Azure administration, architecture, development and security and is a Microsoft Certified Trainer.
Related Posts
Comments
All articles
Topics
Web MobileMobile
Desktop
Design
Productivity
People
