
How to Migrate Your Web Forms App to Blazor in 6 Steps

Summarize with AI:
So the time has come to thank your Web Forms app for its service and let it enjoy a peaceful retirement, but how exactly do you set about migrating from Web Forms to Blazor?
You’ve got a tried and tested Web Forms app that’s been supporting an important part of the business for years. But a lot’s changed in the world of web development since Web Forms first emerged onto the scene, and Blazor has now established itself as a stable, performant, productive alternative.
The time has come to thank your Web Forms app for its service and let it enjoy a peaceful retirement. But where do you start, and what are the pitfalls to look out for along the way?
Here are the key steps you’ll need to perform to migrate your Web Forms app to Blazor:
- Create a new project for the new Blazor UI.
- Bring in any package references your app needs.
- (optional) Install the Windows Compatibility Pack to provide Windows-only functionality (which has been omitted from ASP.NET Core).
- Migrate from global.asax to program.cs.
- Carefully unpick your presentation and business logic.
- Migrate your app, one ASPX page at a time (ASPX -> Blazor component).
Let’s explore each one:
1. Create a New Project for Your Blazor UI
The task here is to migrate from .NET Framework to .NET (Core), specifically Blazor, so you’ll need to start with a new Blazor project. Which means you need to decide whether to use Blazor WASM or Blazor Server.
In many ways Blazor Server feels like a more natural evolution for a Web Forms app, as everything still runs on the server. If you want to use Blazor WASM, you’ll need to expose your existing business logic via a web API.
It’s worth noting .NET 8 looks set to shake things up a bit in this area, with options to execute Blazor components on the server, but without relying on socket connections.
.NET 8 will also make it easier to adopt Blazor components for parts of your app (no longer will you need to go “all Blazor” just to start using it).
For now though, it all starts with this new Blazor project.
2. Bring in Packages (Dependencies)
Your Web Forms app likely relies on a number of packages, which will be listed in your app’s packages.config. You’ll want to migrate those across to your new Blazor project, but it may not be entirely clear which ones you need.
Web Forms projects list all the dependencies they rely on, whereas modern .NET projects only list the “top level” dependencies (and any related/sub packages are installed automatically).
You have a couple of options here. You can attempt to bring across just the packages you know you need “up front.” Or you might prefer to adopt a “page by page” approach to migrating your app, in which case you may be better to bring dependencies across as you need them.
A key factor here is likely to be the size of your app. If you’re staring at a thousand page behemoth, you may want to come up with a strategy where you slowly migrate parts of the existing app, carefully testing that everything still works as you go.
A smaller app may be best migrated in one go.
You can add package references to your new Blazor app in the .csproj file for your app:
<ItemGroup>
  <PackageReference Include="Swashbuckle.AspNetCore" Version="6.5.0" />
  <PackageReference Include="Microsoft.AspNetCore.Components.WebAssembly.Authentication" Version="7.0.3" />
  <PackageReference Include="Microsoft.AspNetCore.Components.WebAssembly.Server" Version="7.0.3" />
   ...
</ItemGroup>
Many of the dependencies your app relies on will work with .NET (Core). This includes versions of popular packages like log4net, Entity Framework 6, etc.
If you attempt to reference a package that isn’t compatible, you’ll get runtime errors when you launch your new app (and errors in Visual Studio).
3. (Optional) Install the Windows Compatibility Pack
.NET is now cross-platform, but this means some features have been omitted because they only work on Windows.
If your app depends on any of these “missing” features, you can install the Windows Compatibility Pack to continue using them. This includes support for things like Windows Communication Foundation, Windows EventLog and ODBC (to name just a few).
Find out more about the compatibility pack here.
4. Migrate from global.asax to program.cs
Your WebForm app is effectively bootstrapped using global.asax. This is where a lot of the essential, initial configuration for your app takes place.
In Blazor the equivalent is Program.cs (from .NET 6 onward) or Program.cs and Startup.cs (earlier version of .NET).
Here’s an example of the structure of a typical Global.asax class:
public class Global : HttpApplication
{
    protected void Application_Start(object sender, EventArgs e)
    {
        // Code to run on application startup
    }

    protected void Application_Error(object sender, EventArgs e)
    {
        // Code to run when an unhandled error occurs
    }

    protected void Application_End(object sender, EventArgs e)
    {
        // Code to run when the application is shut down
    }
}
.NET (Core) has different mechanisms you can employ for the various methods here.
For example, to run code when your app starts, you can use a hosted service. Here’s an example:
namespace Courses.Demos.Server;

public class MyService : IHostedService
{
    private readonly ILogger<MigrateDB> _logger;

    public MyService(ILogger<MigrateDB> logger)
    {
        _logger = logger;
    }

    Task IHostedService.StartAsync(CancellationToken cancellationToken)
    {
        _logger.LogInformation("App starting");
        return Task.CompletedTask;
    }

    public Task StopAsync(CancellationToken cancellationToken)
    {
        _logger.LogInformation("App ending");
        return Task.CompletedTask;
    }
}
In Program.cs we can register this service:
builder.Services.AddHostedService<MyService>();
With that, StartAsync will be executed when our app starts and StopAsync when our app stops.
5. Carefully Unpick Your Presentation and Business Logic
So far we’ve focused on the mechanics of migrating your app, but now comes the fun part (well, depending on your definition of fun!)
One of the big changes from Web Forms to Blazor is that Blazor encourages a much cleaner separation of concerns.
In general, Blazor components are focused on the UI part of your app (how things like button clicks and other interactions are handled). They delegate to a backend (API or service) for executing business logic.
Web Forms apps, on the other hand, have been known to mix up presentation and business logic.
Here’s a partial example of a Web Forms aspx page:
private List<item> disposedItems;

protected override void Page_Load(object sender, EventArgs e)
{
    SetupServices();
    trans = new Translate(SiteHelper.CurrentCulture);

    if (!IsPostBack)
    {
        ltLogo.Text = Toolbox.SiteUtils.DomainLogo(CurrentUser.Company.DomainID);

        if (!String.IsNullOrEmpty(Request["r"]))
        {
            nRequest request = new nRequest(new Guid(Request["r"]));
            nBarcode barcode = new nBarcode(request.ID, 3);

            if (barcode.ID != Guid.Empty)
            {
                Image1.ImageUrl = "barcodeLabeller.aspx?code=" + barcode.Barcode;
                Literal2.Text = barcode.Barcode;
            }
            else
            {
                Literal2.Text = trans.TranslateString("Barcode Failed to create");
            }

            Literal1.Text += trans.TranslateString("Email") + ": " + request.User.Email + "<br/>";
            Literal1.Text += "<br>" + trans.TranslateString("Customer Ref") + ": " + request.OrderNumber;

            ICollection<DisplayRequestPackage> requestItems = requestService.GetRequestDisplayObjects(request.ID);
            ICollection<DisplayRequestSubPackage> subPackages =
                GetSubPackagesFromRequestItems(requestItems);
            litItems.Text = GetRequestItemsHTML(requestItems);
            if (disposedItems.Count > 0)
            {
                pnlSubPackages.Visible = true;
                rptSubPackages.DataSource = subPackages;
                rptSubPackages.DataBind();
            }
        }
    }
}
The challenge here comes from the way UI altering code is intermingled with business logic (and/or data access) code like this:
if (disposedItems.Count > 0)
{
    pnlSubPackages.Visible = true;
    rptSubPackages.DataSource = subPackages;
    rptSubPackages.DataBind();
}
With Blazor, we’d be more likely to do the data fetching up front, and have the UI react to that data, perhaps even splitting the UI up into multiple components, each representing a small part of the UI.
Separating this out can feel like a pretty daunting task, but we can make it easier with some step-by-step refactoring before we attempt to migrate this to Blazor.
Here a few tactics that can help to separate out UI and business logic.
Look for the Seams
Sometimes your Web Forms code might be making direct calls to a database (via a repository, store or some other approach).
Other times you may find you’re calling a service or some other form of “middle man.”
And, because life is messy, sometimes you’ll find your aspx pages calling a combination of both (and lots of other calls besides!).
Take this representative “legacy” Web Forms project:
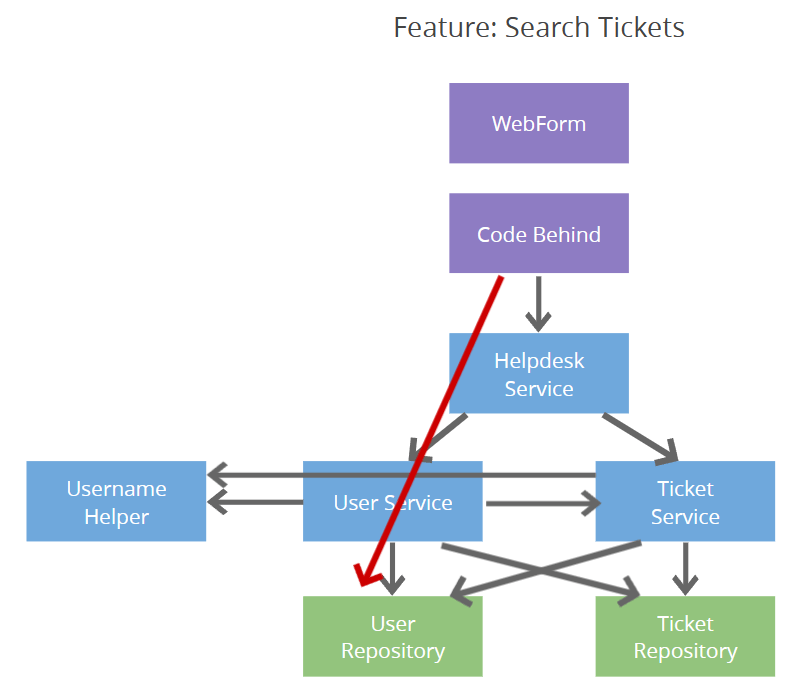
This aspx page is pulling together data from various sources, including both a Helpdesk Service and a lower level User Repository.
It’s much easier to migrate to a new UI stack if we can use, or create, clear seams in this architecture.
Ideally we want a clear boundary which exposes methods to interact with the backend (for querying data, but also for mutating it, while ensuring important business rules are followed).
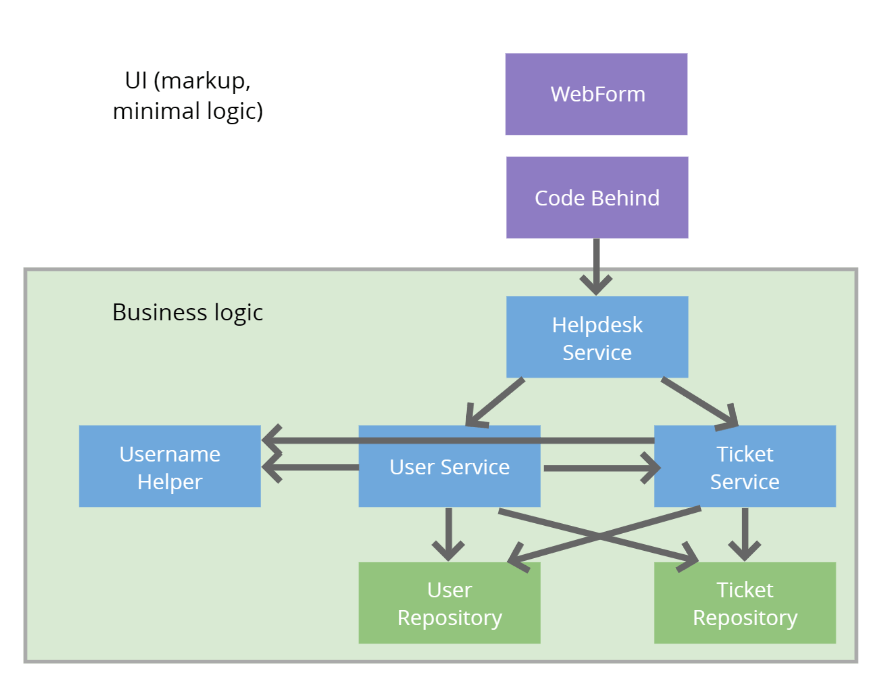
If you’ve already got this, you can go ahead and call those from your Blazor app, either direct (Blazor Server) or by exposing those calls via an API (Blazor WASM).
Here, for example, is a Blazor component which calls the HelpdeskService in the above example:
@inject IHelpdeskService HelpdeskService

<ul>
    @foreach(var ticket in tickets){
    	<li>@ticket.Subject</li>
    }
</ul>
@code {

    IEnumerable<Ticket> tickets;

 	protected override void OnInitialized() {
        tickets = HelpdeskService.ListForUser("someUserId");
    }

}
But if the existing aspx page is making multiple calls, to cobble data together from various places, it might actually make things a lot easier to create a new seam, a new method which pulls from multiple sources and returns just the data needed for the specific page.
public interface ITicketListPageQuery {
    TicketListResponse Get(string userId);
}

public record TicketListResponse {
    public int UserTicketCount { get; set; }
    public IEnumerable<TicketListItem> Tickets { get; set; }
}

public record TicketListItem {
    public int Id { get; set; }
    public string Title { get; set; }
    public DateTime LastModified { get; set; }
}
In this example, the implementation might make calls to several lower level objects to pull the data it needs to populate the TicketListResponse.
You can perform this refactoring and use the ITicketListPageQuery with the existing Web Forms code as a first step.
This “in place” refactoring might feel like a sideways or even backwards move but, in practice, preparing the ground like this (while “keeping the lights on” in the existing Web Forms app) typically makes the Blazor migration much easier, and much less risky, because you know the existing backend calls can be trusted.
Push Logic Down into Domain Objects
Here’s another example aspx page:
public class Default
{
    ...

    private void GetUserSummaryForTickets(IEnumerable<Ticket> orderedTickets)
    {
        foreach (var ticket in orderedTickets)
        {
            ticket.User = _helpdeskService.User.ById(ticket.UserId);

            if (ticket.DateCreated > new DateTime(2018, 1, 1))
            {
                ticket.Text = ticket.Text + "Legacy - ";
            }
        }
    }
}

public class Ticket
{
    public DateTime DateCreated { get; internal set; }
    public string Text { get; set; }

    public int UserId { get; set; }
    public User User { get; set; }
    public Guid Id { get; set; }
}
Notice how Ticket here is a plain old C# class, with properties and no business logic.
In the code for the Default aspx page we’re performing an if check on values from Ticket.
if (ticket.DateCreated > new DateTime(2018, 1, 1))
{
    ticket.Text = ticket.Text + "Legacy - ";
}
One improvement here would be to push that logic down into the Ticket domain object.
public class Default
{
    ...

    private void GetUserSummaryForTickets(IEnumerable<Ticket> orderedTickets)
    {
        foreach (var ticket in orderedTickets)
        {
            ticket.User = _helpdeskService.User.ById(ticket.UserId);

            if (ticket.IsLegacy())
            {
                ticket.Text = ticket.Text + "Legacy - ";
            }
        }
    }
}

public class Ticket
{
    public DateTime DateCreated { get; internal set; }
    public string Text { get; set; }

    public int UserId { get; set; }
    public User User { get; set; }
    public Guid Id { get; set; }

    public bool IsLegacy()
    {
        return DateCreated > new DateTime(2018, 1, 1);
    }
}
This neatly encapsulates some key business logic (is a ticket “Legacy”) and decouples the aspx page from the implementation details of how that’s decided.
Migrate Your App, One ASPX Page at a Time (ASPX to Blazor Component)
The good news is, once you’ve separate business logic and presentation logic, you’re ready to start migrating your pages.
Assuming you’ve managed to create a clear boundary between your UI and business logic, you can now point your Blazor UI at the relevant service/query and off you go.
@inject ITicketListPageQuery TicketListQuery

<ul>
    @foreach(var ticket in model.Tickets){
    	<li>@ticket.Subject</li>
    }
</ul>
@code {

    TicketListResponse model;

    protected override void OnInitialized() {
        tickets = TicketListQuery.Get("someUserId");
    }

}
Blazor leans heavily on dependency injection—you can inject dependencies into your Blazor component with this syntax:
@inject ITicketListPageQuery TicketListQuery
Then use them in your code:
TicketListQuery.Get();
For that to work, your services will need to be registered in the DI container. The easiest way to do that is in Program.cs.
var builder = WebApplication.CreateBuilder(args);

builder.Services.AddScoped<ITicketListPageQuery, TicketListPageQuery>();
From Page_Load to OnInitialized
If you have code in the Page_Load for your aspx pages, you’ll want to run that in OnInitialized (or its async equivalent) in your Blazor app.
@code {
	protected override void OnInitialized() {
        tickets = TicketListQuery.Get("someUserId");
    }
}
Use DataAnnotations to Handle Validation
If you’ve employed validation in your aspx pages you can implement the same validation using DataAnnotations in your Blazor UI.
Here, for example, is a form for editing a ticket in our helpdesk example.
Web Forms
<div>
    <label>Subject</label>
    <div>
        <asp:TextBox ID="Subject" runat="server" CssClass="form-control"></asp:TextBox>
        <asp:RequiredFieldValidator runat="server" ControlToValidate="Subject" ErrorMessage="Ticket Subject is required." />
    </div>
</div>
Blazor
<EditForm Model="ticket" OnValidSubmit="@...">
    <DataAnnotationsValidator />

    <div>
        <label>Subject</label>
        <div>
         	<InputText class="form-control" @bind-Value="ticket.Subject" />
            <ValidationMessage For="(() => ticket.Subject)" />
        </div>
    </div>

    ...
</EditForm>
Here’s that Ticket class (referenced as ticket above):
using System.ComponentModel.DataAnnotations;

public class Ticket
{
    [Required]
    public string? Subject { get; set; }
}
In Summary
Depending on the separation between UI and business logic in your existing Web Forms app, you might need to do a little refactoring before you can start using Blazor.
If so, perform these refactors “in situ,” updating the Web Forms aspx pages to use your newly refactored code.
When you’ve exposed clear seams for one or more parts of your app, you can start to consume those from your shiny new Blazor components.
Most everything in your Web Forms app an be migrated to .NET (Core), including code from global.asax, dependencies and validation logic.
Finally, .NET 8 looks set to make all of this a little easier, with the option to slowly adopt Blazor for parts of your app (rather than the entire thing), but you’ll still need to separate your UI and business logic concerns, so time spent refactoring is time well spent!
Try Telerik Today
Develop new Blazor apps and modernize legacy web projects in half the time with a high-performing Grid and 100+ truly native, easy-to-customize Blazor components to cover any requirement. Try Progress Telerik UI for Blazor for free with our 30-day trial and enjoy our industry-leading support.
Or get started with a Progress Telerik DevCraft Trial today! The DevCraft suite is the most powerful collection of Telerik .NET and Kendo UI JavaScript developer tools. It includes modern, feature-rich, professionally designed UI components for web, desktop and mobile applications; embedded reporting and report management solutions; document processing libraries; and automated testing and mocking tools.

Jon Hilton
Jon spends his days building applications using Microsoft technologies (plus, whisper it quietly, a little bit of JavaScript) and his spare time helping developers level up their skills and knowledge via his blog, courses and books. He's especially passionate about enabling developers to build better web applications by mastering the tools available to them. Follow him on Twitter here.
Related Posts
Comments
All articles
Topics
Web MobileMobile
Desktop
Design
Productivity
People
