
CRUD Operations & EF Core Migrations with Telerik UI for .NET MAUI (Part 1)

Summarize with AI:
In Part 1, we are implementing CRUD operations with Telerik UI for .NET MAUI and EF Core.
Data is an important part of every application, and it is what the UI is fed with. Working with data in a cross-platform app that works on four platforms—Android, iOS, macOS and Windows—at the same time can be tricky.
We should decide where to store it: Should we use a local database or connect to a REST Service? What provider should we use?
One of the things to consider when deciding is performance. And the performance can be improved if we do not connect to the REST service all the time but keep at least part of the data locally. That’s why working with local data is the focus of this post.
You can store this data using several different technologies. But a proven standard for .NET MAUI applications and working with relational data is an SQLite database, and that is what we will continue with. .NET MAUI offers great support for SQL via the SQLLite.NET that you can read more about in the Microsoft article.
We will add one more component to our article and this is Entity Framework Core, or simply EF Core. We’re doing so for several reasons:
- It works with a database using .NET objects.
- It eliminates the need for most of the data-access code that typically needs to be written.
- Sometimes we need to change the requirements of the applications, to add or remove new property to our models, and this will lead to changing the scheme of our database. EF Core is here to solve this task.
- If you are coming from the desktop world of WinForms or WPF, most probably you already have some existing code for EF Core to reuse.
Having all the above, that is what this post is about—to review and unlock a common aspect of building applications for Telerik users—populating Telerik UI using EF Core and SQL.
So, let’s get started! 😎
Prepare a .NET MAUI Application
Using a new blank .NET MAUI application, we should add first the following packages:
Microsoft.EntityFrameworkCore.SqliteTelerik.UI.Maui
Note: Call
UseTelerik();. Don’t forget to call theUseTelerik()method inside the MauiProgram.cs file of your .NET MAUI project. This is needed for all Telerik UI for .NET MAUI components.
Add Telerik UI Components
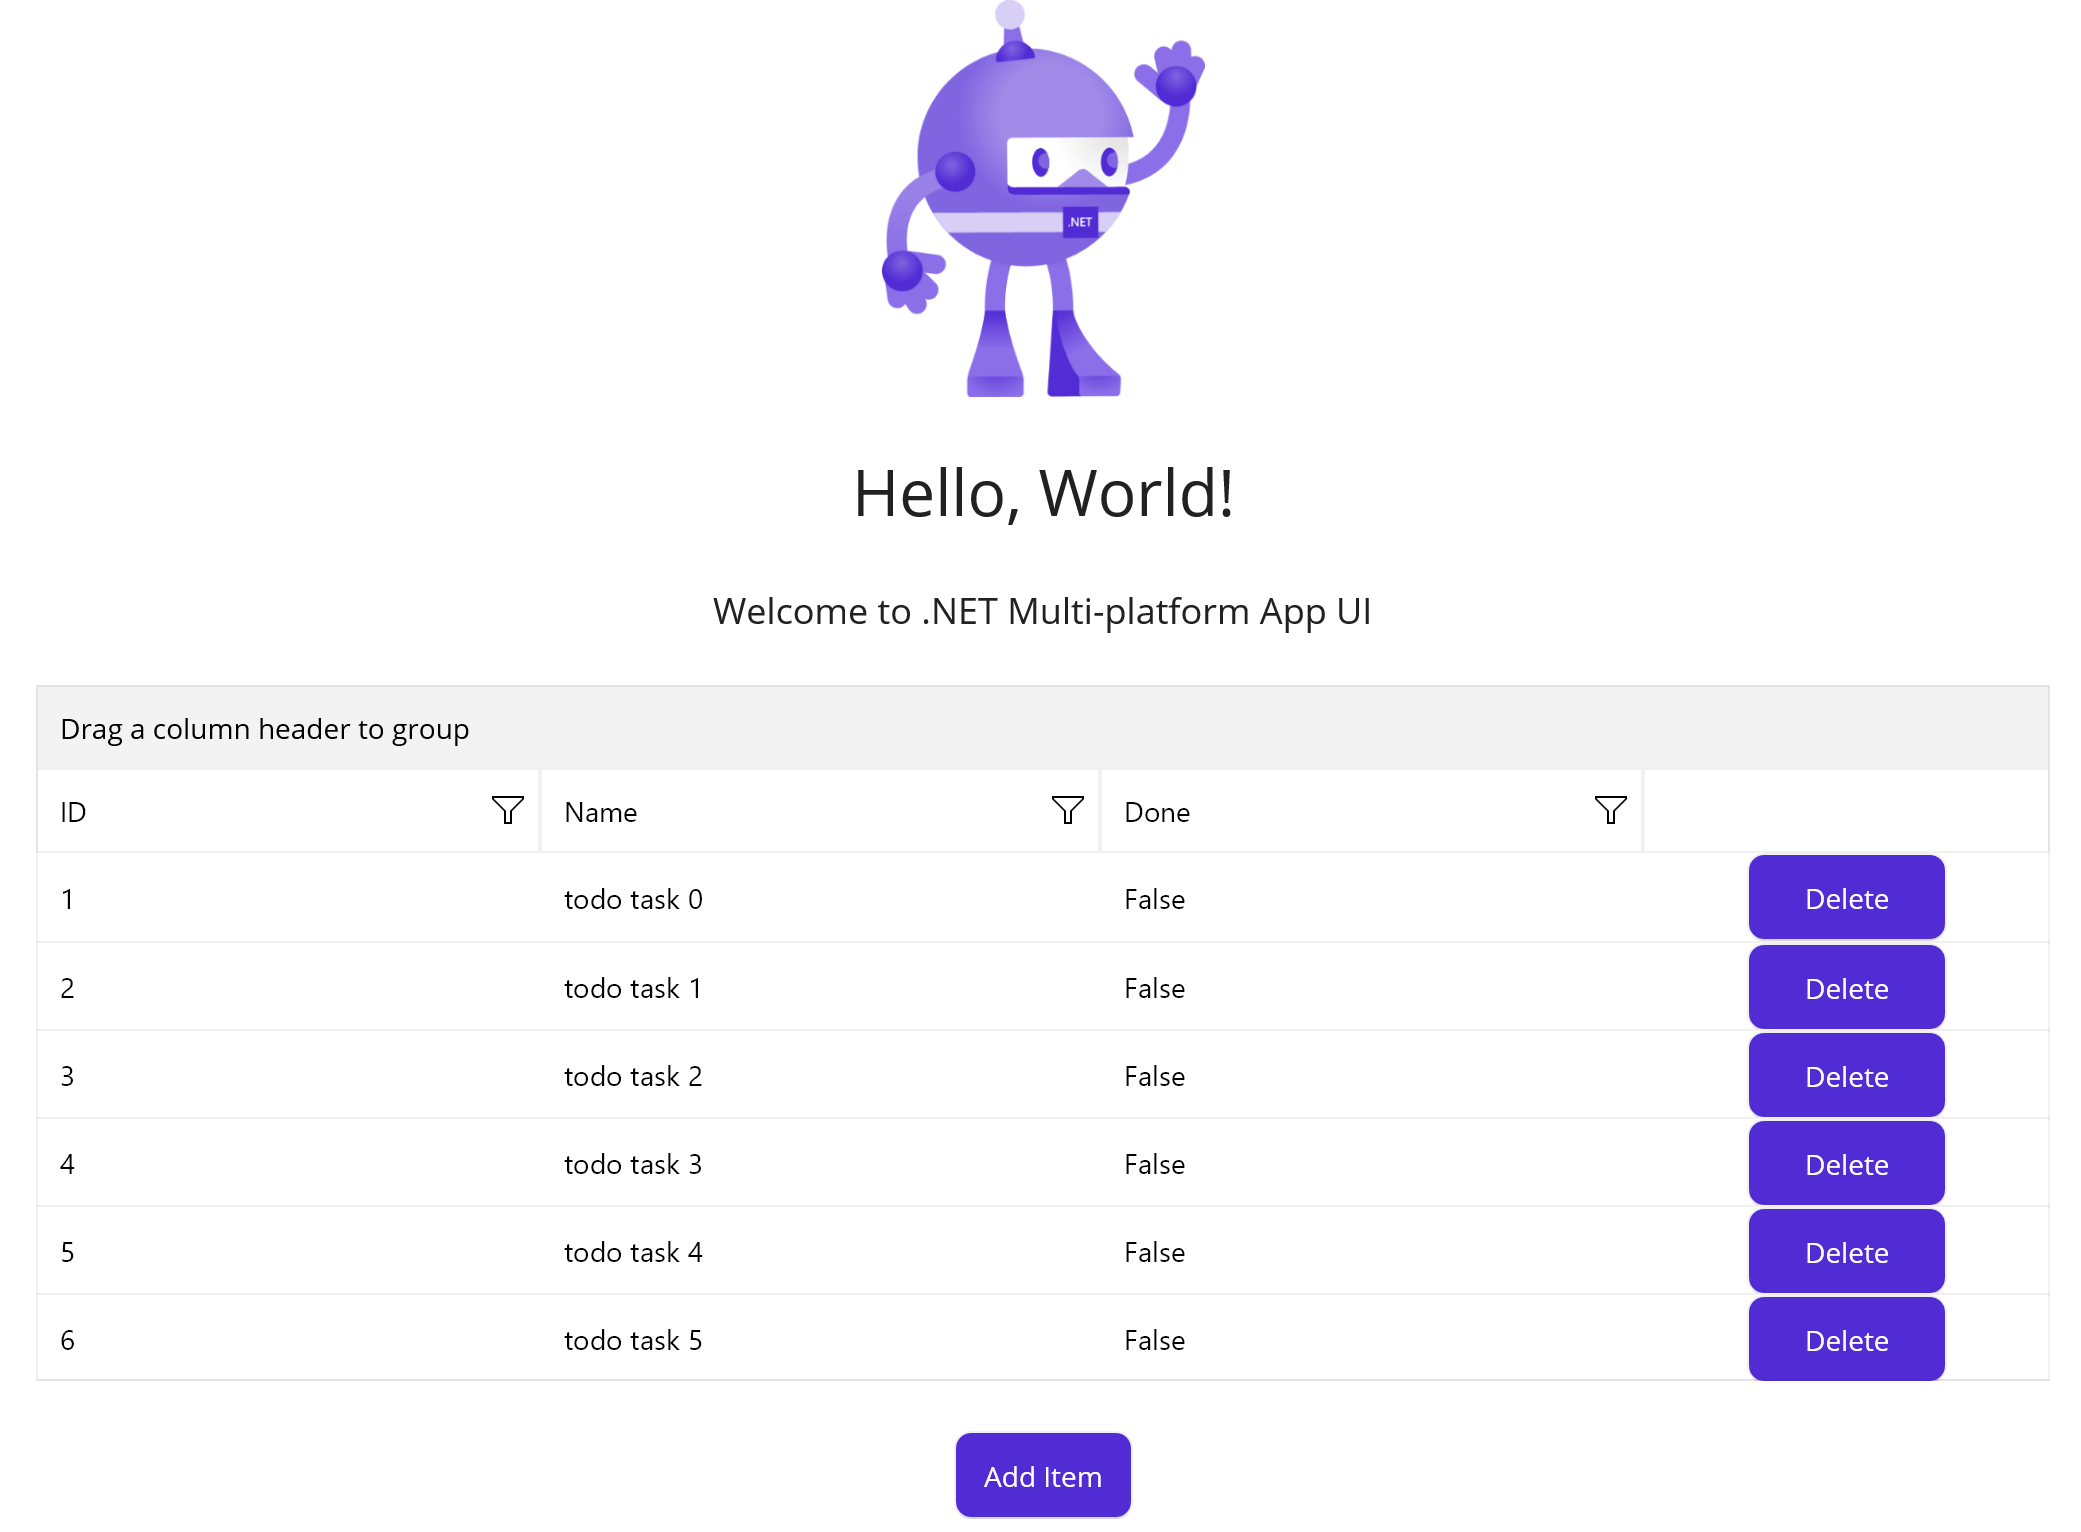
In this demo I’ll add a Telerik .NET MAUI DataGrid and bind it to illustrate the CRUD operations. However, the steps are the same for any other items control that you may use from Progress Telerik UI for .NET MAUI, such as ComboBox or TreeView.
XAML
xmlns:telerik="http://schemas.telerik.com/2022/xaml/maui"
<telerik:RadDataGrid x:Name="dataGrid"/>
Prepare the Data Model
In this demo we will use a dummy data for managing a list with tasks, so we’ll create simple TodoItem class representing the model:
C#
public class TodoItem
{
  public int ID { get; set; }
  public string Name { get; set; }
  public bool Done { get; set; }
}
Create DataContext with EF Core
To create a relation between the database and what we will display, we need a data context—a session with the database. The context object will allow us to query and save data. EF Core offers a base DbContext class that groups together database queries and changes. We will inherit it and extend it with our set of TodoItems collection:
The full C# class:
public class DbDataContext : DbContext
{
  public DbSet<TodoItem> TodoItems { get; set; }
  public DbDataContext()
  {
    SQLitePCL.Batteries_V2.Init();
    this.Database.EnsureCreated();
  }
  protected override void OnConfiguring(DbContextOptionsBuilder optionsBuilder)
  {
    string dbPath = Path.Combine(FileSystem.AppDataDirectory, "todos.db3");

    optionsBuilder
      .UseSqlite($"Filename={dbPath}");
  }
}
Note the following important parts above:
- The place where we can create our database file on a physical device—the
OnConfiguringfunction. - Take a look at the
SQLitePCL.Batteries_V2.Init()line. It is needed in the constructor to initiate SQLite on iOS.
Now, let’s read the data and bind it to the .NET MAUI DataGrid or any other Telerik UI for .NET MAUI component.
CRUD Operations
READ: Load the Data
Here are the steps to read the TODO items and load them to our DataGrid:
- In Main.cs (or any view that holds the UI elements) I created a
static IList<TodoItem> todoitemsto hold the items that will be pulled from database. - Load data from the data context and assign it in a separate method. We will call this initially and after we add or delete an item:
private void Load(){
  using (var dbContext = new DbDataContext())
  {
    todoitems = dbContext.TodoItems.ToList();
    grid.ItemsSource = todoitems;
  }
}
- Override
OnAppearingand call theLoadmethod:
protected override void OnAppearing()
{
  base.OnAppearing();
  Load();
}
CREATE: Add New Item
I’ll add a new item on a button click. I’ll use the Counter button that every new .NET MAUI app has and change its click event handler like this:
private async void OnCounterClicked(object sender, EventArgs e)
{
  using (var dbContext = new DbDataContext())
  {
    var todo = new TodoItem { Name = "todo task " + dbContext.TodoItems.Count()};
    dbContext.Add(todo);
    await dbContext.SaveChangesAsync();
  }
  Load();
}
The important things to notice here are:
- Change it to an async method to call
await dbContext.SaveChangesAsync();. - Call the
Load()method to pull the new data and reload the DataGrid.
UPDATE: Edit an Item
Telerik DataGrid for .NET MAUI offers several commands that we can use to handle different scenarios during edit.
For this demo I’ll inherit the command and override its Execute method where:
public class CommitEditCommand : DataGridCommand
{
  public CommitEditCommand()
  {
    this.Id = DataGridCommandId.CommitEdit;
  }
  public async  override void Execute(object parameter)
  {
    var todoItem = ((EditContext)parameter).CellInfo.Item as TodoItem;
    this.Owner.CommandService.ExecuteDefaultCommand(DataGridCommandId.CommitEdit, parameter);
    using (var dbContext = new DbDataContext())
    {
      var todoEdit = await dbContext.TodoItems.FirstAsync(i => i.ID == todoItem.ID);
      todoEdit.Name = todoItem.Name;
      todoEdit.Done = todoItem.Done;
      await dbContext.SaveChangesAsync();
    }
  }
}
DELETE: Delete an Item
First, let’s play with the grid a little bit to add a column that will display a delete button. To do that I’ll use a TemplateColumn and update the DataGrid XAML definition like this:
Note: We need to set the
BindingContextof the Delete Button so we know which row to delete.
<telerik:RadDataGrid x:Name="grid" AutoGenerateColumns="True" SelectionMode="Single"  >
  <telerik:RadDataGrid.Columns>
    <telerik:DataGridTemplateColumn CanUserReorder="True">
      <telerik:DataGridTemplateColumn.CellContentTemplate>
        <DataTemplate>
          <Button WidthRequest="100"  Text="Delete " BindingContext="{Binding .}"  Clicked="ButtonDel_Clicked"/>
        </DataTemplate>
      </telerik:DataGridTemplateColumn.CellContentTemplate>
    </telerik:DataGridTemplateColumn>
  </telerik:RadDataGrid.Columns>
</telerik:RadDataGrid>
Then the code for deleting will go to the Clicked event handler:
C#
private async void ButtonDel_Clicked(object sender, EventArgs e)
{
  var btn = sender as Button;
  var todoitem = btn.BindingContext as TodoItem;
  using (var dbContext = new DbDataContext())
  {
    dbContext.RemoveRange(dbContext.TodoItems.Where(i=> i .ID==todoitem.ID));
    await dbContext.SaveChangesAsync();
  }
  Load();
}
What’s Next
In this post we demonstrated how we can achieve CRUD operations with EF Core, but in the real world, requirements and code are changing and we need to update the database accordingly. If this is your case, stay tuned for Part 2 of this mini-series: Working with EF Core Migrations.
Meanwhile, to dive deeper into the topics that we covered you can refer to the articles below:
This article uses Telerik .NET MAUI DataGrid, but the steps above are valid for loading with data any of the 60+ Telerik UI for .NET MAUI components. More examples with Telerik UI can be found at Telerik Controls Samples, developer-focused examples and Telerik documentation.
If you are curious what else come to the package download and try it now. 👇

Rossitza Fakalieva
Rossitza Fakalieva is a Technical Manager, Microsoft MVP in Developer Technologies and a Director of the Bulgarian chapter of the global Women Who Code organization. She previously worked on the Telerik engineering team and defines herself as .NET enthusiast. She loves to empower others to grow in their career and in the tech field—by teaching, by delivering courses and presentations, and as part of her daily job.
Related Posts
Comments
All articles
Topics
Web MobileMobile
Desktop
Design
Productivity
People
