
Building An Interactive Timeline With Kendo UI

Summarize with AI:
Kendo UI is a UI library that enables you to build rich, smart HTML5 and JavaScript applications for any platform, browser, or device. Over the years, we’ve dedicated many hours to building up Kendo UI to the point where it now consists of over 70 components. These range from simple ones, like the Button, to complex ones, like the PivotGrid.

Kendo UI recently celebrated its fifth birthday. Since its debut in August 2011, we have shipped 58 major updates to customers along with internal builds on a bi-weekly basis. These updates have consisted of 16 betas, 24 service packs, and 17 version releases. That cadence works out to approximately one significant release every five weeks. Not too shabby. To honor this work and recap the journey, we’ve had over the years, I felt inspired to create a historical timeline of the most significant events of Kendo UI.
Originally, I planned to build this timeline using TimelineJS: an open-source tool for creating timelines based on data served from Google Sheets. Instead, I built something similar with both Kendo UI for jQuery and Kendo UI for Angular called A Brief History of Kendo UI:
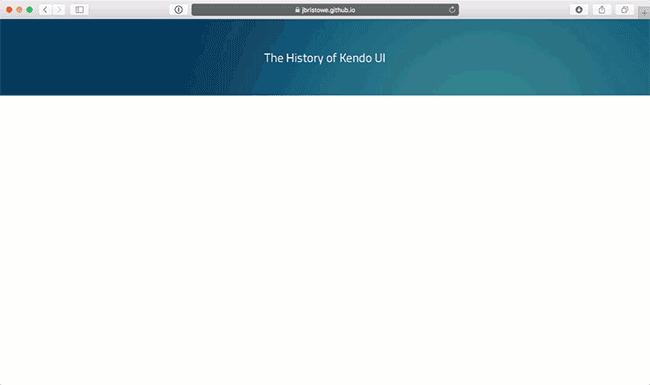
You can check out a live version of the timeline up on GitHub Pages.
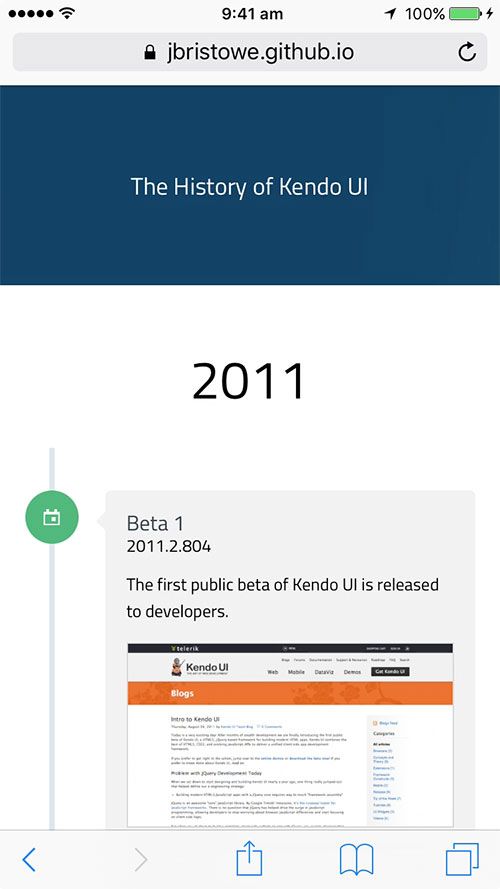
The design is based on Sebastiano Guerriero’s (excellent) Vertical Timeline with a few modifications to the underlying stylesheet. I chose this design for its form and function. It’s beautiful and supports an adaptive layout, which looks great in a mobile browser:
Using Google Sheets as a Backend
Just like TimelineJS, the timeline for this project was based on data from Google Sheets:
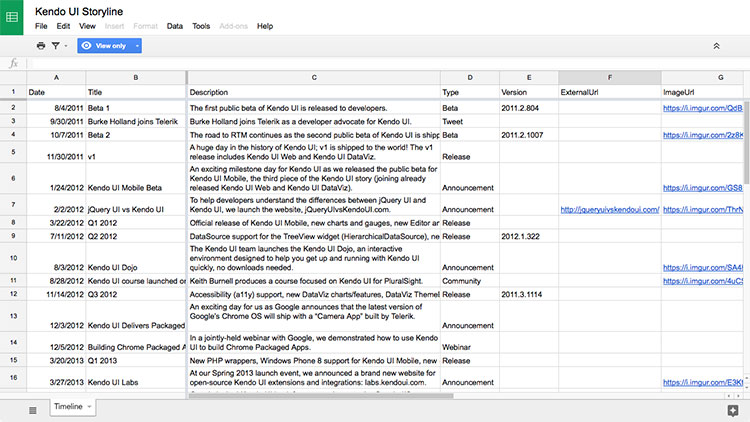
Google Sheets is easy to use and provides an ability to serve worksheets as a JSON-based feed. This lends itself to integrating easily with the DataSource component in Kendo UI for jQuery. It’s important to note that this functionality is part of the Google Sheets API (formerly called the Google Spreadsheets API), which has been depricated and replaced by newer APIs. I selected them because they don’t impose authentication via OAuth 2.0 or identification via an API key. That’s because using API keys in JavaScript exposes them to the public once the code has been published.
Obtaining access to worksheet data in Google Sheets is done via a JSON-based feed endpoint with the following structure:
https://spreadsheets.google.com/feeds/list/spreadsheet-id/od6/public/values?alt=json
Once a spreadsheet has been published and made publicly-available, its JSON-based feed can be accessed through its spreadsheet identifier. For example, the identifier of the spreadsheet underpinning the Kendo UI timeline is 1Z54-N6h0Dl-JSfr2o95f58g2omYz7DLw9CX-j7Th_VQ. Therefore, the JSON-based feed endpoint is located here:
https://spreadsheets.google.com/feeds/list/1Z54-N6h0Dl-JSfr2o95f58g2omYz7DLw9CX-j7Th_VQ/od6/public/values?alt=json
In the URL above, the od6 refers to the worksheet ID of the “default” sheet within your Google Spreadsheet. Typically, this is the left-most sheet visible in Google Sheets. You can also reference the worksheet through its numeric identifier.
Let’s Build It with Kendo UI for jQuery
The timeline (above) is built using a DataSource, two custom widgets, and a series of templates that target Kendo UI for jQuery. I’ll walk you through the series of steps to create it.
First, I’ve loaded the data in the spreadsheet into a DataSource as follows:
var dataSource = new kendo.data.DataSource({
  schema: {
    parse: function(response) {
      var items = [],
          entry = response.feed.entry;
      for (var i = 0; i < entry.length; i++) {
        var item = {
          date: kendo.parseDate(entry[i].gsx$date.$t),
          title: entry[i].gsx$title.$t,
          description: entry[i].gsx$description.$t,
          type: entry[i].gsx$type.$t,
          version: entry[i].gsx$version.$t,
          imageUrl: entry[i].gsx$imageurl.$t,
          notesUrl: entry[i].gsx$notesurl.$t,
          youTubeId: entry[i].gsx$youtubeid.$t,
          tweetUrl: entry[i].gsx$tweeturl.$t,
          tweetId: entry[i].gsx$tweetid.$t
        };

        items.push(item);
      }
      return items;
    }
  },
  transport: {
    read: {
      url: "url-to-spreadsheet-endpoint"
    }
  }
});
The code above configures a DataSource to process the endpoint response through the parse() method. Notice the use of the utility function, kendo.parseDate(). This is one of many helper functions made available as part of Kendo UI for jQuery that can handle a greater number of formats than the built-in Date object.
The next step is to bind the DataSource to the Timeline widget, which is represented through a <div> placeholder element on our page:
$("#timeline").kendoTimeline({
  dataSource: dataSource
});
The Timeline widget performs the heavy-lifting of looping through the bound data and emitting the markup and styles that are necessary to render it to the screen:
(function ($, undefined) {
  var kendo = window.kendo,
      Widget = kendo.ui.Widget,
      CHANGE = "change";

  var Timeline = Widget.extend({

    init: function(element, options) {
      var that = this;
      Widget.fn.init.call(this, element, options);
      that.template = kendo.template(that.options.template || that._getDefaultTemplate());
      that._dataSource();
    },

    options: {
      name: "Timeline",
      autoBind: true,
      template: ""
    },

    _getDefaultTemplate: function() {
      return `# for (var i = 0; i < data.length; i++) { #
        # if (i == 0 || data[i].date.getYear() > data[i - 1].date.getYear()) { #
        <h1 id="timeline-header-#= data[i].date.getFullYear() #" style="font-size: 40px; text-align: center;">#= data[i].date.getFullYear() #</h1>
        <section id="cd-timeline" class="cd-container">
        # } #
        # if (!data[i].type || data[i].type == undefined) { continue; } #
        <div id="timeline-block-#= i #" class="cd-timeline-block">
          <div class="cd-timeline-img cd-picture bounce-in"><i class="k-font-icon k-i-calendar" aria-hidden="true"></i></div>
          <div class="cd-timeline-content bounce-in">
            <div class="list-group">
              # if (data[i].notesUrl) { #
              <a href="http://www.telerik.com/support/whats-new/kendo-ui/release-history/#= data[i].notesUrl #">
              # } #
              <h2>#= data[i].title #</h2>
              # if (data[i].notesUrl || data[i].youTubeId) { #
              </a>
              # } #
              # if (data[i].version) { #
              <span class="cd-timeline-content-version">#= data[i].version #</span>
              # } #
              # if (data[i].description) { #
              <p class="cd-timeline-content-description">#= data[i].description #</p>
              # } #
              # if (data[i].tweetUrl) { #
              <div id="timeline-tweet-#= i #" data-role="tweet" data-url="#= data[i].tweetUrl #" data-id="#= data[i].tweetId #"></div>
              # } #
              # if (data[i].youTubeId) { #
              <p><iframe id="timeline-video-#= i #" width="100%" height="315" src="https://www.youtube.com/embed/#= data[i].youTubeId #" frameborder="0" allowfullscreen></iframe></p>
              # } #
            </div>
            # if (data[i].imageUrl) { #
            <p><img class="timeline-image" src="#= data[i].imageUrl #" /></p>
            # } #
            <span class="cd-date">#= kendo.toString(data[i].date, "m") #</span>
          </div>
        </div>
        # if (i == data.length - 1 || data[i].date.getYear() < data[i + 1].date.getYear()) { #
      </section>
        # } #
      # } #`;
    },

    _dataSource: function() {
      var that = this;

      that.dataSource = kendo.data.DataSource.create(that.options.dataSource);

      that.dataSource.bind(CHANGE, function() {
        that.refresh();
      });

      if (that.options.autoBind) {
        that.dataSource.fetch();
      }
    },

    refresh: function() {
      var that = this,
          view = that.dataSource.view(),
          html = kendo.render(that.template, view);

      var template = kendo.template(that.template);
      var result = template(view);

      that.element.append(result);
      kendo.init(that.element);
    }
  });

  kendo.ui.plugin(Timeline);

})(window.kendo.jQuery);
The code above relies heavily on the use of Kendo UI templates to emit the timeline to the DOM. The template used to create the timeline is ugly and yet, where it lacks in beauty, it more than makes up for it with its speed and versatility. Also, Burke Holland’s article entitled, Creating a DataSource-Aware Kendo UI Widget provides an excellent overview over the boilerplate that’s used to create it.
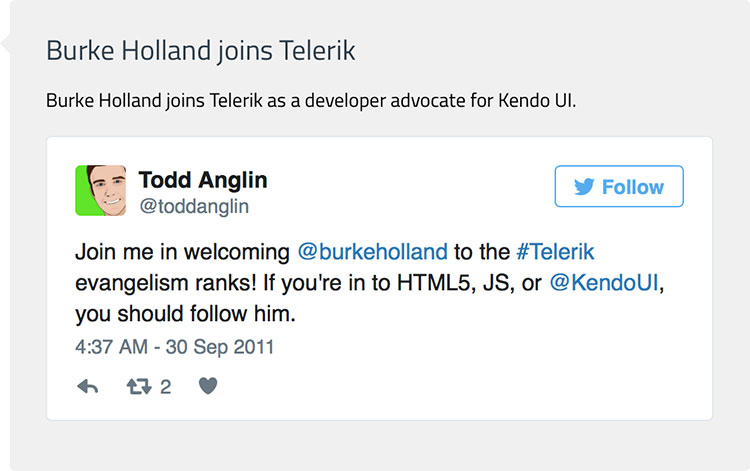
Tweets are loading through the Tweet widget:
The structure of the Tweet widget is quite simple:
(function ($, undefined) {
  var kendo = window.kendo,
      Widget = kendo.ui.Widget;

  var Tweet = Widget.extend({

    init: function(element, options) {
      var that = this;
      Widget.fn.init.call(this, element, options);
      that._render();
    },

    options: {
      name: "Tweet",
      align: "",
      hideMedia: false,
      hideThread: false,
      hideTweet: false,
      lang: "",
      maxWidth: "",
      omitScript: false,
      related: "",
      url: "",
      widgetType: ""
    },

    _render: function() {
      var that = this,
          element = that.element,
          options = that.options,
          oEmbedUrl = "https://publish.twitter.com/oembed";

      if (options.url) {
        oEmbedUrl += "?url=" + options.url;

        if (options.align) {
          oEmbedUrl += "&align=" + options.align;
        }

        if (options.hideMedia) {
          oEmbedUrl += "&hide_media=1";
        }

        if (options.hideThread) {
          oEmbedUrl += "&hide_thread=1";
        }

        if (options.lang) {
          oEmbedUrl += "&lang=" + options.lang;
        }

        if (options.omitScript) {
          oEmbedUrl += "&omit_script=1";
        }

        if (options.related) {
          oEmbedUrl += "&related=" + options.related;
        }

        if (options.widgetType == "video") {
          oEmbedUrl += "&widget_type=video"
          if (options.hideTweet) {
            oEmbedUrl += "&hide_tweet=1"
          }
        }

        $.ajax({
          url: oEmbedUrl + "&callback=?",
          dataType: "jsonp",
          success: function (data) {
            $(data.html).prependTo(element);
          }
        });
      }
    }
  });

  kendo.ui.plugin(Tweet);

})(window.kendo.jQuery);
This widget wraps Twitter’s oEmbed API and injects the Tweet markup that’s returned into the DOM. An alternative to this approach would be to inject the tweet through a factory function from the JavaScript utility, widgets-js and twttr.widgets.createTweet().
Another media type that’s supported in the timeline are embedded videos from YouTube. Every webinar that we’ve hosted for Kendo UI has been published to YouTube. As such, I felt it would be a good idea to support them as well:

YouTube provides a convenient means of embedding videos through an <iframe>, which loads the markup, styles, and dependencies for this functionality. All that’s required is the video identifier:
<iframe width="100%" height="315" src="https://www.youtube.com/embed/#= data[i].youTubeId #"></iframe>
YouTube also provides an API that supports embedding a video player through JavaScript:
var player = new YT.Player("player", {
  height: "390",
  width: "640",
  videoId: "LQ5g4RdrqBY"
}
The end result is same - an embedded video player in the timeline.
Let’s Build It with Kendo UI for Angular
The timeline built with Kendo UI for Angular is identical in appearance to the one built with Kendo UI for jQuery. However, its underlying implmentation is vastly different. The project’s structure is based off the project generators in the Angular CLI with dependencies on Kendo UI for Angular and components published by the community to npm. The main page consists of the following template:
<header style="z-index: 1;">
  <h1>{{title}}</h1>
</header>
<kendo-ui-timeline></kendo-ui-timeline>
This template includes the Timeline component, which is represented by the <kendo-ui-timeline> element:
import { Component } from '@angular/core'
import { GoogleSheetsService } from '../google-sheets.service'
import { TimelineEntryCollection } from '../timeline-entry-collection'

@Component({
  selector: 'kendo-ui-timeline',
  providers: [ GoogleSheetsService ],
  templateUrl: './timeline.component.html',
  styleUrls: ['./timeline.component.scss']
})

export class TimelineComponent {

  timelineEntryCollections: TimelineEntryCollection[] = [];

  constructor(public googleSheetsService: GoogleSheetsService) {
    googleSheetsService.load('1Z54-N6h0Dl-JSfr2o95f58g2omYz7DLw9CX-j7Th_VQ')
      .then ((data) => {
        this.timelineEntryCollections = data;
      }, (error) => {
        // handle error
      });
  }

}
The Timeline component employs the use of a service, GoogleSheetsService, which is responsible for loading data from the Google Sheets API:
import { Injectable } from '@angular/core';
import { Http } from '@angular/http';
import 'rxjs/add/operator/map';
import { IntlService } from '@progress/kendo-angular-intl';
import { TimelineEntry } from './timeline-entry';
import { TimelineEntryCollection } from './timeline-entry-collection';

@Injectable()
export class GoogleSheetsService {

  data: any = null;

  constructor(public http: Http, public intl: IntlService) {}

  load( id ) {
    if (this.data) {
      return Promise.resolve(this.data);
    }

    var url = 'https://spreadsheets.google.com/feeds/list/' + id + '/od6/public/values?alt=json';
    return new Promise(resolve => {
      this.http.get(url)
        .map(res => res.json() )
        .subscribe( data => {
          this.data = data.feed.entry;
          let currentYear:Number = 0;
          let timelineEntryCollections: TimelineEntryCollection[] = [];
          let tempTimelineEntryCollection:TimelineEntryCollection;
          if (this.data && this.data.length > 0 ) {
            this.data.forEach((entry, index) => {
              let date = this.intl.parseDate(entry.gsx$date.$t);
              if (currentYear < date.getFullYear()) {
                if (index != 0) {
                  timelineEntryCollections.push(tempTimelineEntryCollection);
                }
                tempTimelineEntryCollection = new TimelineEntryCollection();
                tempTimelineEntryCollection.year = currentYear = date.getFullYear();
              }
              let timelineEntry:TimelineEntry = {
                date: this.intl.parseDate(entry.gsx$date.$t),
                title: entry.gsx$title.$t,
                description: entry.gsx$description.$t,
                type: entry.gsx$type.$t,
                version: entry.gsx$version.$t,
                imageUrl: entry.gsx$imageurl.$t,
                notesUrl: entry.gsx$notesurl.$t,
                youTubeId: entry.gsx$youtubeid.$t,
                tweetUrl:  entry.gsx$tweeturl.$t,
                tweetId: entry.gsx$tweetid.$t
              };
              if (index == this.data.length - 1) {
                timelineEntryCollections.push(tempTimelineEntryCollection);
              }
              tempTimelineEntryCollection.entries.push(timelineEntry);
            });
          }
          resolve(timelineEntryCollections);
        });
    });
  }
}
This component does most of the heavy lifting as its responsible for populating a custom type (TimelineEntryCollection) with data from a remote endpoint. Just like the implementation built with Kendo UI for jQuery, the use of a utility component (IntlService) is used to parse dates in the response. This is part of the Internationalization package in Kendo UI for Angular that provides services for parsing and formatting of dates and numbers.
Once the data from the Google Sheets API has been parsed and structured into custom types, it’s bound to the template of the Timeline component:
<div style="padding-top: 200px;">
  <template ngFor let-timelineEntryCollection [ngForOf]="timelineEntryCollections">
    <h1 id="timeline-header" style="font-size: 40px; text-align: center;">{{timelineEntryCollection.year}}</h1>
    <section id="cd-timeline" class="cd-container">
      <template ngFor let-timelineEntry [ngForOf]="timelineEntryCollection.entries">
        <div id="timeline-block" class="cd-timeline-block">
          <div class="cd-timeline-img cd-picture bounce-in">
            <i class="k-font-icon k-i-calendar" aria-hidden="true"></i>
          </div>
          <div class="cd-timeline-content bounce-in">
            <div class="list-group">
              <h2>{{timelineEntry.title}}</h2>
              <span *ngIf="timelineEntry.version" class="cd-timeline-content-version">
                {{timelineEntry.version}}
              </span>
              <p *ngIf="timelineEntry.description" class="cd-timeline-content-description">
                {{timelineEntry.description}}
              </p>
              <img *ngIf="timelineEntry.imageUrl" [src]="timelineEntry.imageUrl" />
              <timeline-tweet *ngIf="timelineEntry.tweetId" [tweetId]="timelineEntry.tweetId"></timeline-tweet>
              <youtube-player *ngIf="timelineEntry.youTubeId" [videoId]="timelineEntry.youTubeId" width="100%"></youtube-player>
            </div>
          </div>
        </div>
      </template>
    </section>
  </template>
</div>
The syntax for the Timeline component is quite different from the one that targets Kendo UI for jQuery. It may be argued that the template syntax expressed in Angular is easier to understand. Regardless of preference for either implementation, both templates in jQuery and Angular output similar markup.
When it comes to embedding media types in the Timeline from Twitter and YouTube, the implementation targeting Kendo UI for Angular differs from the one targeting Kendo UI for jQuery. YouTube videos are embedded through the use of ng2-youtube-player, an Angular component for embedding a YouTube via the <iframe> shown earlier. Tweets are embedded using the JavaScript utility, widgets-js and twttr.widgets.createTweet() that I mentioned earlier:
import { Component, ElementRef, OnInit, Input } from '@angular/core';

@Component({
  selector: 'timeline-tweet',
  template: ''
})

export class TweetComponent implements OnInit {

  private _elementRef: ElementRef;
  @Input() tweetId;

  constructor(private elementRef: ElementRef) {
    this._elementRef = elementRef;
  }

  ngOnInit() {
    if (this.tweetId) {
      twttr.widgets.createTweet(this.tweetId, this._elementRef.nativeElement);
    }
  }
}
The decision to use widgets-js was based on the fact that Angular imposes restrictions on injecting markup and JavaScript into the DOM at run-time. If one were inclined, an implementation could be built that employs the DomSanitizer. This was my original intent when building the timeline with Kendo UI for Angular. However, I decided to simplify the implementation by taking a dependency on widgets-js along with its TypeScript definitions from DefinitelyTyped – namely, @types/twitter.
Some Observations and Wrapping up
Building a timeline component for separate and independent frameworks provided a good perspective on the different approaches one must take when targeting Kendo UI and jQuery and Kendo UI for Angular. I was curious to see how much code and markup could be shared between the two frameworks. As it turns out, much of the frontend implementation remained the same. A main difference I observed was how the components themselves were structured. The approach used for the implementation targeting Kendo UI for Angular lent itself better for testing. However, both solutions produced the same result.
On a personal note, I’ve been involved with Kendo UI since it was first introduced to the world back in 2011. It’s been amazing to watch its growth over the years. This project has made me proud of what the team has achieved thus far and I look forward to watching and participating in the next five years of its evolution.

John Bristowe
John Bristowe is a member of the Developer Relations team at Progress. He specialises in web and mobile app development.