
Advanced Form Validation in Blazor 10

Summarize with AI:
These new validation features available in Blazor as of .NET 10 help manage forms with nested objects and lists, plus perform complex and cross-field validations.
Form validation is essential when working with data in Blazor applications. Before .NET 10, if you wanted to perform validation of nested objects, you had to take a series of additional steps that could add complexity to your projects. In this article, we will examine the improvements and new features in .NET 10 to solve this problem through a practical exercise. Let’s go!
Understanding the Problem of Nested Validations Before .NET 10
To see the problem when working with nested objects and their validation, let’s create a sample Blazor project. For this demonstration, I am working with a project using the Blazor Web App template configured with Interactive Server rendering globally.
Immediately after creating the project, perform the installation and configuration steps for the Progress Telerik UI for Blazor controls, as we will use them to quickly build modern interfaces.
Creating Models in the Application
Suppose we are building an attendee registration application for a technical event. As a first step, I have defined a class EventRegistration with the following structure:
public class EventRegistration
{
    public Attendee Attendee { get; set; } = new();
    public BillingAddress BillingAddress { get; set; } = new();
    public List<SessionSelection> Sessions { get; set; } = [];

    [Range(typeof(bool), "true", "true", ErrorMessage = "You must accept the terms and conditions.")]
    public bool AcceptTerms { get; set; }
}
The model above has some nested objects, both single objects such as Attendee and a list of type SessionSelection. Likewise, there is a validation on the property AcceptTerms of type Range, which verifies that the value is true.
The model of a Attendee looks as follows:
public class Attendee
{
    [Required(ErrorMessage = "Full name is required.")]
    [StringLength(100, ErrorMessage = "Name cannot exceed 100 characters.")]
    public string? FullName { get; set; }

    [Required(ErrorMessage = "Email is required.")]
    [EmailAddress(ErrorMessage = "Invalid email format.")]
    public string? Email { get; set; }

    [Required(ErrorMessage = "Phone number is required.")]
    [Phone(ErrorMessage = "Invalid phone number format.")]
    public string? Phone { get; set; }

    [Required(ErrorMessage = "Company name is required.")]
    public string? Company { get; set; }

    [Required(ErrorMessage = "Job title is required.")]
    public string? JobTitle { get; set; }
}
The Attendee model has more validation annotations per property, which allow validating each attendee’s information. The project also includes the BillingAddress model to store address information, also featuring validation attributes:
public class BillingAddress
{
    [Required(ErrorMessage = "Street address is required.")]
    public string? Street { get; set; }

    [Required(ErrorMessage = "City is required.")]
    public string? City { get; set; }

    [Required(ErrorMessage = "State/Province is required.")]
    public string? State { get; set; }

    [Required(ErrorMessage = "Postal code is required.")]
    public string? PostalCode { get; set; }

    [Required(ErrorMessage = "Country is required.")]
    public string? Country { get; set; }
}
Finally, the SessionSelection model defines the structure of each session selected by an attendee:
public class SessionSelection
{
    [Required(ErrorMessage = "Session name is required.")]
    public string? SessionName { get; set; }

    [Required(ErrorMessage = "Preference level is required.")]
    public string? Preference { get; set; }
}
The complexity among the previous models will allow us to test the new validation features included in .NET 10.
Initializing Project Data Using a Session Catalog Service
To display mock data in the application, let’s create a SessionCatalog service, where we’ll define a list of sessions:
public class SessionCatalog
{
    public List<string> GetAvailableSessions() =>
    [
        "Keynote: The Future of .NET",
        "Workshop: Blazor Advanced Patterns",
        "Talk: SignalR Real-Time Communication",
        "Workshop: Minimal APIs Deep Dive",
        "Talk: Cloud-Native .NET Applications",
        "Workshop: AI Integration with .NET"
    ];

    public List<string> GetPreferenceLevels() =>
    [
        "High",
        "Medium",
        "Low"
    ];
}
We will register this service in Program.cs as follows:
var builder = WebApplication.CreateBuilder(args);
...
builder.Services.AddSingleton<SessionCatalog>();

var app = builder.Build();
Creating the Graphical Interface
To perform various checks, let’s create a graphical interface using the TelerikForm component. This will enable generating and customizing model-based forms and with many configuration parameters, making it a powerful and useful component for our example. The resulting code looks like this:
@page "/registration"
@rendermode InteractiveServer
@using FormValidationNET10.Models
@using FormValidationNET10.Services
@inject SessionCatalog SessionCatalog

<PageTitle>Event Registration</PageTitle>

<h1 class="mb-4">Event Registration</h1>

<TelerikForm EditContext="editContext"
             OnValidSubmit="HandleValidSubmit">
    <FormValidation>
        <DataAnnotationsValidator />
        <TelerikValidationSummary />
    </FormValidation>
    <FormItems>
        <FormItem Field="Attendee.FullName" LabelText="Full Name" />
        <FormItem Field="Attendee.Email" LabelText="Email" />
        <FormItem Field="Attendee.Phone" LabelText="Phone" />
        <FormItem Field="Attendee.Company" LabelText="Company" />
        <FormItem Field="Attendee.JobTitle" LabelText="Job Title" />
        <FormItem Field="BillingAddress.Street" LabelText="Street" />
        <FormItem Field="BillingAddress.City" LabelText="City" />
        <FormItem Field="BillingAddress.State" LabelText="State / Province" />
        <FormItem Field="BillingAddress.PostalCode" LabelText="Postal Code" />
        <FormItem Field="BillingAddress.Country">
            <Template>
                <label for="country-editor" class="k-label k-form-label">Country</label>
                <div class="k-form-field-wrap">
                    <TelerikDropDownList @bind-Value="registration.BillingAddress.Country"
                                         Data="@countries"
                                         DefaultText="Select a country..."
                                         Id="country-editor" />
                    <TelerikValidationMessage For="@(() => registration.BillingAddress.Country)" />
                </div>
            </Template>
        </FormItem>
        <FormItem Field="AcceptTerms">
            <Template>
                <div class="k-form-field-wrap">
                    <TelerikCheckBox @bind-Value="registration.AcceptTerms" Id="acceptTerms" />
                    <label for="acceptTerms" class="ms-2">I accept the terms and conditions</label>
                    <div>
                        <TelerikValidationMessage For="@(() => registration.AcceptTerms)" />
                    </div>
                </div>
            </Template>
        </FormItem>
    </FormItems>
    <FormItemsTemplate Context="formContext">
        @{
            var items = formContext.Items.OfType<IFormItem>().ToList();
        }

        <div class="card shadow-sm mb-4">
            <div class="card-header bg-primary text-white">
                <h5 class="mb-0">Attendee Information</h5>
            </div>
            <div class="card-body">
                <div class="row g-3">
                    <div class="col-md-6">
                        <TelerikFormItemRenderer Item="@(items.First(x => x.Field == "Attendee.FullName"))" />
                    </div>
                    <div class="col-md-6">
                        <TelerikFormItemRenderer Item="@(items.First(x => x.Field == "Attendee.Email"))" />
                    </div>
                    <div class="col-md-4">
                        <TelerikFormItemRenderer Item="@(items.First(x => x.Field == "Attendee.Phone"))" />
                    </div>
                    <div class="col-md-4">
                        <TelerikFormItemRenderer Item="@(items.First(x => x.Field == "Attendee.Company"))" />
                    </div>
                    <div class="col-md-4">
                        <TelerikFormItemRenderer Item="@(items.First(x => x.Field == "Attendee.JobTitle"))" />
                    </div>
                </div>
            </div>
        </div>

        <div class="card shadow-sm mb-4">
            <div class="card-header bg-primary text-white">
                <h5 class="mb-0">Billing Address</h5>
            </div>
            <div class="card-body">
                <div class="row g-3">
                    <div class="col-12">
                        <TelerikFormItemRenderer Item="@(items.First(x => x.Field == "BillingAddress.Street"))" />
                    </div>
                    <div class="col-md-4">
                        <TelerikFormItemRenderer Item="@(items.First(x => x.Field == "BillingAddress.City"))" />
                    </div>
                    <div class="col-md-4">
                        <TelerikFormItemRenderer Item="@(items.First(x => x.Field == "BillingAddress.State"))" />
                    </div>
                    <div class="col-md-4">
                        <TelerikFormItemRenderer Item="@(items.First(x => x.Field == "BillingAddress.PostalCode"))" />
                    </div>
                    <div class="col-md-12">
                        <TelerikFormItemRenderer Item="@(items.First(x => x.Field == "BillingAddress.Country"))" />
                    </div>
                </div>
            </div>
        </div>

        <div class="card shadow-sm mb-4">
            <div class="card-header bg-primary text-white d-flex justify-content-between align-items-center">
                <h5 class="mb-0">Session Selection</h5>
                <TelerikButton OnClick="@AddSession"
                               ThemeColor="@ThemeConstants.Button.ThemeColor.Light"
                               ButtonType="@ButtonType.Button">
                    + Add Session
                </TelerikButton>
            </div>
            <div class="card-body">
                @if (registration.Sessions.Count == 0)
                {
                    <div class="alert alert-info mb-0">
                        No sessions added yet. Click "Add Session" to select the sessions you'd like to attend.
                    </div>
                }
                else
                {
                    @for (int i = 0; i < registration.Sessions.Count; i++)
                    {
                        var index = i;
                        <div class="row g-3 mb-3 align-items-end">
                            <div class="col-md-5">
                                <label class="k-label k-form-label">Session</label>
                                <TelerikDropDownList @bind-Value="registration.Sessions[index].SessionName"
                                                     Data="@availableSessions"
                                                     DefaultText="Select a session..." />
                                <TelerikValidationMessage For="@(() => registration.Sessions[index].SessionName)" />
                            </div>
                            <div class="col-md-4">
                                <label class="k-label k-form-label">Preference</label>
                                <TelerikDropDownList @bind-Value="registration.Sessions[index].Preference"
                                                     Data="@preferenceLevels"
                                                     DefaultText="Select preference..." />
                                <TelerikValidationMessage For="@(() => registration.Sessions[index].Preference)" />
                            </div>
                            <div class="col-md-3">
                                <TelerikButton OnClick="@(() => RemoveSession(index))"
                                               ThemeColor="@ThemeConstants.Button.ThemeColor.Error"
                                               ButtonType="@ButtonType.Button">
                                    Remove
                                </TelerikButton>
                            </div>
                        </div>
                    }
                }
                <TelerikValidationMessage For="@(() => registration.Sessions)" />
            </div>
        </div>

        <div class="card shadow-sm mb-4">
            <div class="card-body">
                <TelerikFormItemRenderer Item="@(items.First(x => x.Field == "AcceptTerms"))" />
            </div>
        </div>
    </FormItemsTemplate>
    <FormButtons>
        <TelerikButton ButtonType="@ButtonType.Submit"
                       ThemeColor="@ThemeConstants.Button.ThemeColor.Primary">
            Submit Registration
        </TelerikButton>
    </FormButtons>
</TelerikForm>

@if (isSubmitted)
{
    <div class="alert alert-success mt-4">
        <h5>Registration Successful!</h5>
        <p>Thank you, <strong>@registration.Attendee.FullName</strong>! Your registration for @registration.Sessions.Count session(s) has been submitted.</p>
    </div>
}

@code {
    private EventRegistration registration = new();
    private EditContext editContext = default!;
    private List<string> availableSessions = [];
    private List<string> preferenceLevels = [];
    private List<string> countries = ["United States", "Canada", "Mexico", "United Kingdom", "Germany", "France", "Spain"];
    private bool isSubmitted;

    protected override void OnInitialized()
    {
        editContext = new EditContext(registration);

        availableSessions = SessionCatalog.GetAvailableSessions();
        preferenceLevels = SessionCatalog.GetPreferenceLevels();
    }

    private void AddSession()
    {
        registration.Sessions.Add(new SessionSelection());
    }

    private void RemoveSession(int index)
    {
        registration.Sessions.RemoveAt(index);
    }

    private void HandleValidSubmit(EditContext context)
    {
        isSubmitted = true;
    }
}
Validating Data Before .NET 10
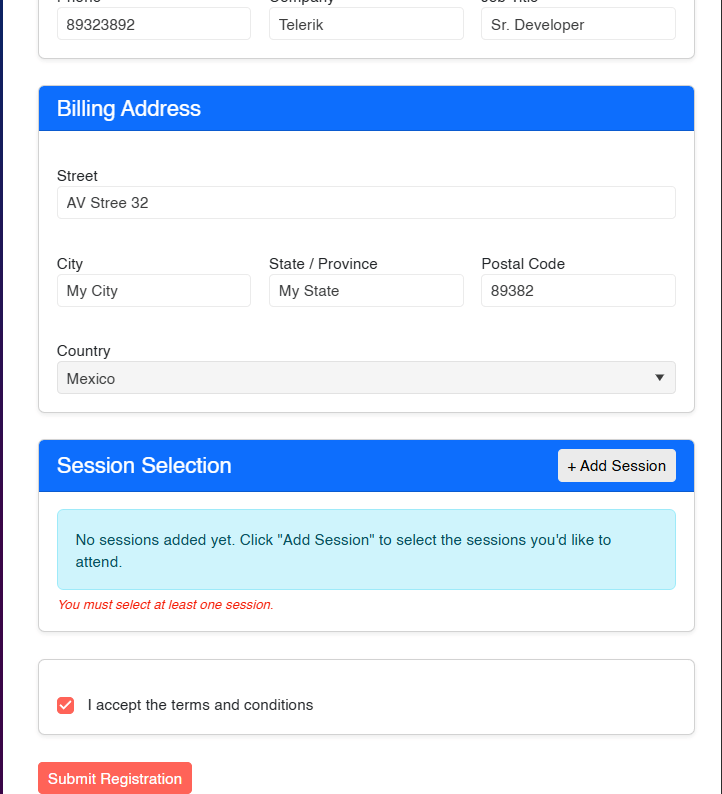
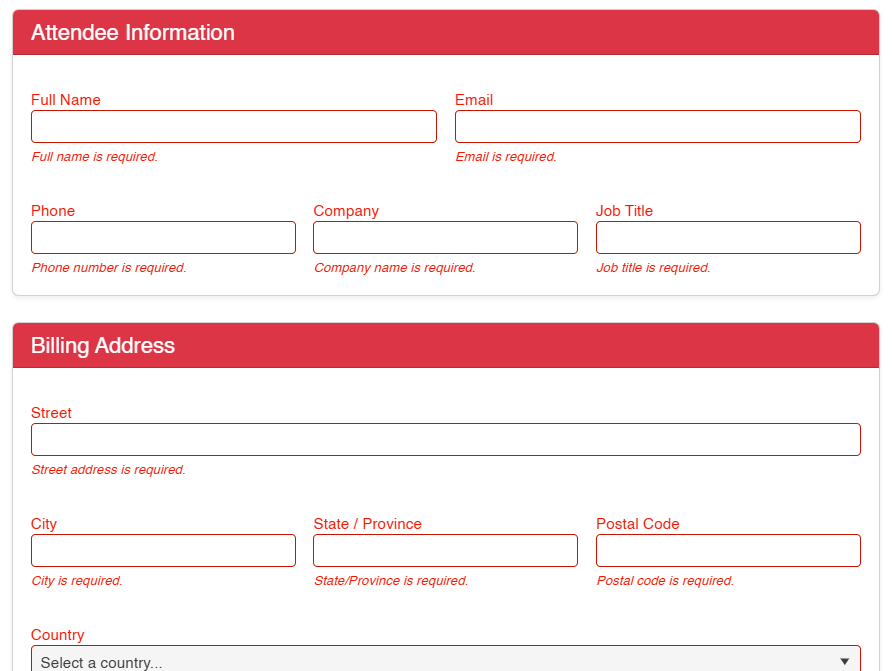
Once we have all the pieces of the project, let’s run it. Let’s do a test by trying to submit the empty form:
In the previous image, you can see that when submitting the form the only error shown is the one indicating that the terms and conditions have not been accepted. However, although all models implement validations, no others are shown.
The reason behind this is that DataAnnotationsValidator in Blazor does not perform validation on nested objects or collections. This has been a known limitation in Blazor since its beginnings, which was addressed using custom recursive validators. Let’s see how .NET 10 helps us solve this problem.
Validating Data Thanks to the New Features in .NET 10
To perform validation of nested objects and collections, the first step you must take is to add in Program.cs a call to the method AddValidation():
var builder = WebApplication.CreateBuilder(args);
...
builder.Services.AddValidation();

var app = builder.Build();
The method AddValidation() registers the services required for the validation system to work.
The next step is to open the main model that contains the hierarchy of submodels and add the attribute [ValidatableType] to the class. In our example, the class is EventRegistration, which will look as follows after the modification:
[ValidatableType]
public class EventRegistration
{
   ...
}
The attribute [ValidatableType] tells the .NET source generator to generate validation logic for the class. Behind the scenes the following steps will be performed:
- All properties of the decorated class are inspected.
- Nested objects are detected and the necessary code to recursively validate their validation annotations is generated.
- Collections are detected and code is generated to iterate through each element, validating their validation annotations.
After applying the previous changes, you will see that now, when submitting the form with empty fields, all errors are displayed correctly:
With these changes, we have correctly enabled full validation of nested objects and collections.
Implementing Cross-field Validation Using IValidatableObject
So far we have been able to apply validation rules at the level of individual properties. However, it is common in complex applications to have rules that involve multiple properties or complex business logic. For these cases, .NET provides the interface IValidatableObject, which in version 10 integrates seamlessly with [ValidatableType].
Let’s perform a check of this type assuming this pair of business rules:
- The user must select at least one session.
- Duplicate sessions are not allowed.
The rules depend on the state of the collection Sessions as a whole. To make it work correctly, let’s modify the class EventRegistration by adding the interface:
[ValidatableType]
public class EventRegistration : IValidatableObject
{
    ...

    public IEnumerable<ValidationResult> Validate(ValidationContext validationContext)
    {
    	// 1.
        if (Sessions.Count == 0)
        {
            yield return new ValidationResult(
                "You must select at least one session.",
                [nameof(Sessions)]);
        }

        // 2.
        var duplicates = Sessions
            .Where(s => !string.IsNullOrEmpty(s.SessionName))
            .GroupBy(s => s.SessionName)
            .Where(g => g.Count() > 1)
            .Select(g => g.Key)
            .ToList();

        if (duplicates.Count > 0)
        {
            yield return new ValidationResult(
                $"Duplicate sessions are not allowed: {string.Join(", ", duplicates)}",
                [nameof(Sessions)]);
        }
    }
}
In the code above:
- We validate that at least one session is selected.
- We look for duplicate sessions.
In case of any error, we return an ValidationResult indicating the error. When running the application, we see the following result if no session is selected:
Now, when duplicate sessions are selected, the following error is shown:
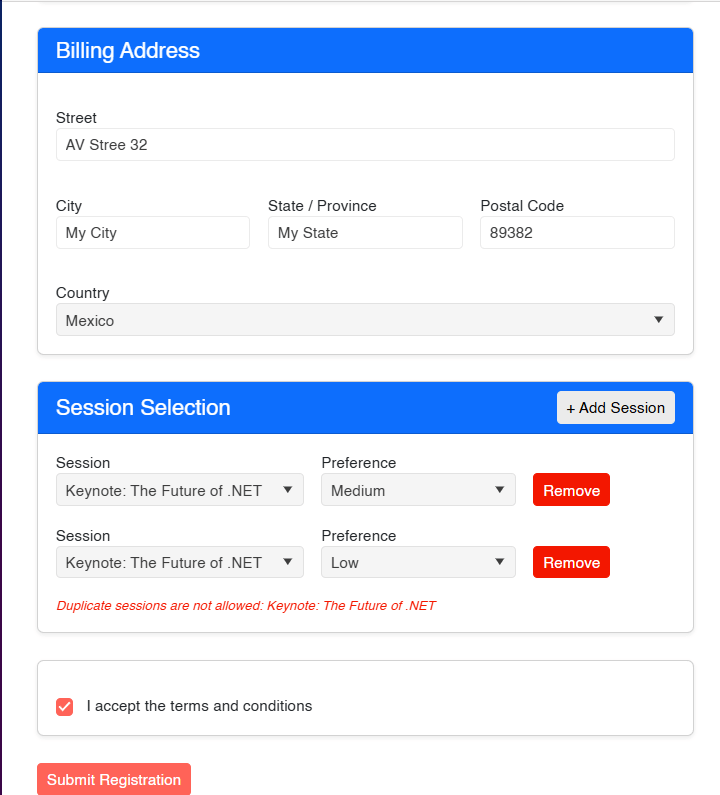
With this, we have created cross-field validation correctly using Blazor.
Improving Validations Using FieldCssClassProvider
At this point we have a project that correctly validates the form information, thanks to the native capabilities of TelerikForm. We can go one step further and modify the project to add visual indicators at the section level that communicate to the user which sections have errors. We can do this thanks to the method EditContext.IsValid(fieldIdentifier) introduced in .NET 10, which allows directly checking whether a field is valid.
To use it, the first thing we will do is create a class that inherits from FieldCssClassProvider. For the demonstration I will create a class called RegistrationFieldClassProvider at the root level of the project that looks as follows:
public class RegistrationFieldClassProvider : FieldCssClassProvider
{
    public override string GetFieldCssClass(EditContext editContext, in FieldIdentifier fieldIdentifier)
    {
        if (!editContext.IsModified(fieldIdentifier))
            return string.Empty;

        var isValid = editContext.IsValid(fieldIdentifier);
        return isValid ? "is-valid" : "is-invalid";
    }
}
In the code above, it checks whether the field has been modified. Next IsValid() is used inside the method GetFieldCssClass to check if the field has associated validation messages. Finally, Bootstrap classes are returned that will provide feedback to the user about the validity of the sections.
To achieve this, we will make the card headers change color according to the state of their fields by modifying Registration.razor as follows:
- Add the event
OnValidSubmittoTelerikForm:
<TelerikForm EditContext="editContext"
             OnValidSubmit="HandleValidSubmit"
             OnInvalidSubmit="HandleInvalidSubmit">
- Find the
h5elements that reference Attendee Information and Billing Address, and modify their containerdivas follows:
<div class="card-header @GetAttendeeHeaderClass()">
    <h5 class="mb-0">Attendee Information</h5>
</div>
...
<div class="card-header @GetBillingHeaderClass()">
    <h5 class="mb-0">Billing Address</h5>
</div>
- Modify the code section by adding the following changes:
@code {
   ...
    private bool hasValidated;

    protected override void OnInitialized()
    {
        editContext = new EditContext(registration);

        editContext.SetFieldCssClassProvider(new RegistrationFieldClassProvider());
        editContext.OnValidationStateChanged += (_, _) => StateHasChanged();

        availableSessions = SessionCatalog.GetAvailableSessions();
        preferenceLevels = SessionCatalog.GetPreferenceLevels();
    }

    private bool IsFieldValid<T>(Expression<Func<T>> accessor)
       => editContext.IsValid(FieldIdentifier.Create(accessor));

    private string GetAttendeeHeaderClass()
    {
        if (!hasValidated) return "bg-primary text-white";

        bool allValid = IsFieldValid(() => registration.Attendee.FullName)
            && IsFieldValid(() => registration.Attendee.Email)
            && IsFieldValid(() => registration.Attendee.Phone)
            && IsFieldValid(() => registration.Attendee.Company)
            && IsFieldValid(() => registration.Attendee.JobTitle);

        return allValid ? "bg-success text-white" : "bg-danger text-white";
    }

    private string GetBillingHeaderClass()
    {
        if (!hasValidated) return "bg-primary text-white";

        bool allValid = IsFieldValid(() => registration.BillingAddress.Street)
            && IsFieldValid(() => registration.BillingAddress.City)
            && IsFieldValid(() => registration.BillingAddress.State)
            && IsFieldValid(() => registration.BillingAddress.PostalCode)
            && IsFieldValid(() => registration.BillingAddress.Country);

        return allValid ? "bg-success text-white" : "bg-danger text-white";
    }

    ...

    private void HandleValidSubmit(EditContext context)
    {
        hasValidated = true;
        isSubmitted = true;
    }

    private void HandleInvalidSubmit(EditContext context)
    {
        hasValidated = true;
    }
}
In the code above, I added the field hasValidated to check if the form has been submitted. I also modified OnInitialized by adding the handler for the event OnValidationStateChanged, which allows the UI to update reactively. I also added the helper IsFieldValid<T> and the methods GetAttendeeHeaderClass and GetBillingHeaderClass. This is the result:
With this, we have managed to give the user better feedback about the sections they need to complete before proceeding.
Conclusion
Throughout this article, we have explored the new features available in .NET 10 that will undoubtedly help you manage forms with nested objects and lists. We’ve also looked at how to perform cross-validations and, finally, the process of carrying out more complex validations by checking data in sections.
Now it’s your time to implement these new features in your own projects and provide better feedback to your users.

Héctor Pérez
Héctor Pérez is a Microsoft MVP with more than 10 years of experience in software development. He is an independent consultant, working with business and government clients to achieve their goals. Additionally, he is an author of books and an instructor at El Camino Dev and Devs School.
Related Posts
Comments
All articles
Topics
Web MobileMobile
Desktop
Design
Productivity
People
