
Streaming Server Events with SSE and Blazor

Summarize with AI:
Understand the SSE standard, the .NET 10 changes to simplify SSE endpoints and how to add real-time events to your Blazor clients.
In the world of web development, there are scenarios where you need to receive real-time information, such as notifications about an event, server metrics or live logs. One possible solution to achieve this is the use of Server-Sent Events (SSE). With the arrival of .NET 10, implementing this type of solution has become much easier, so let’s see how to integrate this web standard into your projects.
What Are Server-Sent Events?
The Server-Sent Events (SSE) are not a new technology. Their origins date back to around 2006, and they are a web standard that allows data to be sent to clients continuously using a persistent HTTP connection.
If you wonder the difference compared to other similar technologies, we can make a comparison:
SSE vs. Polling: In the case of polling, the direction goes from the client to the server, using the HTTP protocol. We can see it as a client asking the server if there are updates at certain intervals. It involves low implementation complexity.
SSE vs. WebSockets: With WebSockets there is bidirectional communication. It involves high complexity and is ideal for scenarios like video games, chats, etc. It works over the WS protocol.
SSE vs. SignalR: SignalR also establishes bidirectional communication, with medium implementation complexity. It allows the use of binary protocols, which makes it a very good option for scalable enterprise apps. It uses variable protocols.
Analyzing the above, we can conclude that SSE is ideal when the data flow is unidirectional, you need it to work over the HTTP protocol and it must be easy to implement.
How Does the SSE Protocol Work?
The workings behind the scenes of the SSE protocol, in broad terms, are as follows: a server SSE endpoint needs to send an HTTP response of the type Content-Type: text/event-stream. The response looks similar to the following:
event: app-event
data: {"id":1,"time":"10:30:45","level":"Info","source":"OrderService","message":"Order #1234 placed successfully"}
In the code above, there are some fields we should pay attention to:
event: Specifies the name of the eventdata: Is the content of the messageid: Identifier used to perform a reconnection if needed
What’s New in .NET 10 for SSE
The most important update in .NET 10 for working with SSE is that the ability to return a ServerSentEvents using the API TypedResults.ServerSentEvents has been implemented. This means that the method TypedResults.ServerSentEvents<T>() allows converting any IAsyncEnumerable<T> into a formatted SSE stream without needing to do anything else. Tasks like JSON serialization, HTTP headers, connection closing, etc. are handled automatically.
To better understand how it works, let’s create a project using the SSE standard with ASP.NET 10.
Building an SSE Project Using ASP.NET 10
To practice the theoretical concepts covered so far, we’ll create a page that shows a simulation of receiving events from backend services in real time. Using a Progress Telerik UI for Blazor Grid, we’ll perform tasks like filtering, grouping and analysis quickly.
Creating and Configuring the Project
The first thing we’ll do is create a project using the Blazor Web App template, selecting an Interactive render mode of Server and Interactivity location of Global. Next, we’ll follow the official installation guide for Telerik UI for Blazor to configure the project and be able to use the Telerik components.
Creating an EventBroadcaster
For our project, we’ll create an event broadcaster, which in simple terms will be a bus that SSE clients can connect to to consume events, while backend services will use it to publish events. First, we’ll create a record that represents a system event:
namespace SSEDemo.Services
{
    public record AppEvent(int Id, string Time, string Level, string Source, string Message);
}
Next, we will create the class EventBroadcaster which will have the following definition:
public class EventBroadcaster
{
    //1.
    private readonly Channel<AppEvent> _channel = Channel.CreateBounded<AppEvent>(
    new BoundedChannelOptions(100) { FullMode = BoundedChannelFullMode.DropOldest });

    private int _nextId;

    // 2.
    public void Publish(string level, string source, string message)
    {
        var id = Interlocked.Increment(ref _nextId);
        var evt = new AppEvent(id, DateTime.Now.ToString("HH:mm:ss"), level, source, message);
        _channel.Writer.TryWrite(evt);
    }

    // 3.
    public async IAsyncEnumerable<AppEvent> Subscribe(
        [System.Runtime.CompilerServices.EnumeratorCancellation] CancellationToken ct)
    {
        while (!ct.IsCancellationRequested)
        {
            bool hasData;
            try
            {
                hasData = await _channel.Reader.WaitToReadAsync(ct);
            }
            catch (OperationCanceledException)
            {
                yield break;
            }

            if (!hasData) yield break;

            while (_channel.Reader.TryRead(out var evt))
            {
                yield return evt;
            }
        }
    }
}
In the code above, we have the following sections:
Sets up the channel where events will be passed, with a queue limit of 100 messages.
FullMode = BoundedChannelFullMode.DropOldestallows that if the queue fills up and a new message arrives, the oldest one is removed to make room for the new message.The method
Publishis the one that will be used to emit events.Interlocked.Incrementallows generating sequential IDs in a safe manner, whileAppEventpackages the received data together with the obtained id. Finally the methodTryWrite()attempts to write the event to the channel asynchronously.On the other hand, the method
Subscribereturns a continuous stream of asynchronous data through the use ofIAsyncEnumerable<AppEvent>. Inside its implementation an infinite loop is created that waits for data to be available in the channel. Once an event enters the channel, it is emitted to the consumer. This will happen until theCancellationTokencalledctis canceled.
Generating Test Events
To test the bus defined above, we’ll create a service that simulates the activity of multiple services:
public class DemoEventGenerator(EventBroadcaster broadcaster) : BackgroundService
{
    private static readonly string[] Levels = ["Info", "Warning", "Error", "Success"];
    private static readonly string[] Sources =
        ["OrderService", "PaymentService", "InventoryService", "AuthService", "ShippingService"];
    private static readonly string[][] Messages =
    [
        ["Order #{0} placed successfully", "New customer registered", "Product viewed: SKU-{0}"],
        ["High latency detected: {0}ms", "Retry attempt #{0}", "Queue depth above threshold"],
        ["Payment failed for order #{0}", "Database timeout after {0}ms", "Service unreachable"],
        ["Deployment completed v2.{0}", "Health check passed", "Cache refreshed ({0} items)"]
    ];

    protected override async Task ExecuteAsync(CancellationToken stoppingToken)
    {
        var rng = new Random();

        while (!stoppingToken.IsCancellationRequested)
        {
            await Task.Delay(rng.Next(1500, 4000), stoppingToken);

            var levelIdx = rng.Next(Levels.Length);
            var level = Levels[levelIdx];
            var source = Sources[rng.Next(Sources.Length)];
            var templates = Messages[levelIdx];
            var message = string.Format(templates[rng.Next(templates.Length)], rng.Next(1000, 9999));

            broadcaster.Publish(level, source, message);
        }
    }
}
The previous class is a random event generator, taking a random value from the arrays Levels, Sources and Messages. In addition, through the parameter broadcaster, the new event is published to the bus.
Creating the SSE Endpoint
Now it’s time to create the SSE endpoint, which will consume the shared EventBroadcaster, with the purpose of creating the Event Feed so clients can connect to receive events:
public static class SseEndpoints
{
    public static void MapSseEndpoints(this WebApplication app)
    {
        app.MapGet("/sse/events", (EventBroadcaster broadcaster, CancellationToken ct) =>
            TypedResults.ServerSentEvents(broadcaster.Subscribe(ct), eventType: "app-event"));
    }
}
In the code above you can notice how EventBroadcaster is injected as a parameter of MapGet. Likewise, TypedResults.ServerSentEvent is executed, which serializes the information and sends the correct SSE format to clients.
Registering Services in Program.cs
For everything to work as expected, we must register in Program.cs the different instances that will interact in the Blazor application. This means creating a singleton instance of EventBroadcaster, so that all systems have access to the same bus. Similarly, we will register DemoEventGenerator as a background service, through the method AddHostedService. This will allow simulated events to be generated in the background continuously:
var builder = WebApplication.CreateBuilder(args);
...
builder.Services.AddSingleton<EventBroadcaster>();
builder.Services.AddHostedService<DemoEventGenerator>();

var app = builder.Build();
...

app.MapSseEndpoints();

app.Run();
In the previous code, in addition to registering the services, MapSseEndpoints is invoked to enable SSE communication in the project.
Creating the Blazor Application
Once we have the application infrastructure ready, it’s time to move on to the UI part. At this point, let’s start by creating a JavaScript client, because the standard requires using the browser’s EventSource API. Since the project is configured as InteractiveServer, we cannot add inline script tags. To work around this, I will add a new file inside the wwwroot/js folder called sse-demos.js:
//1.
let eventFeedSource = null;

2.
export function start(dotNetRef) {
    // 3.
    if (eventFeedSource) eventFeedSource.close();

	//4.
    const src = new EventSource('/sse/events');

    // 5.
    src.addEventListener('app-event', function (e) {
        dotNetRef.invokeMethodAsync('OnEventReceived', JSON.parse(e.data));
    });

    // 6.
    src.onopen = function () { dotNetRef.invokeMethodAsync('OnConnectionChanged', true); };
    src.onerror = function () { dotNetRef.invokeMethodAsync('OnConnectionChanged', false); };

    eventFeedSource = src;
}

//7.
export function stop() {
    if (eventFeedSource) {
        eventFeedSource.close();
        eventFeedSource = null;
    }
}
The previous code does the following:
- A variable
eventFeedSourceis created to keep information about whether there is an active connection with the server. - A function named
startshould be called from C# code when you want to start receiving information… - It checks whether there is an open connection, in which case it is closed.
- It tells the browser to connect to
/sse/eventsand to listen for all events that the server sends. - It filters events named
app-event. - We subscribe to the events
onopenandonerror. Each will notify the methodOnConnectionChangedabout a change in the connection, which will allow showing a different state in the Blazor UI. - The function
stopshould be invoked to clean up memory when we want to close the connection.
With the JS functions ready, the next step is to create the Blazor component. In this new component we will use a Blazor Data Grid type component, because it is a highly configurable component that has built-in options to filter, group, etc., ideal for quickly obtaining information about events in the different systems.
To do the above, we will create a component called EventFeed.razor, which looks as follows:
@page "/events"
@rendermode InteractiveServer
@inject IJSRuntime JS
@implements IAsyncDisposable

<PageTitle>Live Event Feed</PageTitle>

<h1 class="mb-4">Live Event Feed</h1>

<div class="card shadow-sm">
    <div class="card-header d-flex align-items-center justify-content-between py-2">
        <div class="d-flex align-items-center gap-3">
            @if (isStreaming)
            {
                <span class="badge rounded-pill @(isConnected ? "bg-success" : "bg-secondary") fs-6">
                    <span class="me-1">⬤</span>@(isConnected ? "Connected" : "Disconnected")
                </span>
            }
            else
            {
                <span class="badge rounded-pill bg-warning text-dark fs-6">
                    <span class="me-1">⏸</span>Paused
                </span>
            }
            <span class="text-muted">
                Events received: <strong class="text-dark">@totalEventsReceived</strong>
            </span>
        </div>
        <div class="d-flex gap-2">
            <TelerikButton OnClick="ToggleStreaming"
                           ThemeColor="@(isStreaming ? ThemeConstants.Button.ThemeColor.Primary : ThemeConstants.Button.ThemeColor.Success)">
                @(isStreaming ? "⏸ Pause" : "▶ Resume")
            </TelerikButton>
            <TelerikButton OnClick="ClearGrid" ThemeColor="@ThemeConstants.Button.ThemeColor.Light">🗑 Clear</TelerikButton>
        </div>
    </div>
    <div class="card-body p-0">
        <TelerikGrid Data="@events"
                     Height="560px"
                     Sortable="true"
                     Resizable="true"
                     Reorderable="true"
                     Groupable="true"
                     ShowColumnMenu="true">
            <GridColumns>
                <GridColumn Field="@nameof(AppEvent.Time)" Title="Time" Width="110px" />
                <GridColumn Field="@nameof(AppEvent.Level)" Title="Level" Width="120px">
                    <Template>
                        @{
                            var item = (AppEvent)context;
                        }
                        <span class="badge rounded-pill @GetBadgeClass(item.Level) px-3 py-2">@item.Level</span>
                    </Template>
                </GridColumn>
                <GridColumn Field="@nameof(AppEvent.Source)" Title="Source" Width="140px" />
                <GridColumn Field="@nameof(AppEvent.Message)" Title="Message" />
            </GridColumns>
        </TelerikGrid>
    </div>
</div>

@code {
    private List<AppEvent> events = new();
    private bool isConnected;
    private bool isStreaming = true;
    private int totalEventsReceived;
    private DotNetObjectReference<EventFeed>? dotNetRef;
    private IJSObjectReference? jsModule;
    private bool _jsInitialized;

    protected override async Task OnAfterRenderAsync(bool firstRender)
    {
        if (firstRender)
        {
            dotNetRef = DotNetObjectReference.Create(this);

            jsModule = await JS.InvokeAsync<IJSObjectReference>("import", "./js/sse-demos.js");

            await jsModule.InvokeVoidAsync("start", dotNetRef);

            _jsInitialized = true;
        }
    }

    [JSInvokable]
    public void OnEventReceived(AppEvent appEvent)
    {
        totalEventsReceived++;
        var updated = new List<AppEvent>(events);
        updated.Insert(0, appEvent);
        if (updated.Count > 50)
            updated.RemoveRange(50, updated.Count - 50);
        events = updated;
        InvokeAsync(StateHasChanged);
    }

    [JSInvokable]
    public void OnConnectionChanged(bool connected)
    {
        isConnected = connected;
        InvokeAsync(StateHasChanged);
    }

    private async Task ToggleStreaming()
    {
        isStreaming = !isStreaming;

        if (jsModule is not null)
        {
            if (isStreaming)
                await jsModule.InvokeVoidAsync("start", dotNetRef);
            else
                await jsModule.InvokeVoidAsync("stop");
        }
    }

    private void ClearGrid()
    {
        events = new List<AppEvent>();
        StateHasChanged();
    }

    private string GetBadgeClass(string level) => level switch
    {
        "Info" => "bg-info text-dark",
        "Warning" => "bg-warning text-dark",
        "Error" => "bg-danger",
        "Success" => "bg-success",
        _ => "bg-secondary"
    };

    public async ValueTask DisposeAsync()
    {
        if (_jsInitialized && jsModule is not null)
        {
            try
            {
                await jsModule.InvokeVoidAsync("stop");

                await jsModule.DisposeAsync();
            }
            catch
            {
            }
        }
        dotNetRef?.Dispose();
    }

    public class AppEvent
    {
        public int Id { get; set; }
        public string Time { get; set; } = string.Empty;
        public string Level { get; set; } = string.Empty;
        public string Source { get; set; } = string.Empty;
        public string Message { get; set; } = string.Empty;
    }
}
In the previous code, there are some points to highlight:
jsModuledynamically loads the JS module.- The variable
dotNetRefwraps the instance of the Blazor component that we will use inside the JS code. - The method
InvokeVoidAsyncis used both to start and to stop the event streaming. - The method
OnEventReceivedis invoked from the JS code each time an event is received. This allows updating the listeventsto show the new information inTelerikGrid. - The
OnConnectionChangedmethod receives a connection status from the JS code to update the UI according to any change in the connection.
With the new component ready, we can test the application, which looks like the following:
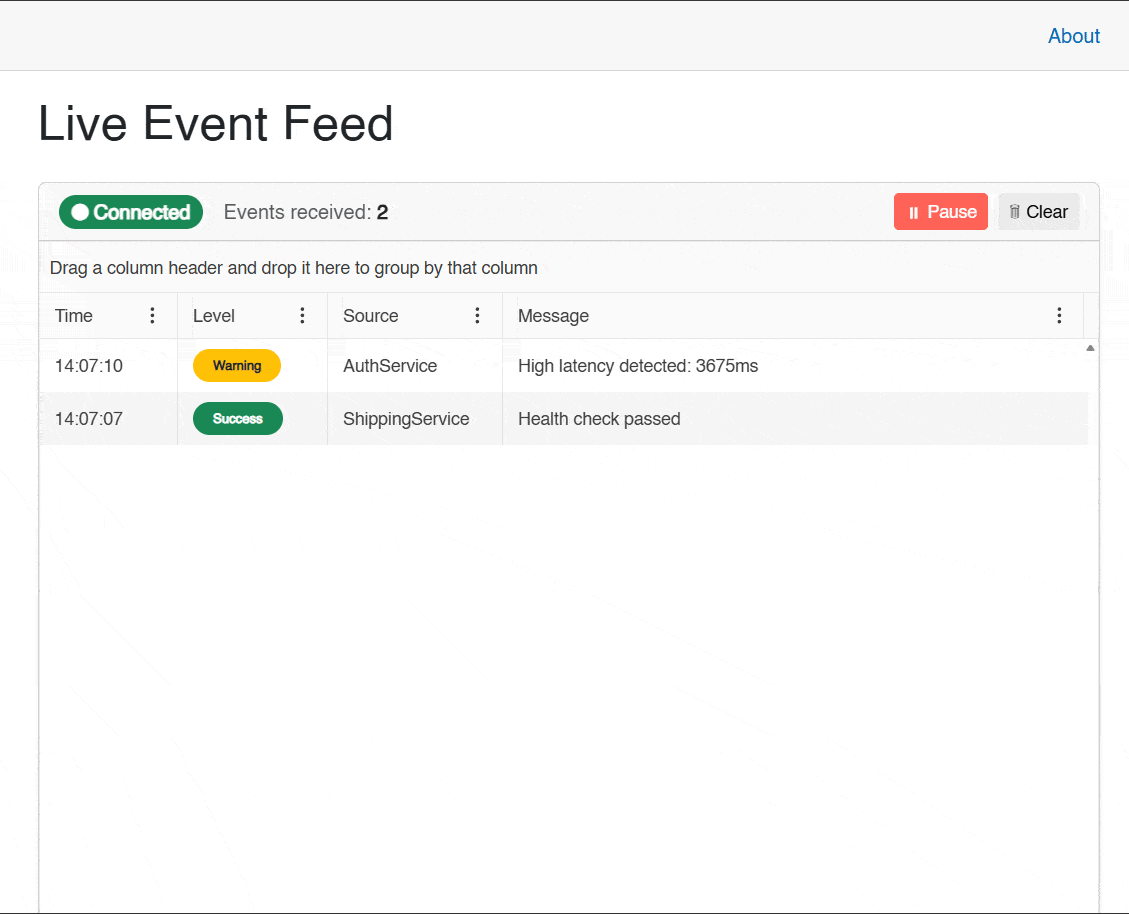
With this, we verify that everything works correctly. Also, thanks to the Blazor DataGrid capabilities, we can perform operations such as monitoring only those high-severity events:
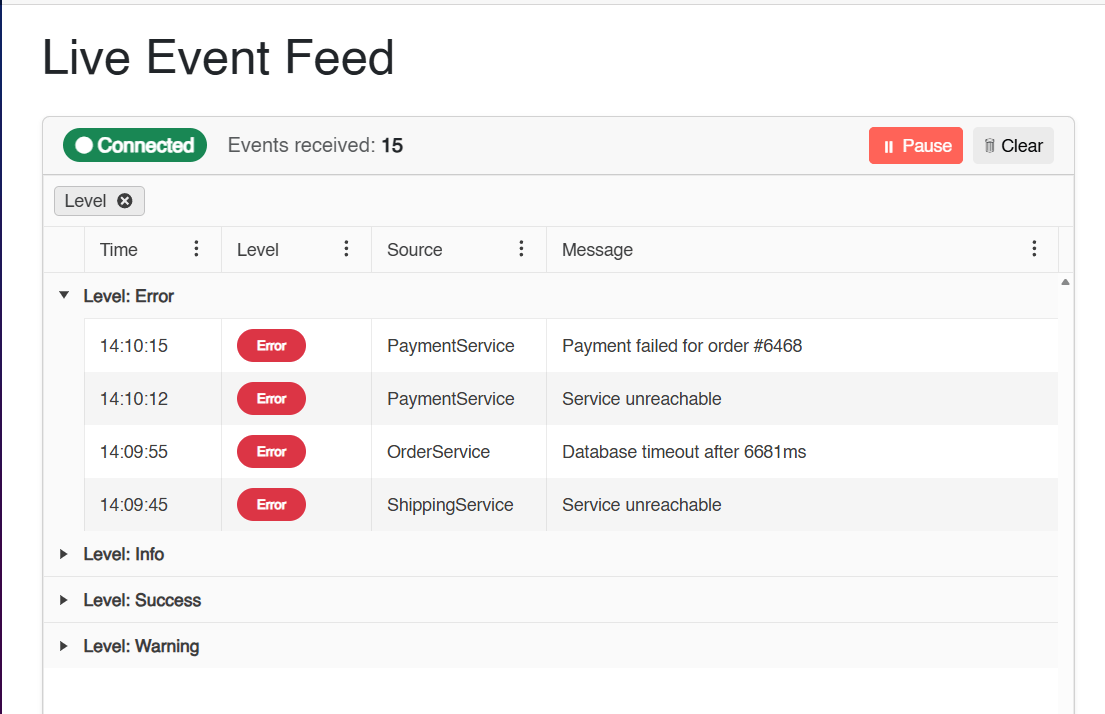
With this we have a nice event viewer that monitors the status of multiple fictitious systems.
Conclusion
Throughout this article you have learned about the SSE standard. You have also seen how changes introduced in .NET 10 help simplify the creation of SSE endpoints, enabling the creation of applications that send real-time events to clients. Now it’s your turn to explore when you might use this web standard in your own projects. See you in the next article!
Try all this yourself with a free 30-day trial of Telerik UI for Blazor.

Héctor Pérez
Héctor Pérez is a Microsoft MVP with more than 10 years of experience in software development. He is an independent consultant, working with business and government clients to achieve their goals. Additionally, he is an author of books and an instructor at El Camino Dev and Devs School.
Related Posts
Comments
All articles
Topics
Web MobileMobile
Desktop
Design
Productivity
People
