
Instantiating Objects and Accessing Properties in Blazor

Summarize with AI:
Learn how to use Blazor’s interop features with JavaScript to handle live C# objects for typeable code.
Blazor is Microsoft’s framework ideal for creating single-page applications (SPAs), complementing the stack for developing applications entirely in .NET. This is why each year we see significant updates in the framework that allows developers to create secure and robust applications. These changes, along with Blazor control suites like the one from Progress Telerik, undoubtedly accelerate the development of complete apps.
In this article, I will tell you about the new interop features with JavaScript, which certainly marks a significant improvement in handling objects from the C# language. Let’s get started!
Understanding the Problem to Solve
Until .NET 10, interoperability with JS was mainly done by invoking JS functions, without being able to directly handle live objects from C# code, which involved creating wrappers and code that could often lead to failures and runtime errors due to syntax errors.
We can get an idea of the above through a practical case. Suppose that in our application, we have a Blazor Data Grid control that allows displaying products from an online store. Each row has a column with a button to show a lightbox popup, where images are displayed. The demonstration code, for you to gain a complete idea, looks as follows.
First, I created a JavaScript file with the necessary functionality to display the lightbox image gallery:
lightboxGallery.js
window.lightboxGallery = {
LightboxGallery: class LightboxGallery {
constructor(imageUrls, startIndex = 0) {
this.images = imageUrls;
this.currentIndex = startIndex;
this.overlayElement = null;
this.keyHandler = null;
}
show() {
this.createOverlay();
this.displayImage();
}
createOverlay() {
if (this.overlayElement) {
this.overlayElement.remove();
}
this.overlayElement = document.createElement('div');
this.overlayElement.className = 'lightbox-overlay';
this.overlayElement.innerHTML = `
<div class="lightbox-container">
<button class="lightbox-close">×</button>
<button class="lightbox-prev">‹</button>
<div class="lightbox-content">
<img class="lightbox-image" src="" alt="Gallery Image">
<div class="lightbox-counter"></div>
</div>
<button class="lightbox-next">›</button>
</div>
`;
document.body.appendChild(this.overlayElement);
this.overlayElement.querySelector('.lightbox-close').addEventListener('click', () => this.close());
this.overlayElement.querySelector('.lightbox-prev').addEventListener('click', () => this.prev());
this.overlayElement.querySelector('.lightbox-next').addEventListener('click', () => this.next());
this.overlayElement.addEventListener('click', (e) => {
if (e.target === this.overlayElement) {
this.close();
}
});
this.keyHandler = (e) => {
if (e.key === 'Escape') this.close();
if (e.key === 'ArrowLeft') this.prev();
if (e.key === 'ArrowRight') this.next();
};
document.addEventListener('keydown', this.keyHandler);
}
displayImage() {
if (!this.overlayElement) return;
const img = this.overlayElement.querySelector('.lightbox-image');
const counter = this.overlayElement.querySelector('.lightbox-counter');
img.src = this.images[this.currentIndex];
counter.textContent = `${this.currentIndex + 1} / ${this.images.length}`;
}
next() {
this.currentIndex = (this.currentIndex + 1) % this.images.length;
this.displayImage();
}
prev() {
this.currentIndex = (this.currentIndex - 1 + this.images.length) % this.images.length;
this.displayImage();
}
close() {
if (this.overlayElement) {
this.overlayElement.remove();
this.overlayElement = null;
}
if (this.keyHandler) {
document.removeEventListener('keydown', this.keyHandler);
this.keyHandler = null;
}
}
getCurrentIndex() {
return this.currentIndex;
}
getImagesLength() {
return this.images.length;
}
}
};
The above code shows the definition of a JS class LightboxGallery with some properties to control the gallery. In addition, methods are also defined to enable interaction with it, such as next, prev, show, etc.
This file needs to be registered in App.razor to be able to use it from the application, as I show you below:
....
<head>
    ...
</head>

<body>
    <Routes @rendermode="InteractiveServer" />
    <ReconnectModal />
    <script src="@Assets["_content/Telerik.UI.for.Blazor/js/telerik-blazor.js"]"></script>
    <script src="@Assets["js/lightboxGallery.js"]"></script>
    <script src="@Assets["_framework/blazor.web.js"]"></script>
</body>

</html>
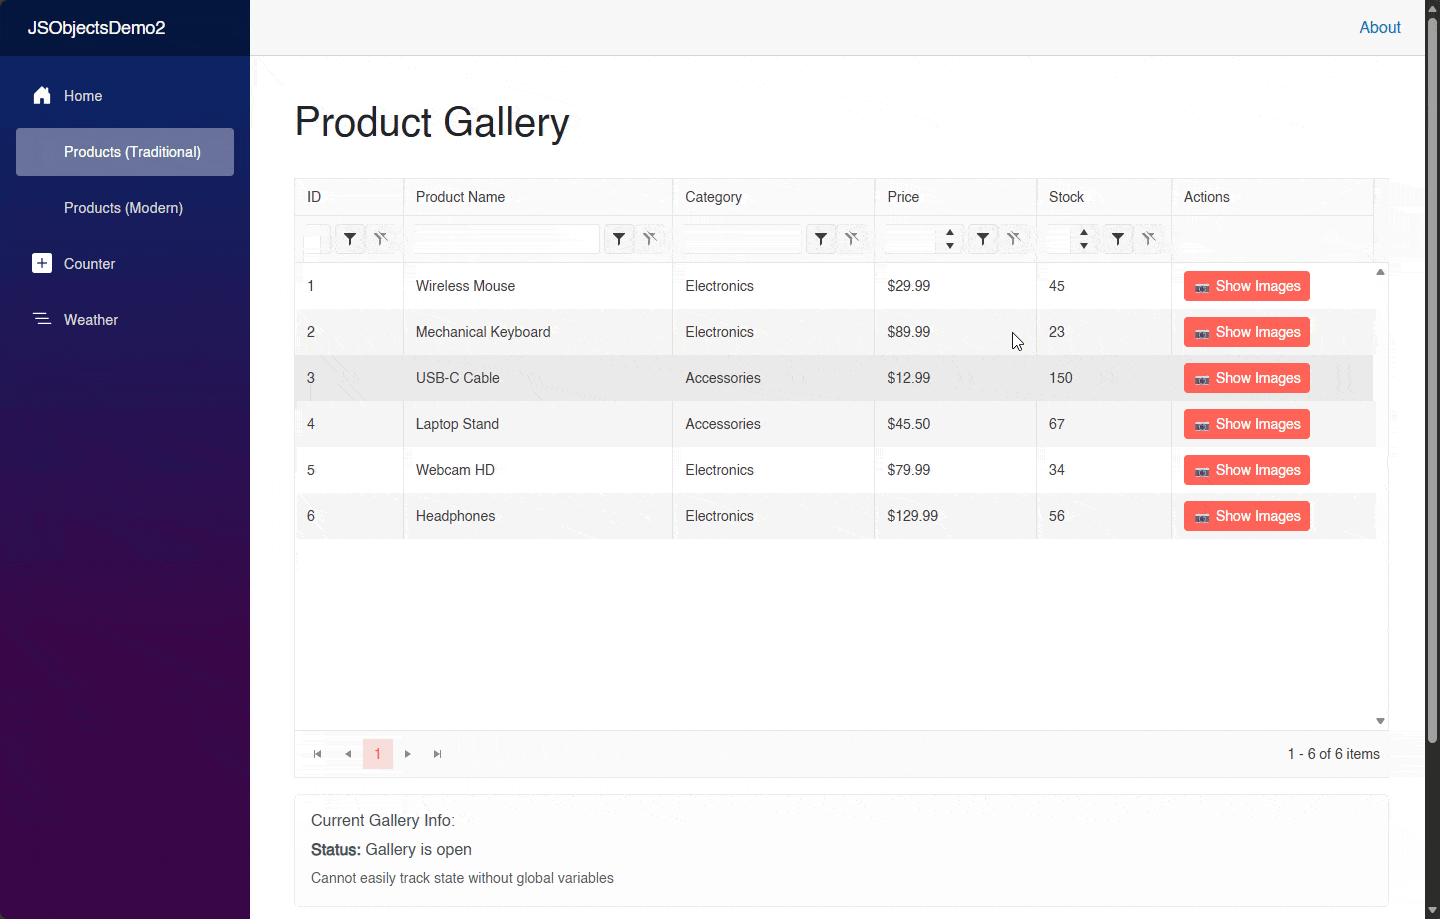
Finally, I created a Razor page where I use the Blazor Data Grid and Blazor Button components to create a quick and functional graphic interface.
@page "/products-traditional"
@inject IJSRuntime JSRuntime

<PageTitle>Products - Traditional JS Interop</PageTitle>

<div class="container-fluid mt-4">
    <div class="row mb-4">
        <div class="col-12">
            <h1 class="display-6">Product Gallery</h1>
        </div>
    </div>

    <div class="row">
        <div class="col-12">
            <TelerikGrid Data="@Products"
                         Pageable="true"
                         PageSize="10"
                         Sortable="true"
                         FilterMode="@GridFilterMode.FilterRow"
                         Resizable="true"
                         Height="600px">
                <GridColumns>
                    <GridColumn Field="@nameof(Product.Id)"
                                Title="ID"
                                Width="80px" />
                    <GridColumn Field="@nameof(Product.Name)"
                                Title="Product Name"
                                Width="200px" />
                    <GridColumn Field="@nameof(Product.Category)"
                                Title="Category"
                                Width="150px" />
                    <GridColumn Field="@nameof(Product.Price)"
                                Title="Price"
                                Width="120px">
                        <Template>
                            @{
                                var product = context as Product;
                                <span>$@product?.Price.ToString("N2")</span>
                            }
                        </Template>
                    </GridColumn>
                    <GridColumn Field="@nameof(Product.Stock)"
                                Title="Stock"
                                Width="100px" />
                    <GridColumn Title="Actions"
                                Width="150px"
                                Filterable="false"
                                Sortable="false">
                        <Template>
                            @{
                                var product = context as Product;
                                <TelerikButton OnClick="@(async () => await ShowImagesTraditional(product))"
                                               ThemeColor="@ThemeConstants.Button.ThemeColor.Primary">
                                    Show Images
                                </TelerikButton>
                            }
                        </Template>
                    </GridColumn>
                </GridColumns>
            </TelerikGrid>
        </div>
    </div>
If we want to invoke the methods from the JS code, there are various ways, although in the following example I show you one of the easiest. To display the gallery, we would use the following code:
private async Task ShowImagesTraditional(Product? product)
{
    if (product == null || product.ImageUrls.Count == 0)
        return;

    var imageUrlsJson = System.Text.Json.JsonSerializer.Serialize(product.ImageUrls);

    // Step 1
    await JSRuntime.InvokeVoidAsync("eval",
        $"window.__tempGallery = new lightboxGallery.LightboxGallery({imageUrlsJson}, 0)");

    // Step 2
    await JSRuntime.InvokeVoidAsync("eval", "window.__tempGallery.show()");

    // Step 3
    var currentIndex = await JSRuntime.InvokeAsync<int>("eval", "window.__tempGallery.currentIndex");

    // Step 4
    var imagesCount = await JSRuntime.InvokeAsync<int>("eval", "window.__tempGallery.images.length");

    // Step 5
    Console.WriteLine($"Traditional: Showing {imagesCount} images, starting at index {currentIndex}");

    isGalleryOpen = true;
    StateHasChanged();
}
Here’s what we do in the above code:
- Step 1: We use eval and global variables in
windowto maintain the reference to the gallery. - Step 2: The method show defined in the class
LightboxGalleryis called. - Step 3: We obtain the
indexof the image from the gallery. - Step 4: The number of images is obtained using
lenght. - Step 5: The results are displayed based on the information obtained.
The same applies to perform operations like navigating forward or backward:
Navigating Forward
await JSRuntime.InvokeVoidAsync("eval", "window.__tempGallery.next()");
Navigating Backward
await JSRuntime.InvokeVoidAsync("eval", "window.__tempGallery.prev()");
Or even to close the gallery:
await JSRuntime.InvokeVoidAsync("eval", "window.__tempGallery.close()");

await JSRuntime.InvokeVoidAsync("eval", "delete window.__tempGallery");
The example being executed looks as follows:
In the previous example, you can notice several problems, starting with the use of eval, which allows executing text as JavaScript code. Although it is an easy way to run code, it poses a danger as it opens the door to code injection. Moreover, it is slow as it cannot be optimized, is difficult to debug and is generally considered a bad practice.
Another problem is the direct use of global variables in window, as there is a risk of collisions with other libraries in the project; there is no management of galleries or lifecycle, plus there is no control over when to destroy it.
A third serious problem is that there can be a memory leak if the object in memory isn’t destroyed since the browser’s garbage collection (GC) cannot collect the reference, leaving listeners and live DOM references.
New JavaScript Interop Features in Blazor 10
We could continue discussing the multiple issues in the example from the previous section, but let’s focus on the new features of Blazor in .NET 10 to address this.
The InvokeConstructorAsync Method
In .NET 10, it is possible to use the method InvokeConstructorAsync, which allows you to invoke a JS constructor asynchronously. This method will execute the new operator and return a type IJSObjectReference. For example, to display a gallery, it would be done as follows:
@code {
    ...
    private IJSObjectReference? galleryInstance;
    private GalleryInfo? currentGalleryInfo;
    ...
    private async Task ShowImagesModern(Product? product)
    {
        if (product == null || product.ImageUrls.Count == 0)
            return;

        try
        {
            if (galleryInstance != null)
            {
                await galleryInstance.DisposeAsync();
            }

            var imageUrls = product.ImageUrls.ToArray();

            // Step 1
            galleryInstance = await JSRuntime.InvokeConstructorAsync(
                "lightboxGallery.LightboxGallery",
                imageUrls,
                0);

            // Step 2
            await galleryInstance.InvokeVoidAsync("show");

            // Step 3
            var currentIndex = await galleryInstance.GetValueAsync<int>("currentIndex");

            // Step 4
            var imagesLength = await galleryInstance.GetValueAsync<int>("images.length");

            //Step 5
            currentGalleryInfo = new GalleryInfo
            {
                CurrentIndex = currentIndex,
                TotalImages = imagesLength
            };

            StateHasChanged();

            Console.WriteLine($"Modern: Showing {imagesLength} images, starting at index {currentIndex}");

        }
        catch (Exception ex)
        {
            Console.WriteLine($"Error showing images: {ex.Message}");
        }
    }
}
In the above code, the exact same steps are followed to display the gallery, but with cleaner code. InvokeConstructorAsync is used to create the object and maintain its reference, which can in turn be used to invoke other methods using the traditional method InvokeVoidAsync. In our example, we invoke the method show defined in the JavaScript class.
To perform other actions, a similar approach is followed:
To advance:
await galleryInstance.InvokeVoidAsync("next");
To go back:
await galleryInstance.InvokeVoidAsync("prev");
To close the gallery:
await galleryInstance.InvokeVoidAsync("close");
currentGalleryInfo = null;
StateHasChanged();
With this new approach, we have a drastic change not only aesthetically but also internally. For example, each component has its own instance, which prevents collisions between them. Additionally, there is a controlled lifecycle with no memory leaks. You may also notice that parameter passing is much simpler and safer.
The GetValueAsync and SetValueAsync Methods
In addition to the method for invoking a JS function constructor, we can also access the values of the instance obtained through the methods GetValueAsync<TValue>(string identifier) and SetValueAsync<TValue>(string identifier, TValue value). A clear example of this can be seen when we obtain the value of the current image and the length for debugging purposes:
// Step 3
var currentIndex = await galleryInstance.GetValueAsync<int>("currentIndex");

// Step 4
var imagesLength = await galleryInstance.GetValueAsync<int>("images.length");

//Step 5
currentGalleryInfo = new GalleryInfo
{
    CurrentIndex = currentIndex,
    TotalImages = imagesLength
};

StateHasChanged();

Console.WriteLine($"Modern: Showing {imagesLength} images, starting at index {currentIndex}");
In the above code, these values are displayed through an Console.WriteLine, but you could perfectly use them to modify other UI elements or to perform operations.
Conclusion
Throughout this article, you have been introduced to the new JavaScript interop features available in .NET 10, which undoubtedly marks an evolution in the way interaction with JS occurs when necessary. It is time to create safer and typeable code in web apps based on Blazor.
Remember, you can try Telerik UI for Blazor free for 30 days:

Héctor Pérez
Héctor Pérez is a Microsoft MVP with more than 10 years of experience in software development. He is an independent consultant, working with business and government clients to achieve their goals. Additionally, he is an author of books and an instructor at El Camino Dev and Devs School.
Related Posts
Comments
All articles
Topics
Web MobileMobile
Desktop
Design
Productivity
People
