
Server-Side Filtering with the Kendo UI for Angular Grid

Summarize with AI:
You can combine the Kendo UI for Angular Grid’s filtering with your own custom code in any combination that you want … and then call a web service to retrieve the data you want as you need it.
In a previous post, I discussed how to filter the rows in the from your application’s code. However, in that post, I also made two “simplifying assumptions”: that all the objects being used by the application were held in a client-side array and that I could ignore the Grid’s own filtering functions.
So, in this post, I’ll look at what happens if I drop those assumptions.
Calling a Web Service
To begin with, the Progress Kendo UI for Angular Grid supports binding directly to a web service.
All you need to do is bind the grid’s data property to an Observable object that’s initialized with a class that extends the React Extension’s BehaviorSubject class (a BehaviorSubject is a kind of
Observable):
<kendo-grid
            [data]="dataObservable | async"
The relevant code looks something like this:
export class FetchDataComponent implements OnInit
{
  public dataObservable: Observable<any>;
  public ngOnInit(): void
  {
     this.dataObservable = this.dataService;
     this.dataService.fetchWebServiceData();
  }
}
export class DataService extends BehaviorSubject<any[]> {
  constructor(private http: HttpClient) {
    super([]);
  }
  ..functions to interact with the Web service…
}
You could do worse than to just copy the dataService object in this post and change the URL to call your web service.
Regardless of where you get the code to call your web service, you’re going to need a web service that can respond to requests from the client that ask for a) the data for the current page and/or b) the data that meets whatever filtering criteria is being applied to the Grid.
Spoiler alert: I’m demonstrating a format for communicating that information to your web service, but I’m not going to discuss that service’s logic.
Configuring the Grid
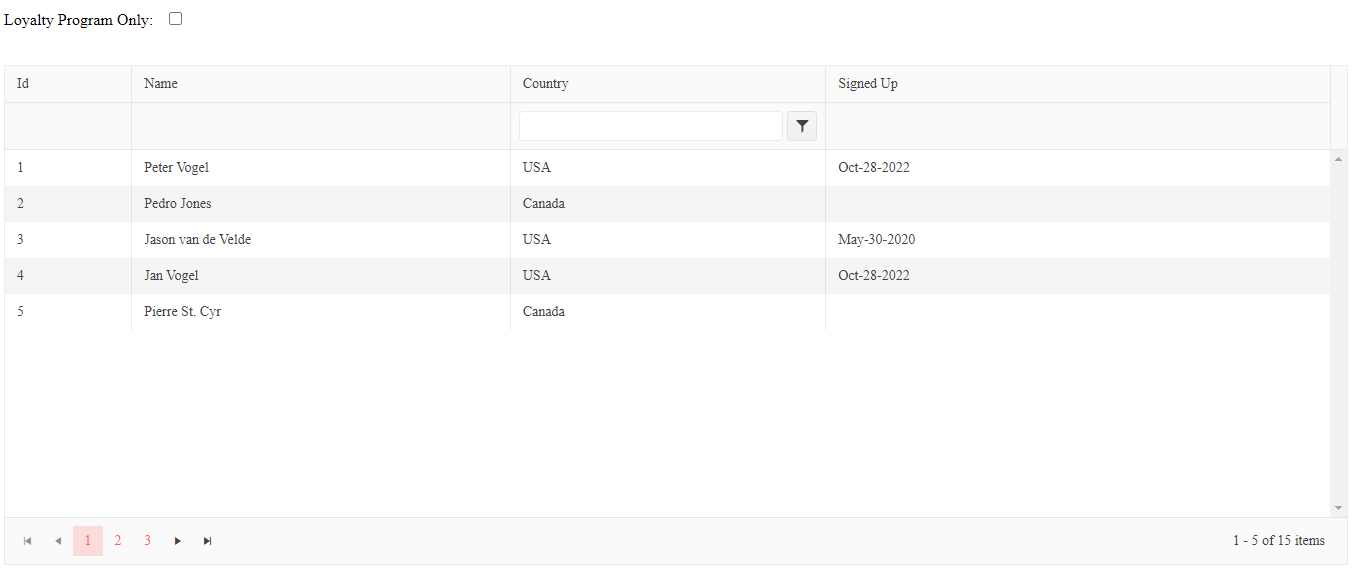
In this case study, my grid is displaying a list of Customer objects. I’ve enabled the Grid’s own filtering capabilities by adding the filterable attribute to the kendo-grid element and to one of the Grid’s columns (the customer’s country). I’ve also included a checkbox in the application’s UI that allows the user to filter the grid results to customers in the company’s loyalty program.
The resulting UI looks like this:
My kendo-grid element (before catching any events) looks like this:
<kendo-grid
         [data]="dataObservable | async"
         [filterable]="true"
          [pageable]="true"
          [pageSize]="10">
            <kendo-grid-column title="Id" field="id" [filterable]="false"
                                                 [width]="50"></kendo-grid-column>
            <kendo-grid-column title="Name" field="custName" [filterable]="false"
                                                  [width]="150"></kendo-grid-column>
            <kendo-grid-column title="Country" field="country"
                                                  [width]="125"></kendo-grid-column>
            <kendo-grid-column title="Signed Up" field="signUpDate" [filterable]="false"
                                                  [width]="200" format="MMM-dd-yyyy"></kendo-grid-column>
</kendo-grid>
Whenever the user uses the Grid’s built-in filtering or just moves to another page in the grid, a dataStateChange event is fired. To capture the dataStateChange event, you need to
add the dataStateChange attribute to the kendo-grid element and set the attribute to some function in your component (you should pass that function the $event placeholder so that when
your function is called at runtime it gets the dataStateChange’s event object).
After that change, my Grid markup would look something like this:
kendo-grid
           [data]="dataObservable | async"
          (dataStateChange)="this.getData($event)"
         …other attributes…
Your function (getData, in my sample), now tied to the DataStateChange event, will be passed the information you need to call your web service in a DataStateChangeEvent object. You’ll need to import the event object’s class:
import {DataStateChangeEvent } from "@progress/kendo-angular-grid";
The skeleton of a function to handle the event would, then, look like this:
public getData(e:DataStateChangeEvent):void
{

}
Handling DataStateChange
The DataStateChangeEvent object has five properties:
- take: The number of rows to fetch from the web service (effectively, the Grid’s pagesize)
- skip: The number of rows already displayed (0 for page 1, 10 for page 2, etc.)
- filter: A CompositeFilterDescriptor that contains zero or more FilterDescriptors or CompositeFilterDescriptors that describe the filters the user has applied to the data (if any)
- sort: A SortDescriptor that describes the sort order the user has applied to the grid (if any)
- group: A GroupDescriptor that describes any grouping that the user has applied to the grid (if any)
Only take and skip are guaranteed to be present—the other three properties are optional (which means that you should always check to make sure they exist before trying to use them).
So now you have to decide how you’re going to pass this information to your web service. Depending on how much control you have over the design of the service, you can use the Telerik toDataSourceRequestString to convert the event object passed to your DataStateChange function to a query string (you can import the function from @progress/kendo-data-query).
Adding the code to create the querystring to your function would look something like this:
getData(e:DataStateChangeEvent):void
{
     const querystring:string = toDataSourceRequestString(e);
}
As an example of what you get from the toDataSourceRequestString: If the user is on the second page of the grid (and the grid has a pagesize of 10) and sets the Grid’s country filter to “canada” then the querystring generated from the event object would be “filter=country~contains~'canada'&page=1&pageSize=10.”
If this isn’t a format that your web service can process, then you’ll have to write your own code to analyze the event object and create a request your web service will understand. I’ll point out here, though, that while it’s a shame the querystring isn’t in an OData format, it is—amazingly!—in a format that’s compatible with both Telerik UI for ASP.NET MVC and UI for ASP.NET Core objects.
Integrating Custom Filtering
However, so far, I’ve ignored my checkbox sitting outside of the Grid’s own filters. As I discussed in my earlier article, the easiest way to handle that checkbox (or any other filtering criteria outside of the Grid’s own filters) is to create a FilterDescriptor every time the user interacts with the checkbox.
If you’ve implemented that solution, then all you need to do when the user takes advantage of the Grid’s filtering ability is grab the custom FilterDescriptor that you’ve created and add it to the filters collection passed into the event object. Once you’ve done that, you can generate the query string and trigger a call to your web service.
The only real wrinkle is that you have to remove your custom FilterDescriptor when you’re done. The Grid “remembers” filter conditions and, if you don’t remove your custom filter, your custom filter will multiply over time. I recommend adding your custom FilterDescriptor to the end of the filters array so it’s easy to remove.
Putting that all together, a typical DataStateChange function would look like this:
savedFilters: (FilterDescriptor | CompositeFilterDescriptor)[] = [];
getData(e:DataStateChangeEvent):void
  {
    if (e.filter == null || e.filter == undefined)
    {
      e.filter = {filters:[], logic:"and"};
    }

    e.filter.filters.push(this.loyaltyFilter);
    const querystring:string = toDataSourceRequestString(e);
    e.filter.filters.splice(e.filter.filters.length-1,1);
   dataService.fetchWebServiceData(querystring);

    this.savedFilters = e.filter.filters;
}
Triggering Custom Fetches
You’ll notice that, in that sample function, I’ve saved the Grid’s filters into a property (cleverly called savedFilters). I’ve done this so that I can trigger filtering when the user clicks the
checkbox in my application’s UI. In that checkbox’s change function, I need to add the Grid’s current filters to my custom filter before fetching any data.
In the solution in my previous post, the function called from the checkbox’s changed event builds a custom FilterDescriptor and then uses it to filter a client-side array. To have that work with server-side filtering, I just need to stuff all my filters into an array of FilterDescriptors, generate a querystring from it, and then call my web service, passing the querystring.
In this example, I first build an array of filters from my savedFilters array and then add my customer filter to it:
…existing code…
const dfilters:(FilterDescriptor | CompositeFilterDescriptor)[] = [];
this.savedFilters.forEach(f => dfilters.push(f));
dfilters.push(this.loyaltyFilter);
I can then use that array to create a temporary equivalent to the DataStateChangeEvent object and generate a querystring from it:
const querystring:string = toDataSourceRequestString(
                             {take:10, skip:0, filter:{ logic:"and", filters:dfilters } });
dataService.fetchWebServiceData(querystring);
And (after all that), you can now let the user take advantage of the filtering features in the Grid’s own UI, take control of filtering with your own code, or use some combination of the two strategies. Really, it’s whatever makes you happy.
Next up:

Peter Vogel
Peter Vogel is both the author of the Coding Azure series and the instructor for Coding Azure in the Classroom. Peter’s company provides full-stack development from UX design through object modeling to database design. Peter holds multiple certifications in Azure administration, architecture, development and security and is a Microsoft Certified Trainer.
Related Posts
Comments
All articles
Topics
Web MobileMobile
Desktop
Design
Productivity
People
