An Introduction to Firebase Cloud Tasks

Summarize with AI:
Learn about Task Queue Functions that automatically leverage Google’s Cloud Task API in a Firebase project.
Queues play an important role in building performant and scalable applications. They make it possible to avoid congestion in systems by streaming tasks or jobs from a producer to a consumer. Producers are just entities that add the jobs/tasks to the queue, and jobs are typically some JSON data. The worker/consumer is just a function whose job is to process the added jobs or tasks in a controlled manner without being overwhelmed.
Firebase Cloud Functions is a serverless offering by Google that allows developers to focus on writing functions without worrying about the servers they run on. When these functions are written, they can be called via HTTP like a regular web server endpoint, and they can be made to run immediately or in the background when an event happens on some resource/service. For example, when something is added to the database, or when a new file is uploaded to a storage bucket, etc.
This guide will explore one type of Cloud function called Task Queue Functions that automatically leverage Google’s Cloud Tasks API. This is an API that makes it easy for us to use queues. Our use case will be a simple ecommerce app that needs to send emails to users. After processing dummy orders, we will store email-sending requests in a queue and add workers function to send actual emails to the user’s inbox. We will explore the options that can be used to enqueue tasks to the queue.
Prerequisites
To follow along with this guide, it is assumed you understand Firebase and are familiar with JavaScript and comfortable with basic TypeScript.
Google Cloud Tasks API and Task Queue Functions
Let’s briefly describe the Cloud Tasks API and where task queue functions come in. The idea here is to see how these two are related and how they are intended to be used.
The Cloud Tasks API is based on four core constructs: queues, tasks/jobs, handlers/workers and targets.
The queue holds the task. The task is some data, typically a plain JavaScript object. The handler/worker is the function that completes the task. The target refers to the environment where the worker runs. A task is added by making an HTTP request to the Cloud Tasks API, which adds it to the queue, after which the task is then dispatched to the worker to handle it.
The essence of this API is to make it budget-friendly and easy for developers to offload resource-intensive background tasks to queues and then connect worker functions that will process or handle the tasks in the queue. The use case for this API is best suited strictly for tasks that need to be done in the background and do not require immediate results from processing that task. Make sure that your use case fits into this area before using the API.
Some examples of such tasks include:
- Sending emails
- Updating analytics
- Coordinated access to a third party that is rate-limited
While the basic explanation of this API sounds simple, there are some caveats to note. First, even though directly interacting with the Cloud Tasks API allows for more dynamism and supports many use cases, using and understanding all its moving parts can be challenging for a new developer who just wants to have everything working.
The Cloud Tasks API is structured so that when queues are created, the developer has to create the environment (target) separately and add the worker function that will process tasks that will be added to the queue. In some cases, this may also need to handle scaling of the workers under intense workloads. Task functions simplify this.
Task functions are cloud functions that make it easy for the developer to write a worker function and declaratively write the settings for the queue. Under the hood, Firebase takes care of the rest. It interacts with the Cloud Tasks API, creates the queue and connects the worker function to it. It also handles all the scaling related logic so that enough worker functions are spawned when necessary and killed with little or no effort by the developer.
What We Will Be Building
Our mini-application will be a simple ecommerce app that needs to send users emails after processing their order. For this, we will be defining two cloud functions.
First, we will start with the main task queue function, which will manage the queue containing the email-sending tasks. We will add the worker function, which will send emails using EmailJS. Then, we will test our task queue function locally by calling it via HTTP.
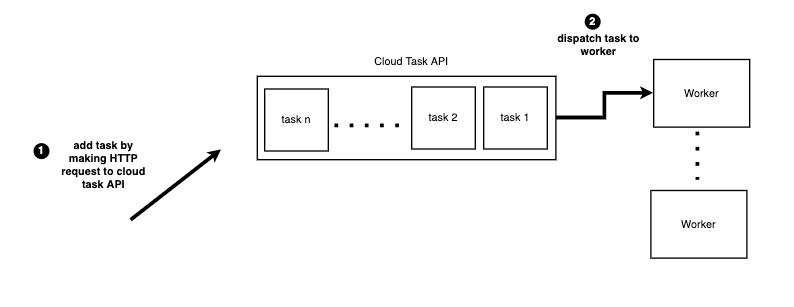
Next, to make our setup feel more like a real-world app, we will create another cloud function, which will be a regular user-facing HTTP endpoint that simulates a simple order processing endpoint. This function will not do anything fancy here; we will just show how to queue email-sending tasks from this function and trigger the task queue function’s worker to execute the task.

We will deploy both functions to a live URL and go over how to expose them in production via HTTP endpoints. We will test all endpoints during development or production.
Project Setup
Let’s put everything we will need in place before we begin. We will be doing three things mainly:
- Setting up a Firebase project
- Setting up cloud functions locally using the Firebase project
- Setting up EmailJS for sending emails
Create a Firebase Project
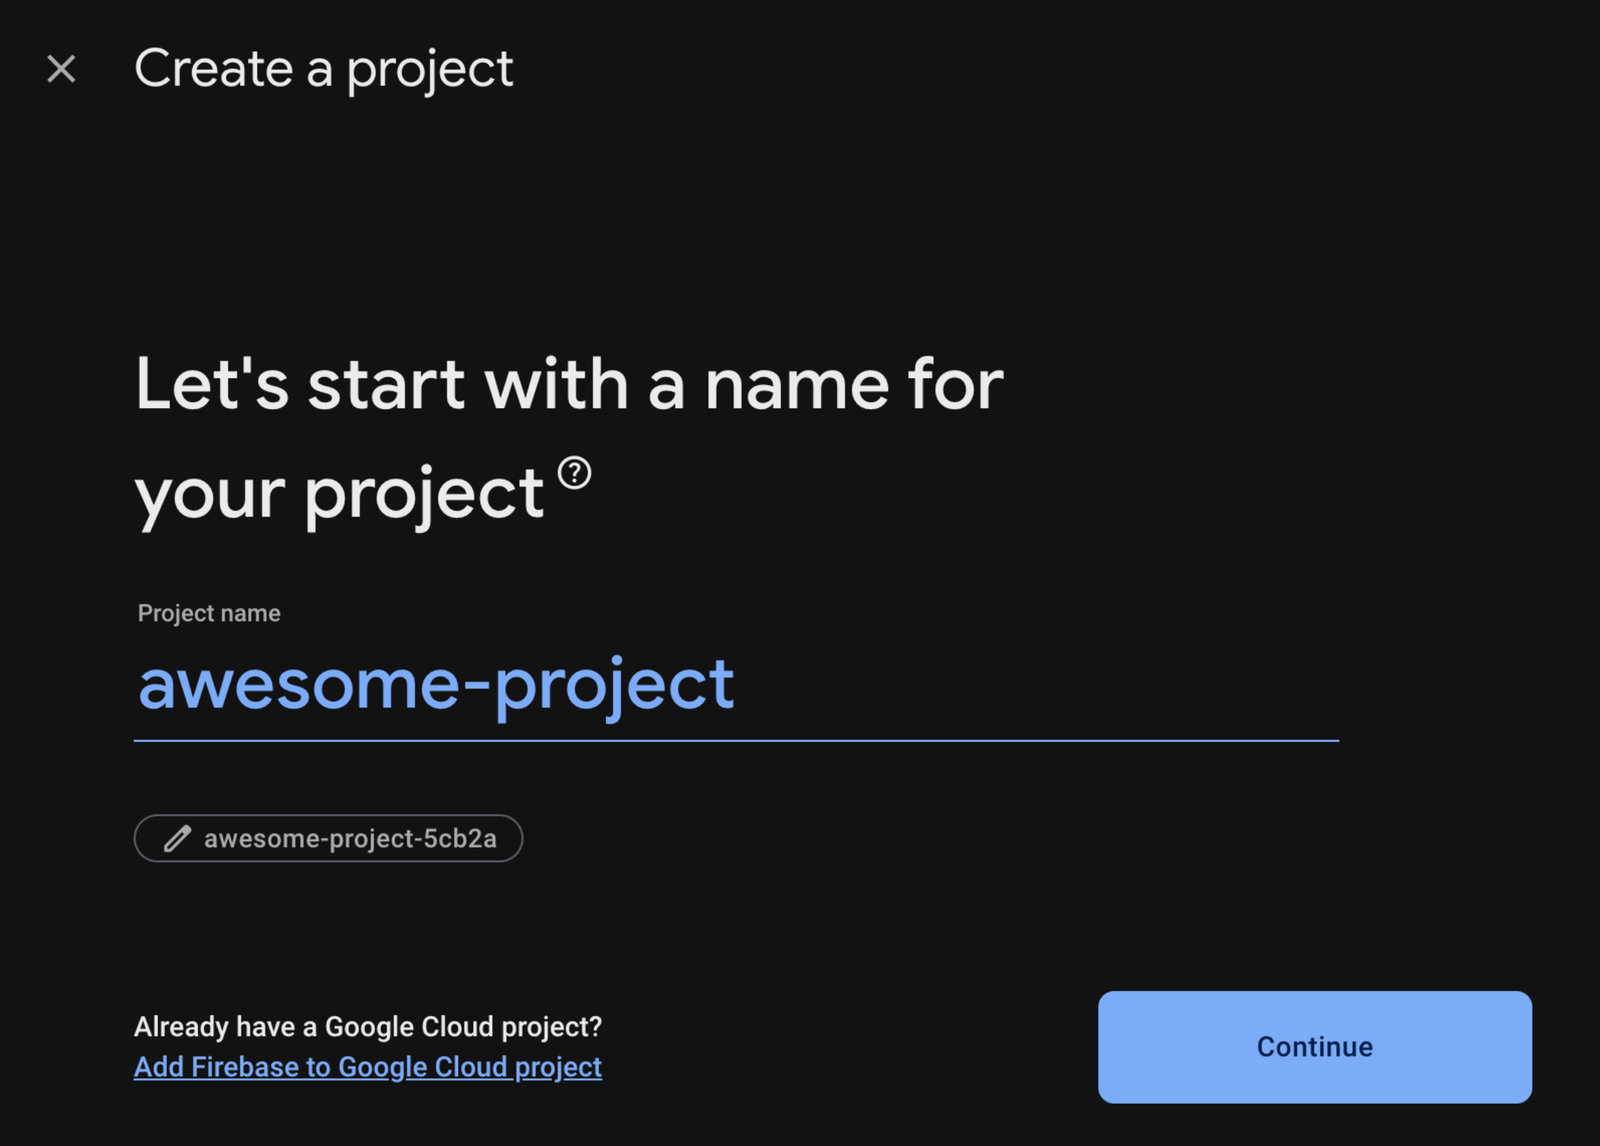
Visit the Firebase console to create a project. Give your project a name. As shown below, I’m calling mine “awesome project”.
If you plan to follow this guide and only test locally, you can omit this step. However, since we plan to deploy our cloud functions and use the Cloud Tasks API, we need to enable billing on the Firebase project we just created.
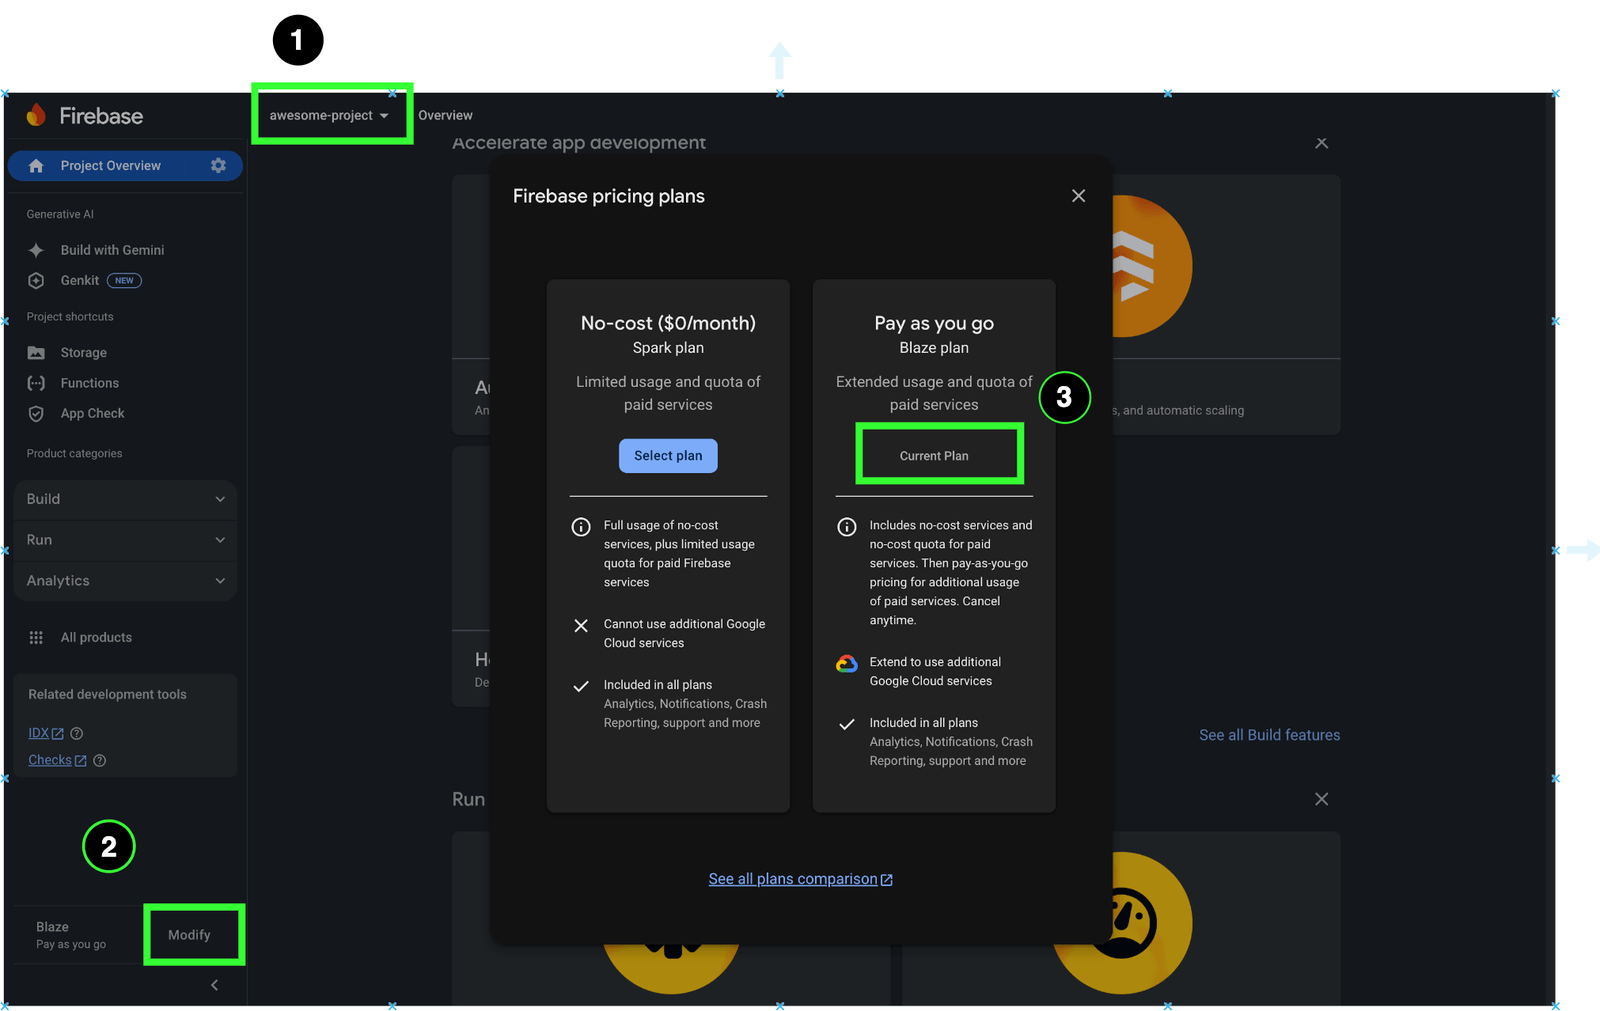
You get up to one million free calls when using the Cloud Tasks API, so feel free to add a billing account.
Initialize Cloud Functions from the Firebase Project
Now, let’s set up a cloud functions project locally. We will start by installing the required Firebase tools needed to do this.
If you have Node.js installed on your system, open your terminal and run this command:
npm install -g firebase-tools
Next, you need to authenticate by running firebase login. Then, you can create a directory of your choice on your device by running mkdir cloud-tasks && cd cloud-tasks.
Then, initialize your project by running firebase init. In the prompt, select the features you want to add to your project. Select cloud functions and emulators. Emulators allow you to test the project locally.
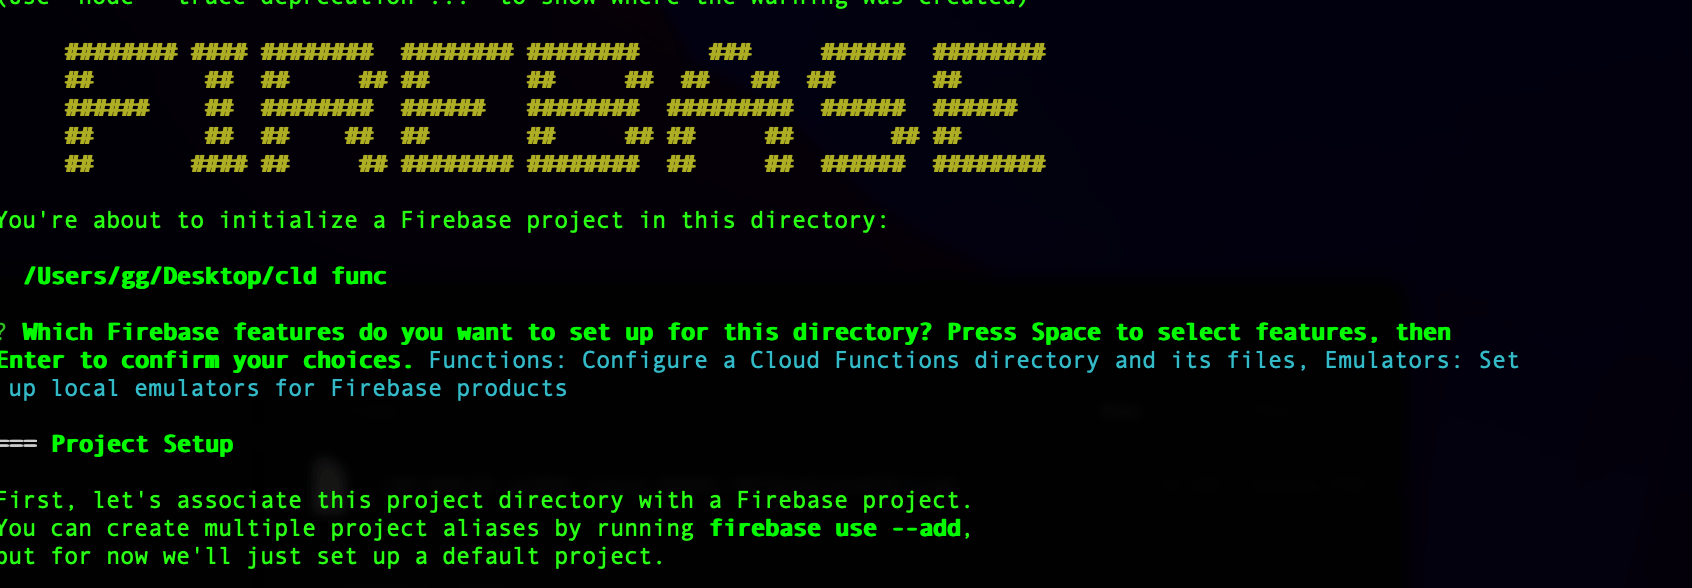
Next, let’s choose the Firebase project we created on the authenticated account and connect it to our local setup.

We will write our functions in TypeScript and use cloud tasks and functions. We will only choose their respective emulators since that is what we will need.
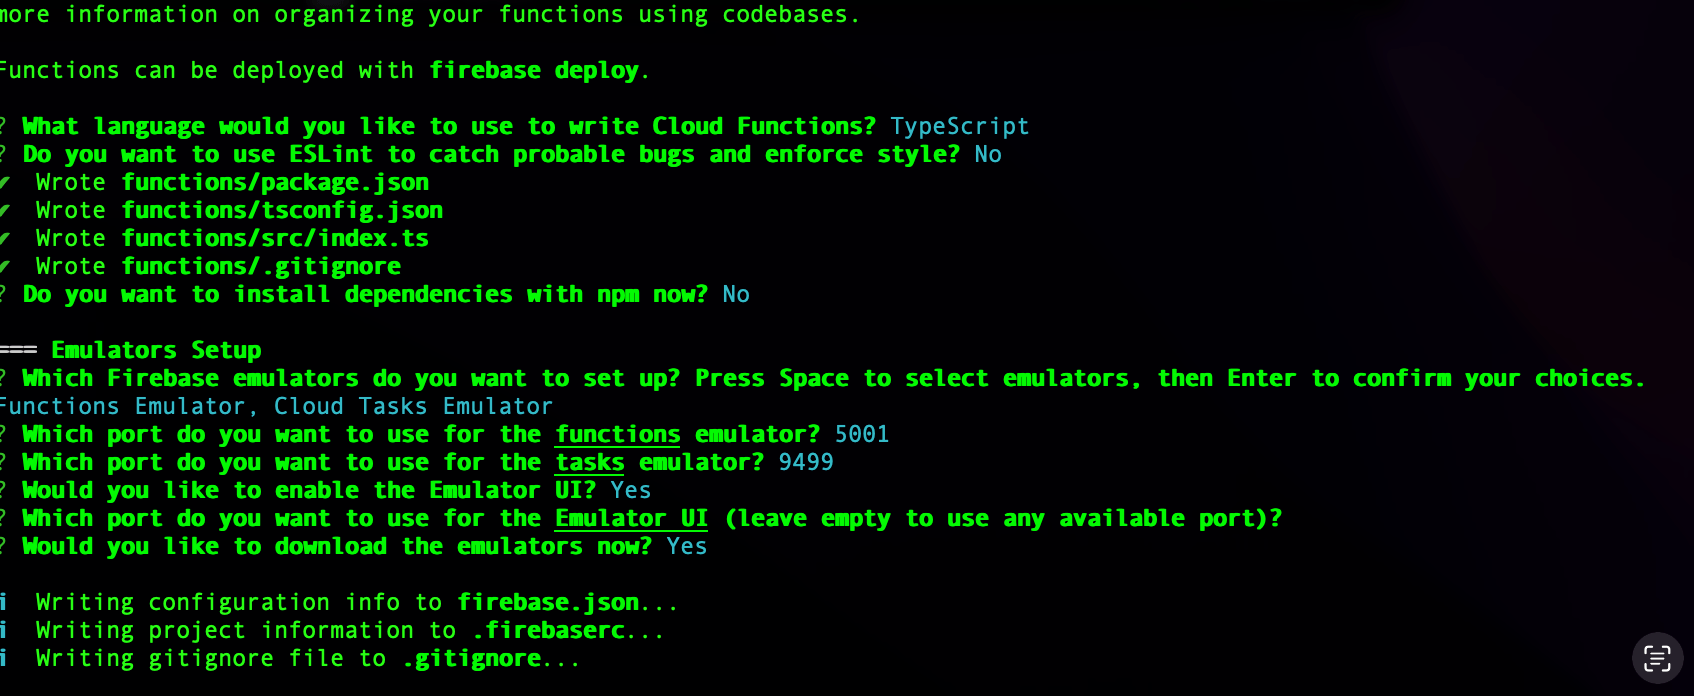
If everything is done correctly, your project setup should look like this:
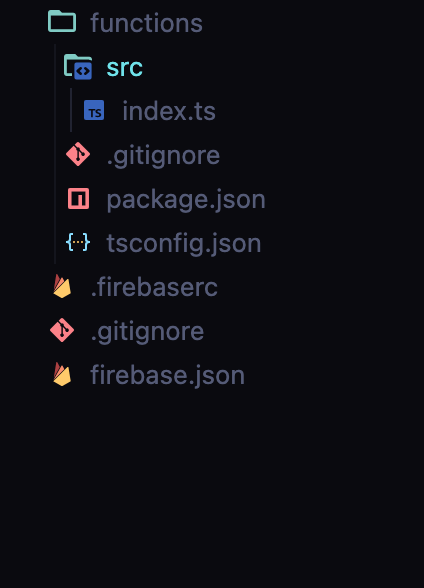
Next, run the following command to install the dependencies for our Cloud Functions project.
cd functions
npm install
As of the time of writing, it is important to note that Cloud Functions are compatible when testing locally and in production for Node.js versions 18 through 20. However, Node.js 22 is only supported for previewing the project when testing locally. If you get an error about your Node version when running the command above, and you are using Node.js 22, you can update the engines property in your functions/package.json file.
// Update the engines property from this:
"engines": {
        "node": "18"
    },

//to this:
    "engines": {
        "node": "22"
    },
Set Up EmailJS for Emails
EmailJS is a service that makes it easy to send emails directly from a client or serverside app. Visit the EmailJS website and create an account. Then, on the dashboard, set up a service.
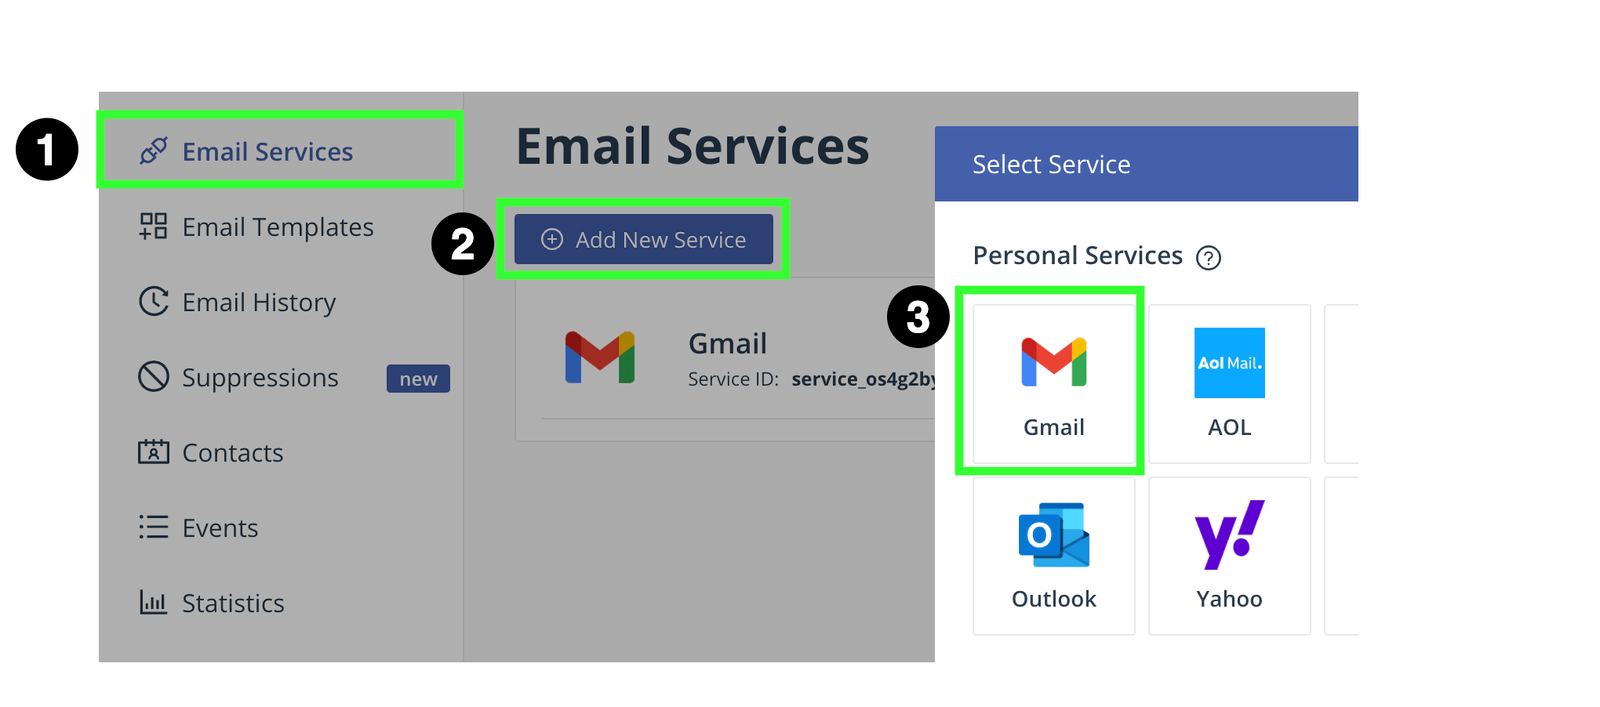
We can use the Gmail service since emails will be sent from a personal account. Feel free to select any service of your choice. Once you have created a service, it will be displayed in the services list. Take note of the Service ID.

Next, we need to create an email template. In the Email Templates section, click Create New Template.

Our template will take four parameters that are quite intuitive.
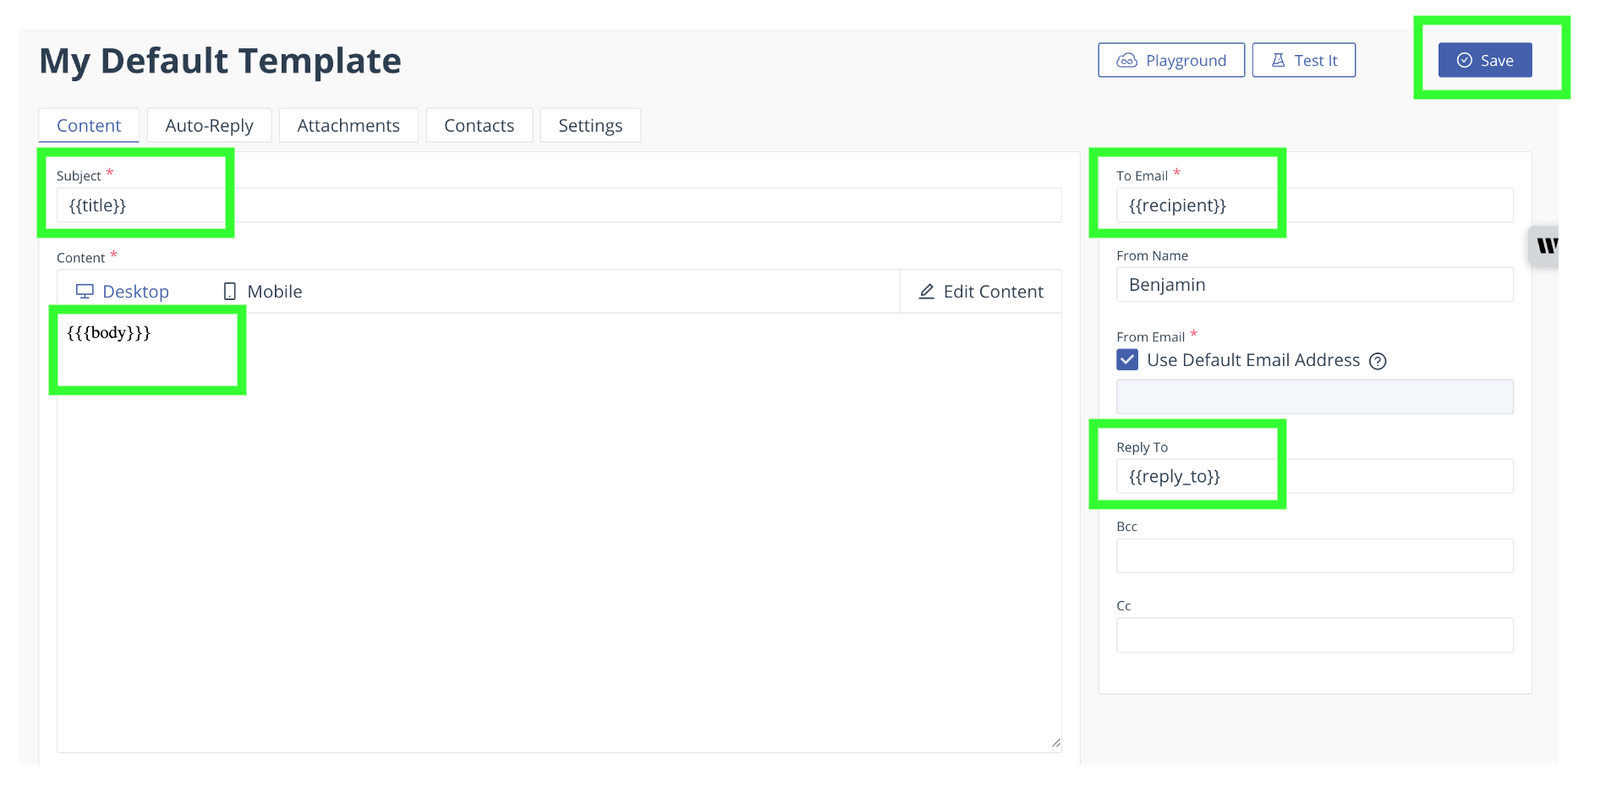
Here are some of them:
title: The title of the emailbody: The raw HTML representing the body of the email. Notice it’s wrapped in 3 braces, i.e.,{{{body}}}recipient: The email address of the receiver
Once you are done, save the template. You should see the newly created template, as shown below. Make sure you take note of the template ID.

Finally, we need to get our API keys. You can retrieve them in the Account section.
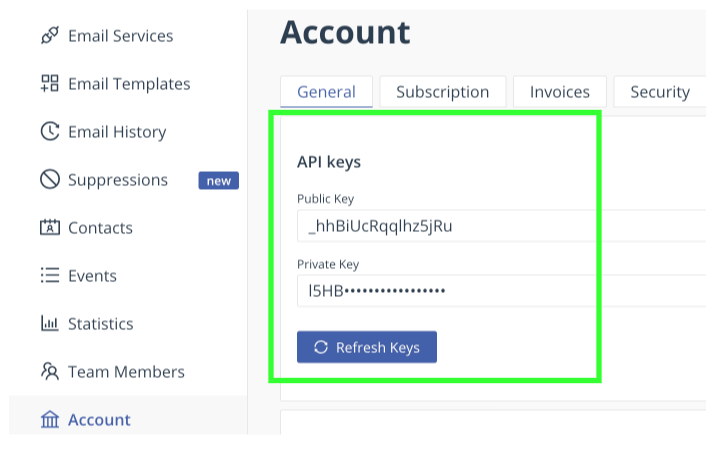
In the functions folder of the project, create a .env file and add the following to it:
GMAIL_SERVICE_ID = ENTER - EMAILJS - SERVICE - ID;
EMAIL_SERVICE_PRIVATE_KEY = ENTER - EMAILJS - PRIVATE - KEY;
EMAIL_SERVICE_PUBLIC_KEY = ENTER - EMAILJS - PUBLIC - KEY;
Since we will be making HTTP requests to the EmailJS server, we will also need Axios. From the functions directory, run the following command in your terminal:
npm i axios
Add Task Queue Function for Sending Emails
Add the following to your functions/src/index.ts file:
import { onTaskDispatched, Request } from "firebase-functions/tasks";
import axios from "axios";
import { initializeApp } from "firebase-admin/app";
initializeApp();

type notificationTask = {
  recipients: string[];
  title: string;
  body: string;
};
exports.handleNotification = onTaskDispatched(
  {
    retryConfig: {
      maxAttempts: 2,
      minBackoffSeconds: 30,
    },
    rateLimits: {
      maxConcurrentDispatches: 5,
    },
  },
  async (req: Request<notificationTask>) => {
    const data = req.data;
    await sendEmail("template_tz98ape", {
      title: data.title,
      body: data.body,
      recipient: data.recipients[0],
    });
    return;
  }
);
async function sendEmail(templateId: string, params: any) {
  await axios.post("https://api.emailjs.com/api/v1.0/email/send", {
    service_id: process.env.GMAIL_SERVICE_ID,
    template_id: templateId,
    template_params: params,
    accessToken: process.env.EMAIL_SERVICE_PRIVATE_KEY,
    user_id: process.env.EMAIL_SERVICE_PUBLIC_KEY,
  });
  return true;
}
In the code above, we use initializeApp to set up the Cloud Functions project using the Firebase project we linked to it earlier. This function has to be called first before any other code. Every project has a default service account that allows the app to access one or more resources, and this call verifies that our application is ready to interface with the cloud.
Next, we called our task queue function handleNotification. Task queue functions are created using the onDispatch function, which expects two parameters: the first is an object that allows us to declaratively specify how we want to configure the queue and its behavior, and the second is the actual worker function.
For the queue options, we use its retryConfig property and specify that each task in the queue should be retried a maximum of two times if it fails. We also specified that each time it fails, there should be a delay of 30 seconds before trying it again.
We also specified that if many tasks are in the queue, at least five should be processed at once. This means that, at most, five instances of the worker function should be spawned in those situations.
The worker function is the second parameter passed to the onDispatch function. Worker functions only accept a request object. Since they are not meant to return a response, each time a worker function is called, the task payload is contained in the request’s body. In our case, our notification task payload type looks like this:
type notificationTask = {
  recipients: string[];
  title: string;
  body: string;
};
It is retrieved from the request body and then used to invoke the sendEmail function to send the email.
You can create and configure powerful customized queues with task queue functions with just a few lines of code and get things to work.
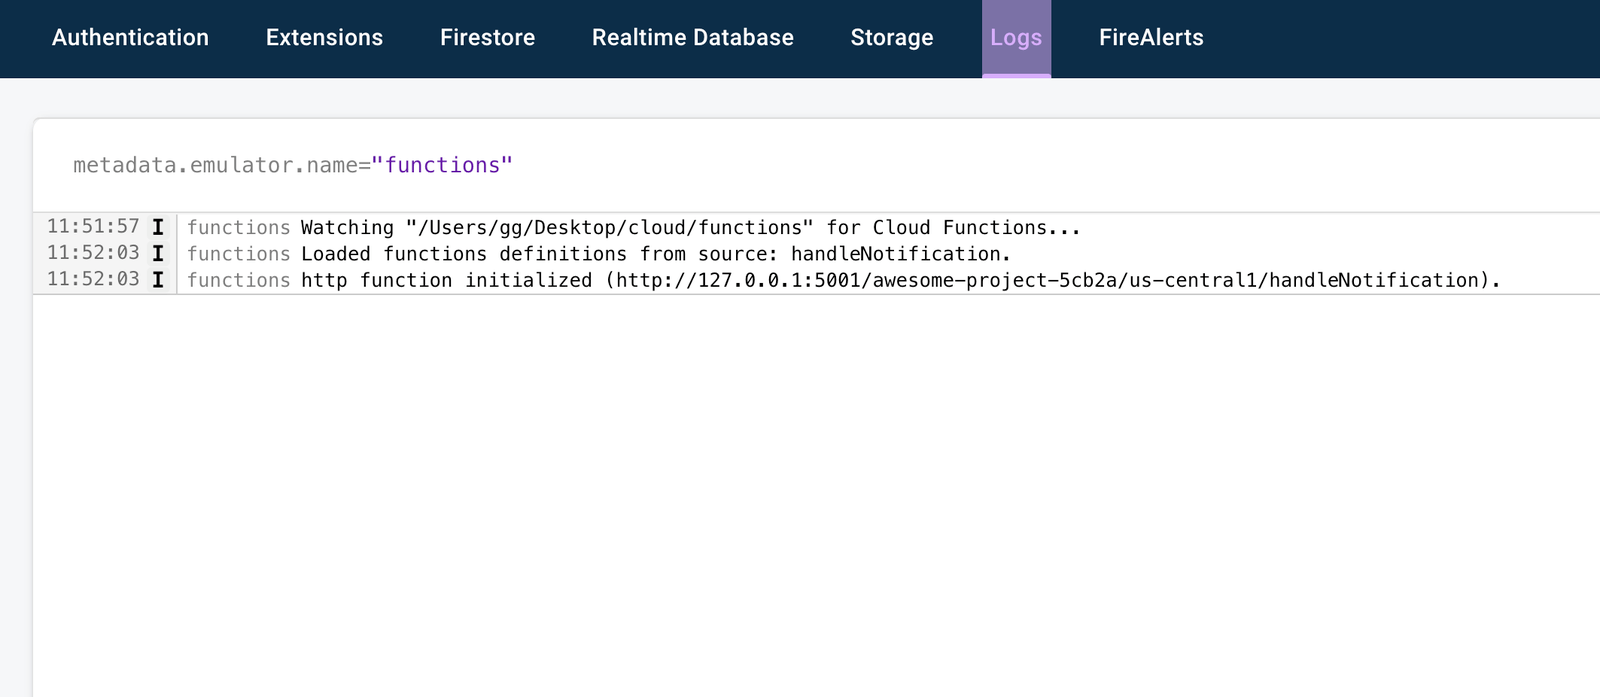
To test our function, run npm run serve, then head over to localhost:4000. In the logs tab, you should see that our handleNotification task queue function is initialized and ready to be called.
Now, let’s add a task to our queue and then trigger the worker function in Progress Telerik Fiddler Everywhere.
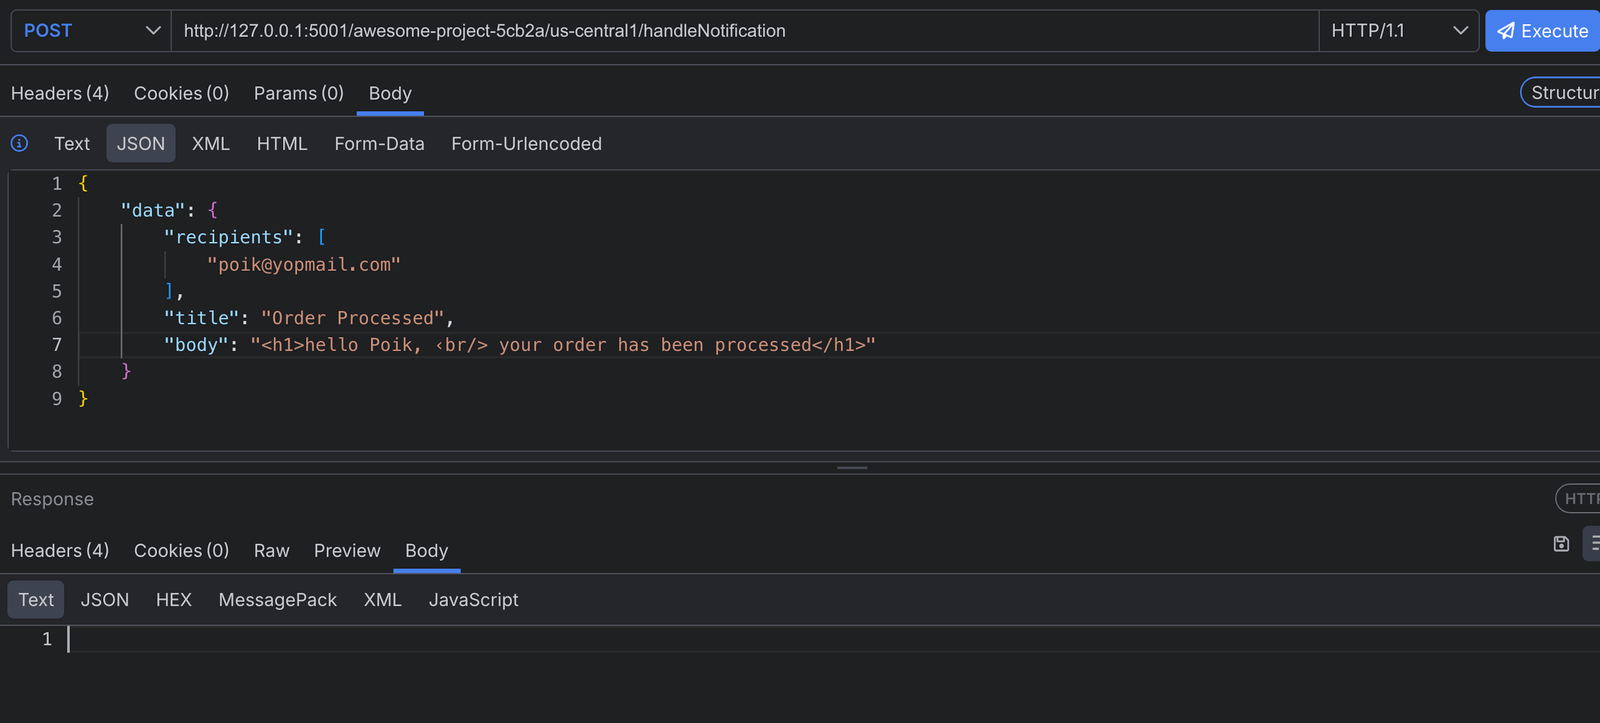
To avoid errors, when adding a task, the request body must contain a data property that holds the contents of the task. In our case, we added our notification task payload. When we make the request, we add the task to the queue via the Cloud Tasks API, and we get back the 204 response.
Later, the Cloud Tasks API will dispatch the task to the worker function to run it. This makes the response time short since the call has no business with the worker directly.
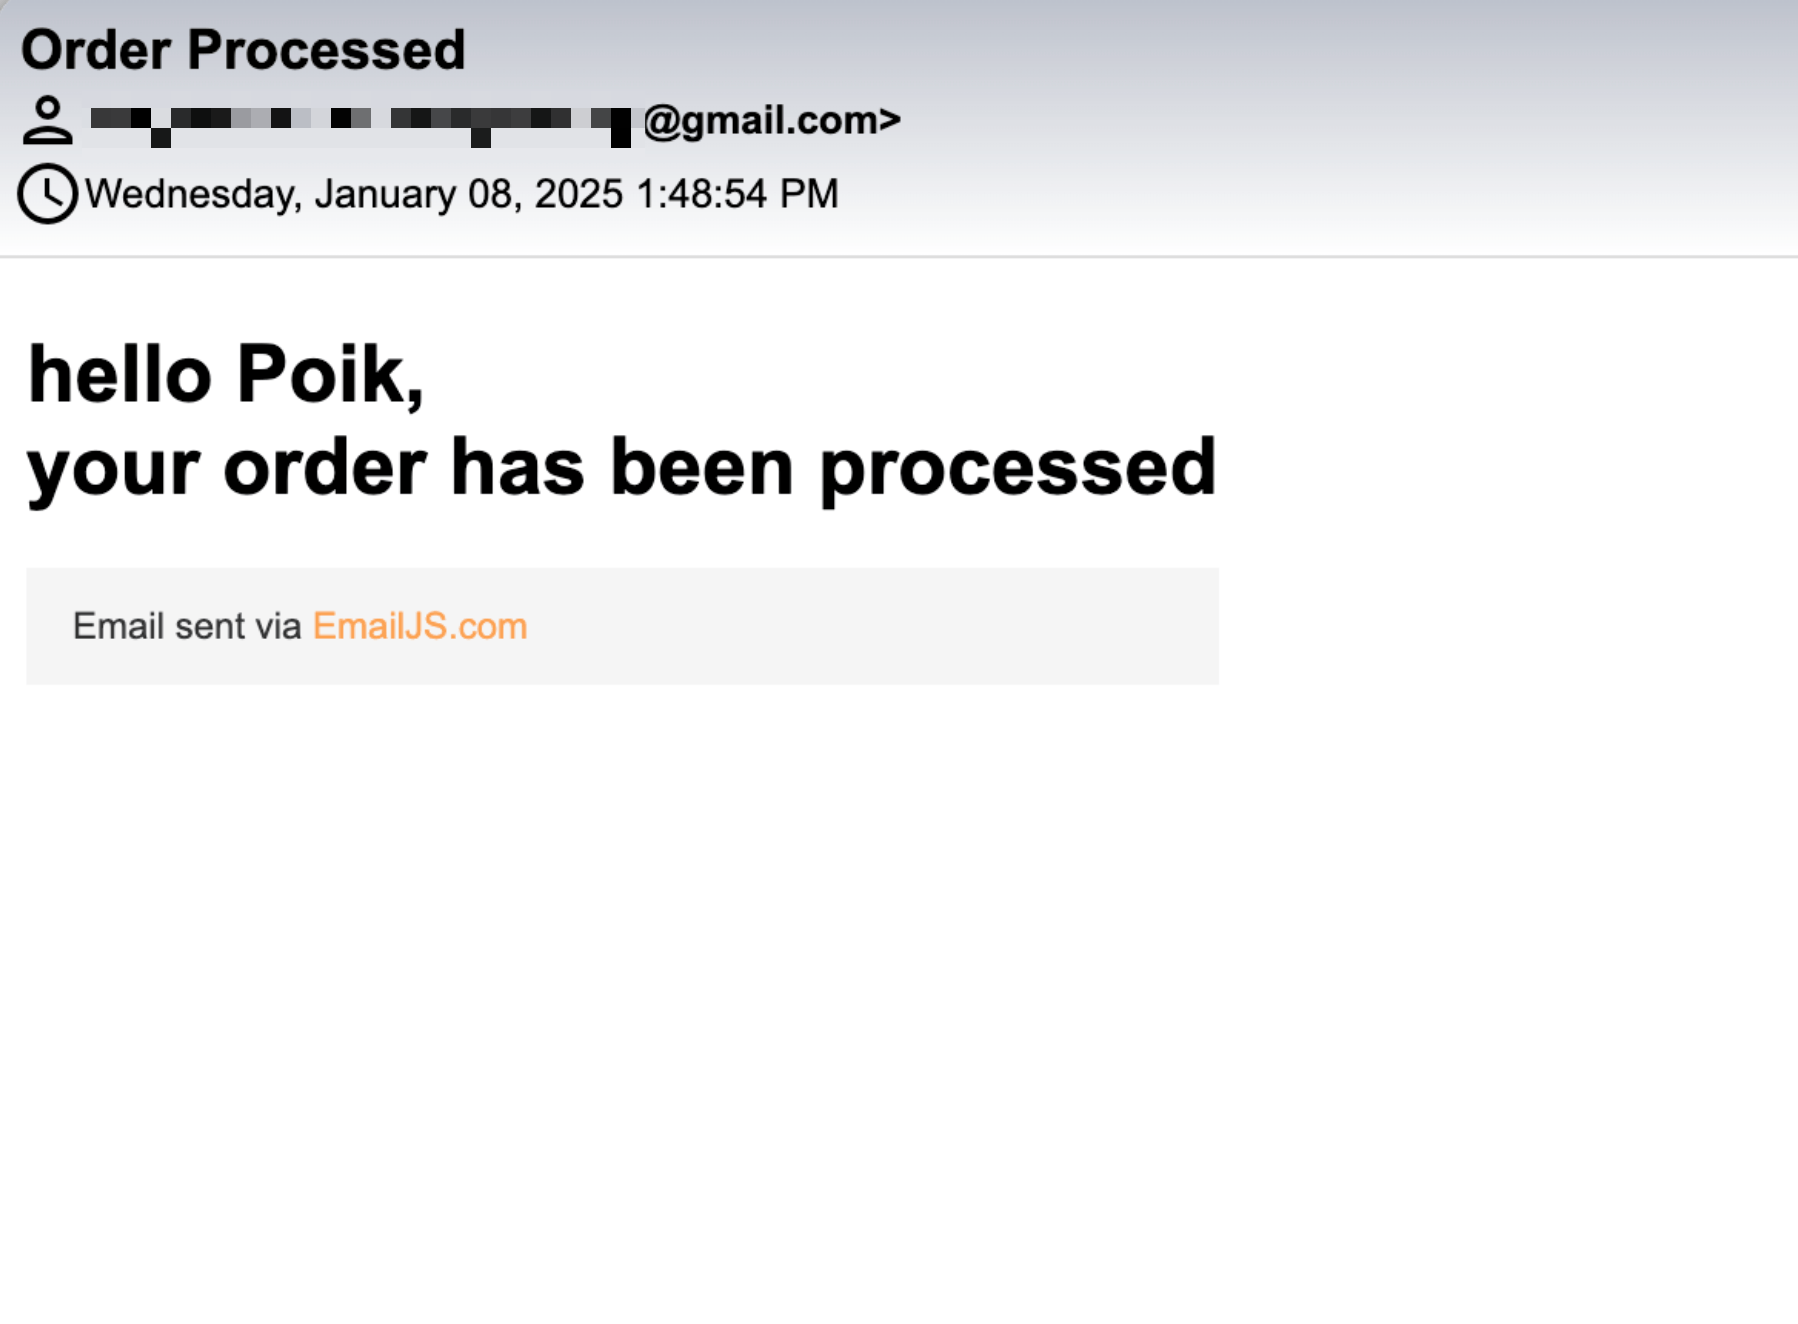
Upon successful execution of the worker, when we check the user’s inbox we should see the email as shown below.
Enqueueing Tasks from Another Cloud Function
We have been able to explore task queue functions, but we are still missing one thing—adding practicality to their usage. In this section, we will be looking at the following:
- In a real-world app like our dummy ecommerce app, email sending typically happens after an order has been processed, so it is common for us to queue notification tasks from a separate function.
- For security reasons and because we know the task producers, we may not want to expose an endpoint that can be called directly to add tasks to the task queue, as we did in Fiddler.
In view of all this, we will define another simple Cloud Function to process orders. It will simply interact with the Cloud Tasks API and enqueue a notification task. Let’s now update our functions/scr/index.ts file with the following:
import { onRequest } from "firebase-functions/v2/https";
import { onTaskDispatched, Request } from "firebase-functions/tasks";
import axios from "axios";
import { getFunctions } from "firebase-admin/functions";
import { initializeApp } from "firebase-admin/app";
initializeApp();
// Start writing functions
// https://firebase.google.com/docs/functions/typescript
type notificationTask = {
  recipients: string[];
  title: string;
  body: string;
};

exports.handleNotification = onTaskDispatched(
  {
    //... queue options
  },
  async (req: Request<notificationTask>) => {
    //....
  }
);
async function sendEmail(templateId: string, params: any) {
  //....
}
type order = {
  order_id: string;
  order_date: string;
  customer: {
    customer_id: string;
    name: string;
    email: string;
  };
  items: {
    item_id: string;
    name: string;
    quantity: number;
    price_per_unit: number;
    subtotal: number;
  }[];
  payment: {
    payment_id: string;
    method: string;
    status: string;
    amount: number;
    currency: string;
    transaction_id: string;
  };
  order_status: string;
  notes: string;
};
export const processOrder = onRequest(async (request, response) => {
  const order: order = request.body;
  const queue = getFunctions().taskQueue("handleNotification");
  const notification: notificationTask = {
    recipients: [order.customer.email],
    title: "order processed succussfully",
    body: `<h2>dear ${order.customer.name} , your order has been processed successfully</h2>`,
  };
  queue.enqueue(notification, {
    scheduleDelaySeconds: 5,
  });
  response.json({
    message: "order processed successfully!",
  });
});
We defined an HTTP function called processOrder using the onRequest function from the firebase-functions library. Our HTTP function simulates a dummy endpoint that expects an order as a payload. Using getFunctions().taskQueue("handleNotification"), the reference to the handleNotification queue is retrieved. It constructs a notification task and then enqueues it to the task queue using its enqueue method.
When using enqueue, we pass two arguments: the task and a configuration on the task. In our case, we just set a delay of 5 seconds. There are many things that can be configured here; for example, you can specify the exact time you want the task to run, etc.
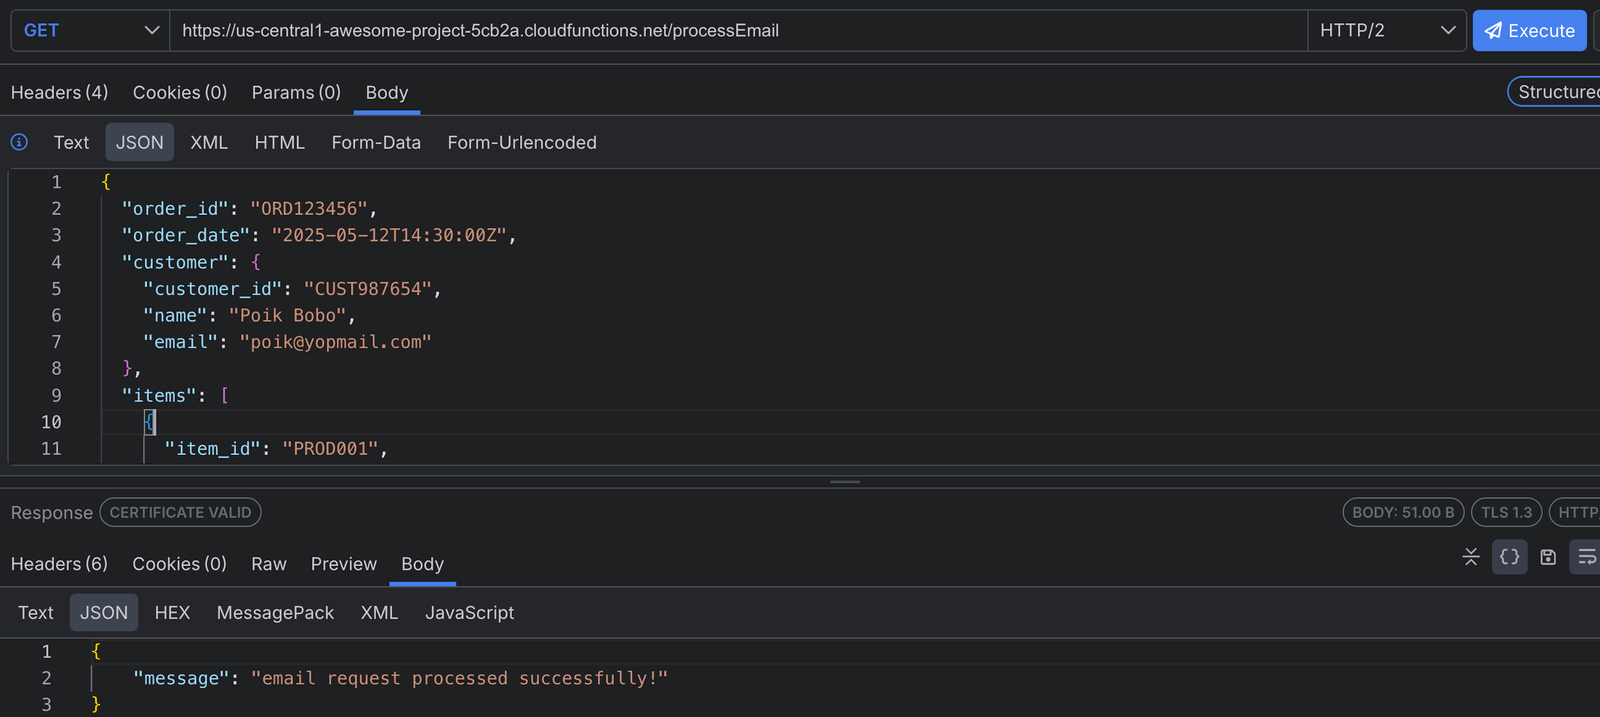
Let’s now proceed to test the function locally again. In your terminal, run npm run serve, head over to Fiddler, and call the function using the URL printed in the logs section of your emulator suite.
Deploying Our Functions
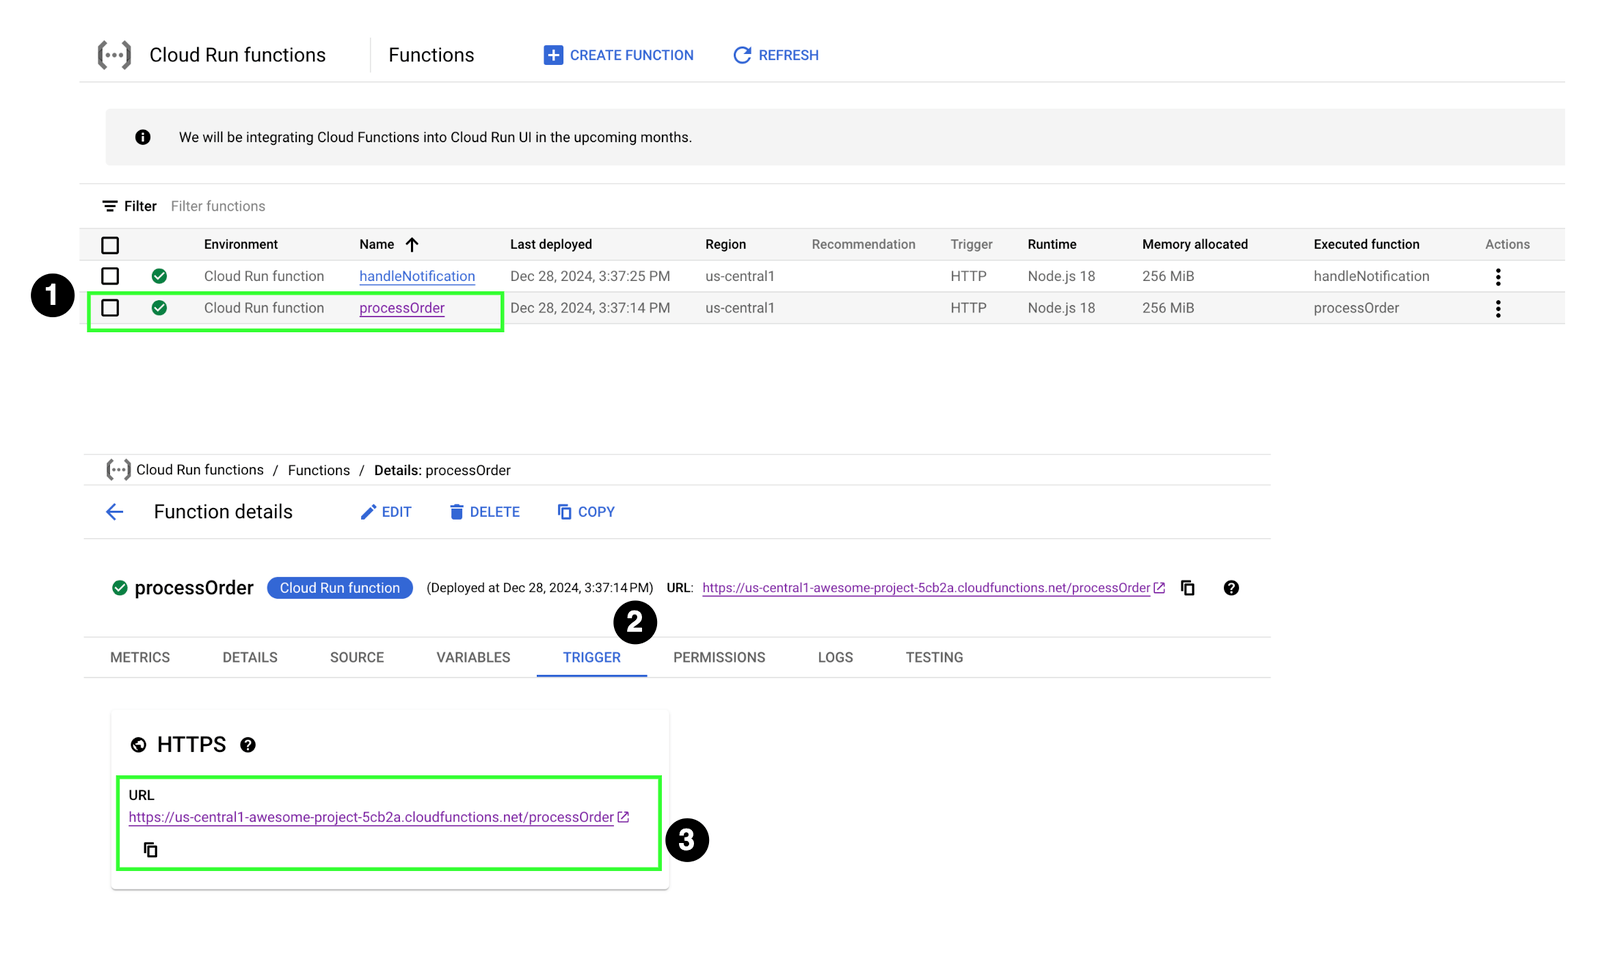
Let’s take our two functions live. Open your terminal and run npm run deploy. To get the live URLs of your functions, do the following:
- Head over to your Cloud console and search for "cloud run functions.”

We want to trigger the processOrder function, so select it. In the trigger section, you should see the live URL to our Cloud Function. We won’t expose the handleNotification task queue function for reasons specified earlier.
However, when we try to access this function, we get an error, as shown below.

We need to make the function available to the public. In Google Cloud terms, we need to add the cloud invoker role for all users to this function.
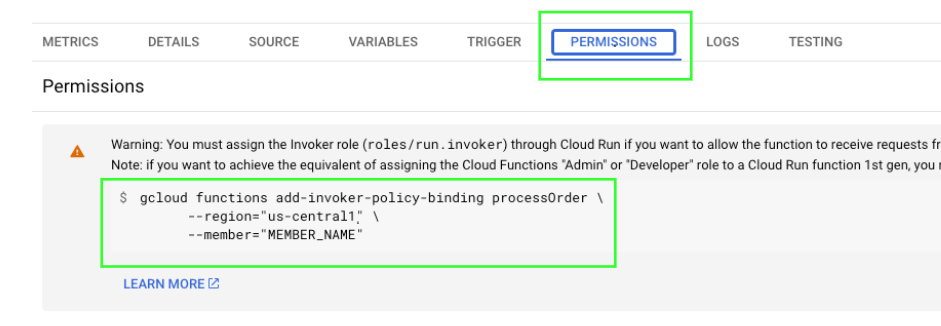
In the permissions tab, copy the command to add the invoker role. If you have the Google Cloud CLI installed, and the target project (awesome-project) selected, run this command in your terminal:
gcloud functions add-invoker-policy-binding processOrder \
--region="us-central1" \
--member="allUsers"
Testing Production Endpoints
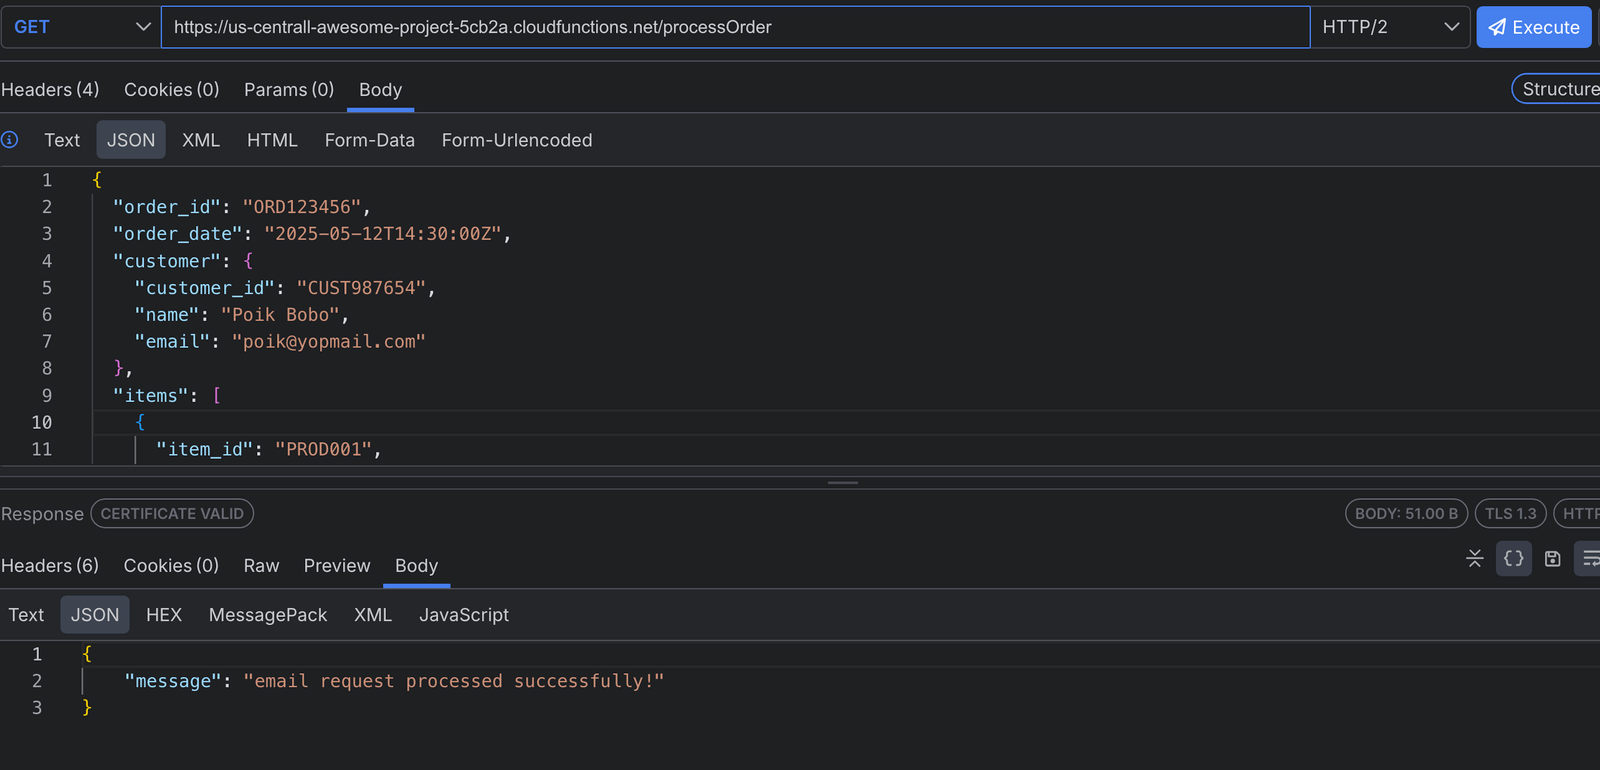
Let’s head to Fiddler Everywhere to trigger our processOrder HTTP function with a dummy order to add a notification task to our queue on the Cloud Tasks API. Then, we trigger our task queue function’s worker to process it and send an email to the user’s inbox.
Conclusion
Queues remain indispensable in building scalable, distributed systems. Finding a budget-friendly way to integrate them using the Cloud Tasks API is something to look into whenever you need to integrate these powerful structures in a project. Hopefully, this will serve as a marker to look out for in future projects.

Christian Nwamba
Chris Nwamba is a Senior Developer Advocate at AWS focusing on AWS Amplify. He is also a teacher with years of experience building products and communities.

