Introduction to Agent Authentication and Authorization on Mastra Using Firebase

Summarize with AI:
Explore how to secure agents built with Mastra, using a demo Next.js application integrated with a simple Mastra agent and authentication and authorization in Firebase.
AI agents have moved beyond the experimental stage and are now being deployed in real-world applications. Unlike a traditional API endpoint, an agent can reason, make decisions and handle complex tasks on behalf of a user. This shift is exciting, but it raises important concerns about knowing exactly who is calling an agent and what they are allowed to do.
When an agent is built and deployed, it can be directly accessed by anyone. This can result in wrongful consumption of API credits, and it poses a significant risk in use cases where the agent is connected to sensitive tools such as databases, file systems and email systems. This is where authentication and authorization come into play. It is important to implement such security protocols to verify the identity and permissions of an agent’s users.
In this article, we’ll explore how to secure agents built with Mastra, a framework for building agents and other AI-powered applications. We’ll build a demo Next.js application integrated with a simple Mastra agent, then implement authentication and authorization using Firebase.
Prerequisites
To follow along with this article, you should have:
- Node.js v22.13.0 or later installed
- Basic knowledge of React and Next.js
- A Google account to set up Firebase
- An API key from a supported model provider
Why Security Matters for AI Agents
To understand why security matters here, let’s first understand what an AI agent actually is and how it differs from a regular application. A traditional application is fixed in its behavior. When an API endpoint is called, it runs a fixed block of code and returns a predictable response. There is no reasoning, no decision-making or any action other than what was explicitly programmed.
An AI agent is quite different. Instead of following a fixed preset, an agent receives an open-ended instruction and figures out how to fulfill it. It can reason about a problem, decide which tools to use, call those tools, interpret the results and take further action, all in a single interaction.
Now let’s talk about security. When you expose an API endpoint, you know exactly what it can do. On the other hand, when you expose an agent, the surface area is much wider. An agent connected to a database can read and write records. An agent connected to email can send messages on someone’s behalf. An agent connected to a payment system can initiate transactions. If an unauthorized person reaches that agent, they could potentially instruct it to do any of those things.
The more capable an agent is, the more important it is to control who can reach it and what it can be asked to do. Also, note that calls to AI agents mostly come at the expense of API credits, so it is important to regulate usage in order to avoid incurring unnecessary costs.
Authentication and Authorization
These two words are often used interchangeably and misplaced for each other. However, they mean different things and solve different problems.
Authentication answers the question “Who are you?” It verifies the identity of the person making a request. Generally, a user signs in, proves who they are, and receives a token that proves their identity on subsequent requests.
Authorization answers the question “What are you allowed to do?” It verifies that the authenticated user actually has permission to perform the action they’re requesting.
Why Firebase?
There are different ways to implement authentication and authorization on Mastra AI agents. In this article, we are using Firebase for several reasons. First, Firebase is a fully managed service. It abstracts away the complexity of OAuth flows, token signing, token expiration, session management and much more.
Next, with Firebase’s Firestore, we don’t need to set up a separate database just to store and manage user roles. Firestore is a natural place to store user roles because it is already in the Firebase ecosystem. Firestore also has built-in security rules, which means we can control and manage access.
Finally, Mastra has first-class support for Firebase through the @mastra/auth-firebase package. This means that protecting Mastra’s own internal server endpoints is straightforward and requires very little configuration.
Demo Setup
So far, we’ve touched briefly on what AI agents are, the need for security and why we’re using Firebase in this article. We can now start building our demo application to see how authentication and authorization can be implemented on Mastra AI agents using Firebase.
For the demo, we’ll build a simple prompt-and-response application that integrates with a Mastra agent under the hood. We’ll configure security beyond just agent protection. Security here is applied in four different layers.
Layer 1 redirects all unauthenticated users to the login page. At Layer 2, every request to the API route must carry a valid Firebase token. If it doesn’t, the request is rejected with a 401 error before anything else happens. This cannot be bypassed in the browser because it runs entirely on the server.
At Layer 3, once the token is verified and the server knows who the user is, it checks their role in Firestore. If their role does not qualify, the request is rejected with a 403 error. At this point, the agent has not even been triggered.
Layer 4, which is the core of this article, uses the MastraAuthFirebase class to apply the same Firebase token verification to Mastra’s own endpoints. Note that this security configuration can be approached in different ways. The most important thing is to properly define the MastraAuthFirebase class.
To get started, run the command below in your terminal to create a new Next.js application:
npx create-next-app@latest test-nextjs-agent
This creates a project called test-nextjs-agent. Feel free to rename the project, and complete the resulting prompts as shown below:
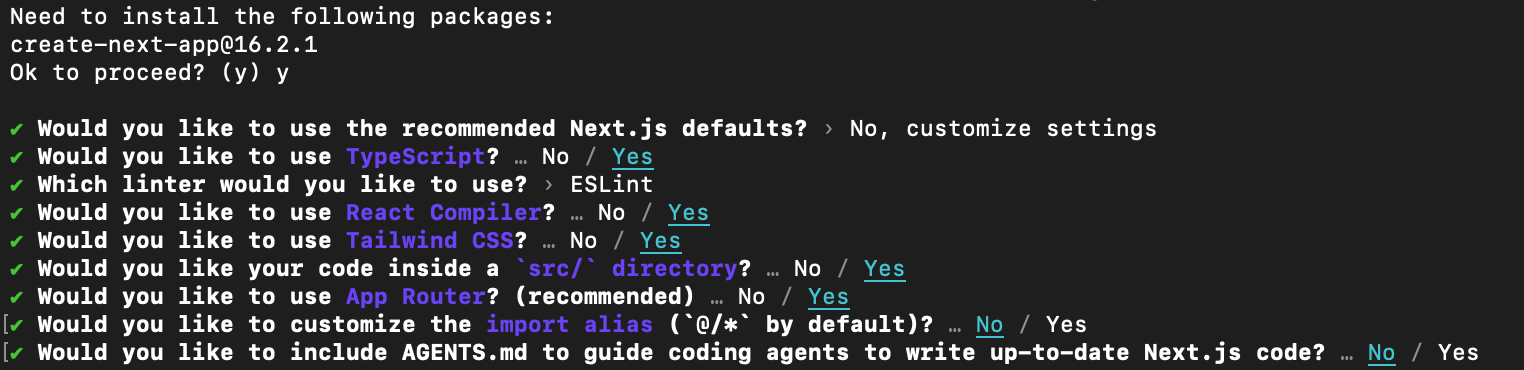
Run the following commands to navigate into the newly created project and start the development server:
cd test-nextjs-agent
npm run dev
Initialize Mastra
Open a new terminal and run the code below to initialize Mastra:
npx mastra@latest init
This installs the Mastra core dependencies and scaffolds the necessary folders and configurations without generating a new project from scratch.
In the resulting prompt when you run the command above, select a default model provider from the list provided. Here, we’ll use Google, but you can select any other provider of your choice.
There is also a prompt to provide the API key for the selected provider. Since we’re using Google, you can create and retrieve a new API key from Google AI Studio, as shown below:
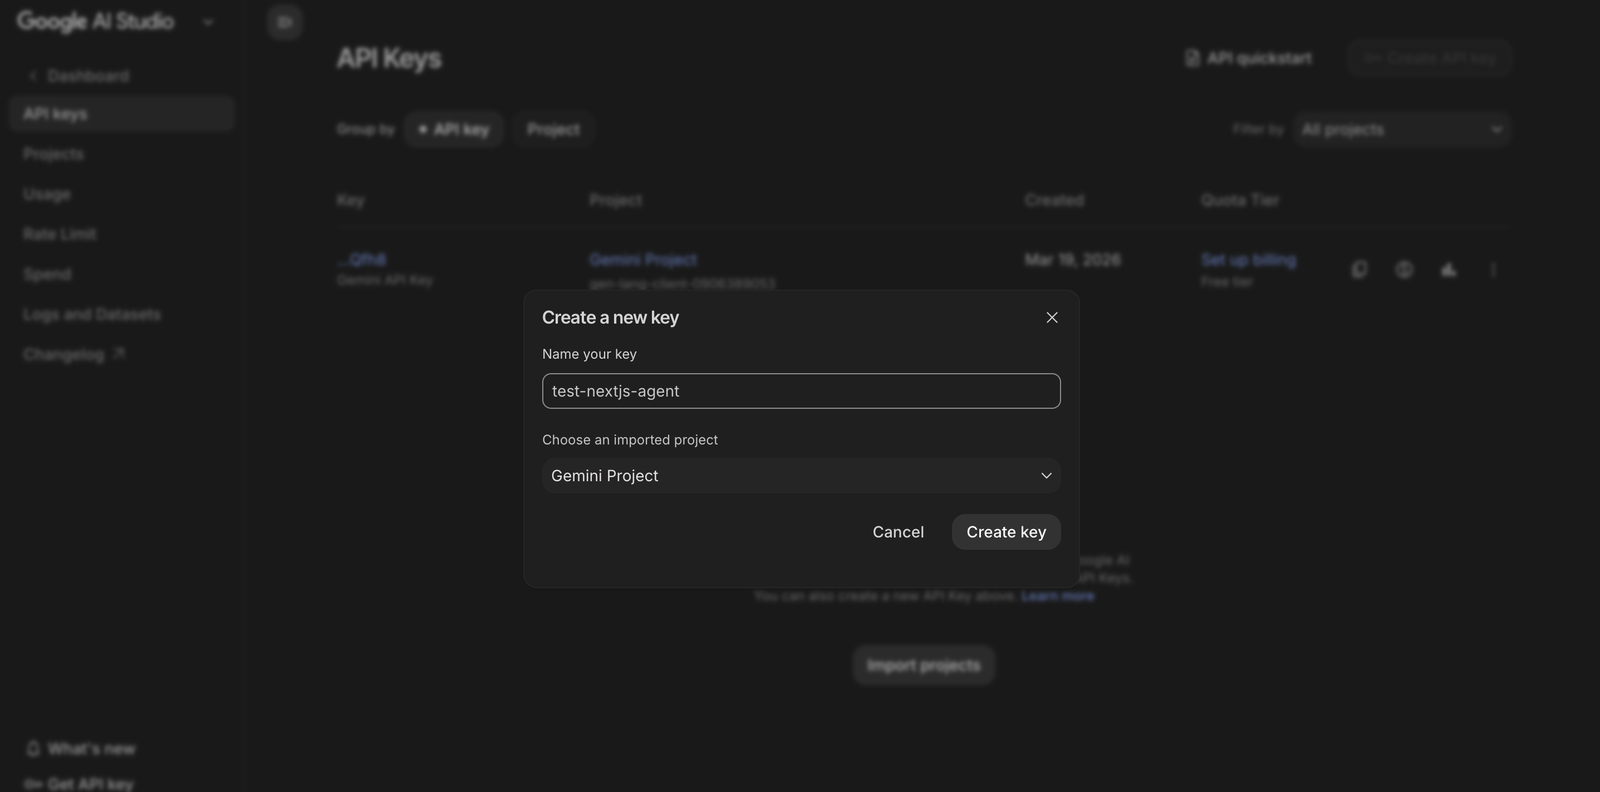
You can skip this step, but you’ll need to create a .env file and define the API key manually, as shown below:
GOOGLE_GENERATIVE_AI_API_KEY=YOUR-GOOGLE-API-KEY
You should now see a new /mastra folder with some predefined files inside the /src folder. It is important to take note of the following files:
/mastra/index.ts: This holds a Mastra instance, imported from@mastra/core/mastra./mastra/agents/weather-agent.ts: Holds a test weather agent predefined by the Mastra team. The agent uses thegoogle/gemini-2.5-promodel by default. For testing purposes, you can change that togoogle/gemini-2.5-flash, which is a less expensive model./mastra/tools/weather-tool.ts: Contains a tool that fetches weather data and integrates with the weather agent.
We can see this agent in action by running this command in the terminal:
npx mastra dev
The command starts a server that exposes Mastra Studio and REST endpoints for your agents, tools and workflows. Open http://localhost:4111/ to access Mastra Studio, which has the test agent ready to be interacted with.
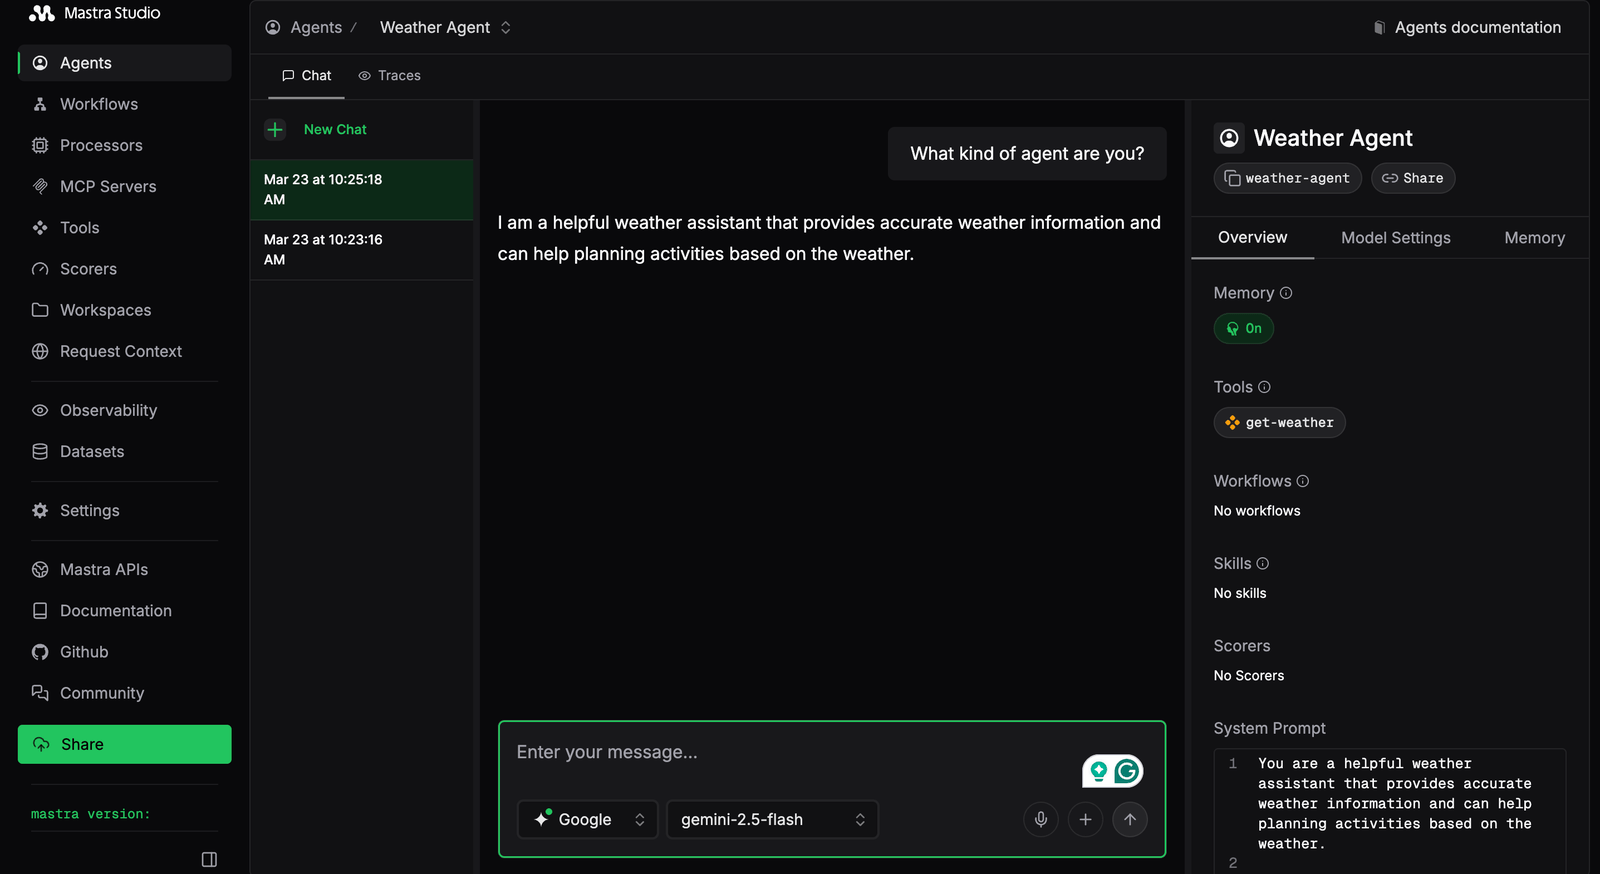
Our focus for this article is on agent authentication and authorization in Mastra using Firebase, so we won’t consider the inner workings of creating agents, tools, workflows and the rest. Instead, we’ll work with this predefined agent. However, you can explore the official documentation to learn more.
Integrating Mastra with Next.js
Since we now have our instance of Mastra up and running, we should be able to call it in our demo Next.js project.
Let’s create a chat API route. Create a src/app/api/chat/route.ts file and add the following to it:
import { mastra } from "@/mastra";
import { NextResponse } from "next/server";

export async function POST(req: Request) {
  const { message } = await req.json();

  if (!message) {
    return NextResponse.json({ error: "Message is required" }, { status: 400 });
  }

  const agent = mastra.getAgent("weatherAgent");
  const result = await agent.generate([{ role: "user", content: message }]);

  return NextResponse.json({ response: result.text });
}
The code above creates an API route that receives a message and has the agent instance generate a response based on the message. We’re intentionally keeping this route simple for demo purposes, with no streaming, memory, thread IDs, etc.
Next, let’s create a simple chat page on the frontend. Replace the contents of your src/app/page.tsx with the following:
"use client";

import { useState } from "react";

export default function Home() {
  const [message, setMessage] = useState("");
  const [response, setResponse] = useState("");
  const [loading, setLoading] = useState(false);

  const handleSubmit = async () => {
    if (!message.trim()) return;
    setLoading(true);
    setResponse("");

    const res = await fetch("/api/chat", {
      method: "POST",
      headers: { "Content-Type": "application/json" },
      body: JSON.stringify({ message }),
    });

    const data = await res.json();
    setResponse(data.response);
    setLoading(false);
  };

  return (
    <main className="flex min-h-screen flex-col items-center justify-center p-8 gap-6">
      <h1 className="text-2xl font-bold">Weather Agent</h1>
      <textarea
        className="w-full max-w-lg border rounded p-3 text-sm"
        rows={3}
        placeholder="Ask about the weather anywhere..."
        value={message}
        onChange={(e) => setMessage(e.target.value)}
      />
      <button
        onClick={handleSubmit}
        disabled={loading}
        className="bg-blue-600 text-white px-6 py-2 rounded disabled:opacity-50"
      >
        {loading ? "Thinking..." : "Send"}
      </button>
      {response && (
        <div className="w-full max-w-lg border rounded p-4 bg-gray-50 text-sm">
          {response}
        </div>
      )}
    </main>
  );
}
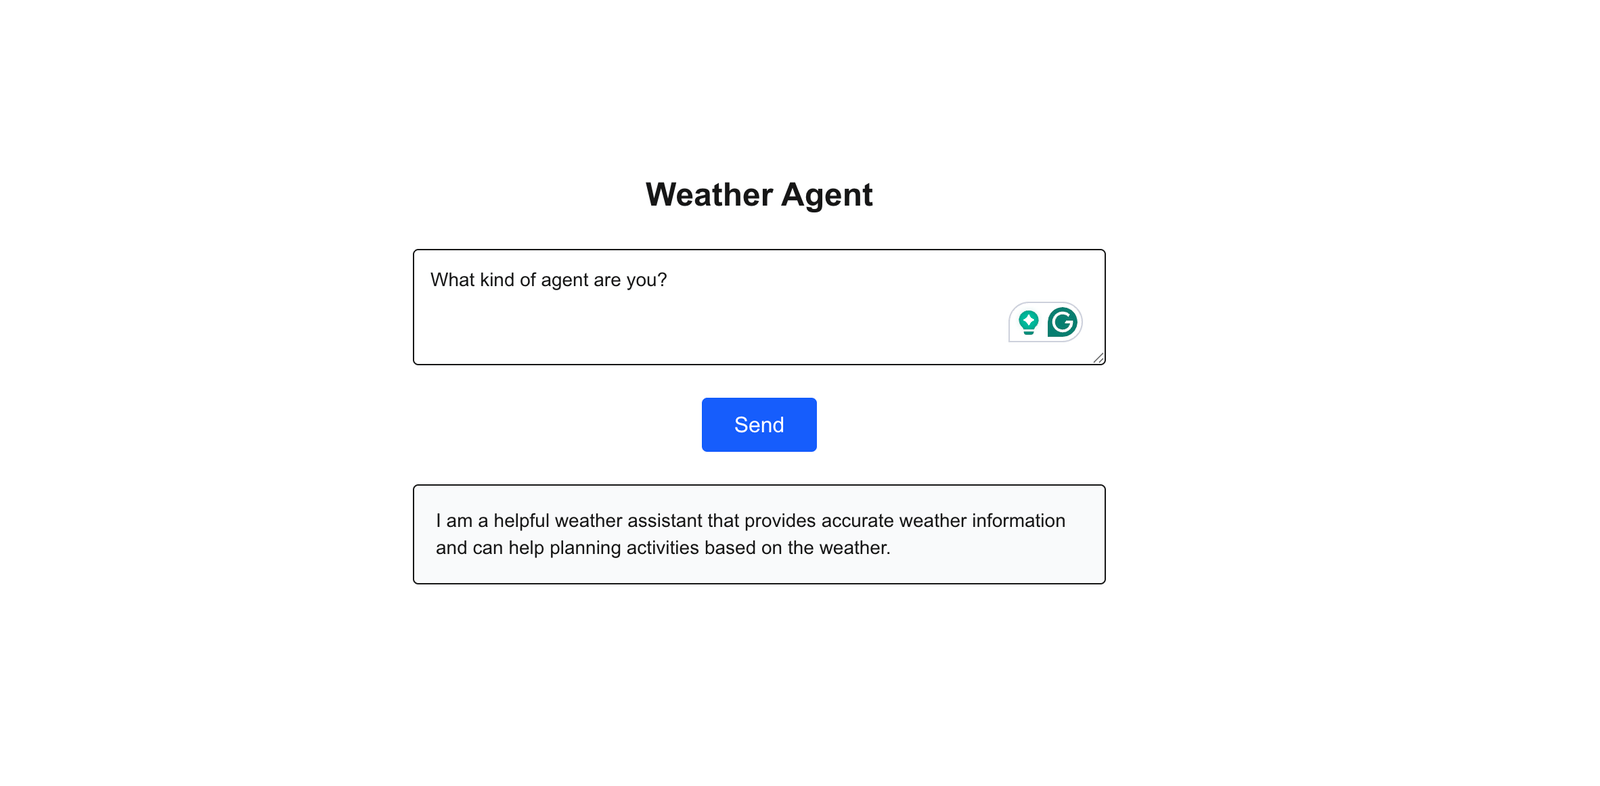
Here, we created a simple chat page where we can send a message and have the returned response rendered on the screen. Open http://localhost:3000/ in your browser to see the updated demo project.
Set Up Firebase
With our agent up and running, the next step is securing it. Right now, it is completely open, and when deployed, anyone with the URL can interact with it. To fix this, we’ll introduce Firebase as our authentication and authorization layer so that only verified users can access both the agent and the demo project as a whole.
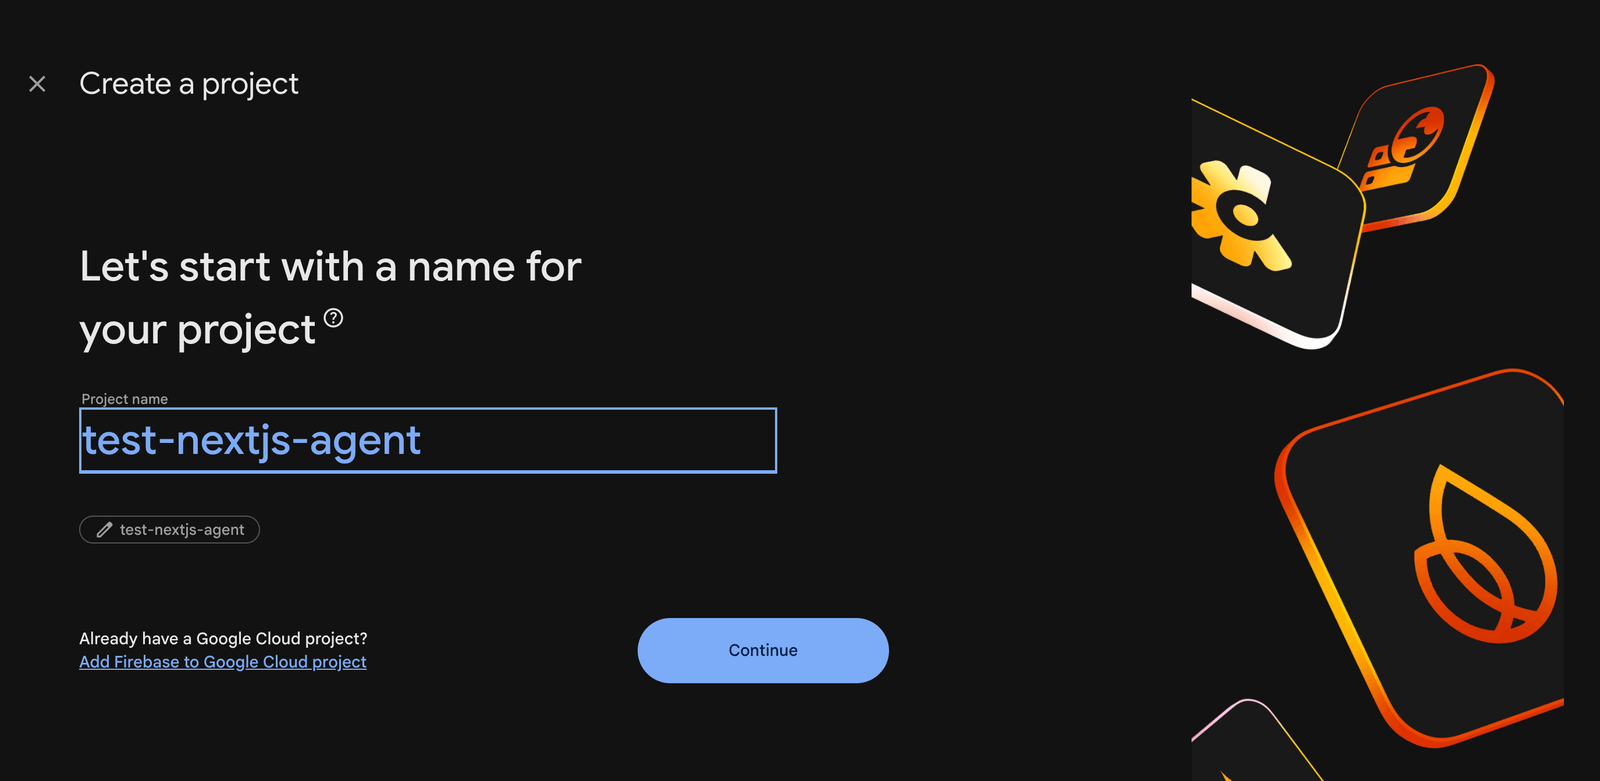
Let’s start by setting up and configuring a Firebase project. Go to Firebase and create a new Firebase project. You can call it test-nextjs-agent or give it any other name you prefer.
On the left sidebar in the dashboard, go to Security → Authentication and click “Get started.”
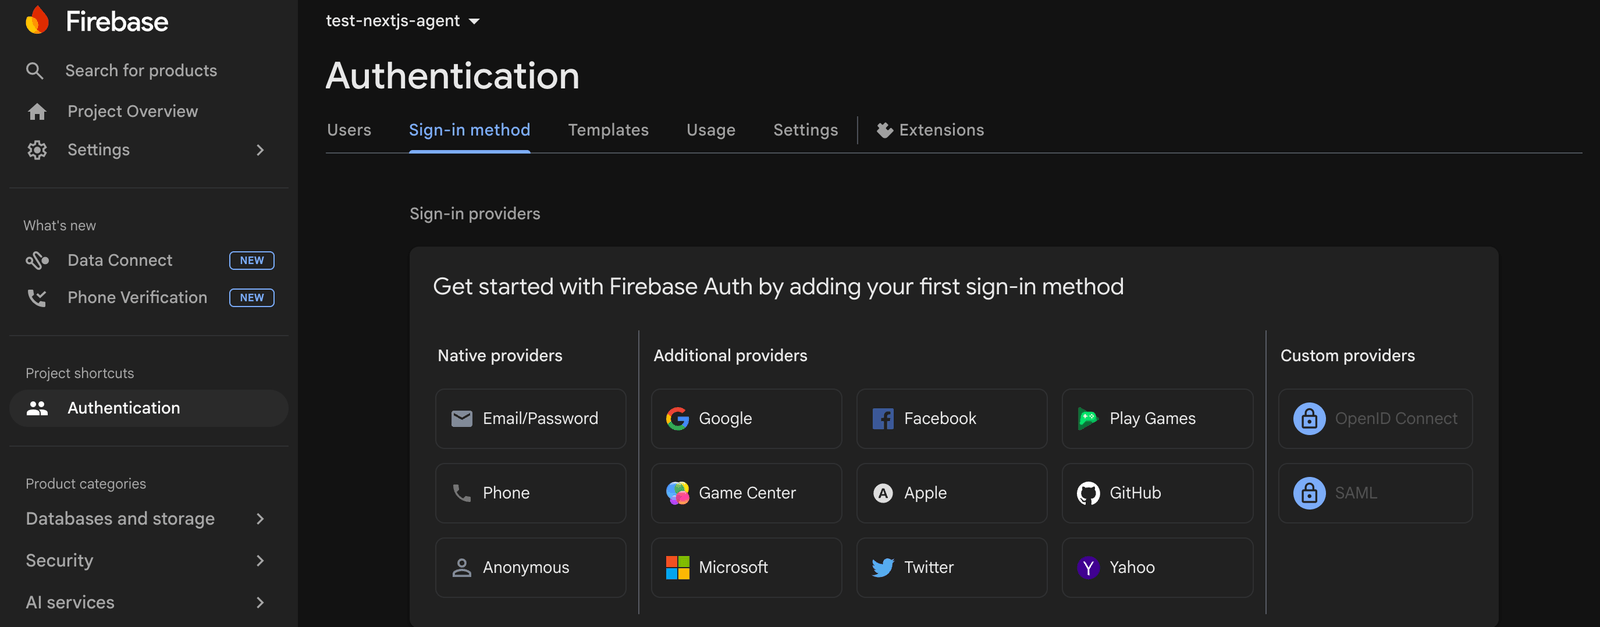
Enable the Google sign-in provider, set a public-facing name and support email, and then click “Save.” You can also work with any other provider you prefer. For this demo, we’ll use Google.
Next, in the sidebar, go to Project Settings → General tab. Scroll down to “Your apps” and click the web icon (</>). Register a web app with any nickname.
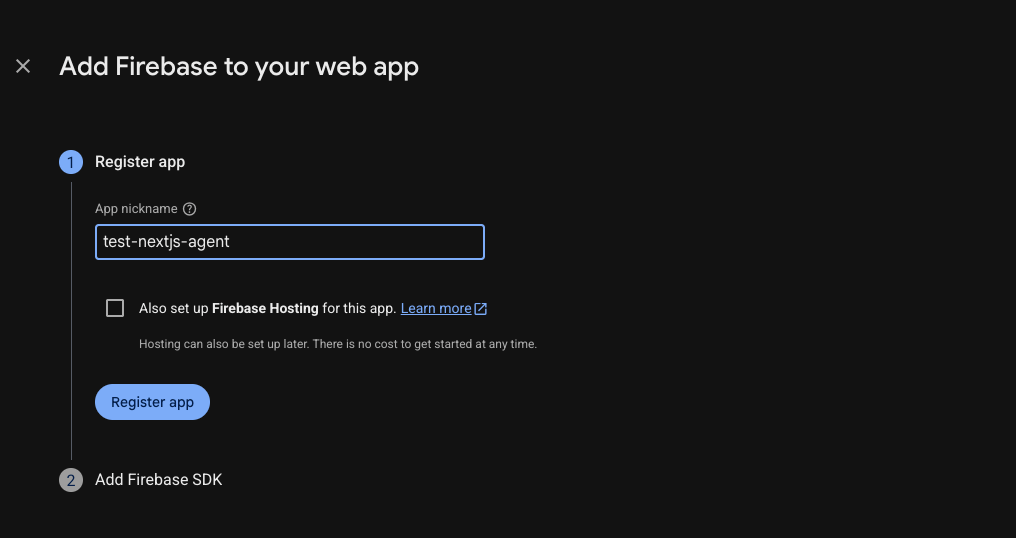
Firebase will display a firebaseConfig object as shown below. Copy this object and save it, as we’ll be using it later:
const firebaseConfig = {
  apiKey: "...YOUR-API-KEY",
  authDomain: "test-nextjs-agent.firebaseapp.com",
  projectId: "test-nextjs-agent",
  ...
};
Next, go to Project Settings and click on the Service Accounts tab. Then click to generate a new private key. This will download a JSON file that serves as the server’s proof of identity to Firebase.
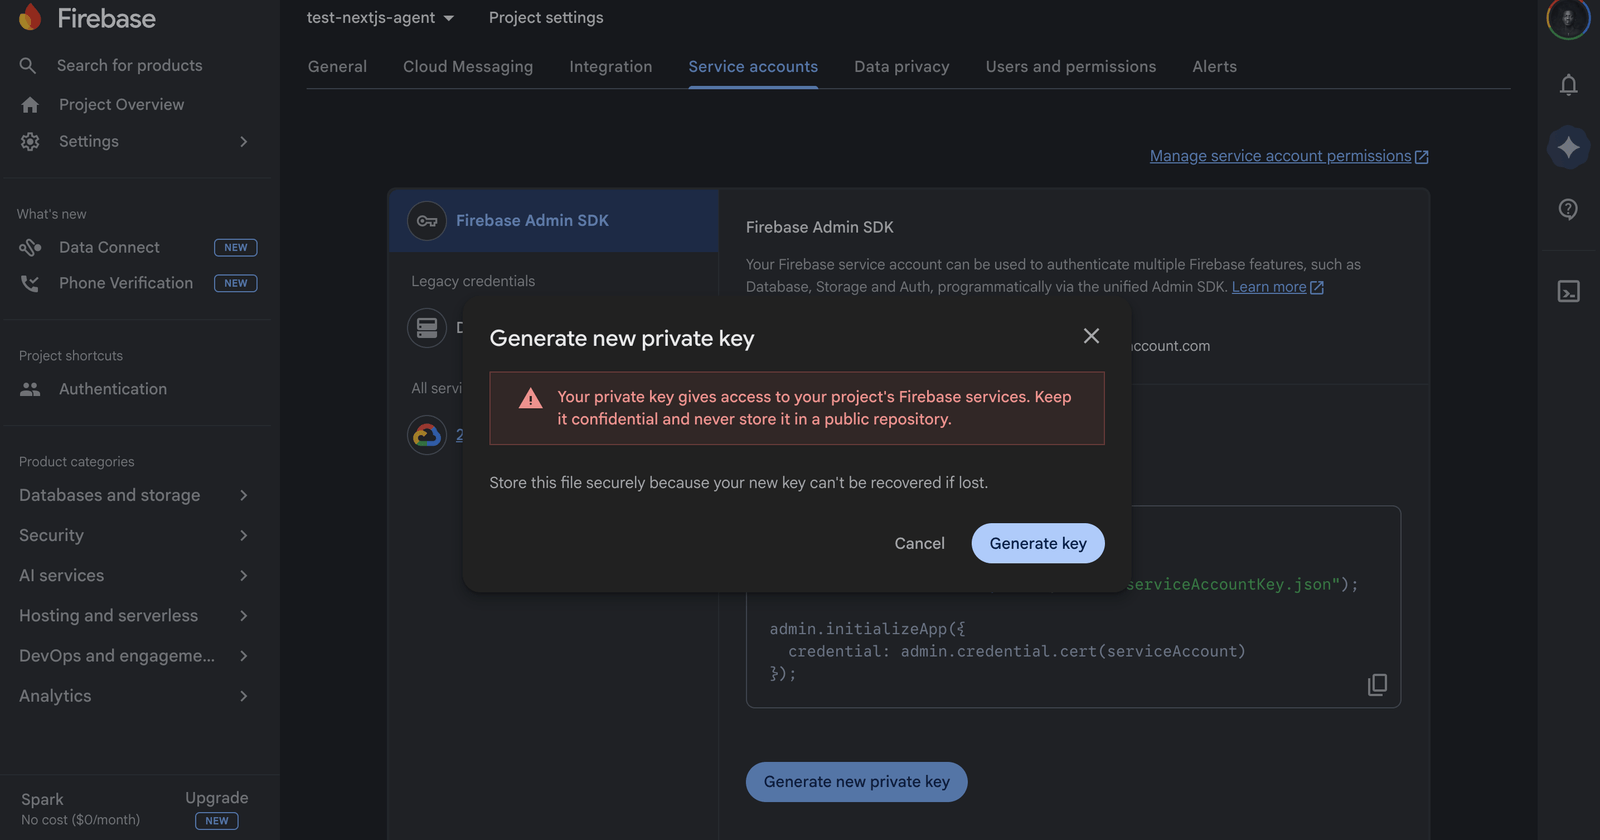
This service account file is very important. It enables server-side access to Firebase. Do not commit it to your project’s version control. Move the file to the project’s root folder and add it to .gitignore immediately.
Next, run the command below:
npm install firebase firebase-admin @mastra/auth-firebase
This installs the following:
firebase: The Firebase client-side SDK that runs in the browser. Since we’re using Google sign-in here, it handles the sign-in pop-up and manages the user’s ID token.firebase-admin: The server-side SDK that runs in Next.js API routes. It verifies that the ID token the browser sent is real and hasn’t been tampered with.@mastra/auth-firebase: Mastra’s built-in auth wrapper for Firebase.
Finally, open the .env file and update the environment variables as shown below:
GOOGLE_GENERATIVE_AI_API_KEY=YOUR-GOOGLE-API-KEY

    NEXT_PUBLIC_FIREBASE_API_KEY=YOUR-FIREBASE-API-KEY
    NEXT_PUBLIC_FIREBASE_AUTH_DOMAIN=test-nextjs-agent.firebaseapp.com
    NEXT_PUBLIC_FIREBASE_PROJECT_ID=test-nextjs-agent

    FIREBASE_SERVICE_ACCOUNT=/absolute/path/to/the/service/account/file.json
Here, we included environment variables required for both the frontend and backend. The firebaseConfig object we copied earlier contains the frontend values, while FIREBASE_SERVICE_ACCOUNT is an absolute path to the service account file we downloaded.
If you’re unsure how to get the absolute path, run the command below in the terminal:
pwd
Copy the returned path, then append the filename and its extension to form the full file path.
Implementing Firebase Agent Authentication
In this section, we’ll see how to implement Firebase authentication across our application, including for our Mastra agent.
Create a src/lib/firebase.ts file and add the following to it to initialize the Firebase client SDK:
import { initializeApp, getApps, getApp } from "firebase/app";
import { getAuth, GoogleAuthProvider } from "firebase/auth";

const firebaseConfig = {
  apiKey: process.env.NEXT_PUBLIC_FIREBASE_API_KEY,
  authDomain: process.env.NEXT_PUBLIC_FIREBASE_AUTH_DOMAIN,
  projectId: process.env.NEXT_PUBLIC_FIREBASE_PROJECT_ID,
};

const app = getApps().length ? getApp() : initializeApp(firebaseConfig);

export const auth = getAuth(app);
export const googleProvider = new GoogleAuthProvider();
This sets up a Firebase app instance using environment variables, with a guard to prevent duplicate initialization during Next.js hot reloads. It then exports the Firebase Authentication instance and a Google sign-in provider, both ready to be used anywhere in the app.
We also need to initialize the Firebase Admin SDK. Create a src/lib/firebase-admin.ts file and add the following to it:
import admin from "firebase-admin";
import fs from "fs";

if (!admin.apps.length) {
  const serviceAccountPath = process.env.FIREBASE_SERVICE_ACCOUNT as string;

  const serviceAccount = JSON.parse(
    fs.readFileSync(serviceAccountPath, "utf-8"),
  );

  admin.initializeApp({
    credential: admin.credential.cert(serviceAccount),
  });
}

export const adminAuth = admin.auth();
In the code above, we initialized the Firebase Admin SDK, the server-side counterpart to the client-side Firebase setup. It reads the service account JSON file from the path specified in the FIREBASE_SERVICE_ACCOUNT environment variable, uses it to authenticate as a trusted admin and exports adminAuth, which will be used server-side to verify and decode user tokens sent from the client.
Next, create a src/context/AuthContext.tsx file and add the following to it:
"use client";

import {
  createContext,
  useContext,
  useEffect,
  useState,
  ReactNode,
} from "react";
import { onAuthStateChanged, User } from "firebase/auth";
import { auth } from "@/lib/firebase";

interface AuthContextValue {
  user: User | null;
  loading: boolean;
}

const AuthContext = createContext<AuthContextValue>({
  user: null,
  loading: true,
});

export function AuthProvider({ children }: { children: ReactNode }) {
  const [user, setUser] = useState<User | null>(null);
  const [loading, setLoading] = useState(true);

  useEffect(() => {
    const unsubscribe = onAuthStateChanged(auth, (firebaseUser) => {
      setUser(firebaseUser);
      setLoading(false);
    });
    return () => unsubscribe();
  }, []);

  return (
    <AuthContext.Provider value={{ user, loading }}>
      {children}
    </AuthContext.Provider>
  );
}

export const useAuth = () => useContext(AuthContext);
This file creates a React context that tracks the currently signed-in Firebase user across the app, exposing a user object and a loading state. The useAuth hook is then exported to allow access to the context values from any component.
Open the src/app/layout.tsx file and wrap the application with the context provider, AuthProvider, as shown below:
import type { Metadata } from "next";
import { Geist, Geist_Mono } from "next/font/google";
import "./globals.css";
import { AuthProvider } from "@/context/AuthContext";

//...

export default function RootLayout({
  children,
}: Readonly<{
  children: React.ReactNode;
}>) {
  return (
    <html
      lang="en"
      className={`${geistSans.variable} ${geistMono.variable} h-full antialiased`}
    >
      <body className="min-h-full flex flex-col">
        <AuthProvider>{children}</AuthProvider>
      </body>
    </html>
  );
}
Now, let’s create a simple login page that will be used to test the Firebase authentication in the browser.
Create a src/app/login/page.tsx file and add the following to it:
"use client";

import { useState } from "react";
import { useRouter } from "next/navigation";
import { signInWithPopup } from "firebase/auth";
import { auth, googleProvider } from "@/lib/firebase";

export default function LoginPage() {
  const router = useRouter();
  const [error, setError] = useState<string | null>(null);

  const handleSignIn = async () => {
    try {
      await signInWithPopup(auth, googleProvider);
      router.push("/");
    } catch (err) {
      console.error(err);
      setError("Sign-in failed. Please try again.");
    }
  };

  return (
    <main className="flex min-h-screen flex-col items-center justify-center gap-6 p-8">
      <h1 className="text-2xl font-bold">Weather Agent</h1>
      <p className="text-gray-500">Sign in to continue</p>
      {error && <p className="text-sm text-red-500">{error}</p>}
      <button
        onClick={handleSignIn}
        className="bg-blue-600 text-white px-6 py-2 rounded"
      >
        Sign in with Google
      </button>
    </main>
  );
}
This renders a “Sign in with Google” button that triggers a Firebase Google pop-up sign-in. On success, the user is redirected to the homepage; on failure, an error message is displayed.
Now, let’s protect our chat page and also attach the token. Open the src/app/page.tsx file and update it as shown below:
"use client";

import { useState, useEffect, useRef } from "react";
import { useRouter } from "next/navigation";
import { User } from "firebase/auth";
import { signOut } from "firebase/auth";
import { auth } from "@/lib/firebase";
import { useAuth } from "@/context/AuthContext";

export default function Home() {
  const { user, loading } = useAuth();
  const router = useRouter();
  const userRef = useRef<User | null>(null);

  const [message, setMessage] = useState("");
  const [response, setResponse] = useState("");
  const [fetching, setFetching] = useState(false);

  useEffect(() => {
    userRef.current = user;
  }, [user]);

  useEffect(() => {
    if (!loading && !user) {
      router.push("/login");
    }
  }, [user, loading, router]);

  const handleSubmit = async () => {
    if (!message.trim() || !userRef.current) return;
    setFetching(true);
    setResponse("");
    const token = await userRef.current.getIdToken(true);
    const res = await fetch("/api/chat", {
      method: "POST",
      headers: {
        "Content-Type": "application/json",
        Authorization: `Bearer ${token}`,
      },
      body: JSON.stringify({ message }),
    });
    const data = await res.json();
    setResponse(data.response ?? data.error);
    setFetching(false);
  };

  const handleSignOut = async () => {
    await signOut(auth);
    router.push("/login");
  };

  if (loading || !user) return null;

  return (
    <main className="flex min-h-screen flex-col items-center justify-center p-8 gap-6">
      <div className="w-full max-w-lg flex justify-between items-center">
        <h1 className="text-2xl font-bold">Weather Agent</h1>
        <div className="flex items-center gap-4">
          <span className="text-sm text-gray-500">{user.email}</span>
          <button
            onClick={handleSignOut}
            className="text-sm text-red-500 hover:underline"
          >
            Sign out
          </button>
        </div>
      </div>
      <textarea
        className="w-full max-w-lg border rounded p-3 text-sm"
        rows={3}
        placeholder="Ask about the weather anywhere..."
        value={message}
        onChange={(e) => setMessage(e.target.value)}
      />
      <button
        onClick={handleSubmit}
        disabled={fetching}
        className="bg-blue-600 text-white px-6 py-2 rounded disabled:opacity-50"
      >
        {fetching ? "Thinking..." : "Send"}
      </button>
      {response && (
        <div className="w-full max-w-lg border rounded p-4 bg-gray-50 text-sm">
          {response}
        </div>
      )}
    </main>
  );
}
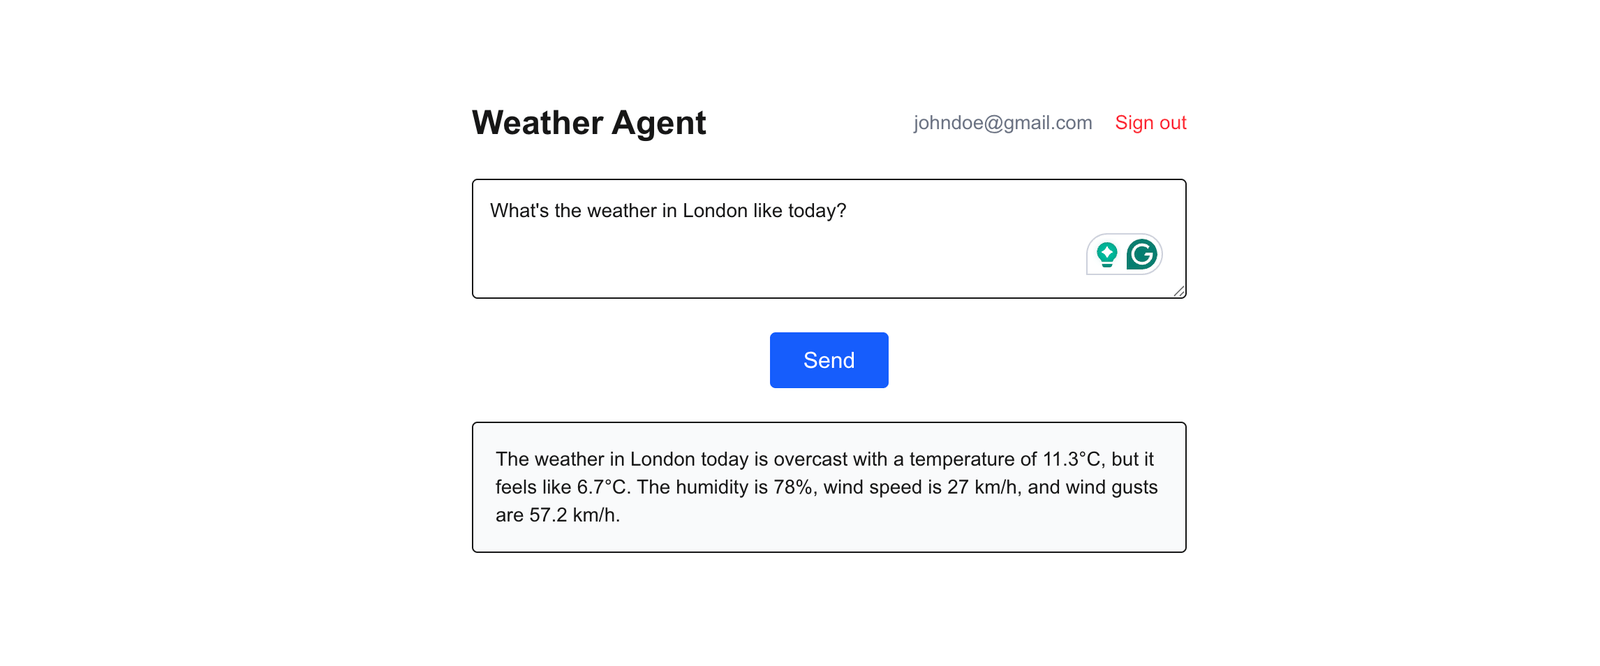
The code above redirects a user if not authenticated. On the other hand, if authenticated, it presents the user with a textarea to send messages to the weather agent.
Before each request, it fetches a fresh Firebase ID token and attaches it to the Authorization header when calling the /api/chat endpoint. It also displays the agent’s response and provides a sign-out button.
That’s it for the client side. Now let’s update the API route to verify the token. Open the src/app/api/chat/route.ts file and update the code as shown below:
import { mastra } from "@/mastra";
import { NextResponse } from "next/server";
import { adminAuth } from "@/lib/firebase-admin";

export async function POST(req: Request) {
  const authHeader = req.headers.get("Authorization");

  if (!authHeader || !authHeader.startsWith("Bearer ")) {
    return NextResponse.json({ error: "Unauthorized" }, { status: 401 });
  }

  const idToken = authHeader.split("Bearer ")[1];

  try {
    await adminAuth.verifyIdToken(idToken);
  } catch {
    return NextResponse.json(
      { error: "Invalid or expired token" },
      { status: 401 },
    );
  }

  const { message } = await req.json();

  if (!message) {
    return NextResponse.json({ error: "Message is required" }, { status: 400 });
  }

  const agent = mastra.getAgent("weatherAgent");
  const result = await agent.generate([{ role: "user", content: message }]);

  return NextResponse.json({ response: result.text });
}
In the code above, instead of just receiving messages from the client side and generating responses based on that, we now include an authentication verification layer.
First, it validates the Authorization header, extracting and verifying the Firebase ID token using the Admin SDK. It rejects any request that is unauthenticated or carries an invalid token. If verification passes, it forwards the user’s message to the Mastra weather agent and returns the agent’s response.
For the final piece, which is adding the authentication guard to our Mastra instance, update the src/mastra/index.ts file as shown below:
import { Mastra } from "@mastra/core/mastra";
import { PinoLogger } from "@mastra/loggers";
import { LibSQLStore } from "@mastra/libsql";
import {
  Observability,
  DefaultExporter,
  CloudExporter,
  SensitiveDataFilter,
} from "@mastra/observability";
import { weatherWorkflow } from "./workflows/weather-workflow";
import { weatherAgent } from "./agents/weather-agent";
import { MastraAuthFirebase } from "@mastra/auth-firebase";

export const mastra = new Mastra({
  workflows: { weatherWorkflow },
  agents: { weatherAgent },
  storage: new LibSQLStore({
    id: "mastra-storage",
    url: "file:./mastra.db",
  }),
  server: {
    auth: new MastraAuthFirebase(),
  },
  logger: new PinoLogger({
    name: "Mastra",
    level: "info",
  }),
  observability: new Observability({
    configs: {
      default: {
        serviceName: "mastra",
        exporters: [
          new DefaultExporter(),
          new CloudExporter(),
        ],
        spanOutputProcessors: [
          new SensitiveDataFilter(),
        ],
      },
    },
  }),
});
For now, pay close attention only to this part:
server: {
    auth: new MastraAuthFirebase(),
},
By passing an instance of the MastraAuthFirebase class to the auth option in the Mastra server config, Mastra will automatically intercept every incoming request to the agent and validate the Firebase ID token, thereby restricting access if no token is provided or if an invalid token is provided.
It is important to note that MastraAuthFirebase will automatically read the FIREBASE_SERVICE_ACCOUNT and FIRESTORE_DATABASE_ID environment variables, so no additional configuration is required other than verifying those values are set in the .env file.
Now you can test the application in your browser to see the authentication in action.
Implementing Authorization
With authentication done, our agent is no longer publicly accessible so only signed-in users can access it. In this section, we’ll add an extra layer of control, which involves checking whether an authenticated user actually has permission to use the agent.
For this, we need somewhere to store user roles. Firestore is the best fit for this, since it is already part of the Firebase ecosystem.
In the sidebar of the Firebase dashboard, go to Databases and Storage → Firestore and click “Create Database.” Next, pick a region and select “Start in test mode.”
After successfully creating it, open the .env file and add the database ID as shown below:
//...previous environment variables

FIRESTORE_DATABASE_ID=(default)
In the snippet above, (default) is the ID Firestore assigns to the first database it creates for a project.
Now, open the src/lib/firebase-admin.ts file to update the Firestore admin to export Firestore:
import admin from "firebase-admin";
import fs from "fs";

if (!admin.apps.length) {
  const serviceAccountPath = process.env.FIREBASE_SERVICE_ACCOUNT as string;
  const serviceAccount = JSON.parse(
    fs.readFileSync(serviceAccountPath, "utf-8"),
  );
  admin.initializeApp({
    credential: admin.credential.cert(serviceAccount),
  });
}

export const adminAuth = admin.auth();
export const adminFirestore = admin.firestore();
Here, admin.firestore() provides a Firestore client that uses the service account credentials. Instead of writing the role-checking logic directly inside the API route, let’s create a separate file for that. Create a src/lib/authorization.ts file and add the following to it:
import { adminFirestore } from "./firebase-admin";

export type UserRole = "admin" | "user" | "blocked";
const ALLOWED_ROLES: UserRole[] = ["admin", "user"];

export async function getUserRole(uid: string): Promise<UserRole | null> {
  const doc = await adminFirestore.collection("users").doc(uid).get();

  if (!doc.exists) return null;

  const data = doc.data() as { role: UserRole };
  return data.role ?? null;
}
export async function isUserAuthorized(uid: string): Promise<boolean> {
  const role = await getUserRole(uid);
  if (!role) return false;
  return ALLOWED_ROLES.includes(role);
}
In the code above, getUserRole takes a Firebase UID, looks up the corresponding document in the users Firestore collection, and returns the role stored in it. If no document exists for that UID, it returns null, meaning that the user has never been granted access.
Also, isUserAuthorized calls getUserRole and checks whether the result is in the ALLOWED_ROLES array. Only “admin” and “user” pass this check. A “blocked” role or a missing document both return false.
Next, let’s add the authorization check to our API route. Open the src/app/api/chat/route.ts file and update the code as shown below:
import { mastra } from "@/mastra";
import { NextResponse } from "next/server";
import { adminAuth } from "@/lib/firebase-admin";
import { isUserAuthorized } from "@/lib/authorization";

export async function POST(req: Request) {
  const authHeader = req.headers.get("Authorization");

  if (!authHeader || !authHeader.startsWith("Bearer ")) {
    return NextResponse.json({ error: "Unauthorized" }, { status: 401 });
  }

  const idToken = authHeader.split("Bearer ")[1];
  let decodedToken;

  try {
    decodedToken = await adminAuth.verifyIdToken(idToken);
  } catch {
    return NextResponse.json(
      { error: "Invalid or expired token" },
      { status: 401 },
    );
  }

  const authorized = await isUserAuthorized(decodedToken.uid);
  if (!authorized) {
    return NextResponse.json(
      { error: "You do not have access to this agent." },
      { status: 403 },
    );
  }

  const { message } = await req.json();

  if (!message) {
    return NextResponse.json({ error: "Message is required" }, { status: 400 });
  }

  const agent = mastra.getAgent("weatherAgent");
  const result = await agent.generate([{ role: "user", content: message }]);

  return NextResponse.json({ response: result.text });
}
We updated the code to follow a sequential flow. First, we verify the token (authentication), then checking the role (authorization). If either check fails, an error is returned.
Notice how the message is only read after both checks pass. There is no reason to retrieve the message if the user is not authenticated or not authorized.
Now, let’s update our Mastra server instance. We want to inform it about our role system as well, so that even direct calls to Mastra’s server go through the same authorization logic.
Open the src/mastra/index.ts file and update it as shown below:
import { Mastra } from "@mastra/core/mastra";
import { PinoLogger } from "@mastra/loggers";
import { LibSQLStore } from "@mastra/libsql";
import {
  Observability,
  DefaultExporter,
  CloudExporter,
  SensitiveDataFilter,
} from "@mastra/observability";
import { weatherWorkflow } from "./workflows/weather-workflow";
import { weatherAgent } from "./agents/weather-agent";
import { MastraAuthFirebase } from "@mastra/auth-firebase";
import { isUserAuthorized } from "@/lib/authorization";

export const mastra = new Mastra({
  workflows: { weatherWorkflow },
  agents: { weatherAgent },
  storage: new LibSQLStore({
    id: "mastra-storage",
    url: "file:./mastra.db",
  }),
  server: {
    auth: new MastraAuthFirebase({
      authorizeUser: async (user) => {
        return isUserAuthorized(user.id);
      },
    }),
  },
  logger: new PinoLogger({
    name: "Mastra",
    level: "info",
  }),
  observability: new Observability({
    configs: {
      default: {
        serviceName: "mastra",
        exporters: [
          new DefaultExporter(),
          new CloudExporter(),
        ],
        spanOutputProcessors: [
          new SensitiveDataFilter(),
        ],
      },
    },
  }),
});
Let’s pay attention to this block of code:
export const mastra = new Mastra({
  ...
  server: {
    auth: new MastraAuthFirebase({
      authorizeUser: async (user) => {
        return isUserAuthorized(user.uid);
      },
    }),
  },
///
});
The authorizeUser function receives the decoded Firebase token after verification. Then user.uid is passed to the same isUserAuthorized function we used earlier in the API route. This keeps the role logic in one place and enforces it consistently across both entry points.
Let’s update the chat page to acknowledge authorization. Open the src/app/page.tsx file and update the code as shown below:
"use client";
import { useState, useEffect, useRef } from "react";
import { useRouter } from "next/navigation";
import { User } from "firebase/auth";
import { signOut } from "firebase/auth";
import { auth } from "@/lib/firebase";
import { useAuth } from "@/context/AuthContext";

export default function Home() {
  const { user, loading } = useAuth();
  const router = useRouter();
  const userRef = useRef<User | null>(null);

  const [message, setMessage] = useState("");
  const [response, setResponse] = useState("");
  const [fetching, setFetching] = useState(false);
  const [forbidden, setForbidden] = useState(false);

  useEffect(() => {
    userRef.current = user;
  }, [user]);

  useEffect(() => {
    if (!loading && !user) {
      router.push("/login");
    }
  }, [user, loading, router]);

  const handleSubmit = async () => {
    if (!message.trim() || !userRef.current) return;
    setFetching(true);
    setResponse("");

    const token = await userRef.current.getIdToken(true);

    const res = await fetch("/api/chat", {
      method: "POST",
      headers: {
        "Content-Type": "application/json",
        Authorization: `Bearer ${token}`,
      },
      body: JSON.stringify({ message }),
    });

    if (res.status === 403) {
      setForbidden(true);
      setFetching(false);
      return;
    }

    const data = await res.json();
    setResponse(data.response ?? data.error);
    setFetching(false);
  };

  const handleSignOut = async () => {
    await signOut(auth);
    router.push("/login");
  };

  if (loading || !user) return null;
  return (
    <main className="flex min-h-screen flex-col items-center justify-center p-8 gap-6">
      <div className="w-full max-w-lg flex justify-between items-center">
        <h1 className="text-2xl font-bold">Weather Agent</h1>
        <div className="flex items-center gap-4">
          <span className="text-sm text-gray-500">{user.email}</span>
          <button
            onClick={handleSignOut}
            className="text-sm text-red-500 hover:underline"
          >
            Sign out
          </button>
        </div>
      </div>

      {forbidden && (
        <div className="w-full max-w-lg border border-red-300 rounded p-4 bg-red-50 text-sm text-red-700">
          You do not have access to this agent. Please contact the
          administrator.
        </div>
      )}

      <textarea
        className="w-full max-w-lg border rounded p-3 text-sm"
        rows={3}
        placeholder="Ask about the weather anywhere..."
        value={message}
        onChange={(e) => setMessage(e.target.value)}
      />
      <button
        onClick={handleSubmit}
        disabled={fetching}
        className="bg-blue-600 text-white px-6 py-2 rounded disabled:opacity-50"
      >
        {fetching ? "Thinking..." : "Send"}
      </button>
      {response && (
        <div className="w-full max-w-lg border rounded p-4 bg-gray-50 text-sm">
          {response}
        </div>
      )}
    </main>
  );
}
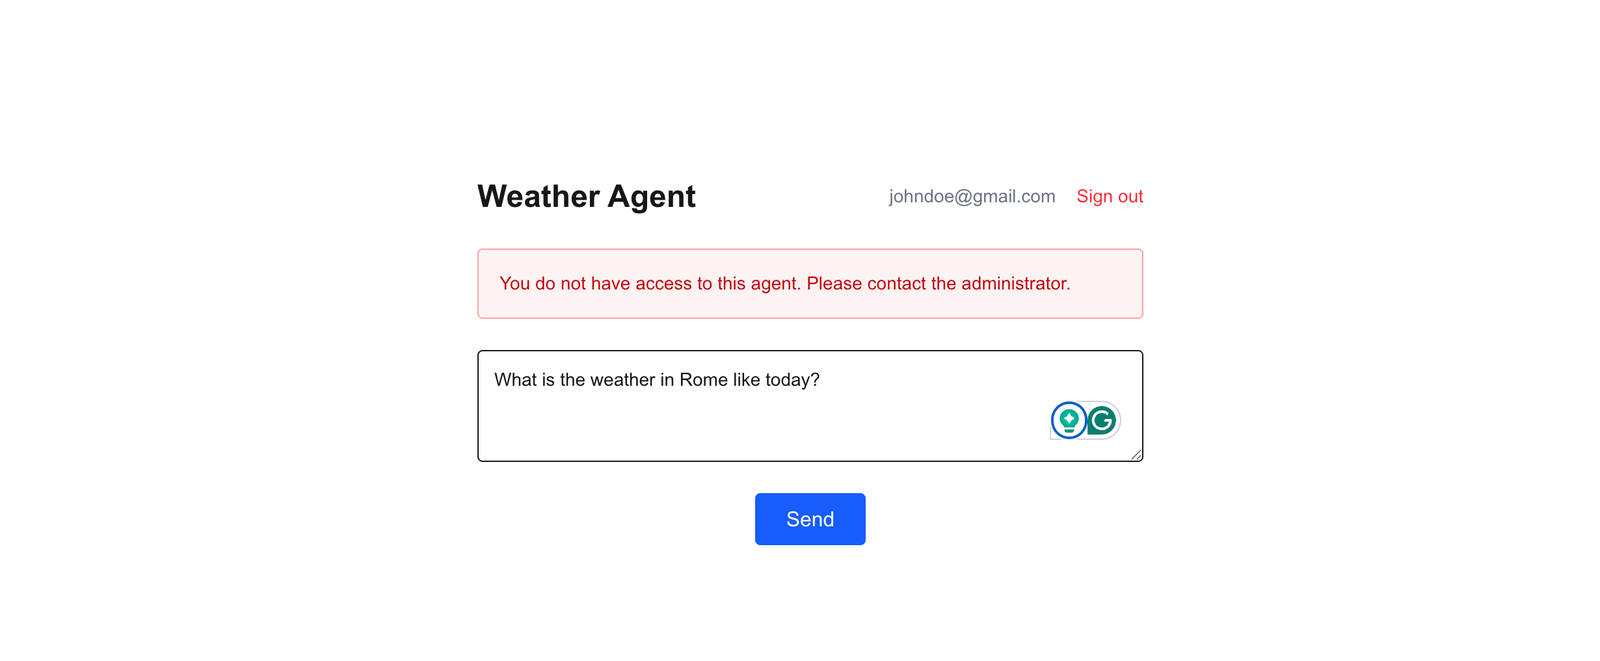
Here, we added a new forbidden state that is set to true when the user is unauthorized. In that case, a message is rendered on the screen. The user then understands what happened and what to do next (contact whoever manages access).
To test this, in the Firestore database we created earlier, create a collection called users. Follow the steps below for each user you want to grant access:
- Click “Add document.”
- Set the Document ID to the user’s Firebase UID (you’ll have to copy this from Authentication → Users in the Firebase dashboard).
- Add two fields: email and role. Email should be of type
stringwith a value of the email you want to test with. Role should also be of typestring, and its value should be either “user” or “admin,” or “blocked” if you want to deny a user access.
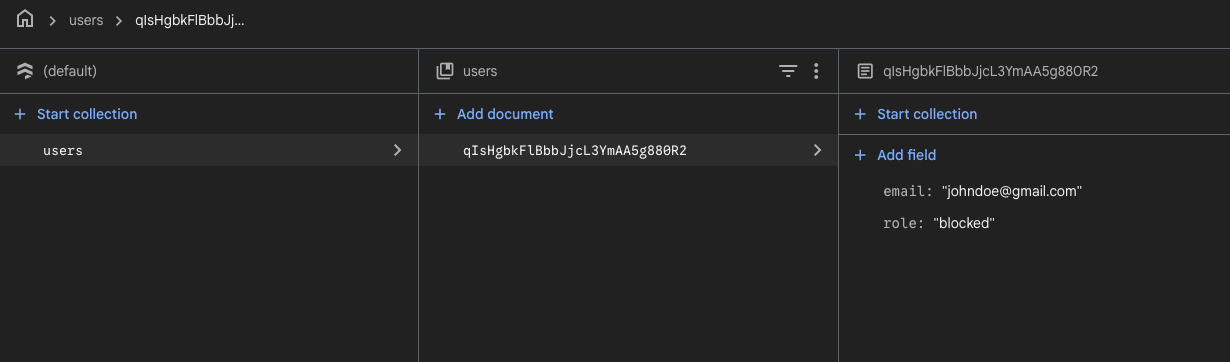
For this demo, we are manually adding users to Firestore to keep things simple. In a real application, you would automate this by creating the user’s Firestore document programmatically right after their first sign-in.
Go to the Rules tab in Firestore and update the default rules as shown below:
rules_version = '2';
service cloud.firestore {
  match /databases/{database}/documents {

    match /{document=**} {
      allow read, write: if request.time < timestamp.date(2026, 4, 23);
    }

    match /users/{uid} {
      allow read, write: if false;
    }
  }
}
This prevents any browser code from reading role data directly. The server (Admin SDK) bypasses these rules entirely, so it still works fine.
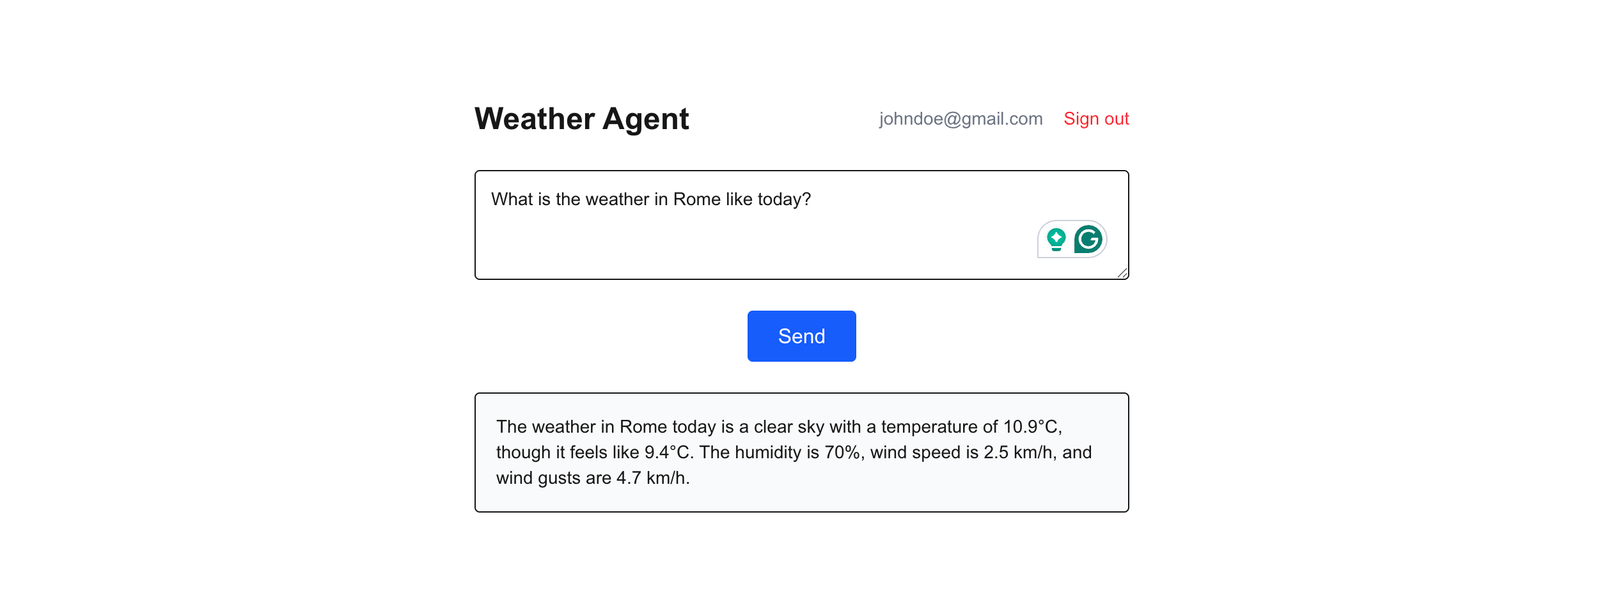
Now, you can test the application in your browser. The agent now restricts access to users with the “blocked” role.
Change the role to “admin” or “user.”
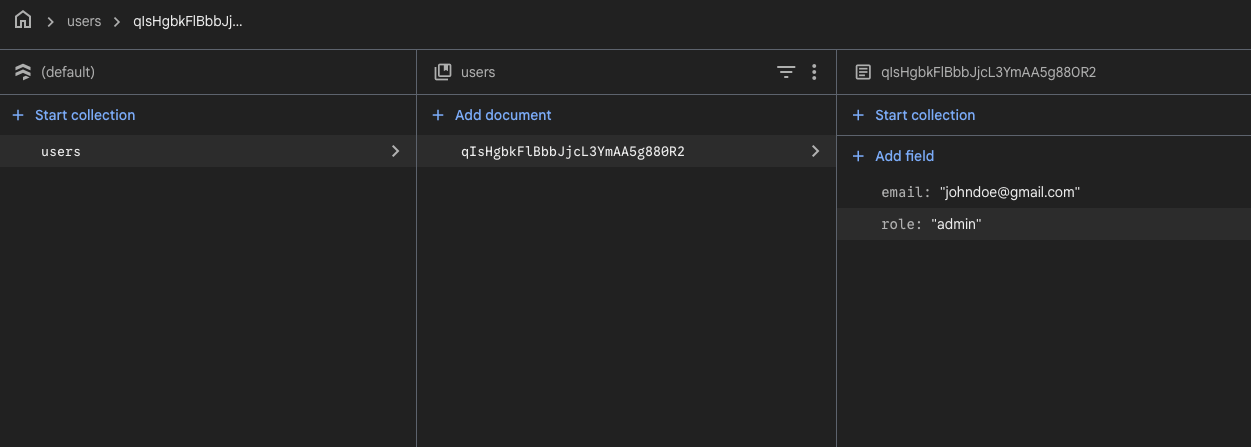
The user can now get responses to messages sent.
Conclusion
Agent authentication and authorization are key security mechanisms that cannot be overlooked. Authentication confirms who the user accessing an agent is, while authorization determines whether that user should be granted access.
The MastraAuthFirebase class makes the setup straightforward and allows us to add these security layers to our agent’s server easily.
In this article, we built a simple Next.js project that implements authentication and authorization across the frontend, the Next.js API, and the agent’s server. We covered the basics here, but you can explore the official Mastra documentation to build on what we covered.

Christian Nwamba
Chris Nwamba is a Senior Developer Advocate at AWS focusing on AWS Amplify. He is also a teacher with years of experience building products and communities.
Related Posts
Comments
All articles
Topics
Web MobileMobile
Desktop
Design
Productivity
People