
Integrating Stripe in Blazor Applications

Summarize with AI:
Learn how to add Stripe payment capabilities to your Blazor web application.
In this article, I will show you the step-by-step process you need to follow to integrate Stripe into your Blazor-based applications. This is very useful for processing online payments through debit/credit cards quickly and easily. Let’s get started!
What Is Stripe?
Stripe is an all-in-one comprehensive platform that provides tools to securely process online payments. Among its advantages, we can highlight:
- Creation of products with variations
- Handling of coupons
- Generation of subscriptions
- Billing automation
Additionally, it has the option to enable a testing environment where you can easily simulate transactions of your products, allowing for fast and reliable development.
Integrating Stripe Payments into Blazor
We will carry out the integration of payments through Stripe in different steps, starting with creating a Razor component page with a test example, as shown below.
Creating a Practical Example to Receive Payments
The first thing we will do is configure a project that simulates the generation of images using AI. The idea is that after generating five images, the user will be prompted to purchase credits to continue generating images. The steps to achieve this are:
- Create a new project using the Blazor Web App template, with Interactive render mode set to Server and Interactivity location set to Per page/component.
- Follow steps 1-4 of the installation guide for Telerik controls.
- Inside the Components | Pages folder, create a new component named
Purchase.razorand add the following code:
@page "/"
@using Telerik.Blazor.Components
@using System.ComponentModel.DataAnnotations

@rendermode InteractiveServer

<style>
    .card-style {
        box-shadow: 0 4px 8px rgba(0, 0, 0, 0.1);
        border: none;
        border-radius: 10px;
        overflow: hidden;
    }

    .card-header-content {
        background: linear-gradient(135deg, #6a11cb 0%, #2575fc 100%);
        color: white;
        padding: 20px;
        text-align: center;
    }

        .card-header-content h3 {
            margin: 0;
            font-size: 1.5rem;
        }

        .card-header-content .card-price {
            margin: 5px 0 0;
            font-size: 1.2rem;
            font-weight: bold;
        }

    .card-body {
        padding: 20px;
        text-align: center;
    }

    .card-footer {
        background-color: #f7f7f7;
        padding: 15px;
        text-align: center;
    }

    .buy-button {
        font-weight: bold;
        font-size: 1rem;
        padding: 10px 20px;
    }
</style>

<div class="container" style="max-width: 800px; margin: auto; padding: 20px;">
    <h1>AI Image Generator Demo</h1>
    <div class="generator-section" style="padding: 20px; border: 1px solid #ccc; border-radius: 8px;">
        <TelerikForm Model="@generatorInput">
            <FormValidation>
                <DataAnnotationsValidator />
            </FormValidation>
            <FormItems>
                <FormItem Field="@nameof(generatorInput.Prompt)" LabelText="Prompt">
                    <Template>
                        <TelerikTextBox @bind-Value="generatorInput.Prompt"
                                        Placeholder="Enter your prompt here"
                                        Class="full-width" />
                    </Template>
                </FormItem>
                <FormItem Field="@nameof(generatorInput.Dimensions)" LabelText="Dimensions (px)">
                    <Template>
                        <TelerikNumericTextBox @bind-Value="generatorInput.Dimensions"
                                               Min="64" Max="1024" Step="64"
                                               Class="full-width" />
                    </Template>
                </FormItem>
                <FormItem Field="@nameof(generatorInput.Style)" LabelText="Style">
                    <Template>
                        <TelerikTextBox @bind-Value="generatorInput.Style"
                                        Placeholder="Enter style"
                                        Class="full-width" />
                    </Template>
                </FormItem>
            </FormItems>
            <FormButtons></FormButtons>
        </TelerikForm>

        <div class="generate-button" style="text-align: center; margin-top: 20px;">
            <TelerikButton OnClick="@GenerateImage" Enabled="@(!isGenerating && generationCount < generationLimit)">
                @if (isGenerating)
                {
                    <span>Generating...</span>
                }
                else
                {
                    <span>Generate</span>
                }
            </TelerikButton>
        </div>

        @if (generationCount >= generationLimit)
        {
            <div class="alert alert-warning" style="margin-top: 20px; text-align: center;">
                You have reached the generation limit.
            </div>
        }

        @if (!string.IsNullOrEmpty(currentImageUrl))
        {
            <div class="generated-image" style="margin-top: 20px; text-align: center;">
                <img src="@currentImageUrl" alt="Generated Image" style="max-width: 100%; border: 1px solid #ddd; border-radius: 4px;" />
            </div>
        }
    </div>

    <div class="credits-sale-section" style="margin-top: 40px; padding: 20px; border: 1px solid #ccc; border-radius: 8px;">
        <h2 style="text-align: center;">Buy Credits</h2>
        <TelerikCard Class="card-style">
            <CardHeader>
                <div class="card-header-content">
                    <h3>1000 Credits</h3>
                    <p class="card-price">$10</p>
                </div>
            </CardHeader>
            <CardBody>
                <p>Enhance your creative journey with 1000 additional credits. Unlock more image generations and explore endless possibilities.</p>
            </CardBody>
            <CardFooter>
                <TelerikButton OnClick="@BuyCredits" ThemeColor="primary" Class="buy-button">Buy Now</TelerikButton>
            </CardFooter>
        </TelerikCard>

        @if (!string.IsNullOrEmpty(purchaseMessage))
        {
            <div class="alert alert-success" style="margin-top: 20px; text-align: center;">
                @purchaseMessage
            </div>
        }
    </div>
</div>

@code {
    public class ImageGenerationInput
    {
        public string Prompt { get; set; } = string.Empty;
        public int Dimensions { get; set; } = 256;
        public string Style { get; set; } = string.Empty;
    }

    private ImageGenerationInput generatorInput = new ImageGenerationInput();

    private bool isGenerating = false;

    private string currentImageUrl = string.Empty;

    private int generationCount = 0;

    private int generationLimit = 5;

    private readonly List<string> allImageUrls = new List<string>
    {
        "https://th.bing.com/th/id/OIG3.GgMpBxUXw4K1MHTWDfwG?pid=ImgGn",
        "https://th.bing.com/th/id/OIG2.fwYLXgRzLnnm2DMcdfl1?pid=ImgGn",
        "https://th.bing.com/th/id/OIG3.80EN2JPNx7kp5VqoB5kz?pid=ImgGn",
        "https://th.bing.com/th/id/OIG2.DR0emznkughEtqI1JLl.?pid=ImgGn",
        "https://th.bing.com/th/id/OIG4.7h3EEAkofdcgjDEjeOyg?pid=ImgGn"
    };

    private List<string> availableImageUrls = new List<string>();

    private string purchaseMessage = string.Empty;

    protected override void OnInitialized()
    {
        availableImageUrls = new List<string>(allImageUrls);
    }

    private async Task GenerateImage()
    {
        if (generationCount >= generationLimit)
        {
            return;
        }

        isGenerating = true;

        await Task.Delay(1500);

        if (availableImageUrls.Count == 0)
        {
            availableImageUrls = new List<string>(allImageUrls);
        }

        currentImageUrl = availableImageUrls[0];

        availableImageUrls.RemoveAt(0);

        generationCount++;

        isGenerating = false;
    }

    private void BuyCredits()
    {
        purchaseMessage = "Thank you for your purchase of 1000 credits!";
    }
}
In the previous code, we created a Blazor page component using Telerik controls for a beautiful display, quickly achieved thanks to the properties available in the controls.
- In the
Homecomponent, change the@pagedirective to point to a different URL, so that the new component becomes the main page:
@page "/home"
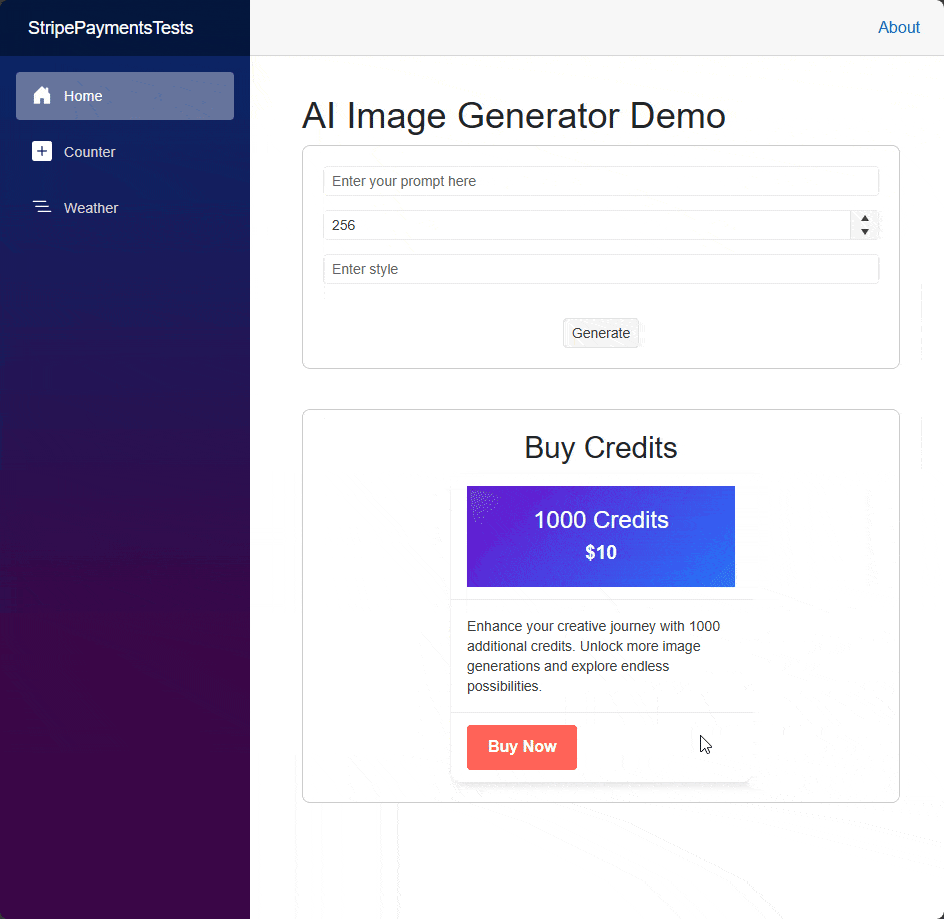
With the above steps, once the application is started, you should see an example like the following:
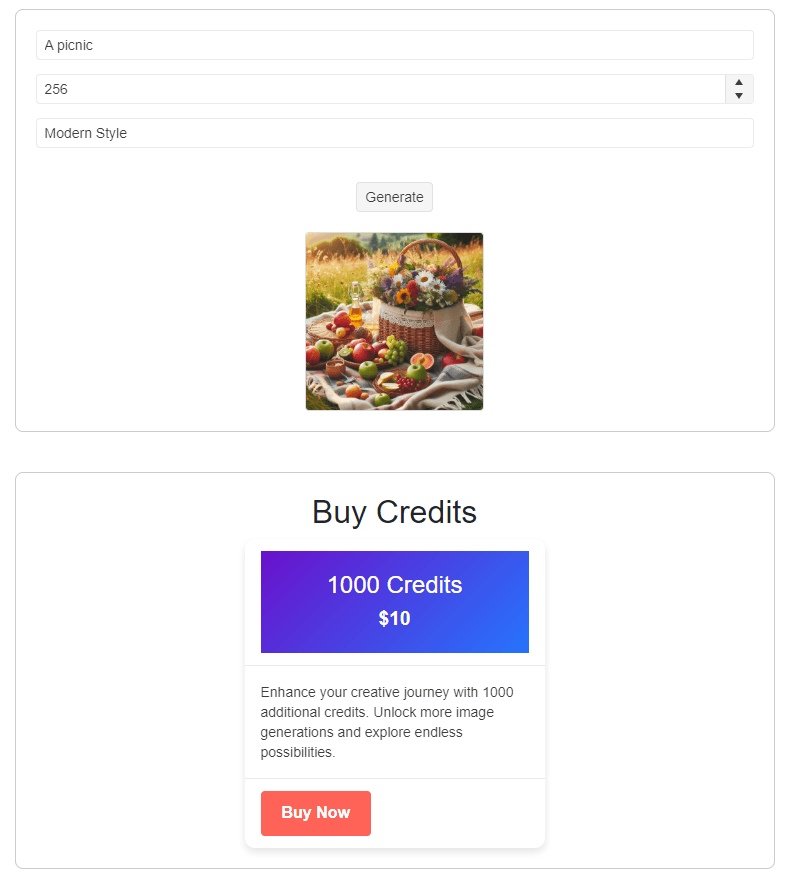
Now that we have created a test page, let’s see how to purchase credits using Stripe.
Setting Up a Product in Stripe
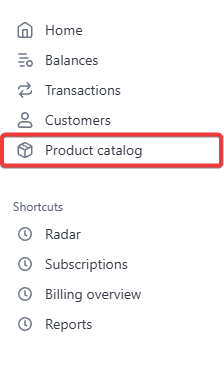
After creating the example page, go to your Stripe Dashboard to create a product. It’s important to enable the Test mode option located at the top right of your account before making any changes to avoid affecting your real configuration, including transactions, settings, etc.:

Once test mode is activated, go to the Product catalog section located in the sidebar:
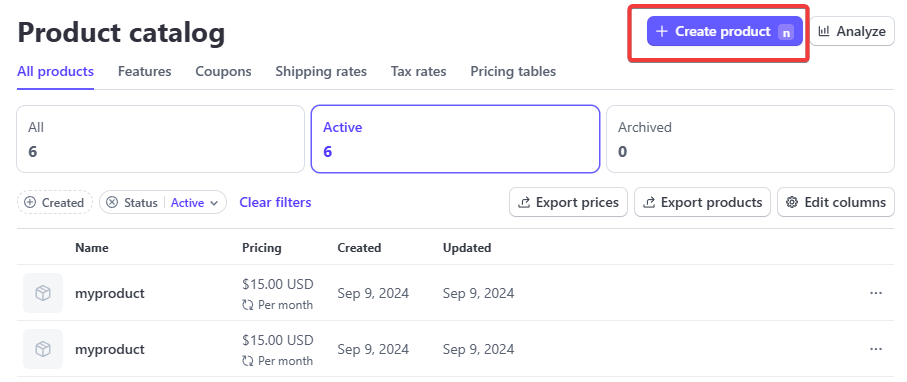
On the Product catalog page, click the Create product button to begin creating a new product:
Clicking the button will bring up a flyout where you should fill in the test product information. Once done, press the Add product button as shown below:
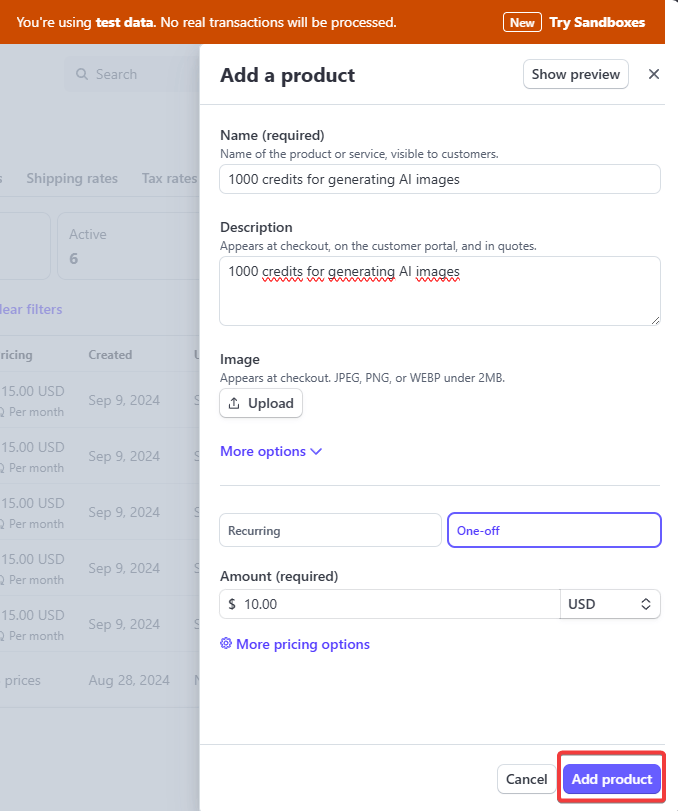
As part of the product setup, note that I selected the One-off option, indicating that the purchase is not a subscription.
After adding the product, you will see it listed in the Product catalog. If you click on the new product, you will be taken to the product page where you will find the Product ID, which is the identifier for the product.
Additionally, if you click on the three dots in the price details, you can see the Price ID, which we will need to complete the purchase from the Blazor application:
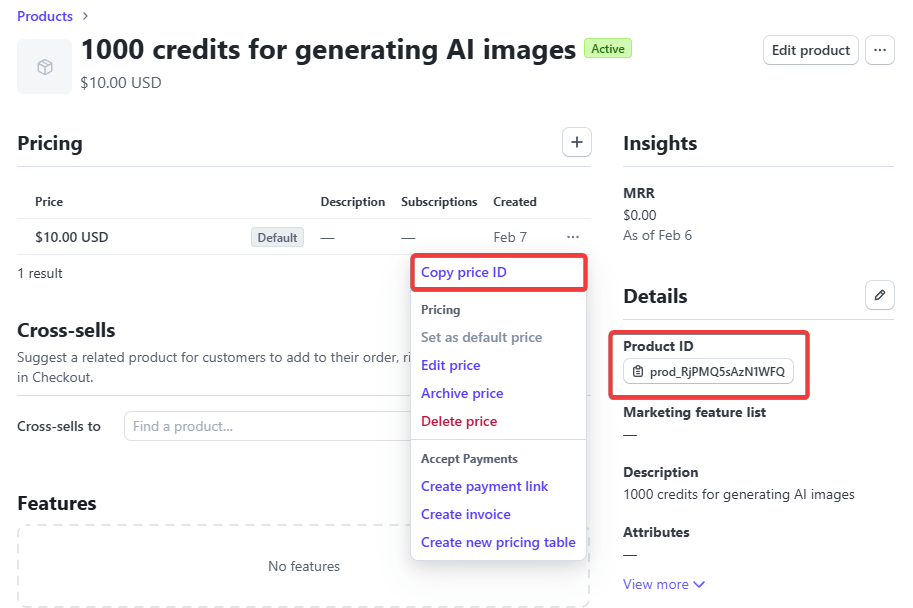
I recommend saving both of these, as we will use them later.
Creating an API Key for External Access to Stripe Services
After setting up the product to sell, we need an API Key to access Stripe’s services. To do this, navigate to the Stripe Developers Dashboard.
In this dashboard, go to the API keys tab where you can generate a key for API access. You’ll see that under Standard keys, there are two types: Publishable key and Secret key. The first is useful for non-critical operations and can be safely exposed in a frontend. The Secret key, however, should never be exposed and should be stored in an environment variable or similar secure location.
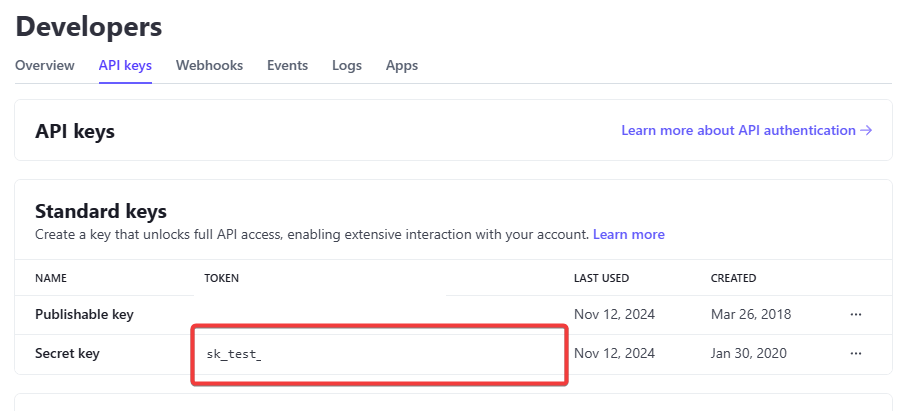
In my example, I copied the Secret key and stored it in an environment variable named Stripe__SecretKey, which I will use in the code.
Configuring the Project to Interact with Stripe
It’s time to return to Visual Studio and integrate Stripe into our project. First, install the Stripe.net package. Then, open the Program.cs file and add the obtained API key to Stripe’s configuration using the ApiKey property as follows:
...
StripeConfiguration.ApiKey = Environment.GetEnvironmentVariable("Stripe__SecretKey");

app.Run();
Replace Stripe__SecretKey with the name you assigned to the environment variable.
Creating Success and Cancellation Pages
Before implementing the redirection to the payment page, it’s important to create a success page for successful purchases and a cancellation page for failed or canceled purchases. I’ve created two simple pages:
PurchaseSuccess.razor page:
@page "/purchase-success"

<!-- Purchase Success Page -->
<div class="container mt-5">
    <div class="card mx-auto" style="max-width: 500px;">
        <div class="card-header bg-success text-white text-center">
            <h3>Purchase Successful</h3>
        </div>
        <div class="card-body text-center">
            <p class="card-text">
                Thank you for your purchase! Your transaction was completed successfully.
            </p>
            <a href="/" class="btn btn-primary">Return Home</a>
        </div>
    </div>
</div>
PurchaseFailed.razor page:
@page "/purchase-failed"

<!-- Purchase Failed Page -->
<div class="container mt-5">
    <div class="card mx-auto" style="max-width: 500px;">
        <div class="card-header bg-danger text-white text-center">
            <h3>Purchase Failed</h3>
        </div>
        <div class="card-body text-center">
            <p class="card-text">
                Unfortunately, your purchase could not be processed. Please try again later or contact support.
            </p>
            <a href="/" class="btn btn-primary">Return Home</a>
        </div>
    </div>
</div>
These pages will be part of the purchase request, so it’s essential to create them before continuing.
Redirecting the User to Stripe’s Payment Page
After completing the previous steps, navigate to the Purchase.razor file. Here, modify the BuyCredits method to create a purchase session and redirect the user to the Stripe payment page to simulate a purchase:
@page "/"
@using Stripe.Checkout
@using Telerik.Blazor.Components
@using System.ComponentModel.DataAnnotations

@inject NavigationManager NavManager

...

private async Task BuyCredits()
{
    var options = new SessionCreateOptions
        {
            LineItems = new List<SessionLineItemOptions>
                {
                    new()
                    {
                        Price = "price_1QpwY7FBZGBGO2FB2pcv0AHp",
                        Quantity = 1,
                    },
                },
            Mode = "payment",
            SuccessUrl = "https://localhost:7286/purchase-success",
            CancelUrl = "https://localhost:7286/purchase-failed",
            CustomerCreation = "always"
        };

    var service = new SessionService();
    var session = await service.CreateAsync(options);
    NavManager.NavigateTo(session.Url);
}
In the above code, note the following key points:
- A
SessionCreateOptionsobject is created to define the purchase type. - The
LineItemsproperty specifies the product to be sold through theprice IDand assigns the product quantity using theQuantityproperty. - The
Modeindicates whether the purchase is a one-time transaction or a subscription. SuccessUrlandCancelUrlspecify the URLs to redirect the user to in case of a successful or failed purchase.CustomerCreationdetermines whether the user should be created in Stripe.- The user is redirected to the payment page after the session is created.
When running the application, pressing the purchase button will redirect you to Stripe’s payment page. To make a test purchase, you can use a test card from the Stripe documentation.
Whether you successfully complete the purchase or cancel it, you will be redirected to the respective page based on the setup.
When you’re ready to switch to production, you’ll need to generate a real API key and set up a real product. You can also process payment information based on events received through a webhook, but that’s a topic for another post.
Conclusion
Throughout this article, you have learned how to integrate Stripe into Blazor, starting with product creation, API key generation and setting up a purchase session to redirect users to the payment page. Now it’s time to get started and begin accepting payments in your Blazor application.

Héctor Pérez
Héctor Pérez is a Microsoft MVP with more than 10 years of experience in software development. He is an independent consultant, working with business and government clients to achieve their goals. Additionally, he is an author of books and an instructor at El Camino Dev and Devs School.
Related Posts
Comments
All articles
Topics
Web MobileMobile
Desktop
Design
Productivity
People
