
Fantastic Alert Messages Using SweetAlert

Summarize with AI:
Learn how to use SweetAlert2 in Blazor to replace the traditional JavaScript alerts to something more custom.
In this article, I will guide you through the use of SweetAlert2 in Blazor, a powerful and beautiful replacement for traditional JavaScript alerts. It is customizable to your needs and accessible as well. Let’s get started!
Getting Started with SweetAlert2
SweetAlert2 is an open-source project that has gained popularity over the years. This is evident in its statistics, with over 17,500 stars on GitHub and nearly 1.5 billion CDN hits in the past month. I want to note that although there are NuGet packages referencing SweetAlert2, most of them are not updated with the latest features. Therefore, in this article, I will show you how to use SweetAlert2 without any NuGet packages. Let’s see how we can use this project in Blazor.
Creating a Sample Project
To see the use of SweetAlert2 in a practical case, I recommend following this guide, starting by creating a project using the Blazor Web App template with an Interactive render mode set to Server and Interactivity location set to Per page/component.
Then, complete the steps in the Getting Started section of the documentation to properly set up the project with the Progress Telerik UI for Blazor components we will use for quick and easy UI creation.
Once the project is configured, create a new Razor component called Tasks, where you should add the following code:
@page "/tasks"
@using System.Collections.ObjectModel
@rendermode InteractiveServer
@inject IJSRuntime JSRuntime

<div class="p-3">
    <h3>Tasks Management</h3>

    <div class="mb-3 d-flex align-items-start">
        <TelerikTextBox @bind-Value="newTask" Width="300px" Placeholder="New Task" />
        <TelerikButton OnClick="@AddTask" Class="ms-2">
            Add
        </TelerikButton>
    </div>

    <TelerikListView TItem="string" Data="@tasks">
        <Template Context="task">
            <div class="d-flex justify-content-between align-items-center">
                @task
                <TelerikButton OnClick="@(() => ConfirmDeleteTask(task))" ThemeColor="Danger">
                    Delete
                </TelerikButton>
            </div>
        </Template>
    </TelerikListView>
</div>

@code {
    private ObservableCollection<string> tasks = new();

    private string newTask = string.Empty;

    private void AddTask()
    {
        if (string.IsNullOrWhiteSpace(newTask))
        {
            JSRuntime.InvokeVoidAsync("alert", "The text field cannot be empty");
        }
        else
        {
            tasks.Add(newTask);
            newTask = string.Empty;

            JSRuntime.InvokeVoidAsync("alert", "Task added successfully!");
        }
    }

    private void ConfirmDeleteTask(string task)
    {
        if (task is not null)
        {
            tasks.Remove(task);
        }

        JSRuntime.InvokeVoidAsync("alert", "Task deleted successfully!");
    }
}
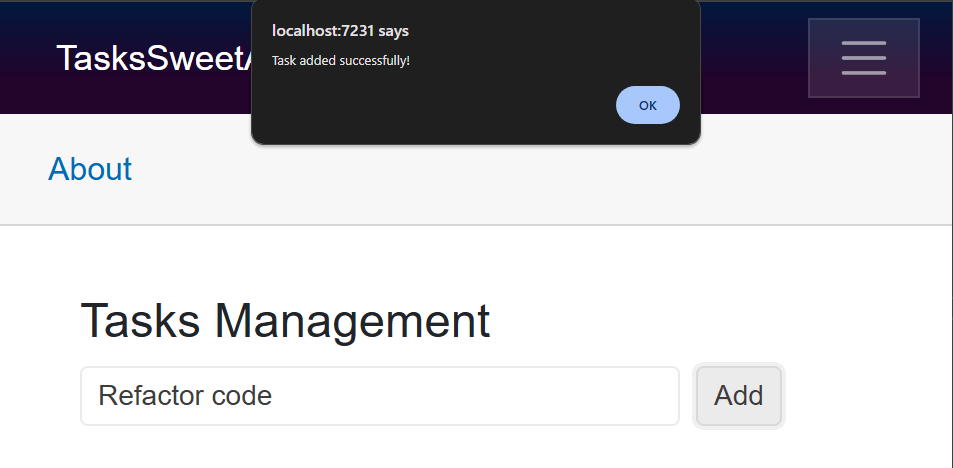
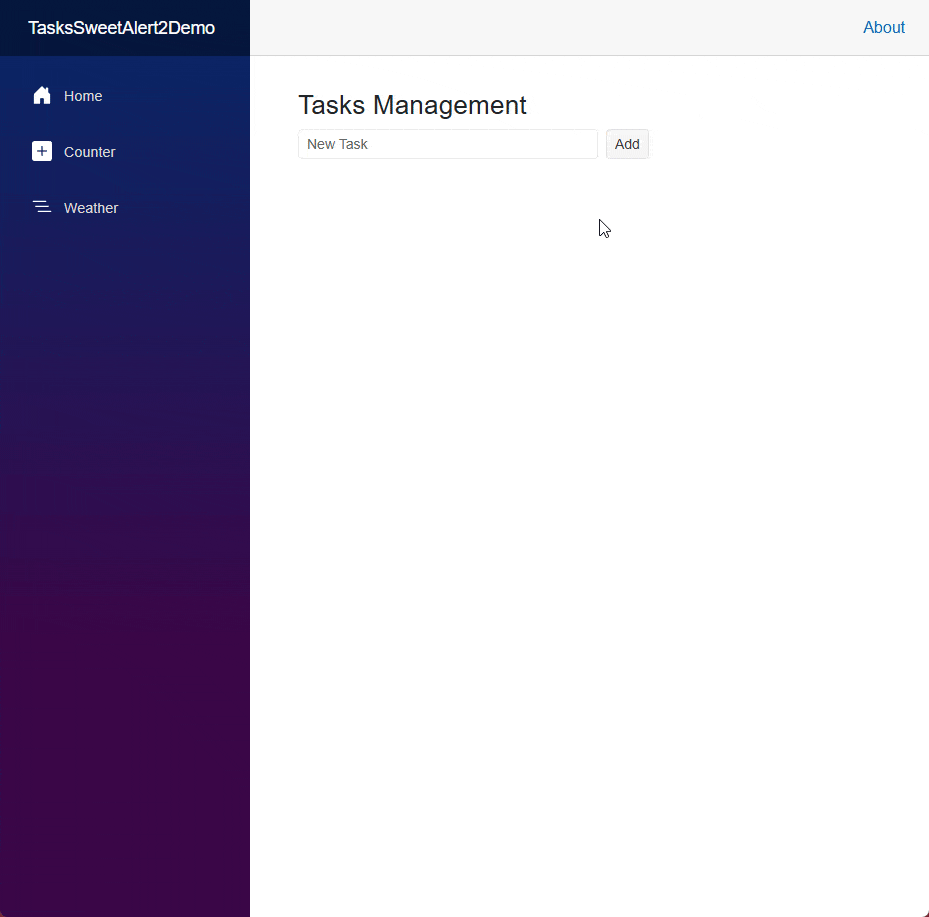
When you run the application and navigate to the tasks page, you will see that traditional JS alert windows are used, which are not aesthetically pleasing:
Let’s see how to improve the application using SweetAlert2.
Installing SweetAlert2 via the JS tag
We will install SweetAlert2 using the JS tag. To do this, navigate to the App.razor file and add the following line at the end of the Body tag:
<script src="https://cdn.jsdelivr.net/npm/sweetalert2@11"></script>
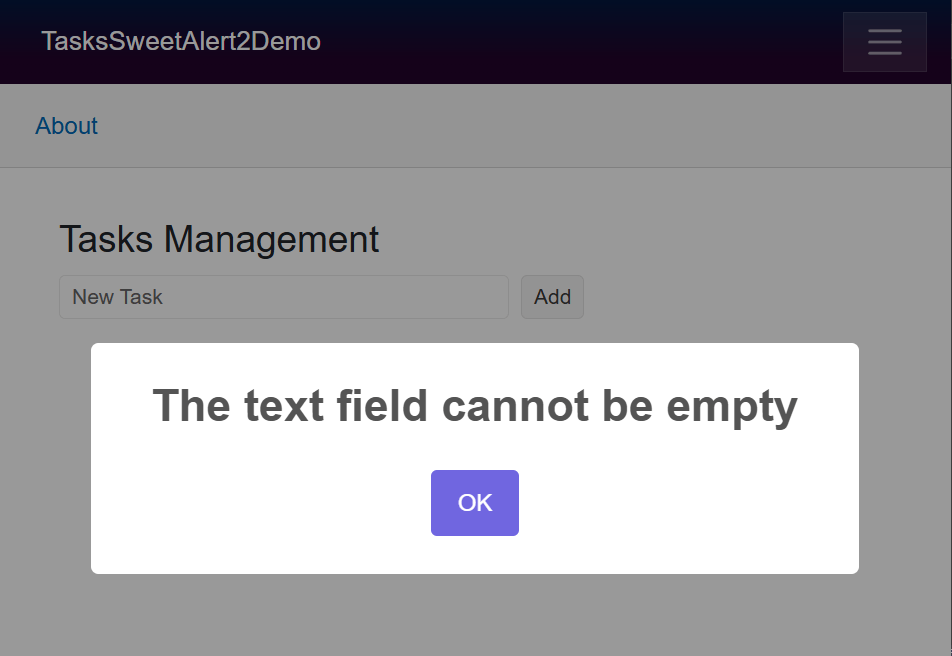
Once the tag above is added, we can return to the Tasks component and replace the classic alert with the following code:
// JSRuntime.InvokeVoidAsync("alert", "The text field cannot be empty");
JSRuntime.InvokeVoidAsync("Swal.fire", "The text field cannot be empty");
The above code displays a more visually appealing error message:
Now, let’s look at some customization options.
Customization Options Using SweetAlert2
If we refer to the official documentation of SweetAlert2, we can see many customization options for alerts. For example, if we wanted to display a title, some text and a custom icon in Blazor, we could do it using the following code:
JSRuntime.InvokeVoidAsync("Swal.fire", "Error", "The text field cannot be empty", "error");
In the code above, after invoking the fire method, the parameters represent the title, message and an icon in their respective order. Reviewing examples in the documentation, we can see some that are more complex and use a configuration object to modify the alert’s appearance and behavior. For instance, the following code enables dragging of the alert:
Swal.fire({
  title: "Drag me!",
  icon: "success",
  draggable: true
});
In Blazor, one way to recreate this object is by creating a class to represent the configuration properties, such as:
public class SwalOptions
{
    public string Title { get; set; }
    public string Icon { get; set; }
    public bool Draggable { get; set; }
}
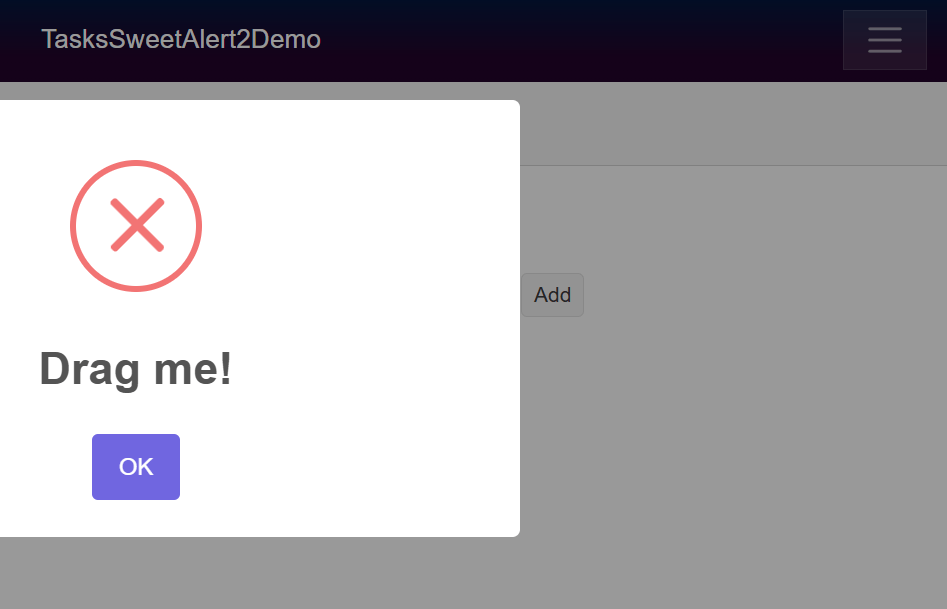
Then, we create a configuration instance with the desired values and pass it as a parameter to the fire method:
...
if (string.IsNullOrWhiteSpace(newTask))
{
    var config = new SwalOptions
        {
            Title = "Drag me!",
            Icon = "error",
            Draggable = true
        };
    JSRuntime.InvokeVoidAsync("Swal.fire", config);
}
...
This way, we will have a more striking and configurable alert, which in this example, I dragged to the left side of the application using the draggable property:
Displaying HTML Content
The documentation also demonstrates how to display custom HTML code. This is very useful since we could, for example, add a URL to a button pointing to a different page to perform an action or apply further customization. Here’s an example from the documentation:
Swal.fire({
  title: "<strong>HTML <u>example</u></strong>",
  icon: "info",
  html: `
    You can use <b>bold text</b>,
    <a href="#" autofocus>links</a>,
    and other HTML tags
  `,
  showCloseButton: true,
  showCancelButton: true,
  focusConfirm: false,
  confirmButtonText: `
    <i class="fa fa-thumbs-up"></i> Great!
  `,
  confirmButtonAriaLabel: "Thumbs up, great!",
  cancelButtonText: `
    <i class="fa fa-thumbs-down"></i>
  `,
  cancelButtonAriaLabel: "Thumbs down"
});
To represent the code above in Blazor, we can define a configuration class like this:
public class SwalOptions
{
    public string Title { get; set; }
    public string Icon { get; set; }
    public string Html { get; set; }
    public bool ShowCloseButton { get; set; }
    public bool ShowCancelButton { get; set; }
    public bool FocusConfirm { get; set; }
    public string ConfirmButtonText { get; set; }
    public string ConfirmButtonAriaLabel { get; set; }
    public string CancelButtonText { get; set; }
    public string CancelButtonAriaLabel { get; set; }
}
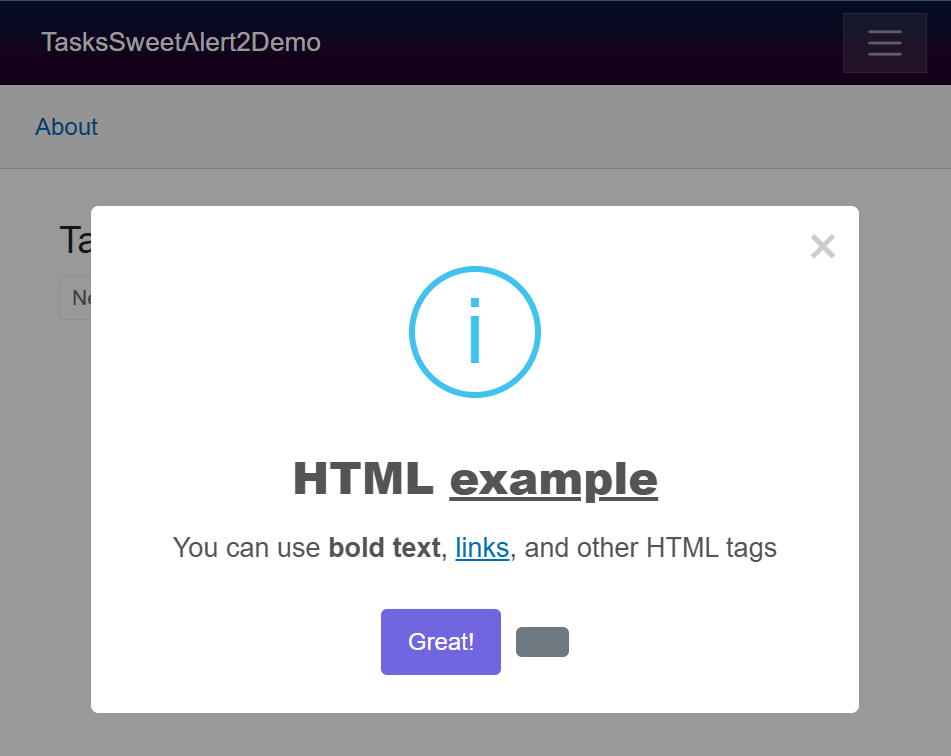
Next, we define the configuration object’s values and use it as follows:
if (string.IsNullOrWhiteSpace(newTask))
{
    var options = new SwalOptions
        {
            Title = "<strong>HTML <u>example</u></strong>",
            Icon = "info",
            Html = @"
                You can use <b>bold text</b>,
                <a href='#' autofocus>links</a>,
                and other HTML tags",
            ShowCloseButton = true,
            ShowCancelButton = true,
            FocusConfirm = false,
            ConfirmButtonText = @"
                <i class='fa fa-thumbs-up'></i> Great!",
            ConfirmButtonAriaLabel = "Thumbs up, great!",
            CancelButtonText = @"<i class='fa fa-thumbs-down'></i>",
            CancelButtonAriaLabel = "Thumbs down"
        };

    JSRuntime.InvokeVoidAsync("Swal.fire", options);
}
When running the application with the above code implemented, we will see a highly customized alert:
Responding to Button Events
SweetAlert2 is undoubtedly an excellent tool for aesthetically displaying alert messages to users. However, it wouldn’t be very useful if we couldn’t perform tasks when a button is pressed. For example, in the documentation, we can find the following snippet:
Swal.fire({
  title: "Do you want to save the changes?",
  showDenyButton: true,
  showCancelButton: true,
  confirmButtonText: "Save",
  denyButtonText: `Don't save`
}).then((result) => {
  if (result.isConfirmed) {
    Swal.fire("Saved!", "", "success");
  } else if (result.isDenied) {
    Swal.fire("Changes are not saved", "", "info");
  }
});
In the code above, we see actions linked to the button pressed. To implement this behavior in Blazor, we will create a folder named js inside wwwroot, and then create a code.js file where we will implement the JavaScript logic we want to replicate:
function showSweetAlertWithCallback(options, dotNetObject) {
    Swal.fire(options).then((result) => {
        if (result.isConfirmed) {
            dotNetObject.invokeMethodAsync('OnConfirm');
        } else if (result.isDenied) {
            dotNetObject.invokeMethodAsync('OnDeny');
        } else if (result.isDismissed) {
            dotNetObject.invokeMethodAsync('OnCancel');
        }
    });
}
You can see that dotNetObject is used in the script above, which allows us to invoke methods defined in C# code from JavaScript via the invokeMethodAsync method.
The next step is to register the script file from App.razor, for example, at the end of the Body tag:
<body>
    <Routes />
    <script src="_framework/blazor.web.js"></script>
    <script src="https://cdn.jsdelivr.net/npm/sweetalert2@11"></script>
    <script src="js/code.js"></script>
</body>
Next, let’s create the methods in C# code that will respond to the SweetAlert2 button events. To ensure the code works correctly, the JSInvokable attribute must be used for the methods that will be invoked from JavaScript. As a demonstration, when the confirmation or denial buttons are pressed, I will display a second alert:
[JSInvokable]
public async Task OnConfirm()
{
    await JSRuntime.InvokeVoidAsync("Swal.fire", new
    {
        title = "Information",
        text = "Task saved successfully!",
        icon = "success"
    });
}
[JSInvokable]
public async Task OnDeny()
{
    await JSRuntime.InvokeVoidAsync("Swal.fire", new
    {
        title = "Information",
        text = "Changes are not saved",
        icon = "info"
    });
}
[JSInvokable]
public void OnCancel()
{
    Console.WriteLine("Action was canceled by the user.");
}
Finally, we invoke the JS function using the InvokeVoidAsync method, passing as parameters the function name, the options (defined here through an anonymous class) and, very importantly, a DotNetObjectReference reference to the object where the methods to be used from JS are defined.
Since, in our example, the methods are in the component, we pass the this reference to the Create method. This allows the .NET object to be converted into a reference manageable by JavaScript:
if (string.IsNullOrWhiteSpace(newTask))
{
    var options = new
    {
        title = "Do you want to save the changes?",
        showDenyButton = true,
        showCancelButton = true,
        confirmButtonText = "Save",
        denyButtonText = "Don't save"
    };

    JSRuntime.InvokeVoidAsync("showSweetAlertWithCallback", options, DotNetObjectReference.Create(this));
}
When running the application again, we will obtain interaction when pressing any of the buttons:
This is how we can respond to the buttons defined in SweetAlert2.
Conclusion
Throughout this post, you have learned how to use SweetAlert2 in Blazor projects, from installation and usage in its simplest form, to customization options, and finally, responding to button events. It’s now your turn to get hands-on and enhance your graphical interfaces by integrating this powerful library into your projects.
If you aren’t already using Telerik UI for Blazor, remember that it comes with a 30-day free trial.

Héctor Pérez
Héctor Pérez is a Microsoft MVP with more than 10 years of experience in software development. He is an independent consultant, working with business and government clients to achieve their goals. Additionally, he is an author of books and an instructor at El Camino Dev and Devs School.
Related Posts
Comments
All articles
Topics
Web MobileMobile
Desktop
Design
Productivity
People
