Get Rolling With Kendo UI And PHP – Part 1
Summarize with AI:
Since Kendo UI was launched, we have seen quite a few questions on how to get going with Kendo UI in a real world web application. Real world applications involve frameworks like PHP, MVC, Rails and Node. They involve transactional related data and business rules. Todo Lists are great, but are not real world examples.
We are beginning development on a “medium sized” application. In order to address all platforms, we will aim to provide the source code in as many different languages / platforms as possible. We decided to start with PHP and go from there.
Now I’ll be the first to admit that I’m not a PHP developer by trade. However, we are all polyglot programmers. The days of being able to resign yourself to one technology are over. Especially when it comes to the web. In order to be an effective web developer you need to know HTML, CSS and JavaScript at a minimum. That seems like a lot of different things already. On top of that, you will probably need to know some sort of server-side technology for accessing your data. Your data itself will be in a relational or file based database which means you are going to need to know some domain specific language like SQL, or get up close and personal with Map/Reduce.
Whew! That’s a lot of different things to have to know. How do we get started?
PHP – Lets Do This
Disclaimer: There are things that I will do for the sake of this article that are not necessarily considered best practice. However, it’s sometimes hard to convey things in simple terms when trying to implement proper application architecture. I will try to point out where I can things that you should do differently than I am doing here. Please use this as a starting point and always try to architect your application as best you can given your own knowledge and availability of resources on the web.
My development environment consists of a MacBook Pro running Lion. Given that I’m on a Mac, I can install MySQL, PHP and Apache by using MAMP (Macintosh Apache MySQL PHP). Once you do this, you will have a neat environment setup for running PHP applications with a MySQL database. MAMP will run by default on port 8888 for the webserver, and the root folder will be htdocs inside of the Applications/MAMP directory.
The next step is to get an IDE. It’s all text in the end, but a good PHP IDE is a must. I started with TextMate but found the PHP support to be not as great as it is for Rails. Per a recommendation from the Zend Framework guys, I went with the Eclipse PHP development environment. You can pick up their community tools contribution to Eclipse free here.
Edit:
Per a comment from Brent below, Microsoft WebMatrix makes a great PHP IDE if you are on Windows. It's free and you can download it here.
Once you download your IDE, you are all setup to start building PHP applications.
We Need Some Data
Now you probably have some actual data just waiting for you to slap a slick interface on. I needed to get some real world data into my MySQL database, so I turned to the Northwind Database.
Any of you who have done .NET development in the past just groaned. Microsoft developers have been resigned to seeing demos with Northwind data for years now. It’s become somewhat of a laughing point to see things developed with Northwind data, but the truth of the matter is that Northwind contains some great “fake” relational data that mimics what you might find were you given the actual task of building an application on line of business data.
Northwind comes in Microsoft Access and SQL Server flavors, but someone was nice enough to port it to just about every other database type out there. You can download the .sql script here and run it in to MySQL to create the database.
Project Setup
Below is a screenshot of how my project looks in Eclipse. Normally, you would put your publicly accessible files in a “public” folder and restrict access to ones that are server only. For the sake of simplicity, all our files are public.
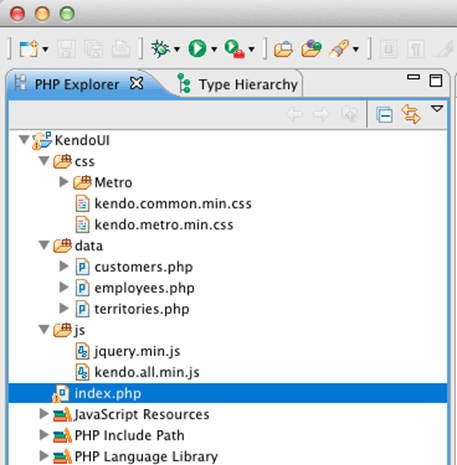
Let’s look a bit at the structure.
I have my css files for Kendo UI and images in the css folder. I am using the Metro theme because I just love it. The Kendo UI JavaScript files and jQuery are in a js folder. The startup page for my site is index.php. Additionally, I have added a data folder. In this folder I will put all of my data access. Each of these files will return to me a JSON formatted string of data from the MySQL database.
The next thing to do is to add in the CSS and JavaScript files to the head of the index.php page.
<!doCTYpe html> <html> <head> <link href="css/kendo.metro.min.css" rel="stylesheet"> <link href="css/kendo.common.min.css" rel="stylesheet"> <script src="js/jquery.min.js"></script>
    <script src="js/kendo.all.min.js"></script> </head>
So far this is probably all very familiar if you have done any PHP development in the past at all.
Interesting Factoid
See how line one specifies the doctype and it’s all mixed case? The doctype is not case sensitive, so always try to have some fun and spice it up a bit.
Create The Grid
Next, I’m just going to add an empty div and then turn that div into a grid by selecting it with a selector and calling the kendoGrid function. For more information about the basics of working with the grid, see the “Getting Started With The Kendo UI Grid” Screencast, or the Walkthrough.
This is what the whole page looks like so far. The grid has no columns and no data. Our next step is to create the .php file which will return the data from the MySQL database.
<!doCTYpe html> <html> <head> <link href="css/kendo.metro.min.css" rel="stylesheet"> <link href="css/kendo.common.min.css" rel="stylesheet"> <script src="js/jquery.min.js"></script>
    <script src="js/kendo.all.min.js"></script>
</head>
<body>
    <div id="grid"></div>
    <script>
        $(function() {
            $("#grid").kendoGrid();
    </script> </body> </html>
Connect To The Database
I am going to create a file in the data folder called employees.php. This file will connect to the MySQL instance and return all of the employees. To do this, we need to connect to the database instance using the MySQL PHP commands.
1: <?php2: $link = mysql_pconnect("localhost", "root", "root") or die("Unable To Connect To Database Server");
3: mysql_select_db("northwind") or die("Unable To Connect To Northwind");
4: 5: $arr = array();6: $rs = mysql_query("SELECT EmployeeID, LastName, FirstName FROM Employees");
7: 8: while($obj = mysql_fetch_object($rs)) {
9: $arr[] = $obj; 10: }11: echo "{\"data\":" .json_encode($arr). "}";
12: ?>
Line 2 connects to the MySQL server. The first parameter is the server name, the second is the username and the third is the password.
Line 3 selects the Northwind database.
Line 6 defines a SQL query and associates the results with the rs variable.
Lines 8 through 10 iterate over the rs variable, which holds a collection of records and stuffs each record into an array that was defined on line 5.
Line 11 returns back the results of the array using the json_encode PHP function which turns the array into formatted JSON. Additionally, I have prefixed the array of data with a top level data element. It’s typically a good idea to not have an array as your top level JSON element.
You could now hit that PHP page directly from your browser and see the results. For me, that URL is http://localhost:8888/KendoUI/data/employees.php
Wire Up The Grid
We define a data source for the grid and bind that data source to this URL which returns the JSON data. The transport defines how the grid will interact with remote endpoints, and the read method defines which URL will provide the data when the grid is loaded. Additionally, I am defining columns for the LastName and FirstName.
<body> <div id="grid"></div> <script>
        $(function() {
            $("#grid").kendoGrid({
                dataSource: {
                    transport: {
                        read: "data/employees.php"
                    },
                    schema: {
                        data: "data"
                    }
                },
                columns: [{ field: "FirstName" }, { field: "LastName" }]
            });
        });
    </script> </body>
Note that since I am not actually defining anything in the column but the field, I could have just specified the columns as:
columns: [ “FirstName”, “LastName” ]
Also notice that I only have to reference data/employees.php as the URL to read because the path is relative to the current application page being served up. I also set some schema information basically telling the grid that the repeating information that it needs to display is found in the top level data element. Let’s save and have a look at it in the browser.
There’s No Data….
I did this on purpose to demonstrate a rather important detail. If you look in the Developer Tools on Chrome you will see an error saying that “length” cannot be read off of undefined.
That’s a good indication that something is wrong with your JSON data. Either it isn’t formatted correctly, or you have some other issue. In this case the data is formatted correctly, the problem is that when the PHP file gets read it’s getting read as HTML and not as JSON.
How did I know this?
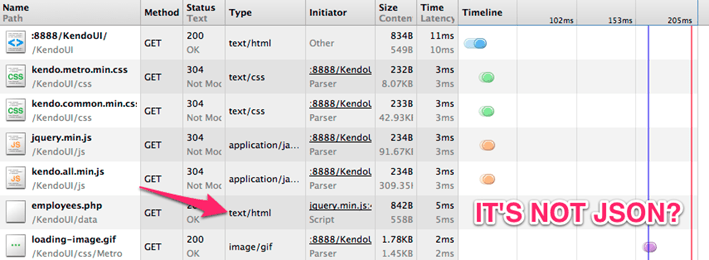
Have a look in the “Network Activity” tab in Chrome Developer Tools. You can examine the content type there.
Actually, it is JSON but the server is reporting that it’s HTML. How do we fix this? We just need to specify in our PHP file right before we echo back that the type is JSON. We do this by adding a header. The PHP file now looks like this…
<?php
$link = mysql_pconnect("localhost", "root", "root") or die("Unable To Connect To Database Server");
mysql_select_db("northwind") or die("Unable To Connect To Northwind");

$arr = array();
$rs = mysql_query("SELECT EmployeeID, LastName, FirstName FROM Employees");

while($obj = mysql_fetch_object($rs)) {
    $arr[] = $obj;
}

// add the header line to specify that the content type is JSON
header("Content-type: application/json");

echo "{\"data\":" .json_encode($arr). "}";
?>
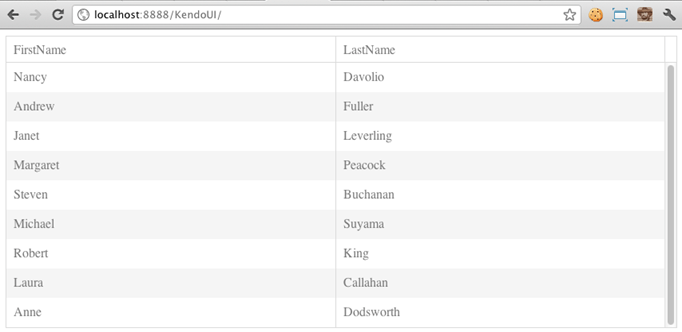
Now we can refresh the page and there will be data in the grid.
More Complex Data
That’s all well and good, but that data is really simple. Let’s make it a bit more complex. Each of these employees is in sales. They all have territories that they are responsible for. Ideally, we need to be able to display 1 to many territories per each employee.
With Kendo UI, you can define a detail template for each item in the grid. In other words, we are going to nest a grid within a grid. Inception anyone?
The Detail Template
The detail template is very simple. It’s just an empty div. We could do much more complex things here like adding in tab controls like we did in the detail template example on the demo’s page.
<script type="text/x-kendo-template" id="template">
    <div class="subgrid"></div>
</script>
For more information on Kendo UI Templates, refer to the documentation and examples. Now that we have a template defined, we need to specify in the grid that we do in fact want a detail template and a function to call each time a row is expanded to check the details.
Our main grid function now looks like this. The last two lines define the template, and to call the detailInit() function when a grid row is expanded.
$("#grid").kendoGrid({
    dataSource: {
        transport: {
            read: "data/employees.php"
        },
        schema: {
           data: "data"
        }
    },
    columns: [{ field: "FirstName" }, { field: "LastName" }],
    detailTemplate: kendo.template($("#template").html()),
    detailInit: detailInit
});
The detailInit function is fairly straightfoward.
function detailInit(e) {
    // get a reference to the current row being initialized var detailRow = e.detailRow;

    // create a subgrid for the current detail row, getting territory data for this employee
    detailRow.find(".subgrid").kendoGrid({
        dataSource: {
            transport: {
                 read: "data/territories.php"
            },
            schema: {
            data: "data"
            },
            serverFiltering: true,
            filter: { field: "EmployeeID", operator: "eq", value: e.data.EmployeeID }
       },
       columns: [{ title: "Territories", field: "TerritoryDescription" }],
    });
}
It takes in an argument of e which will contain data about the row we expanded in the grid, and the data that was in that row.
The subgrid has a class of .subgrid. The .find() is a jQuery method to search the children of the current row and find the grid. Again, having a full template here is unnecessary since all we have is a simple div, but it should give you a better idea of where you would start if you wanted to have a robust details section.
The only other thing of note in the subgrid declaration is that we are going to pass the EmployeeID on which to filter the territories by using filtering. Filtering will pass a filter object with the request to the data/territories.php file.
Create The Territories File
We need a new file for querying territories. Make one exactly like the employees.php file and call it territories.php. You can copy the code inside verbatim. We do need to swap out the SQL. It’s going to have to join several tables together to get from the Territories table back to the Employees Table.
We can get the EmployeeID off the filter object which Kendo UI sends to the server as part of the request. Filter objects are complex in their structure because they can contain extensive filtering instructions. The filter we defined above will pass an object filter that is an array of filters. Each of these filters has a field to filter on, an operator (eq, greaterthan”, ect.) and a value. We are only interested in the one value we are passing and we know the operator is always equals.
1: <?php 2: // DISCLAIMER: It is better to use prepared statements in PHP.
// This provides protection against sql injection. // http://php.net/manual/en/pdo.prepared-statements.php3: // get the employee id off the request. escape it to protect against sql injection
4: $employeeID = mysql_real_escape_string($_REQUEST["filter"]["filters"][0]["value"]);
5: 6: $link = mysql_pconnect("localhost", "root", "root") or die("Unable To Connect To Database Server");
7: mysql_select_db("northwind") or die("Unable To Connect To Northwind");
8: 9: $arr = array(); 10: $rs = mysql_query("SELECT TRIM(t.TerritoryDescription) AS TerritoryDescription
11: FROM Territories t 12: INNER JOIN EmployeeTerritories et ON t.TerritoryID = et.TerritoryID 13: INNER JOIN Employees e ON et.EmployeeID = e.EmployeeID 14: WHERE e.EmployeeID = " .$employeeID); 15: 16: while($obj = mysql_fetch_object($rs)) {
17: $arr[] = $obj; 18: } 19: 20: // add the header line to specify that the content type is JSON
21: header("Content-type: application/json");
22: 23: echo "{\"data\":" .json_encode($arr). "}";
24: 25: ?>
Line 4 pulls the filter data of the PHP $_REQUEST object. This is not necessarily the best way to read the parameter, but for the sake of simplicity and the ability to see how the filter object is actually structured, I have done it this way.
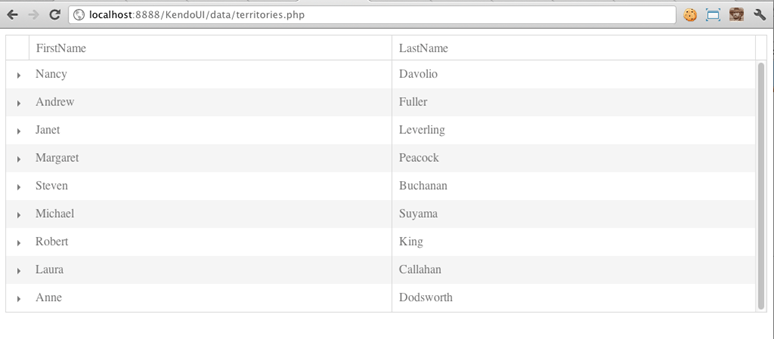
Now whenever a row is expanded, a query will be made to the territories.php file which will provide the territories that are associated with each employee.
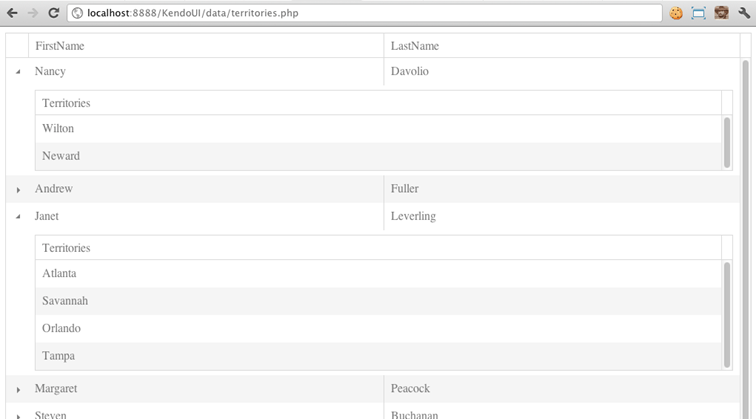
And expanded…
Wrap Up
We walked through a lot of content here, but let’s review. We accomplished the following things…
- Installed PHP, MySQL
- Created A PHP Application
- Wrote Endpoints For Returning Data
- Wired Up A Kendo UI Grid For Displaying Parent-Child Data
So what now? Next time we’ll look at adding create, update and delete functionality to the project. For now, download the source and see if you can accomplish the following items….
- Turn On Paging
- Turn On Sorting
- Enable Grouping
This is just an example of how to get rolling with PHP and Kendo UI. We are hard at work on a much larger application which will showcase many of the Kendo UI widgets, as well as key framework components like the DataSource and Templating.

Burke Holland
Burke Holland is a web developer living in Nashville, TN and was the Director of Developer Relations at Progress. He enjoys working with and meeting developers who are building mobile apps with jQuery / HTML5 and loves to hack on social API's. Burke worked for Progress as a Developer Advocate focusing on Kendo UI.


