Creating an Ecommerce Marketplace Using Kendo UI and jQuery

Summarize with AI:
In this tutorial we will build an ecommerce marketplace with HTML, CSS, jQuery and some components provided by Kendo UI.
An ecommerce application is one where people can place orders for items from their browser thus saving them the stress of going physically to the store. Many ecommerce giants have emerged over time selling various merchandise. Companies like Aliexpress and Amazon top the charts. In this tutorial, we will build a basic version of an ecommerce application.
Building components from scratch sometimes can be daunting and time consuming. To handle an aspect of our application, we will use Kendo UI components, which will save us a ton of time.
Kendo UI is a JavaScript library developed by the Telerik team at Progress. It enables you to build the UI of a web application rapidly. Kendo UI’s core library provides a wide set of easy-to-use UI components such as grids, text boxes, numeric text boxes, charts, etc. Kendo UI provides components for popular JavaScript libraries like jQuery, Angular, React and Vue.
Prerequisites
To follow this tutorial, a basic understanding of jQuery and JavaScript is required. HTML/CSS knowledge is also recommended but not mandatory.
To build this application, here are a few tools we’ll use:

Initializing the Application
Shopping carts, ecommerce and stores are buzzwords that make such a platform seem difficult to develop. While developing a fully functional/scalable ecommerce application may be tasking, implementing basic versions can be trivial to build. We will go through the steps necessary to create one with HTML/CSS, jQuery and Kendo UI.
Create a folder called marketplace and define this folder structure inside it:
marketplace/
      css/
       styles.css
      js/
       items.js
       functions.js
      index.html
For our application we will use a very minimal approach. We:
- Define a css folder to hold our stylesheet.
- Define a js to hold our jQuery functions and a items.js file containing our marketplace items.
- Finally, we make an index.html file at the base of our folder to serve as the entry point into our application.
Before anything else, let’s prepare our index.html file to receive and display contents. In your index file enter the following lines of code:
<!-- ./index.html -->
<html>
 <head>
      <title>Awesome Market</title>
         <link rel="stylesheet" href="css/styles.css">
         <link rel="stylesheet" href=" https://stackpath.bootstrapcdn.com/bootstrap/4.3.1/css/bootstrap.min.css">
         <link rel="stylesheet" href="https://use.fontawesome.com/releases/v5.7.2/css/all.css" integrity="sha384-fnmOCqbTlWIlj8LyTjo7mOUStjsKC4pOpQbqyi7RrhN7udi9RwhKkMHpvLbHG9Sr" crossorigin="anonymous">
  </head>
  <body>
     <main>
       <header>
          <nav class="navbar navbar-light bg-light justify-content-between">
                <a class="navbar-brand">MarketPlace</a>
                      <div id="cart-container">
                          <div id="cart">
                            <i class="fa fa-shopping-cart  openCloseCart" style="margin-right: 10px;" aria-hidden="true">cart</i>

                            <i class="fas fa-trash-alt"  id="emptyCart">Empty cart</i>                           </div>
                        <span id="itemCount"></span>
                </div>
              </nav>
           </header>
               <div id="shoppingCart">
                     <div id="cartItemsContainer">
                        <h2>Items in your cart</h2>
                        <i class="fa fa-times-circle-o fa-3x openCloseCart" aria-hidden="true"></i>
                        <div id="cartItems"></div>
                        <span id="cartTotal"></span>
                     </div>
                  </div>
             <div id="products" class="row">  </div>
      </main>
         <script src="https://code.jquery.com/jquery-3.3.1.js"
          integrity="sha256-2Kok7MbOyxpgUVvAk/HJ2jigOSYS2auK4Pfzbm7uH60="
          crossorigin="anonymous">
          </script>
          <script src="js/functions.js"></script>
  </body>
</html>
In our file we do a couple of things, let’s piece them out one by one.
- Import all relevant assets in via CDN. Assets include jQuery, Bootstrap and fontawesome, plus our custom stylesheet
- We then define the area where the items will be displayed:
- The header contains the current cart items and a button to empty the chart
- After that we define the div to hold the chart items whenever we view it
- The div is empty and will be auto injected with products dynamically from our jQuery functions we will write in the next section
- Finally we import jQuery and our custom js file
So far we have defined a stylesheet and a functions file with empty contents. Let’s go ahead and and fill them up.
Open up your CSS file and add the file and add the following code to it:
// css/styles.css
main {
  padding: 10px 0;
  width: 1024px;
  margin: 0 auto;
}
#cart-container {
  float: right;
  width: 210px;
  position: relative;
}
#itemCount {
  position: absolute;
  display: none;
  top: -10px;
  left: -10px;
  width: 20px;
  height: 20px;
  border-radius: 50%;
  background: red;
  color: white;
  text-align: center;
}
nav {
  margin-bottom: 30px;

nav ul {
  list-style: none;
  overflow: auto;
  width: 100%;
  background: #444444;
}
nav ul li {
  float: left;
  padding: 5px 20px;
}
nav ul li a {
  color: #fff;
  text-decoration: none;
}
nav ul li:hover {
  color: #444444;
  background: #cccccc;
}
nav ul li:hover a {
  color: #444444;
}
img {
  width: 100%;
}
.item {
  width: 31%;
  float: left;
  margin: 1%;
}
.itemText p {
  margin-bottom: 20px;
}
.price-container {
  margin-top: 20px;
}
i:hover {
  cursor: pointer;
}
#shoppingCart {
  top: 0;
  left: 0;
  height: 100%;
  width: 100%;
  display: none;
  position: absolute;
  z-index: 9999;
  background: rgba(0, 0, 0, 0.6);
}
#cartItemsContainer {
  position: relative;
  width: 600px;
  left: 50%;
  top: 150px;
  margin-left: -300px;
  padding: 40px;
  box-shadow: 0 0 10px black;
  background: #e9e9e9;
  overflow: auto;
}
#cartItemsContainer i {
  position: absolute;
  top: 20px;
  right: 20px;
}
#cartItemsContainer .itemDetails {
  overflow: auto;
  width: 100%;
  margin-bottom: 40px;
}
#emptyCart {
  display: none;
}
#cartItemsContainer .itemImage {
  float: left;
  width: 260px;
  padding: 0 40px;
}
#cartItemsContainer .itemText {
  float: right;
  width: 260px;
  padding: 0 40px;
}
#cartItemsContainer .itemText .price-container {
 margin-top: 0;
}
.removeItem {
  margin-left: 40px;
}
.col-sm-4 {
  margin-bottom: 15px;
}
Now let’s fill our items.js file with products. Add the following code to it:
// js/items.js
[
  {
    "name": "Berries",
    "price": 23.54,
    "image": "https://images.unsplash.com/photo-1488900128323-21503983a07e?ixlib=rb-1.2.1&ixid=eyJhcHBfaWQiOjEyMDd9&auto=format&fit=crop&w=400&h=400&q=80",
    "description": "Sweet popsicles to help with the heat"
  },
  {
    "name": "Orange",
    "price": 10.33,
    "image": "https://images.unsplash.com/photo-1504185945330-7a3ca1380535?ixlib=rb-1.2.1&ixid=eyJhcHBfaWQiOjEyMDd9&auto=format&fit=crop&h=340&w=340&q=80",
    "description": "Mouth watering burger. Who cares if it's healthy"
  },
  {
    "name": "Lemons",
    "price": 12.13,
    "image": "https://images.unsplash.com/photo-1504382262782-5b4ece78642b?ixlib=rb-1.2.1&ixid=eyJhcHBfaWQiOjEyMDd9&auto=format&fit=crop&w=400&h=400&q=80",
    "description": "Sumptuous egg sandwich"
  },
  {
    "name": "Bananas",
    "price": 10.33,
    "image": "https://images.unsplash.com/photo-1478369402113-1fd53f17e8b4?ixlib=rb-1.2.1&ixid=eyJhcHBfaWQiOjEyMDd9&auto=format&fit=crop&w=400&h=400&q=80",
    "description": "A great tower of pancakes. Dig in!"
  },
  {
    "name": "Apples",
    "price": 10.33,
    "image": "https://images.unsplash.com/photo-1505253304499-671c55fb57fe?ixlib=rb-1.2.1&ixid=eyJhcHBfaWQiOjEyMDd9&auto=format&fit=crop&w=400&h=400&q=80",
    "description": "Great looking Waffle to start the day"
  },
  {
    "name": "Sharifa",
    "price": 10.33,
    "image": "https://images.unsplash.com/photo-1470119693884-47d3a1d1f180?ixlib=rb-1.2.1&auto=format&fit=crop&w=400&h=400&q=80",
    "description": "What's greater than 5 minutes with grilled corn"
  }
]
N/B: All images are gotten from unsplash.
Now open your functions.js file and add the following code to it:
// js/functions.js

function init(){

 // read our array of products and display it
  $.getJSON( "js/items.js", function( json ) {

       json.forEach(function (item) {
           $("#products").append('<div class="col-sm-4"><div class="card">' +
            '<img class="card-img-top" src="' + item.image + '">' +
            '<div class="card-body">' +
            '<h5 class="card-title">' + item.name + '</h5>' +
            '<p class="card-text price">' + "Price: $" + item.price + '</p>' +
            '<p class="card-text price">' + item.description + '</p>' +
            '<a href="#" id="showPopupNotification" class="add btn btn-primary">Add to cart</a>' +
            '</div>' +
            '</div></div>');
        });
  });
}
$(init);
Using jQuery we:
- Read out the contents from our
items.jsfile - Build our product DOM Element
- Append and display it on our
index.htmlfile.
Now when you try to load your index.html, you will see a blank screen. That is because your browser is unable to read the JSON file due to something called Access control origin. To resolve that, we need to use a http-server to load our files.
First install http-server by typing the following in your terminal:
npm install -g http-server
By installing that, you make http-server available to be used anywhere in your system. Now in your terminal type the following to serve your file:
http-server -c-1
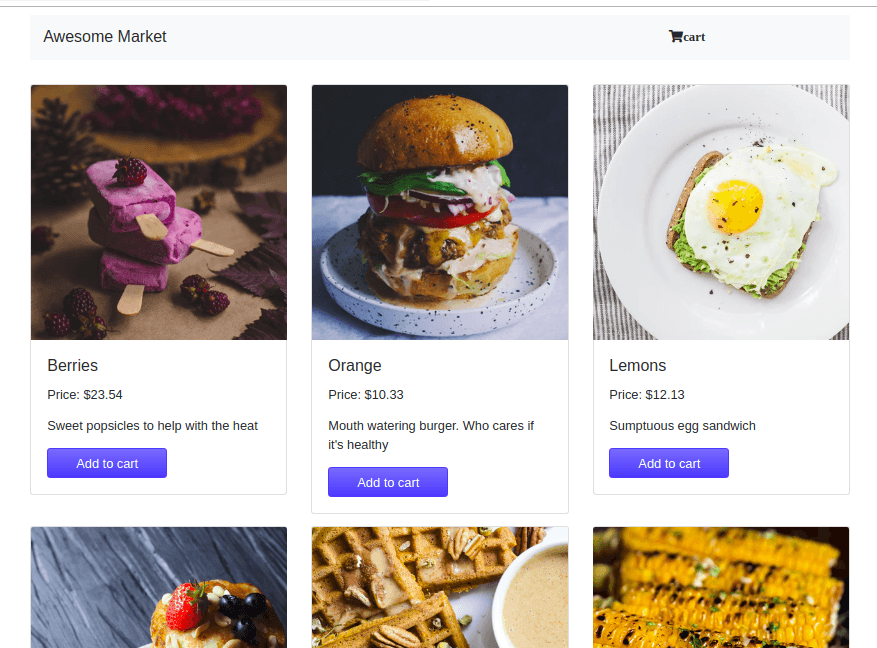
Now when you visit http://localhost:8080 in your browser, you will see this:

That means we have been able to read and display our product alongside their information. Next, we need to write functions to handle adding and removing items from the cart.
Open your functions.js and add the following code to it:
// js/functions.js

function init(){
  var itemCount = 0;
  var priceTotal = 0;
     // other code stays same

    // Add Item to Cart
  $('.add').click(function (){
    itemCount ++;

    $('#itemCount').text(itemCount).css('display', 'block');
    $(this).siblings().clone().appendTo('#cartItems').append('<button class="removeItem">Remove Item</button>');

    // Calculate Total Price
    var price = parseInt($(this).siblings().find('.price').text());
    priceTotal += price;
    $('#cartTotal').text("Total: $" + priceTotal);
  });

  // Hide and Show Cart Items
  $('.openCloseCart').click(function(){
    $('#shoppingCart').toggle();
  });

  // Empty Cart
  $('#emptyCart').click(function() {
    itemCount = 0;
    priceTotal = 0;
    $('#itemCount').css('display', 'none');
    $('#cartItems').text('');
    $('#cartTotal').text("Total: $" + priceTotal);
  });

  // Remove Item From Cart
  $('#shoppingCart').on('click', '.removeItem', function(){
    $(this).parent().remove();
    itemCount --;
    $('#itemCount').text(itemCount);

    // Remove Cost of Deleted Item from Total Price
    var price = parseInt($(this).siblings().find('.price').text());
    priceTotal -= price;
    $('#cartTotal').text("Total: €" + priceTotal);

    if (itemCount == 0) {
      $('#itemCount').css('display', 'none');
    }
  });
}
$(init);
Here we define functions we will need in our application.
- Using the
Clickmethod we target specific elements and update their state based on which button is clicked - The state is changed when the user adds, removes, empties or views the current cart
- Finally we initialize our file by using jQuery’s
$to invoke the init function once it is loaded on our index page
At this point we have a working version of an ecommerce application. Let’s add one more functionality with Kendo UI.
Adding an Empty Cart Button with Kendo UI
You may have noticed that the empty cart doesn’t display when we load our page. That is because we initially set it to not display at all from our CSS. In this section we will:
- Use Kendo UI’s button component to display and style the button
- Display the button only after at least one item is in the cart (can’t empty what’s already empty right?)
We need to import Kendo UI into our project before we can access the button component.
Open your index.html file and add the following lines of code to it (read the comments to know where to insert the snippets) :
// ./index.html

  <head>
        //import kendoui through the cdn in your header
          <link rel="stylesheet" href="https://kendo.cdn.telerik.com/2019.1.220/styles/kendo.common.min.css">
          <link rel="stylesheet" href="https://kendo.cdn.telerik.com/2019.1.220/styles/kendo.rtl.min.css">
          <link rel="stylesheet" href="https://kendo.cdn.telerik.com/2019.1.220/styles/kendo.default.min.css">
          <link rel="stylesheet" href="https://kendo.cdn.telerik.com/2019.1.220/styles/kendo.mobile.all.min.css">
          <script src="https://kendo.cdn.telerik.com/2019.1.220/js/kendo.all.min.js">           </script>
  </head>
In this file we simply import Kendo UI through the CDN.
Now let’s initialize the function in our js file. Open up the functions.js file and add this code to it:
// js/functions.js

// add inside init function
 $("#emptyCart").kendoButton();

 //insert code in bold into this function
 $(document).on("click", ".add", function (){
    // new code
   $('#emptyCart').css('display', 'inline');
 //other code stays same
Here we do two things:
- Initialize the button
- Use jQuery to display of the button
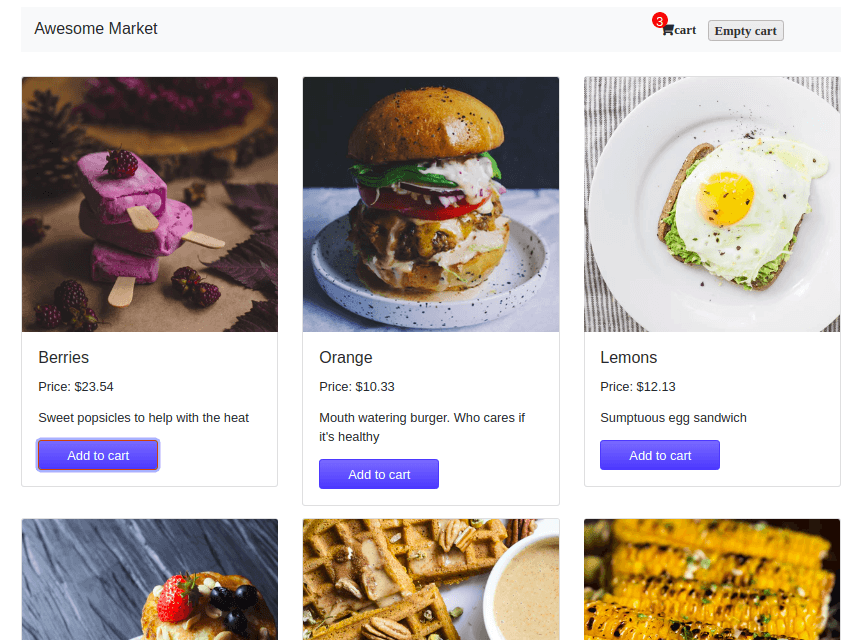
Now restart your server and visit http://localhost:8080 in the browser. Once you add an item to the cart, you will see the button display.

Conclusion
In this tutorial, we learned how to use jQuery, HTML and Kendo UI’s button component to build a basic ecommerce marketplace. The knowledge from here is merely an introduction to creating store applications. Be sure to post comments for clarity on parts you don’t understand. Happy coding.

Christian Nwamba
Chris Nwamba is a Senior Developer Advocate at AWS focusing on AWS Amplify. He is also a teacher with years of experience building products and communities.
