Creating a Complete API with Visual Studio Scaffolding

Summarize with AI:
Creating an API from scratch can be a laborious and error-prone process, especially due to syntax errors or even typos. However, Visual Studio offers a feature that makes this process easier, saving time and avoiding complications. Check out this post to learn how to use Visual Studio's scaffolding features to create a complete API.
Web APIs have become a fundamental concept in modern web applications, thanks to their versatility and simplicity. Despite recent additions to ASP.NET Core, such as minimal APIs, additional code is still required, especially when using the code-first approach with Entity Framework Core. In this approach, incorrect configurations can generate errors that often slow down development.
To make this process easier, there are features such as the scaffolding technique. In this post, we will use Visual Studio to create a complete CRUD API using the main functions available in scaffolding, such as generating a context class and configuring a connection string, among others.
What Is Scaffolding?
Scaffolding in the context of technology is a concept that refers to an approach or tool used to accelerate software development by providing a basic structure or skeleton for the code or system.
The term refers to a “scaffold,” a temporary structure commonly used in building construction to provide support while construction is underway. Similarly, in the context of technology, scaffolding provides support during software development, facilitating the creation of complex or labor-intensive parts of software that would otherwise be done manually.
Scaffolding in ASP.NET Core
In ASP.NET Core, the concept of scaffolding is present through tools that automate the creation of basic code needed to implement common web application features, such as the user interface (UI), database operations, application templates and others.
In this post, we will explore some of the latest scaffolding features provided by Visual Studio for creating a complete web API, with basic CRUD (Create, Read, Update and Delete) operations and integration with a SQL Server database. In addition, we will explore the integration with Entity Framework Core to automate the creation of classes, databases and tables used in the application.
Advantages of Using Scaffolding
Scaffolding can be useful in several development scenarios in ASP.NET Core, especially where agility and consistency are needed. Below are some scenarios where it is recommended.
- Automatically generate code: Scaffolding features allow you to generate code automatically, which minimizes the chance of typos and other issues that can occur when writing code manually.
- Speed up development: Scaffolding provides a ready-made base for CRUD operations, leaving the developer free to focus on more complex features. Some scenarios where scaffolding can be useful include technical interviews where time is usually reduced, initial projects that need a minimum viable product (MVP) and smaller projects where there is no need for much customization. For these kinds of scenarios, scaffolding can be used to quickly configure interactions with the database.
- Code standardization: The code generated by scaffolding follows the predefined ASP.NET Core standards, which helps maintain project consistency. This is especially useful in larger teams where code uniformity is important.
- Entity Framework integration: Scaffolding integrates with Entity Framework Core, allowing code generation from data models or the creation and execution of database scripts.
Prerequisites
To reproduce the example shown in the post, you must have the latest version of .NET installed. At the time the post was created, the latest stable version was .NET 8.
In addition, you must have the latest versions of Visual Studio. The post uses Visual Studio 2022 version 17.11.2.
This example uses the SQL Server database, so you must have a local connection to SQL Server. You can use another database if you find it necessary.
You can access the source code of the project created in the post in this GitHub repository: InventoryHub.
Creating the Application
To demonstrate the scaffolding functions, we will create a web API for registering products in an inventory.
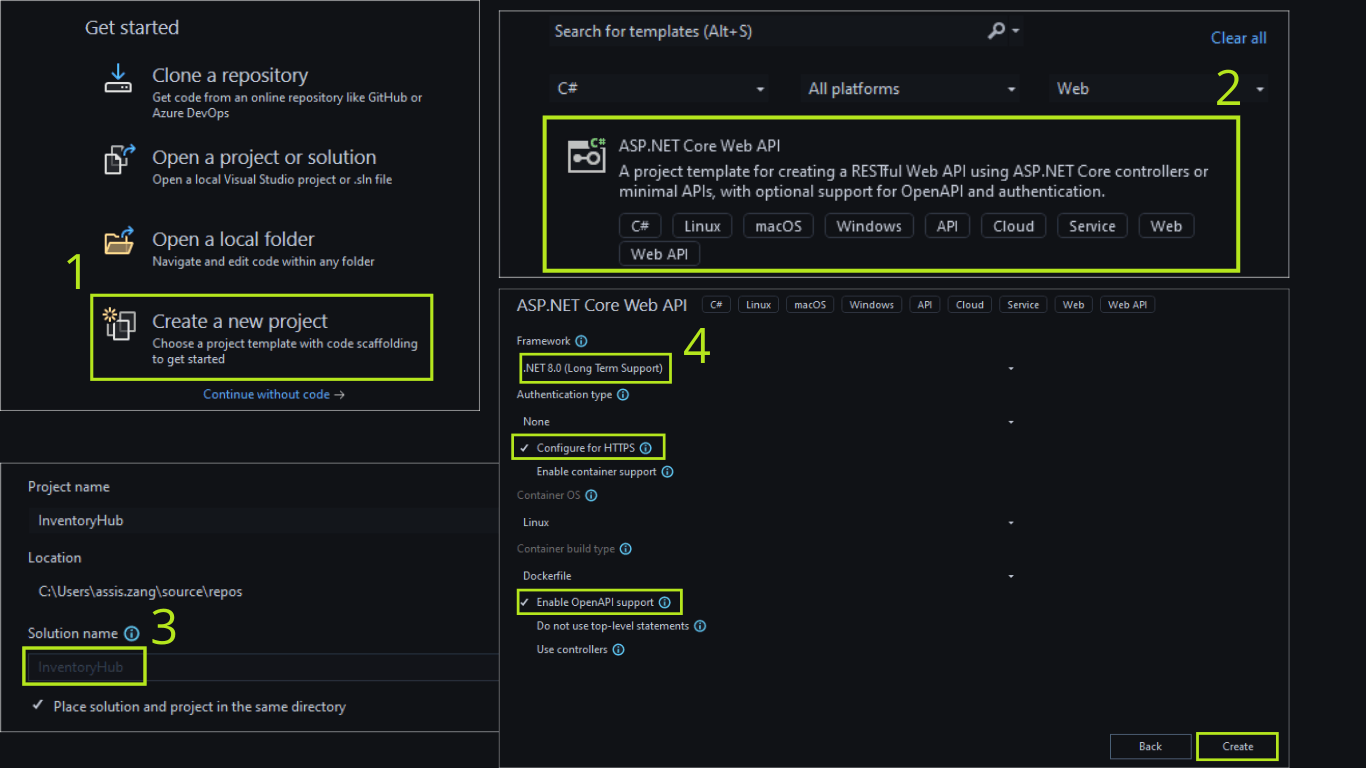
To create the base application, open Visual Studio and click on “Create a new project” and then choose the option “ASP.NET Core Web API.” Give the project a name (in the example, we used “InventoryHub”). In the next window, select the most recent .NET version (in this case, 8) and leave only these options selected: Configure for HTTPS and Enable OpenAPI support. And then click on “Create.”
Then, open the project with Visual Studio, and inside the project create a new folder called “Entities.” Inside it, create the class below:
namespace InventoryHub.Entities;
public class ProductItem
{
        public Guid Id { get; set; }
        public string Name { get; set; }
        public string Description { get; set; }
        public decimal Price { get; set; }
        public int QuantityInStock { get; set; }
        public string SKU { get; set; }

        public string Category { get; set; }
        public DateTime CreatedAt { get; set; } = DateTime.UtcNow;
        public bool IsActive { get; set; } = true;
}
Here we create a simple class to represent a product item with only properties, such as the post focus and scaffolding functions; in-depth examples of classes and functions will not be used.
Creating the Scaffolding Items
The ProductItem class created previously is the only class created manually; everything else will be done with the scaffolding functions present in Visual Studio.
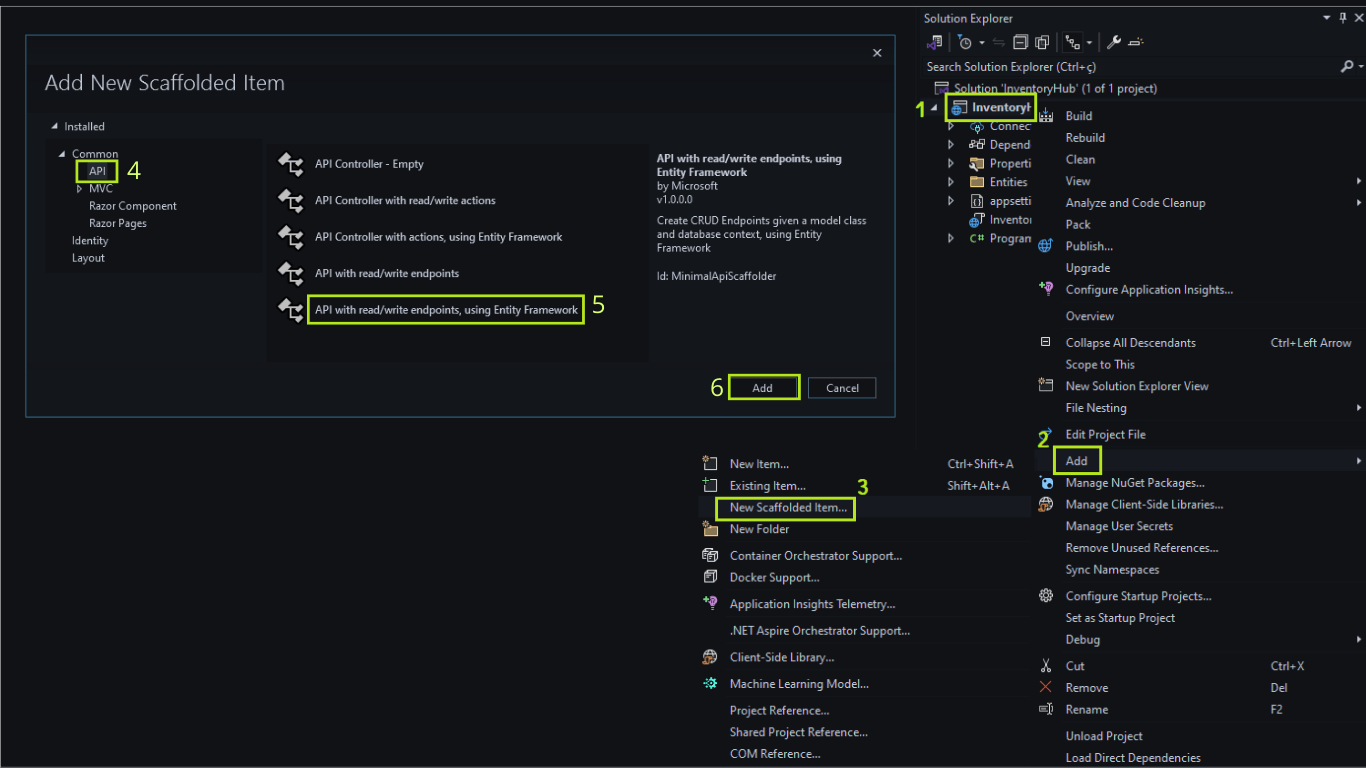
So, right-click on the project and look for the option Add > New Scaffolded Item....
In the window that opens, click on the left menu “API” and select the option “API with read/write endpoints, using Entity Framework.” Finally, click on “Add.”
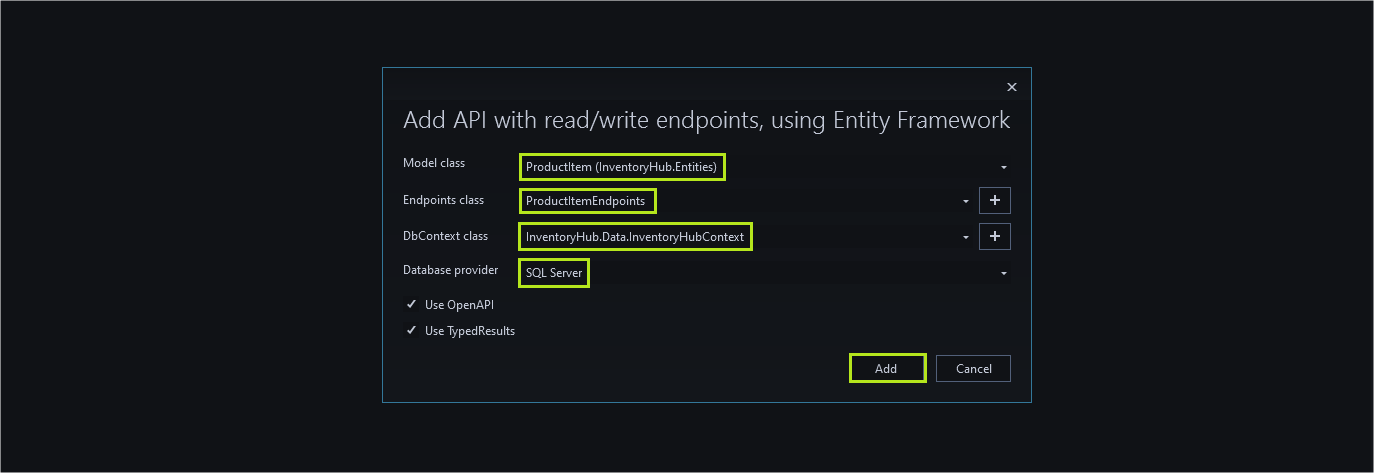
In the next window, you must configure the EF core classes and endpoints. So, in the “Model class” option, select the ProductItem class.
In the Endpoint class option, click the “+” (plus) icon and click add.
In the DbContext class option, click the “+” (plus) icon and click add.
In the Database provider option, select SQL Server (or another database you want to use)
The other options can be left with the default value. Finally, click “Add.”
Note that two new classes have been created. One is the “InventoryHubContext” class, which is inside the “Data” folder. And the other is the “ProductItemEndpoints” class.
Let’s analyze each of them.
DbContext Class
The “InventoryHubContext” class generated in the “Data” folder contains the EF Core configurations.
namespace InventoryHub.Data
{
public class InventoryHubContext : DbContext
{
public InventoryHubContext (DbContextOptions<InventoryHubContext> options)
: base(options)
{
}

public DbSet<InventoryHub.Entities.ProductItem> ProductItem { get; set; } = default!;
}
}
The class inherits from DbContext. This means that it has access to the methods and properties of DbContext, allowing it to interact with the database by performing CRUD operations.
The constructor receives an options parameter of type DbContextOptions<InventoryHubContext>, which contains configuration options for the database context (such as the connection string). It passes these options to the base class constructor (DbContext) using : base(options).
ProductItem represents a collection of entities in the context that can be queried and saved to the database.
Here, ProductItem is a property of type DbSet<ProductItem>, which indicates that it will manage instances of the ProductItem entity. The = default!; syntax is used to suppress null warnings, indicating that this property will be correctly initialized at runtime.
ProductItemEndpoints
Another class generated in the scaffolding was the ProductItemEndpoints class:
public static class ProductItemEndpoints
{
    public static void MapProductItemEndpoints (this IEndpointRouteBuilder routes)
    {
        var group = routes.MapGroup("/api/ProductItem").WithTags(nameof(ProductItem));

        group.MapGet("/", async (InventoryHubContext db) =>
        {
            return await db.ProductItem.ToListAsync();
        })
        .WithName("GetAllProductItems")
        .WithOpenApi();

        group.MapGet("/{id}", async Task<Results<Ok<ProductItem>, NotFound>> (Guid id, InventoryHubContext db) =>
        {
            return await db.ProductItem.AsNoTracking()
                .FirstOrDefaultAsync(model => model.Id == id)
                is ProductItem model
                    ? TypedResults.Ok(model)
                    : TypedResults.NotFound();
        })
        .WithName("GetProductItemById")
        .WithOpenApi();

        group.MapPut("/{id}", async Task<Results<Ok, NotFound>> (Guid id, ProductItem productItem, InventoryHubContext db) =>
        {
            var affected = await db.ProductItem
                .Where(model => model.Id == id)
                .ExecuteUpdateAsync(setters => setters
                    .SetProperty(m => m.Id, productItem.Id)
                    .SetProperty(m => m.Name, productItem.Name)
                    .SetProperty(m => m.Description, productItem.Description)
                    .SetProperty(m => m.Price, productItem.Price)
                    .SetProperty(m => m.QuantityInStock, productItem.QuantityInStock)
                    .SetProperty(m => m.SKU, productItem.SKU)
                    .SetProperty(m => m.Category, productItem.Category)
                    .SetProperty(m => m.CreatedAt, productItem.CreatedAt)
                    .SetProperty(m => m.IsActive, productItem.IsActive)
                    );
            return affected == 1 ? TypedResults.Ok() : TypedResults.NotFound();
        })
        .WithName("UpdateProductItem")
        .WithOpenApi();

        group.MapPost("/", async (ProductItem productItem, InventoryHubContext db) =>
        {
            db.ProductItem.Add(productItem);
            await db.SaveChangesAsync();
            return TypedResults.Created($"/api/ProductItem/{productItem.Id}",productItem);
        })
        .WithName("CreateProductItem")
        .WithOpenApi();

        group.MapDelete("/{id}", async Task<Results<Ok, NotFound>> (Guid id, InventoryHubContext db) =>
        {
            var affected = await db.ProductItem
                .Where(model => model.Id == id)
                .ExecuteDeleteAsync();
            return affected == 1 ? TypedResults.Ok() : TypedResults.NotFound();
        })
        .WithName("DeleteProductItem")
        .WithOpenApi();
    }
}
This class is used to organize the endpoints, preventing them from being scattered in the Program class. It contains all the endpoints required for CRUD operations (Create, Read, Update and Delete). In addition, the endpoints include advanced features, such as “Route Groups”, which allow you to group the endpoints efficiently.
Another important feature is the AsNoTracking() method, which prevents the mapping of modifications to entities by Entity Framework Core, resulting in a performance gain.
Program Class
The Program class already contains the necessary configurations created by scaffolding:
using Microsoft.EntityFrameworkCore;
using InventoryHub.Data;
using InventoryHub;

var builder = WebApplication.CreateBuilder(args);

builder.Services.AddDbContext<InventoryHubContext>(options =>
    options.UseSqlServer(builder.Configuration.GetConnectionString("InventoryHubContext") ?? throw new InvalidOperationException("Connection string 'InventoryHubContext' not found.")));

builder.Services.AddEndpointsApiExplorer();
builder.Services.AddSwaggerGen();

var app = builder.Build();

if (app.Environment.IsDevelopment())
{
    app.UseSwagger();
    app.UseSwaggerUI();
}

app.UseHttpsRedirection();

app.MapProductItemEndpoints();

app.Run();
Here, the InventoryHubContext class settings were created, passing it the connection string that has the same name as the class. If the connection string is not found, an exception is thrown.
In addition to the Swagger settings, the MapProductItemEndpoints(); method is also used, which is responsible for mapping the API endpoints.
If you open the appsettings.json file you may notice that the connection string created by scaffolding is present:
"ConnectionStrings": {
"InventoryHubContext": "Server=(localdb)\\mssqllocaldb;Database=InventoryHubContext-59891a8e-5733-47b5-8e27-26982d11988a;Trusted_Connection=True;MultipleActiveResultSets=true"
}
Note that the database name has a GUID (Globally Unique Identifier) to check that a database with that name does not already exist.
Creating and Running EF Core Migrations
EF Core’s migrations feature is used to generate database scripts and execute them, automatically creating databases and tables based on the application’s entities. To do this through scaffolding, follow the steps below:
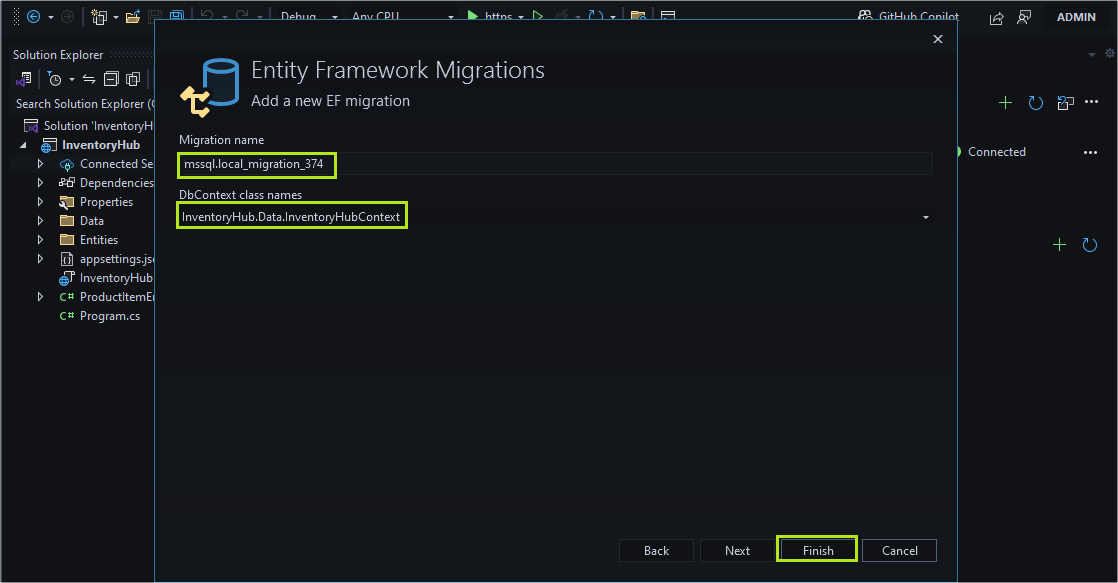
In Visual Studio, double-click on the Connected Services option.
In the window that opens, in the right corner, in the second option, click on the three dots and then select the “Add migration” option as shown in the image below:
- In the window that opens, select the context class and click finish:
Note that the migrations script files have been created. The next step is to run the scripts and generate the database and tables. So, still in the “Connected services” tab, click on the three dots, and then choose the “Update database” option and in the next window click on “Finish.”
After completing the Database update execution, you can check the database and table created by EF Core through scaffolding:
Testing the Application
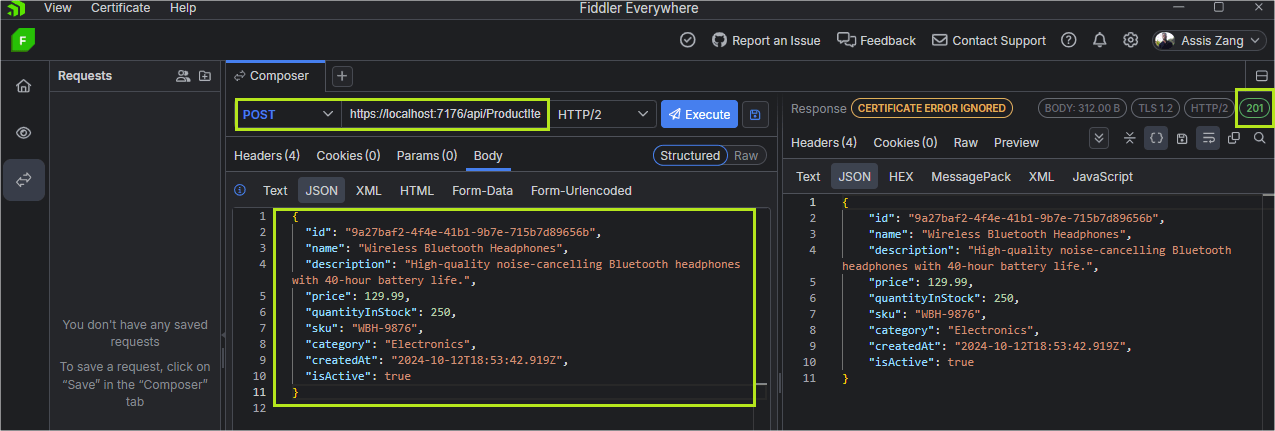
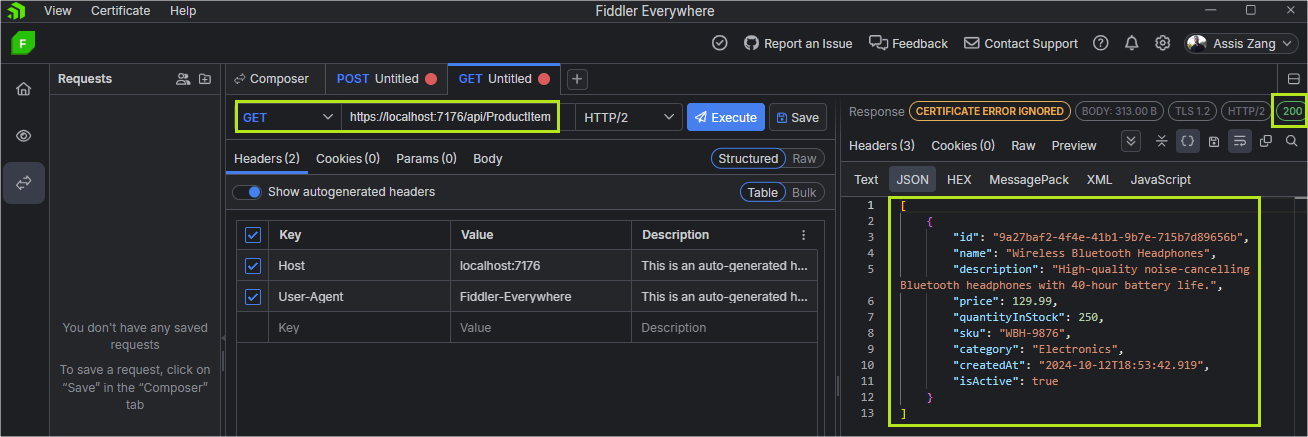
Now let’s run the application and see if it is working as expected. This post uses Progress Telerik Fiddler Everywhere to make requests to the API.
1. Inserting a New Record
You can use this JSON example to insert a new record:
{
  "id": "9a27baf2-4f4e-41b1-9b7e-715b7d89656b",
  "name": "Wireless Bluetooth Headphones",
  "description": "High-quality noise-cancelling Bluetooth headphones with 40-hour battery life.",
  "price": 129.99,
  "quantityInStock": 250,
  "sku": "WBH-9876",
  "category": "Electronics",
  "createdAt": "2024-10-12T18:53:42.919Z",
  "isActive": true
}
2. Retrieving the Data
Conclusion and Final Considerations
As you can see, the API is working correctly. This shows that all the classes and configurations needed to make a CRUD API were correctly implemented by the scaffolding resources. The only class created manually was the ProductItem entity class.
The scaffolding features available in ASP.NET Core are excellent for speeding up the development process, as they avoid the repetitive work of creating basic components, such as controllers, EF Core configuration classes, connection strings and others from defined data models and data context.
This is especially useful in projects that follow the MVC (Model-View-Controller) pattern, where standard code generation can save time and reduce manual errors. In addition, scaffolding allows developers to quickly implement CRUD (Create, Read, Update, Delete) functionalities, freeing them to focus on more complex and specific aspects of the application, such as business rules.
Finally, the use of scaffolding speeds up initial development without compromising code quality, since it follows the best practices recommended by the ASP.NET Core platform itself.

