ASP.NET Core Basics: Simplifying API Integration with Refit

Summarize with AI:
Simplifying integration with APIs reduces boilerplate code and makes the application more modular, reducing coupling and resulting in cleaner, more concise code. Learn how to use Refit in this process and the best resources for handling requests between APIs.
Modern applications use Application Programming Interfaces (APIs) to receive and send data or commands. However, creating HTTP clients to consume these APIs can be exhausting and error-prone. Fortunately, some tools make this process simpler and more efficient. One of these tools is Refit, a powerful library that facilitates integration with APIs in ASP.NET Core applications.
This post will teach you how to configure and use Refit in an ASP.NET Core application. We will cover everything from the initial configuration to creating API clients and making HTTP calls. In addition, we will see how to implement a simple authentication system using JWT and how to configure Refit to receive the authentication token. At the end of the post, you will see how Refit can significantly simplify interaction with APIs, making your code cleaner and easier to maintain.
How Are Requests Between APIs Made?
In web applications, to request an external API, it is common to implement an API client. An API client in software development refers to a component or layer of the application responsible for making requests and interactions with external APIs.
The API client encapsulates the logic necessary to send HTTP requests to API endpoints, process received responses and serialize/deserialize data between formats such as JSON.
By default, ASP.NET Core has the HttpClient class in the System.Net.Http namespace which is used to send an HTTP request and receive the request-response.
Although HttpClient is a powerful class for making HTTP requests in ASP.NET Core applications, some disadvantages must be considered. For example, the need for manual configuration and management of HttpClient instances. Plus, it may be necessary to manage timeouts, headers and handlers, leading to greater complexity and potentially resulting in errors if not managed correctly.
Another less-favorable factor of HttpClient is that it has less abstraction and greater complexity compared to other resources such as third-party libraries, which can provide high-level abstraction through typed interfaces, while HttpClient requires more boilerplate code to configure and send requests.
In scenarios where applications make many calls to external APIs, excessive use of HttpClient can result in more verbose and less readable code.
Refit: A Good Alternative to HttpClient
In scenarios that require several calls to external APIs, a good alternative to HttpClient is Refit. Refit is a library for ASP.NET Core that provides a more simplified, elegant and productive approach to integrating with HTTP APIs.
Refit allows you to define simple, strongly typed C# interfaces to describe API endpoints, eliminating the need to manually write boilerplate code to construct URLs, configure headers, serialize/deserialize JSON objects, and other low-level details. Refit encapsulates all of these standard settings, allowing customization if necessary.
Furthermore, Refit uses attributes to configure HTTP request details, such as authentication and caching. This provides a more declarative and simplified configuration of requests, making the code more intuitive. Another advantage of Refit is that it simplifies error handling based on HTTP status codes returned by APIs.
Hands-on with Refit
In this post, we will create the basic configurations of Refit, and after adding an authentication layer to the external API, for this, we will create two APIs. The first (CustomerAPI) will request the second (CustomerAdditionalInfoApi). This request will be made through Refit, where we will explore some details and see how it is possible to facilitate integration with external APIs.
The complete project code can be accessed in this repository on GitHub: Customer Manager source code.
Creating the Applications
The example in the post uses .NET Version 8, you can create the example application in older versions but problems may occur that are not covered in the post.
To create the solution and the two API projects, you can use the following commands:
dotnet new sln -n CustomerManagement
dotnet new web -n CustomerApi
dotnet new web -n CustomerAdditionalInfoApi
dotnet sln add CustomerApi/CustomerApi.csproj
dotnet sln add CustomerAdditionalInfoApi/CustomerAdditionalInfoApi.csproj
Then you can open the solution project with your favorite IDE. This post uses Visual Studio.
The first API we will work on is CustomerApi. Open a terminal in the project and run the commands below to install the necessary NuGet packages in it:
dotnet add package Refit
dotnet add package Refit.HttpClientFactory
Then, inside the project create a new folder called “Models” and inside it create the class below:
namespace CustomerApi.Models;
public class Customer
{
    public string Id { get; set; }
    public string Name { get; set; }
    public string Email { get; set; }
}
The next step is to create a Data Transfer Object (DTO) to return the data from the API request for additional information. Create a new folder called “Dtos” and inside it add the class below:
- CustomerAdditionalInfoDto
namespace CustomerApi.Dtos;
public class CustomerAdditionalInfoDto
{
    public string Id { get; set; }
    public string CustomerId { get; set; }
    public string Address { get; set; }
    public string PhoneNumber { get; set; }
}
Now let’s create the interface that will be used by Refit to implement the endpoint for the external API. So, within the CustomerAPI project, create a new folder called “Repositories.” Within it, create another folder called “Interfaces” and within that add the interface below:
using CustomerApi.Dtos;
using Refit;

namespace CustomerApi.Repositories.Interfaces;
public interface ICustomerAdditionalInfoApi
{
    [Get("/customerAdditionalInfos/{customerId}")]
    Task<CustomerAdditionalInfoDto> GetCustomerAdditionalInfo(string customerId);
}
Note that in this interface a method is being declared to fetch additional data from a customer using the id as a parameter. In addition, the [Get("/customerAdditionalInfos/{customerId}")] attribute of Refit is used, which declares that the HTTP method is a GET and the route to be accessed is also declared: "/customerAdditionalInfos/{customerId}".
Now let’s configure Refit in the project’s Program class. To do this, simply add the following code just below where the builder variable is created:
builder.Services
    .AddRefitClient<ICustomerAdditionalInfoApi>()
    .ConfigureHttpClient(c => c.BaseAddress = new Uri("http://localhost:5080"));
Here we are informing Refit of the interface it should use to create the abstraction for accessing external APIs. Also, we are passing the Uniform Resource Identifier (Uri) as “http://localhost:5080” which is the http address and port that will be running the external API.
To keep things simple, in this example, we are configuring the Uri directly in the ConfigureHttpClient() method, but in real-world scenarios, this information must be stored in secure locations such as cloud storage hosts protected by encryption.
Now let’s add the endpoint that will communicate with the additional information API:
app.MapGet("/customers/{id}/additionalInfo", async (string id, ICustomerAdditionalInfoApi additionalInfoApi) =>
{
    try
    {
        var info = await additionalInfoApi.GetCustomerAdditionalInfo(id);

        return Results.Ok(info);
    }
    catch (ApiException ex) when (ex.StatusCode == HttpStatusCode.NotFound)
    {
        return Results.NotFound($"Additional information not found for the customer id: {id}");
    }
});
In this endpoint, we are using the interface that implements Refit to access the external API and fetch additional information from the customer. If the data is found, it is returned; if not, if the return is a 404 NotFound status, an error is returned stating that no additional information was found for that customer.
Note how simple it is to request an API through Refit, allowing you to add as many APIs and endpoints as necessary. And it is possible to handle the API return through HTTP status codes.
The first API is ready, now let’s implement the second API, which will be accessed via Refit by the first. Inside the project CustomerAdditionalInfoApi, create a new folder called “Models,” and inside that create the class below:
- CustomerAdditionalInfo
   public string Id { get; set; }
    public string CustomerId { get; set; }
    public string Address { get; set; }
    public string PhoneNumber { get; set; }
And in the Program class add the code below:
app.MapGet("/customerAdditionalInfos/{customerId}", async (string customerId) =>
{
    var customerAdditionalInfo = GetCustomerAdditionalInfos().FirstOrDefault(a => a.CustomerId == customerId);

    return customerAdditionalInfo is CustomerAdditionalInfo info ? Results.Ok(info) : Results.NotFound();
});

List<CustomerAdditionalInfo> GetCustomerAdditionalInfos()
{
    return new List<CustomerAdditionalInfo>
        {
            new CustomerAdditionalInfo
            {
                Id = "6FE892BB",
                CustomerId = "35A51B05",
                Address = "200 John Wesley Blvd, Bossier City, Louisiana, USA",
                PhoneNumber = "555-1234"
            },
            new CustomerAdditionalInfo
            {
                Id = "189DF59F",
                CustomerId = "4D8AD7B2",
                Address = "103100 Overseas Hwy, Key Florida, USA",
                PhoneNumber = "555-5678"
            },
            new CustomerAdditionalInfo
            {
                Id = "A9374B16",
                CustomerId = "23D4FCC2",
                Address = "6175 Brandt Pike, Huber Heights, Ohio, USA",
                PhoneNumber = "555-8765"
            }
        };
}
Note that here we are not using a database—we are just creating a simple API to return some sample data through an endpoint.
Another necessary configuration is defining the port configured in the other API. So, inside the Properties folder, in the launchSettings.json file within the profiles schema change the applicationUrl key port to 5080. This is so that the application starts on this port, which was configured in the customer’s API.
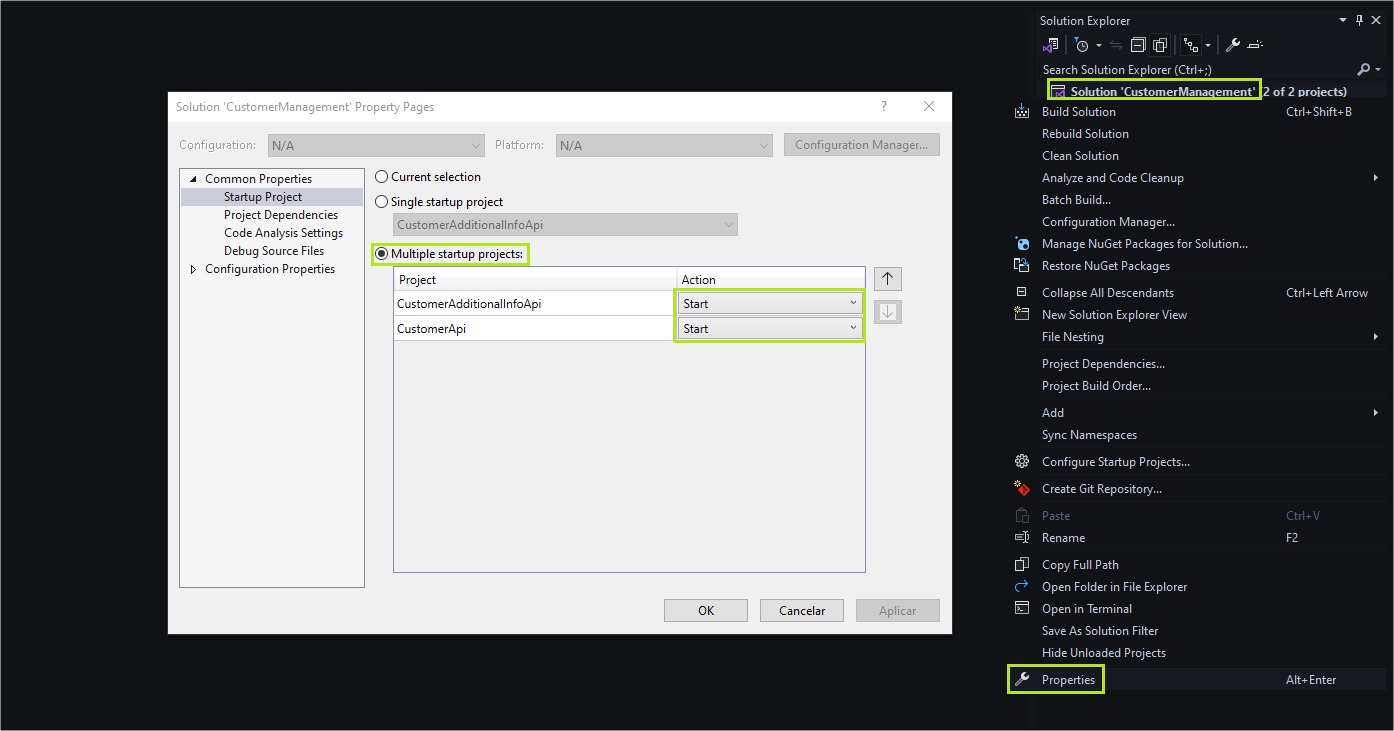
Now let’s run both applications and verify if Refit is working. In Visual Studio, right-click on the solution, and choose the properties option. In the open window, select Multiple startup projects and the Start option for both.

Then, run the applications.
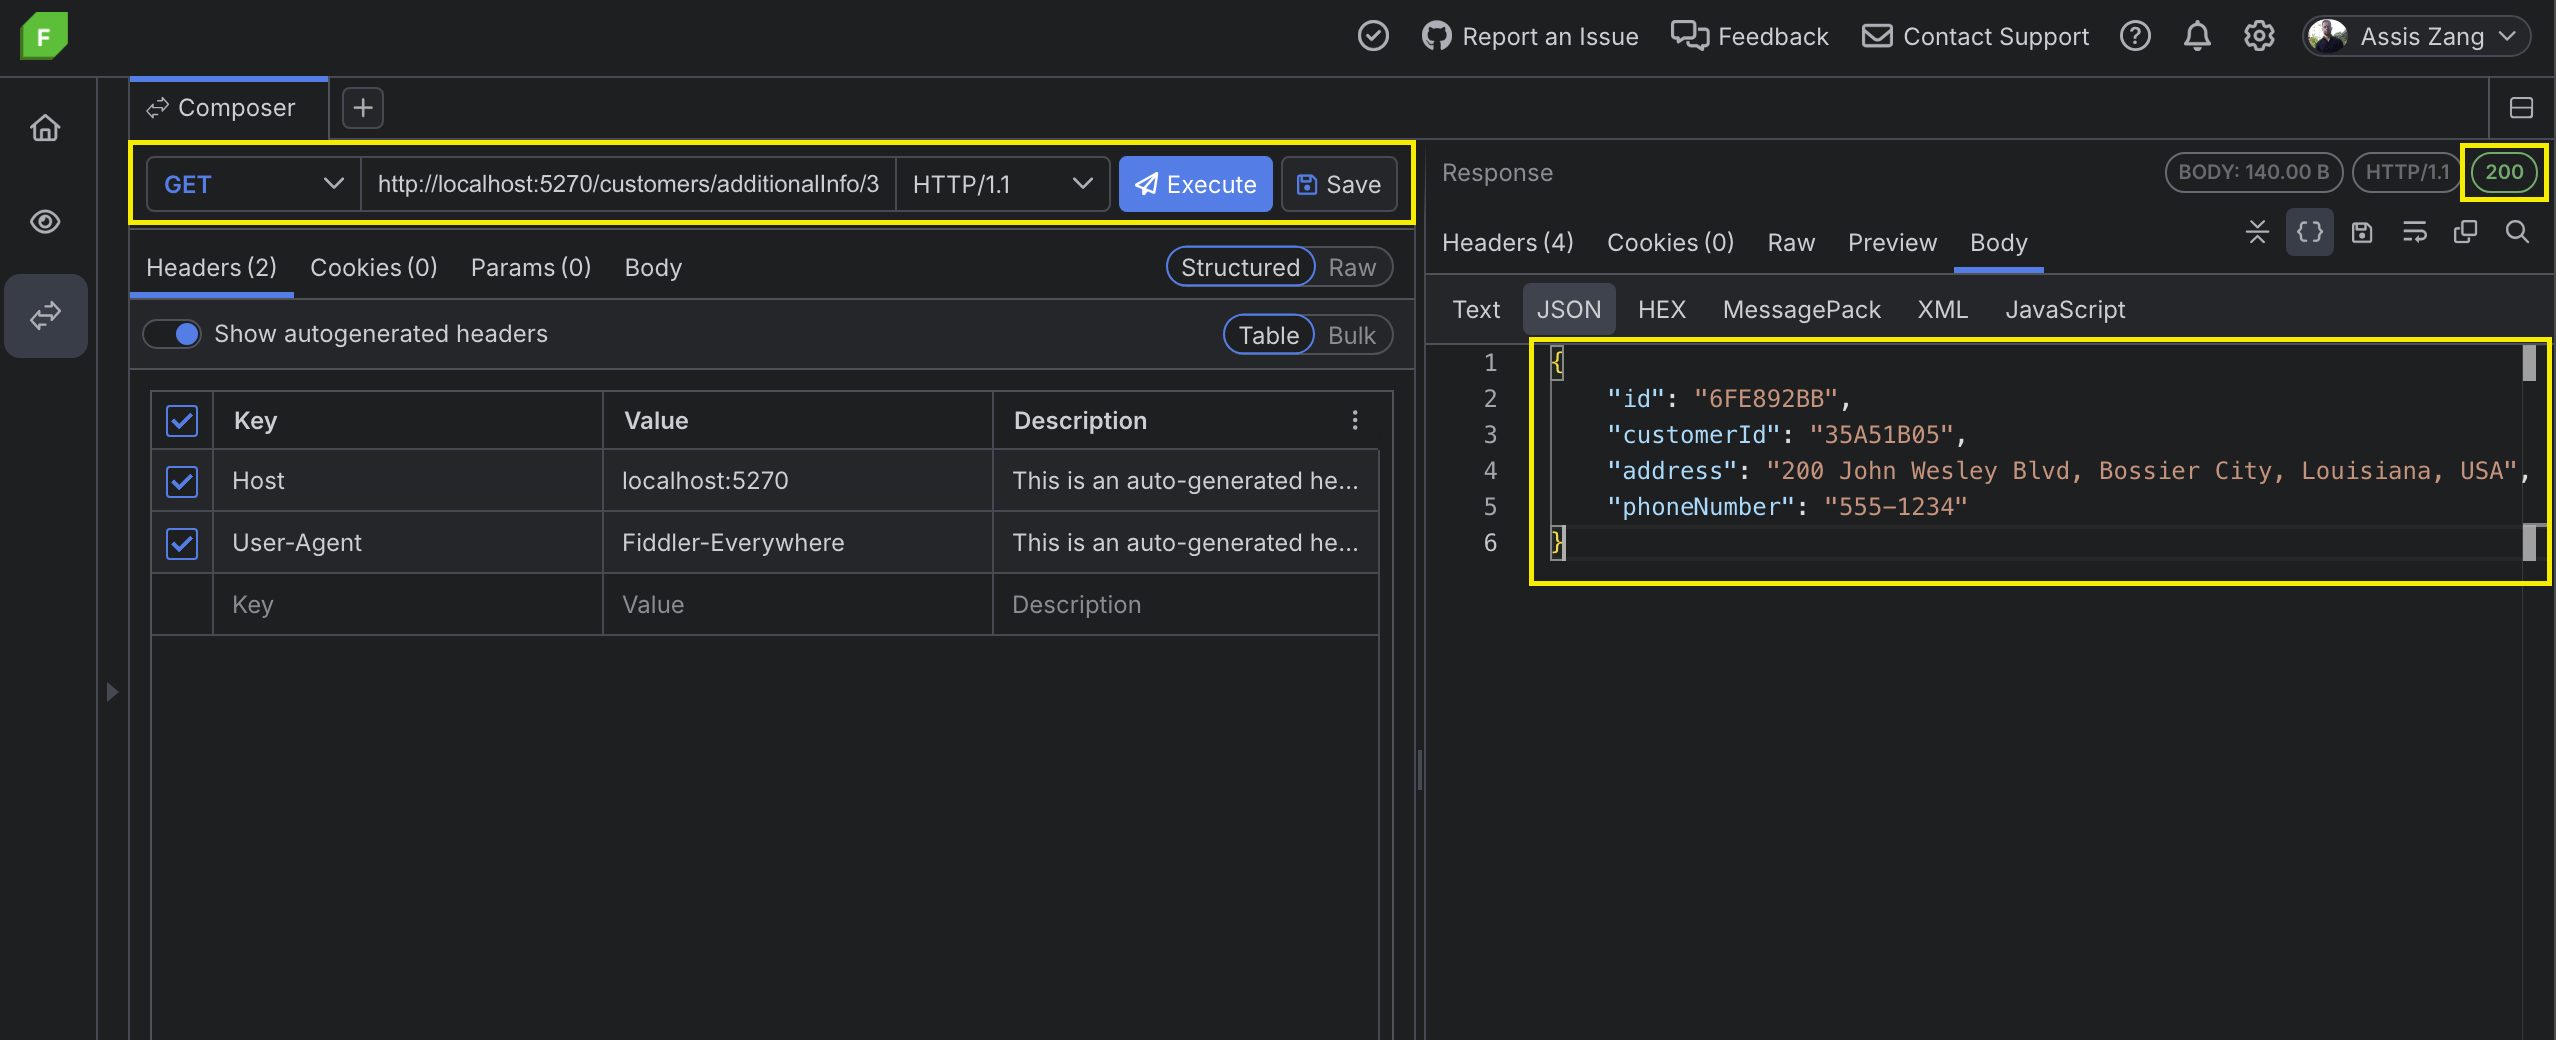
This post uses Progress Telerik Fiddler Everywhere to request. So in Fiddler execute a request to the endpoint http://localhost:PORT/customers/additionalInfo/4D8AD7B2. Here we are making a request to the Customer API passing the customer ID in the URL, which makes the request to the second API (CustomerAdditionalInfoAPI) and returns the customer data.

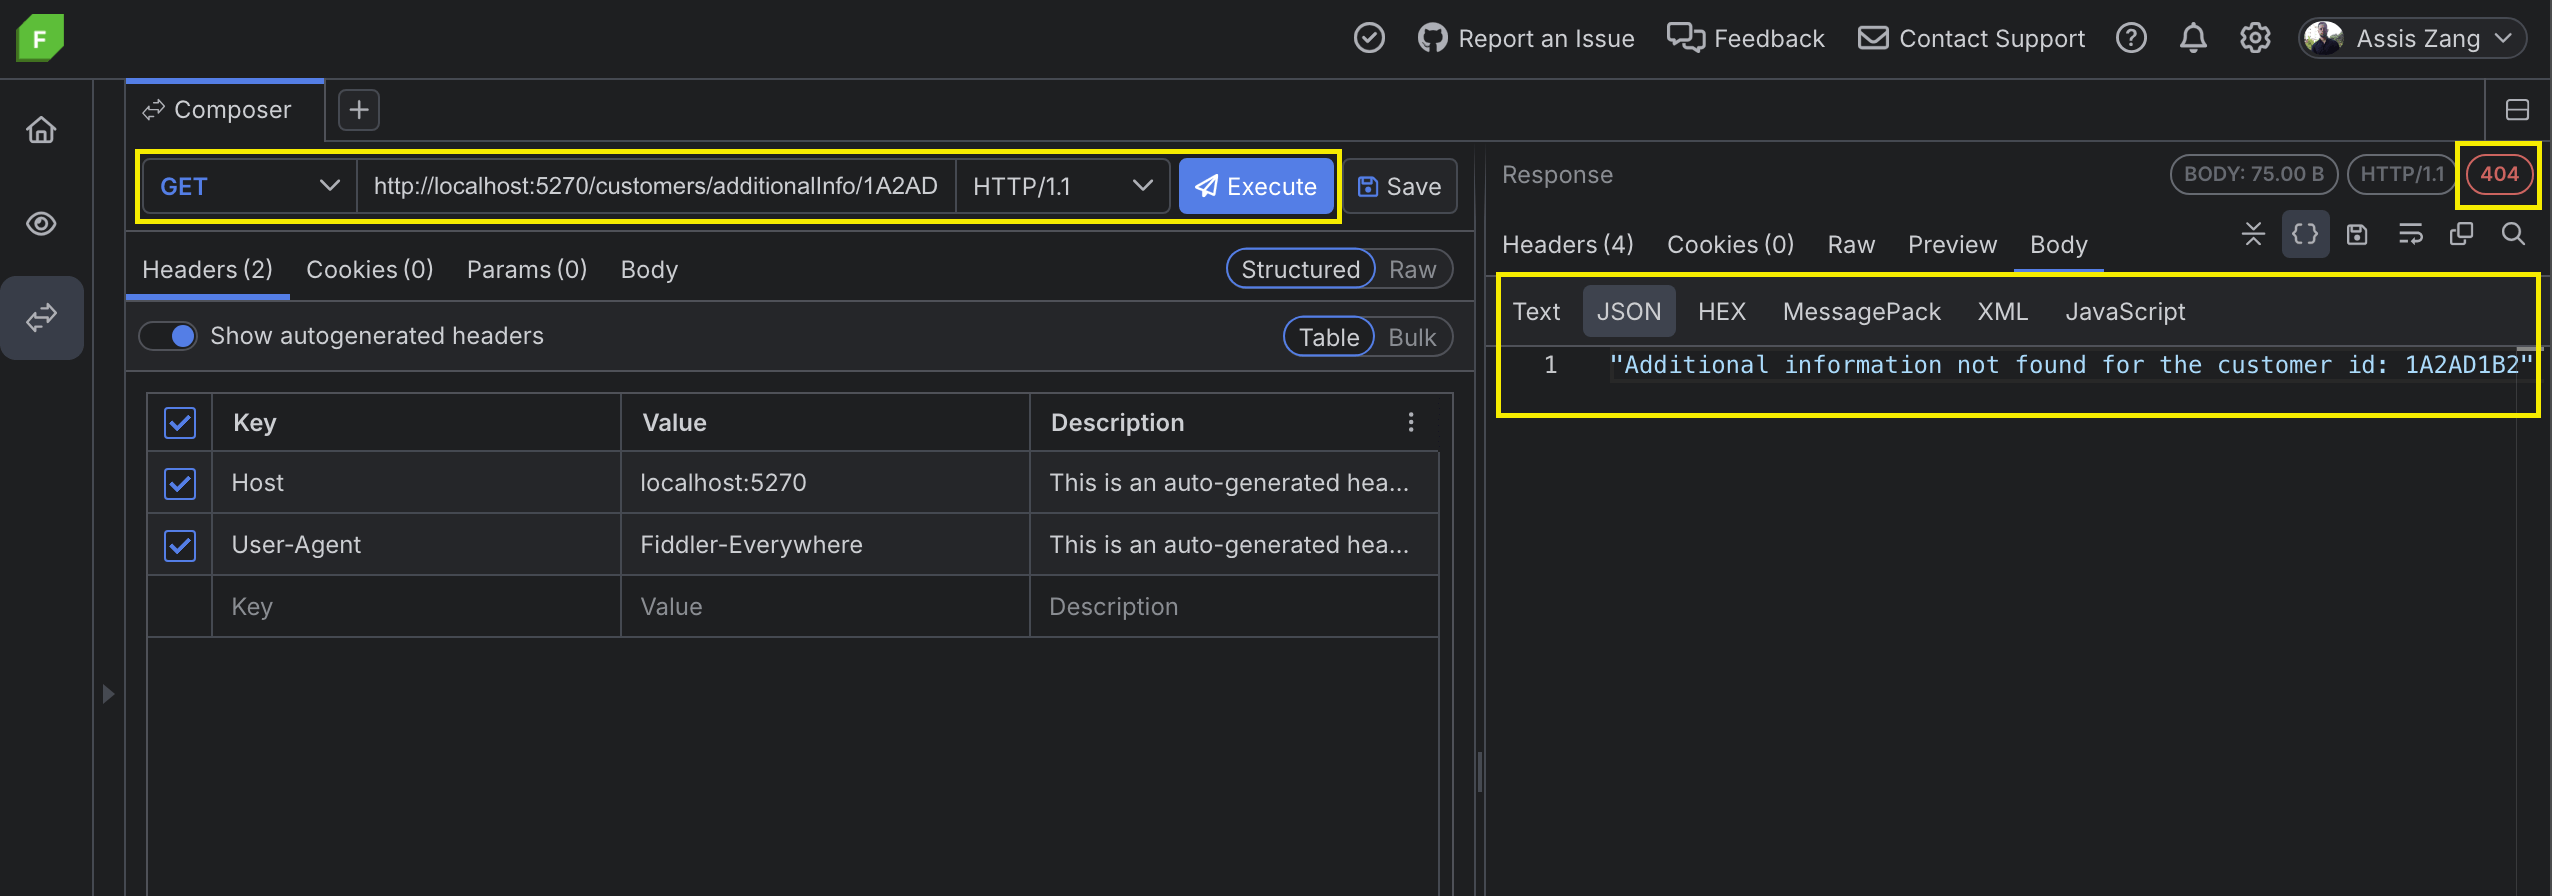
Now, execute the request again but with an nonexistent ID—for example, 1A2AD1B2—and the response will be a status HTTP not found:

Note that using Refit we were able to predict the request’s response and treat it as necessary. In this case, when returning HTTP status 404, an exception was executed and a customized error message was returned.
Adding JWT Authentication to Refit
JSON Web Token (JWT) is a standard used for authentication/authorization in web APIs that uses tokens signed using a private secret or a public/private key.
In the previous example, we accessed the external API, but it did not have any rules for authentication/authorization. Next, we will check how to implement this when accessing the external API using Refit.
First, let’s configure the CustomerAPI to send the token to the CustomerAdditionalInfoApi. So, in the folder Interfaces add the following interface:
- IAuthTokenProvider
namespace CustomerApi.Repositories.Interfaces;
public interface IAuthTokenProvider
{
    string GetToken();
}
Then in the folder Repositories add the following class:
using CustomerApi.Repositories.Interfaces;

namespace CustomerApi.Repositories;
public class AuthTokenProvider : IAuthTokenProvider
{
    public string GetToken()
    {
        return "eyJhbGciOiJIUzI1NiIsInR5cCI6IkpXVCJ9.eyJzdWIiOiIxMjM0NTY3ODkwIiwibmFtZSI6IkpvaG4gRG9lIiwiaWF0IjoxNTE2MjM5MDIyfQ.pg-7kh_cZ0m4yDULVjR7rKPZFh7nBprKGFVYzS7Y7y0";
    }
}
Note that here we define an interface with a method to fetch the token. Then we create a class that implements the GetToken() method and returns a JWT. This token was generated on the JWT website and is fixed in the code.
Remember that this is just an example—in real-world applications, this token must be obtained through a secure endpoint to generate the token. For more information on the subject, you can check out this post that goes deeper into authentication and authorization with JWT: Authentication and Authorization with JWT.
Then, in the Program class, add the following code just below the builder variable:
builder.Services.AddSingleton<IAuthTokenProvider, AuthTokenProvider>();
And replace the code:
builder.Services
 .AddRefitClient<ICustomerAdditionalInfoApi>()
 .ConfigureHttpClient(c => c.BaseAddress = new Uri("http://localhost:5080"));
with the following:
builder.Services
 .AddRefitClient<ICustomerAdditionalInfoApi>()
 .ConfigureHttpClient((serviceProvider, c) =>
 {
 var tokenProvider = serviceProvider.GetRequiredService<IAuthTokenProvider>();
 var token = tokenProvider.GetToken();

 c.BaseAddress = new Uri("http://localhost:5080");
 c.DefaultRequestHeaders.Authorization = new AuthenticationHeaderValue("Bearer", token);
 });
Note that here we are obtaining the token and passing it to Refit through the request header, which will be of the “Bearer” type.
Then, below the snippet:
catch (ApiException ex) when (ex.StatusCode == HttpStatusCode.Unauthorized)
 {
 return Results.Unauthorized();
 }
add the following:
catch (ApiException ex) when (ex.StatusCode == HttpStatusCode.Unauthorized)
{
 return Results.Unauthorized();
}
Here we are dealing with the return of the external API, which from now on will have the option of returning an HTTP Unauthorized status.
The JWT implementation in the first API is ready, now let’s do the configuration in the CustomerAdditionalInfoApi API. So, first, open a terminal in the CustomerAdditionalInfoApi API and run the command below to install the JWT NuGet package dependency:
dotnet add package Microsoft.AspNetCore.Authentication.JwtBearer
Then, in the Program class add the following code below where the “builder” variable is created:
builder.Services.AddAuthentication(options =>
{
    options.DefaultAuthenticateScheme = JwtBearerDefaults.AuthenticationScheme;
    options.DefaultChallengeScheme = JwtBearerDefaults.AuthenticationScheme;
})
.AddJwtBearer(options =>
{
    options.TokenValidationParameters = new TokenValidationParameters
    {
        ValidateIssuer = false,
        ValidateAudience = false,
        ValidateLifetime = false,
        ValidateIssuerSigningKey = true,
        IssuerSigningKey = new SymmetricSecurityKey(Encoding.UTF8.GetBytes("MIICWwIBAAKBgHZO8IQouqjDyY47ZDGdw9j"))
    };
});

builder.Services.AddAuthorization();
Here we are configuring the JWT requirements. Note that most of the requirements are marked as false because, as previously stated, this is just a didactic example. In real-world applications, care must be taken with this information. Furthermore, we are directly configuring the secret key (MIICWwIBAAKBgHZO8IQouqjDyY47ZDGdw9j). This key was used to create the JWT token that was configured in the customer API.
Still in the program class, below the app variable add the following:
app.UseAuthentication();
app.UseAuthorization();
These methods are used to tell the compiler to use authentication and authorization.
Finally, for the endpoint to consider JWT authorization rules, it is necessary to add the RequireAuthorization() extension method. Then the complete endpoint will look like this:
app.MapGet("/customerAdditionalInfos/{customerId}", async (string customerId) =>
{
 var customerAdditionalInfo = GetCustomerAdditionalInfos().FirstOrDefault(a => a.CustomerId == customerId);

 return customerAdditionalInfo is CustomerAdditionalInfo info ? Results.Ok(info) : Results.NotFound();
});
}).RequireAuthorization();
Testing Access to the Authenticated Endpoint Through Refit
Now that all authentication and authorization configurations are ready, we can run the application and check if the endpoint continues to work. Then start both APIs and execute the request through Fiddler again.

Note that again the data was returned successfully, as the API was authenticated. To test the authorization error, modify the secret key (MIICWwIBAAKBgHZO8IQouqjDyY47ZDGdw9j) in the Program class of the CustomerAdditionalInfoApi API and make the request again.

This time the additional information API did not recognize the secret key sent in the request and returned the HTTP status code 401 (Unauthorized).
Conclusion
In this post, we looked at some of the disadvantages of ASP.NET Core’s native HttpClient class, which despite meeting the main needs of communication between APIs can become a problem when managing many requests to external APIs.
In contrast, we explored the functionality of Refit, which is a good alternative to HttpClient, allowing the developer to create less boilerplate code and simplify the request process between APIs. Furthermore, we checked how to implement a simple authentication system and send the token to the external API through Refit.
Refit is a great tool for working with web APIs, so whenever you see the need, consider using Refit to manage external calls and ensure the success of your application.


