ASP.NET Core Basics: Authentication and Authorization with JWT

Summarize with AI:
Discover JSON Web Token in this post—one of the most common token standards in the world—and learn how to use it in ASP.NET Core through a practical example.
JSON Web Token (JWT) is one of the most popular inter-application authentication methods today. Its acceptance is largely due to its ease of implementation and integration with different platforms and programming languages. In addition, it uses a very widespread data type, JSON.
In this post, we will see how JWT works and how to implement it in an ASP.NET Core application using the Swagger interface.
What is JWT?
JSON Web Token—JWT—is an open standard (RFC 7519) that provides a simple way to securely transmit information between parties via a JSON object.
Verification takes place through a signature. This signature allows only a server that has the key to decode and verify the content of the tokens received and grant or deny access to their resources.
In simple terms, tokens are like access keys, with information and a lifetime.
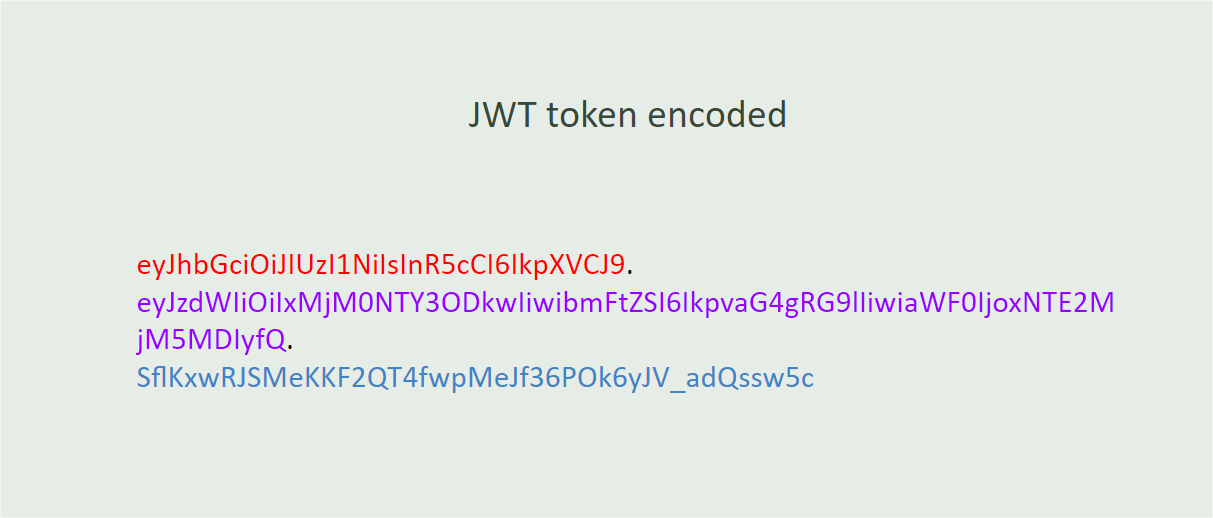
To make tokens secure, we can encrypt them, so if someone discovers your token, they will not be able to see anything other than a sequence of numbers and letters (hash) like the one below:
eyJhbGciOiJIUzI1NiIsInR5cCI6IkpXVCJ9.eyJzdWIiOiIxMjM0NTY3ODkwIiwibm FtZSI6IkpvaG4gRG9lIiwiaWF0IjoxNTE2MjM5MDIyfQ.SflKxwRJSMeKKF2QT4 fwpMeJf36POk6yJV_adQssw5c
When we describe this token we have the following data:
{
  "alg": "HS256",
  "typ": "JWT"
}

{
  "sub": "1234567890",
  "name": "John Doe",
  "iat": 1516239022
}
Note that the token is divided by dots (.) where each dot separates each of the three sections of the JWT. In this image, in red is the header, in purple is the payload and in blue is the signature:
JWTs consist of three parts:
Header: The header typically consists of two parts—the token type (JWT) and the signature algorithm used, such as HMAC SHA256 or RSA.
Payload: The second part of the token is the payload, which contains the declarations. Claims are statements about an entity (typically the user) and additional data. There are three types of claims: registered, public and private.
Signature: To create the signature part, you have to take the encoded header, the encoded payload, a secret and the algorithm specified in the header, and sign it.
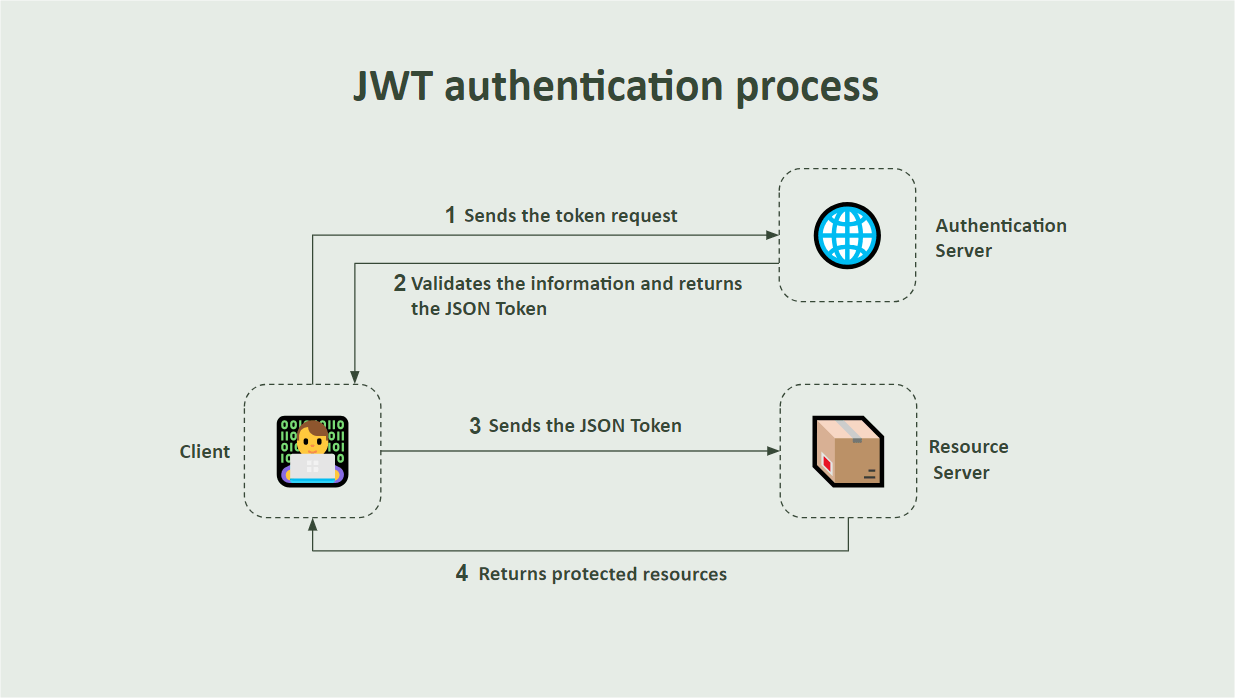
JWTs are often used for authentication and information exchange in web development. When a user logs in, a server can generate a JWT and send it back to the client. The client can then include the JWT in the headers of subsequent requests to prove its identity. The server can check the JWT to check that its claims are valid and the token has not been tampered with.
The flowchart below demonstrates the request and authentication process via JWT
JWT in ASP.NET Core
ASP.NET Core has robust support for JWT, through libraries and tools that facilitate the generation, validation and use of JWT in web applications.
In this post, let’s create a simple application in ASP.NET Core and apply endpoints with JWT validation.
You can access the complete source code here: AuthCore source code.
Creating the Application and Downloading the Dependencies
To create the application, you need to have installed .NET 8 or higher and an IDE. This tutorial will use Visual Studio Code.
In the terminal, execute the following commands:
dotnet new web -o AuthCore
cd AuthCore
dotnet add package Swashbuckle.AspNetCore
dotnet add package Microsoft.AspNetCore. Authentication.JwtBearer
Creating the Private Key
The private key refers to the cryptographic key used to sign the JWTs. JWTs are digitally signed to better safeguard their integrity and authenticity. The private key is used by the server to create the signature, and the corresponding public key is used by clients to verify the signature.
This way, when a user logs in or performs an authentication action, the server creates a JWT and signs it with the private key. The private key must be kept secure and must only be known to the server.
In this example, the private key is configured locally for learning purposes, but for real-world applications, this key must be stored in a safe and private location, such as a secret manager in the cloud.
Then, in the application project, create a new folder called “Helpers” and within it create the class below:
- AuthSettings
namespace AuthCore.Helpers;

public static class AuthSettings
{
  public static string PrivateKey { get; set; } = "MIICWwIBAAKBgHZO8IQouqjDyY47ZDGdw9jPDVHadgfT1kP3igz5xamdVaYPHaN24UZMeSXjW9sWZzwFVbhOAGrjR0MM6APrlvv5mpy67S/K4q4D7Dvf6QySKFzwMZ99Qk10fK8tLoUlHG3qfk9+85LhL/Rnmd9FD7nz8+cYXFmz5LIaLEQATdyNAgMBAAECgYA9ng2Md34IKbiPGIWthcKb5/LC/+nbV8xPp9xBt9Dn7ybNjy/blC3uJCQwxIJxz/BChXDIxe9XvDnARTeN2yTOKrV6mUfI+VmON5gTD5hMGtWmxEsmTfu3JL0LjDe8Rfdu46w5qjX5jyDwU0ygJPqXJPRmHOQW0WN8oLIaDBxIQQJBAN66qMS2GtcgTqECjnZuuP+qrTKL4JzG+yLLNoyWJbMlF0/HatsmrFq/CkYwA806OTmCkUSm9x6mpX1wHKi4jbECQQCH+yVb67gdghmoNhc5vLgnm/efNnhUh7u07OCL3tE9EBbxZFRs17HftfEcfmtOtoyTBpf9jrOvaGjYxmxXWSedAkByZrHVCCxVHxUEAoomLsz7FTGM6ufd3x6TSomkQGLw1zZYFfe+xOh2W/XtAzCQsz09WuE+v/viVHpgKbuutcyhAkB8o8hXnBVz/rdTxti9FG1b6QstBXmASbXVHbaonkD+DoxpEMSNy5t/6b4qlvn2+T6a2VVhlXbAFhzcbewKmG7FAkEAs8z4Y1uI0Bf6ge4foXZ/2B9/pJpODnp2cbQjHomnXM861B/C+jPW3TJJN2cfbAxhCQT2NhzewaqoYzy7dpYsIQ==";
}
Creating the Auth User
Now let’s create a user, which will be used to authenticate in the system. It will have an email and password that will be verified when generating the token. Within the application, create a new folder called “Models” and within it create the class below:
- User
namespace AuthCore.Models;

public record User(Guid Id, string Name, string Email, string Password, string[] Roles);
Creating the Auth Service
Now let’s create a service class that will store all the methods to manage the creation of tokens used during requests.
Inside the project, create a new folder called “Services.” Inside that, create a new class called “AuthService” and put in it the code below.
using System.IdentityModel.Tokens.Jwt;
using System.Security.Claims;
using System.Text;
using AuthCore.Helpers;
using AuthCore.Models;
using Microsoft.IdentityModel.Tokens;

namespace AuthCore.Services;

public class AuthService
{
    public string GenerateToken(User user)
    {
        var handler = new JwtSecurityTokenHandler();
        var key = Encoding.ASCII.GetBytes(AuthSettings.PrivateKey);
        var credentials = new SigningCredentials(
            new SymmetricSecurityKey(key),
            SecurityAlgorithms.HmacSha256Signature);

        var tokenDescriptor = new SecurityTokenDescriptor
        {
            Subject = GenerateClaims(user),
            Expires = DateTime.UtcNow.AddMinutes(15),
            SigningCredentials = credentials,
        };

        var token = handler.CreateToken(tokenDescriptor);
        return handler.WriteToken(token);
    }

    private static ClaimsIdentity GenerateClaims(User user)
    {
        var claims = new ClaimsIdentity();
        claims.AddClaim(new Claim(ClaimTypes.Name, user.Email));

        foreach (var role in user.Roles)
            claims.AddClaim(new Claim(ClaimTypes.Role, role));

        return claims;
    }
}
Analyzing the Code
In the code above we have a method called GenerateToken() where an instance of the JwtSecurityTokenHandler class is created.
The JwtSecurityTokenHandler class is part of the System.IdentityModel.Tokens.Jwt namespace and is responsible for creating, validating and manipulating JWT tokens.
Note that the handler variable has two methods, one to create the token (CreateToken()) and another to serialize the token into a compressed string format (WriteToken(token)).
Next, a variable called key is created that obtains the private key from the AuthSettings class created previously and then converts it into bytes, through the method Encoding.ASCII.GetBytes().
Then, the credentials variable receives the instance of the SigningCredentials object containing the signing credentials that were created using the private key and the HMAC-SHA256 algorithm, which is a secure encryption algorithm, creating a 256-bit hash.
The tokenDescriptor variable is also created, which receives an instance of the SecurityTokenDescriptor class. The SecurityTokenDescriptor class contains the settings and information required to generate a JWT token. This information includes the following properties:
Subject: This represents the subject of the token, that is, information about the user for which the token is being generated.Expires: This specifies the time at which the token will expire. The code is set to 15 minutes from the current time (DateTime.UtcNow). This means that the token will be valid for 15 minutes from the time it was generated.SigningCredentials: It is used to specify the signing credentials for the token. In the code, credentials represent a previously createdSigningCredentialsobject, using a symmetric key and the HMAC-SHA256 algorithm to sign the token.
The method GenerateClaims() creates a ClaimsIdentity object containing claims for the user’s email and roles. Each role is added as a separate declaration of type ClaimTypes.Role. This way, each role sent in the request will be added to the claim, and the list of claims is returned at the end.
Testing Token Generation
The last step before testing the token generation is to create an endpoint that will call the token generation method and return the token in the response. Replace the existing code in the Program.cs file with the code below:
using AuthCore.Models;
using AuthCore.Services;
using Microsoft.OpenApi.Models;

var builder = WebApplication.CreateBuilder(args);
builder.Services.AddTransient<AuthService>();
builder.Services.AddEndpointsApiExplorer();
builder.Services.AddSwaggerGen(c =>
{
    c.SwaggerDoc("v1", new OpenApiInfo { Title = "AuthCore API", Version = "v1" });
});
var app = builder.Build();

if (app.Environment.IsDevelopment())
{
    app.UseSwagger();
    app.UseSwaggerUI(c =>
    {
        c.SwaggerEndpoint("/swagger/v1/swagger.json", "AuthCore API V1");
    });
}

app.MapPost("/authenticate", (User user, AuthService authService)
    => authService.GenerateToken(user));

app.Run();
Now just run the application. You can do this by running the dotnet run command in the terminal.
You can access the Swagger interface through the browser in the http://localhost:PORT/swagger/index.html, and then send the authenticate request with the body request below:
{
    "email": "johnsmith@samplemail.com",
    "roles": [
        "admin"
    ]
}
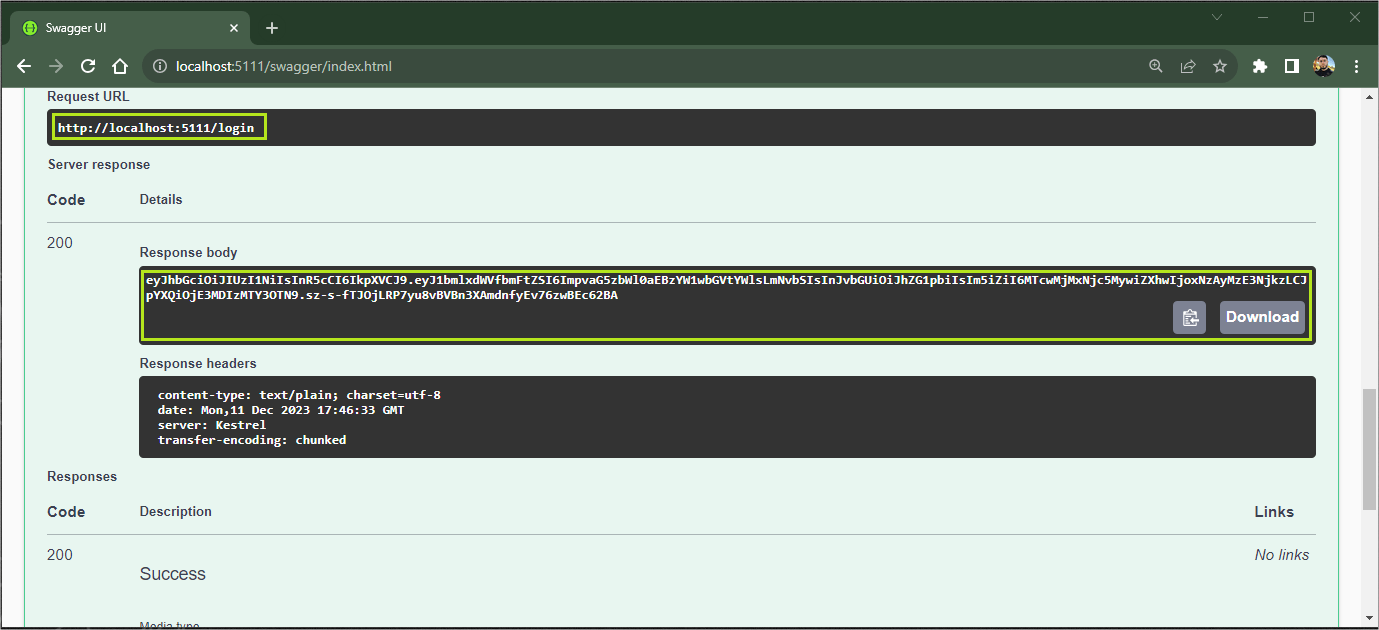
The token will be generated as shown in the image below:
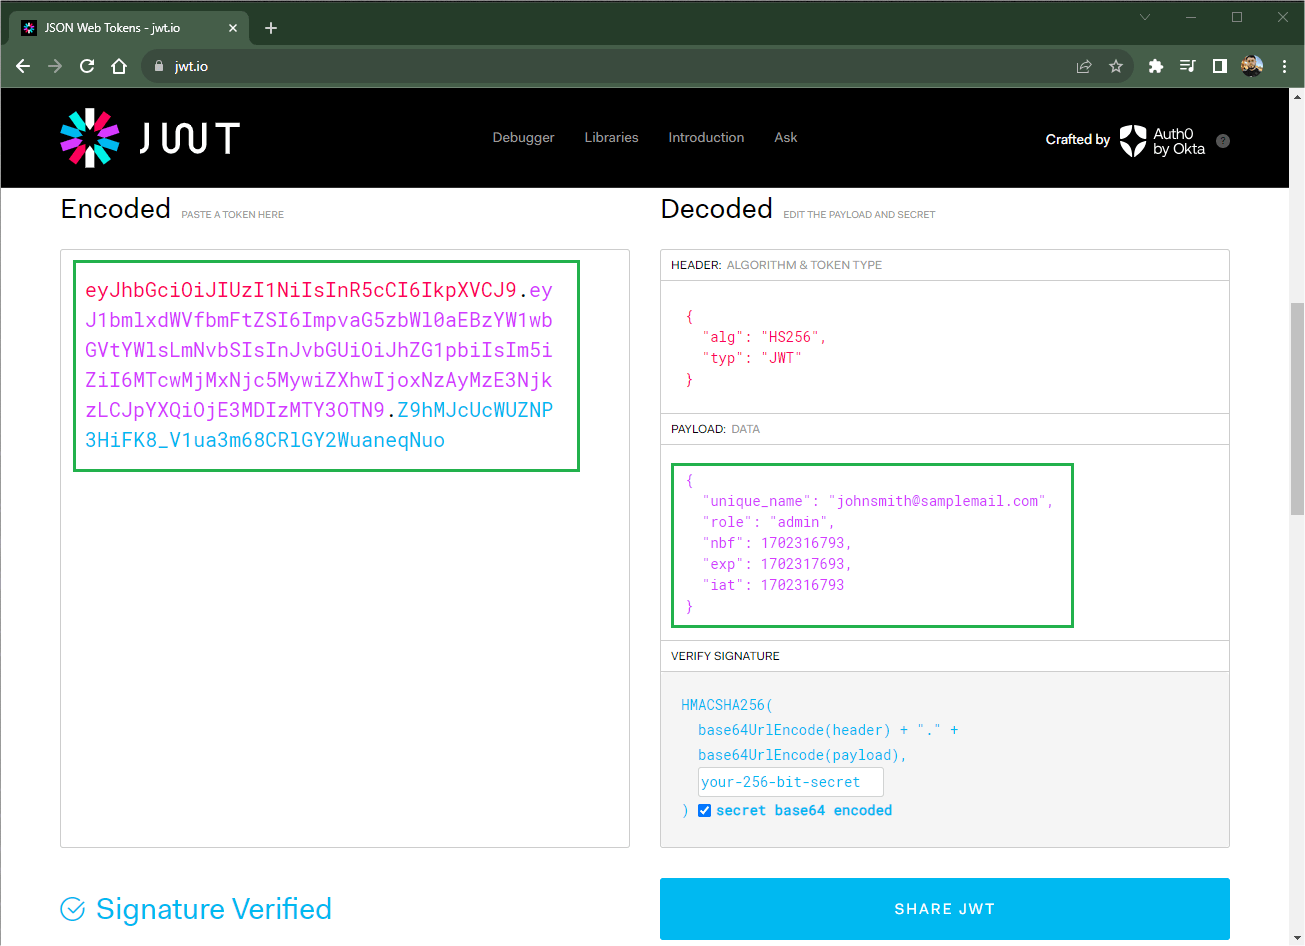
To verify that the token is an authentic JWT token, simply access the official JWT website jwt.io and paste the token obtained through the request. Note that it is possible to verify the information in the right tab of the page:
Using the JWT Token to Authenticate and Authorize
All the previous steps were to create the JWT token. For this, we created an HTTP route called authenticate that returns the token. Let’s create a route that uses the token for authentication and authorization.
To add support for authentication and authorization middleware, in the Program.cs file, right below where the builder variable is created, add the following code:
builder.Services
    .AddAuthentication(x =>
    {
        x.DefaultAuthenticateScheme = JwtBearerDefaults.AuthenticationScheme;
        x.DefaultChallengeScheme = JwtBearerDefaults.AuthenticationScheme;
    })
    .AddJwtBearer(x =>
    {
        x.RequireHttpsMetadata = false;
        x.SaveToken = true;
        x.TokenValidationParameters = new TokenValidationParameters
        {
            IssuerSigningKey = new SymmetricSecurityKey(Encoding.ASCII.GetBytes(AuthSettings.PrivateKey)),
            ValidateIssuer = false,
            ValidateAudience = false
        };
    });
builder.Services.AddAuthorization();
And just below where the app variable is created add the following:
app.UseAuthentication();
app.UseAuthorization();
You also need to add the following namespaces:
using Microsoft.AspNetCore.Authentication.JwtBearer;
using Microsoft.IdentityModel.Tokens;
using System.Text;
using AuthCore.Helpers;
Now let’s analyze the details of the code above.
AddAuthenticationmethod: This method is used to configure the authentication system in the application. It receives a delegatex, which is used to configure authentication options.DefaultAuthenticateSchemeandDefaultChallengeSchemeare set toJwtBearerDefaults.AuthenticationScheme. This means that, by default, authentication and challenges will be handled using the JWT Bearer authentication scheme. JWT Bearer is an authentication scheme used in web applications to provide a more secure way to transmit authentication information between parties. In the Bearer scheme, the JWT token is passed as a string in an HTTP header, usually in the Authorization field. The string starts with the word “Bearer” followed by a space and then the JWT token.AddJwtBearermethod: This method adds the JWT Bearer authentication scheme to the system.RequireHttpsMetadatais set to false, which means HTTPS will not be required for authentication traffic.SaveTokenis set to true, indicating that the received token must be saved. This is useful if you need to access the token later.TokenValidationParametersare configured to define JWT validation parameters.IssuerSigningKey: Defines the secret key used to sign and verify the token signature. The key is obtained from a string contained inAuthSettings.PrivateKeythat we created previously.ValidateIssuerandValidateAudienceare both set to false, which means that issuer and audience validation will not be performed. Sometimes, you may want to enable these validations so that tokens are only valid for specific destinations.
Adding JWT Bearer Token Support to Swagger and Testing the API
First, let’s add JWT Bearer support for Swagger—this way we can send the token obtained through the Swagger interface and check if the authentication system is working.
Still in the Program.cs file, within the AddSwaggerGen method, add the code below:
var securityScheme = new OpenApiSecurityScheme
    {
        Name = "JWT Authentication",
        Description = "Enter your JWT token in this field",
        In = ParameterLocation.Header,
        Type = SecuritySchemeType.Http,
        Scheme = "bearer",
        BearerFormat = "JWT"
    };

    c.AddSecurityDefinition("Bearer", securityScheme);

    var securityRequirement = new OpenApiSecurityRequirement
    {
        {
            new OpenApiSecurityScheme
            {
                Reference = new OpenApiReference
                {
                    Type = ReferenceType.SecurityScheme,
                    Id = "Bearer"
                }
            },
            new string[] {}
        }
    };

    c.AddSecurityRequirement(securityRequirement);
Note that in the code above, an object of the OpenApiSecurityScheme class is created and some settings are assigned to it, such as BearerFormat which in this case will be JWT, then we pass the object to the AddSecurityDefinition() method, along with the name (Bearer).
An object of type OpenApiSecurityRequirement is also created, which receives the schema settings with the type and id.
The object is then passed to the AddSecurityRequirement() method, which indicates that to access the API endpoints, it is necessary to satisfy the security scheme defined by the reference to Bearer. The empty list of strings indicates that no specific scope is needed.
Now let’s create an endpoint to validate authentication with the JWT token. In Program.cs file, below the /authenticate endpoint, add the following code:
app.MapGet("/signin", () => "User Authenticated Successfully!").RequireAuthorization();
This endpoint only returns a success message, but note that it contains the RequireAuthorization() method, which is used to indicate that access to this route requires authentication. If a user is not authenticated, they will be redirected to the authentication flow before accessing the /signin endpoint.
This call is a way to apply authorization policies directly to the route definition, indicating that only authenticated users can access that specific route. This is useful in scenarios where you want to better protect specific endpoints and restrict access to certain parts of your application.
Now let’s check if the authentication is working correctly, then run the application and then access the Swagger interface.
Try running the signin endpoint, but note that the response will be a 401 code—Error: Unauthorized. This happened because authentication was carried out.
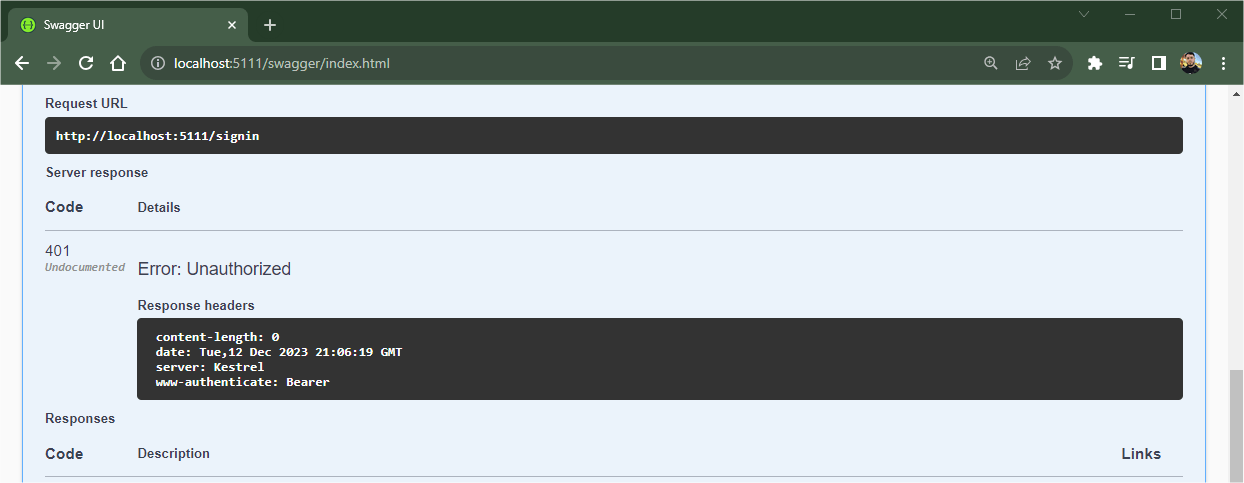
Now let’s try again, but this time with authentication. Run the authenticate endpoint with the previous credentials and copy the returned token.
Then, on the signin route, click on the padlock icon. In the tab that opens, paste the token in the Value field, click on Authorize, close the tab and finally execute the signin endpoint request.
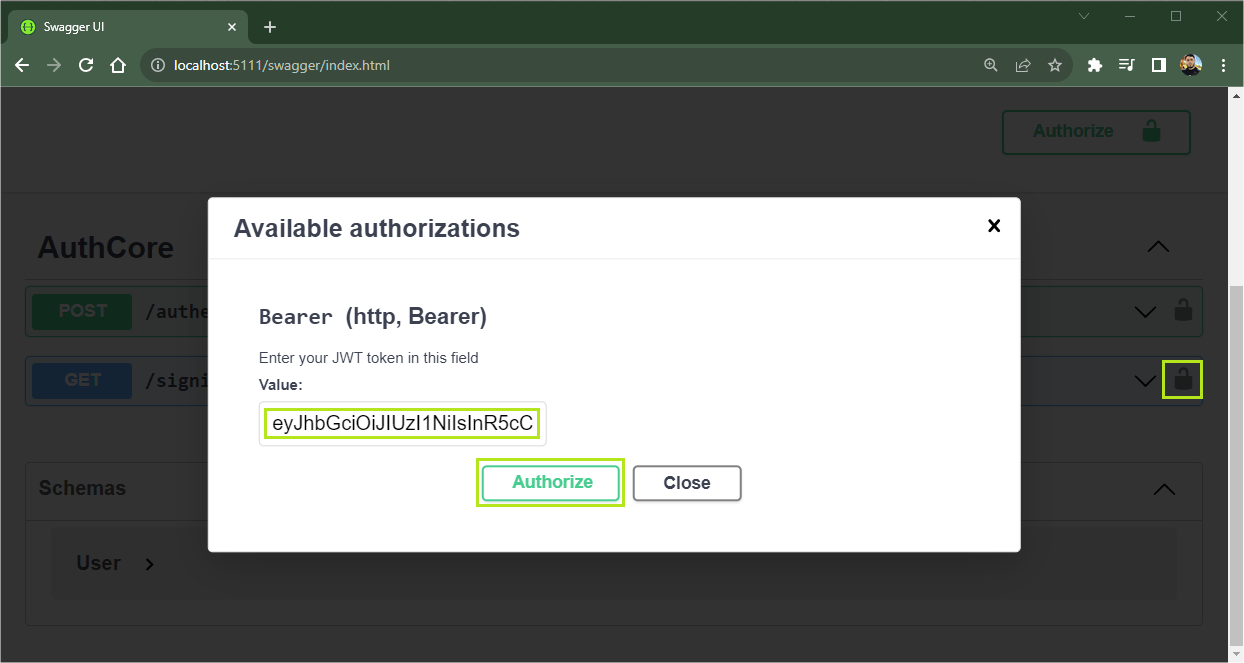
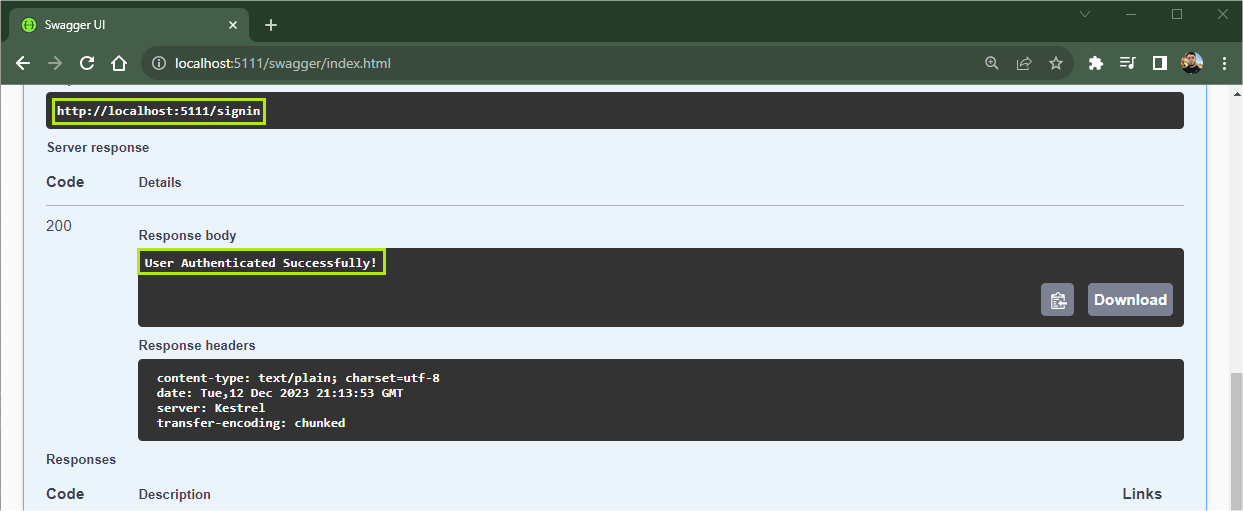
This time, the return was a 200 success code with the message: “User Authenticated Successfully!” This means that the token has been validated and authenticated.
Adding Validation Policies
Policies are used to restrict access to certain parts of the application, granting access only to users who have a previously configured role.
For example, when a user attempts to access a resource protected by the Admin policy, the authorization system will check whether the user has the admin role and allow or deny access based on that check.
To implement the policies in the example in the post, replace the code:
builder.Services.AddAuthorization();
with the code below:
builder.Services.AddAuthorization(options =>
{
  options.AddPolicy("Admin", policy => policy.RequireRole("admin"));
});
Note that we added the Admin policy that expects the admin role. In this case, we need the user who will generate the token to have the admin role.
Next, replace the code:
app.MapGet("/signin", () => "User Authenticated Successfully!").RequireAuthorization();
with the following:
app.MapGet("/signin", () => "User Authenticated Successfully!").RequireAuthorization("Admin");
Note that the only difference here is that we pass the Admin policy method to the RequireAuthorization method.
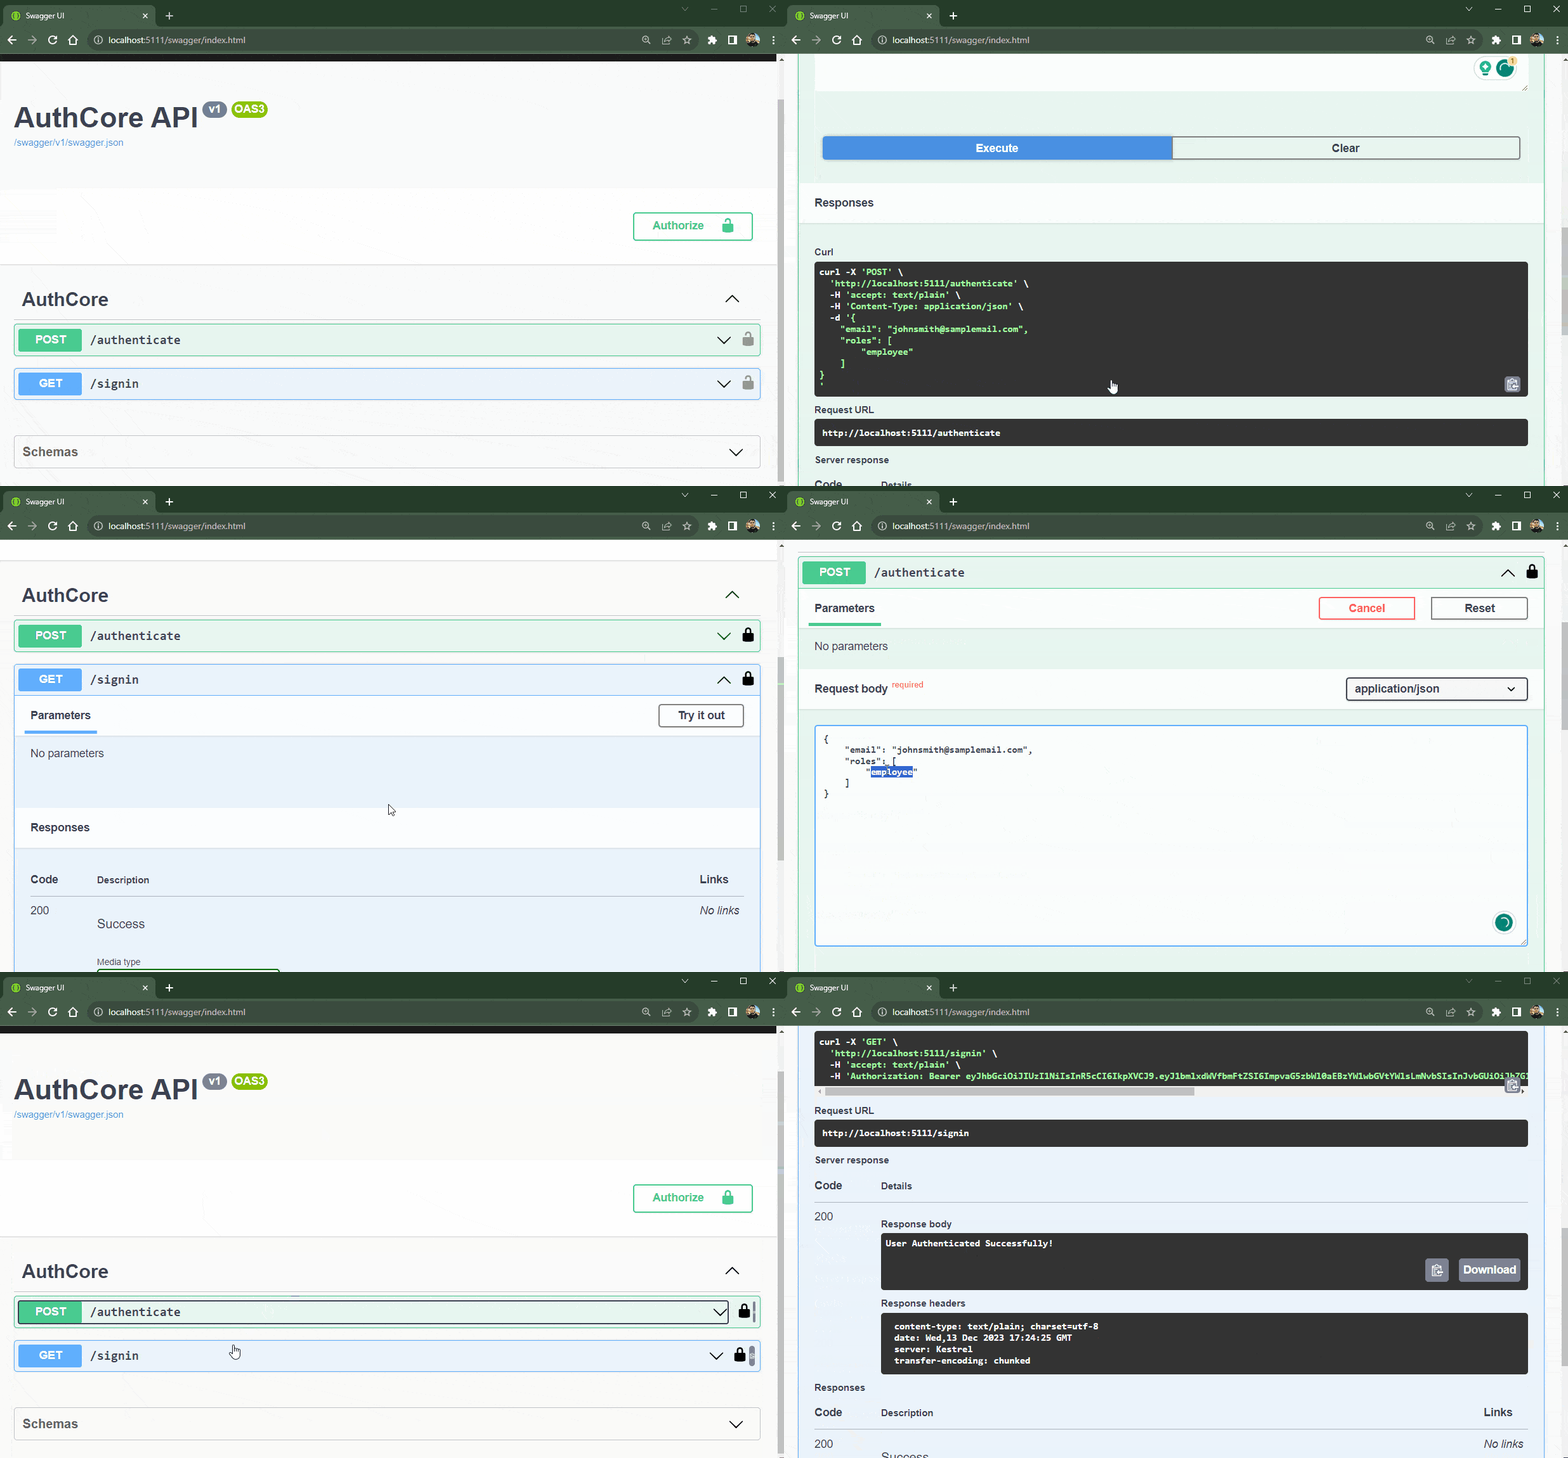
Now, run the application again and try to generate the token, but this time using a different role in the request. Then use the generated token to execute the signin endpoint. Note that this will generate an error 403 - Error: Forbidden, as the user who generated the token had a role other than admin.
To be able to authenticate successfully, just send the expected value to the role—in this case, admin—and then the response will be 200 - Success, as shown in the GIF below.
Conclusion
JSON Web Token is one of the most widely used authentication methods today due to its reliability and simplicity.
In this post, we learned how a JWT token works and how to implement it in an API in ASP.NET Core, using the Swagger interface to check access and we also create authorization “roles” using the native resources of .NET and JWT.
Some important points must be considered when working with JWT such as choosing secure algorithms, storing keys in reliable locations, exposing as little information as possible, and validating the JWT signature to check that the token has not been tampered with, among others.
By considering these points when implementing JWTs, you will increase the security and reliability of your authentication and authorization system.


