Getting Started with API Gateways in ASP.NET Core

Summarize with AI:
An API gateway provides a central point for managing routing, security and data aggregation in web applications. Explore the key benefits of this approach, such as securing APIs by creating an external layer, rate-limiting access and optimizing performance using Ocelot.
Web APIs are known for integrating and communicating between different applications through requests.
To keep an API running, it is usually necessary to monitor it so it doesn’t run out of resources when it receives a significant number of requests. In addition, other demands are necessary, such as authentication, authorization, performance optimization, data processing and others.
Suppose you have several APIs. Imagine how much work it would take to implement these mechanisms in each one!
API gateways encapsulate all these processes, creating unified mechanisms that can be shared by applications. In this post, we will learn more about API gateways and implement an example in practice using Ocelot.
What Is an API Gateway and Why Is It Important?
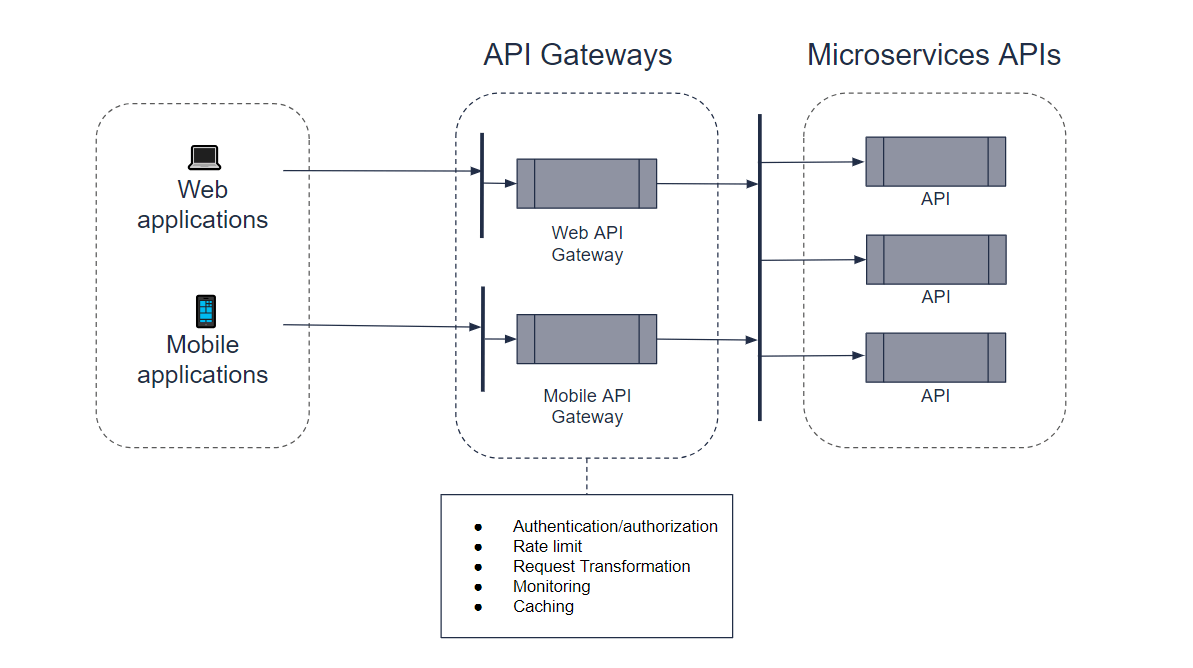
An API gateway is an intermediary component that acts as a bridge between clients and services.
Its main function is to receive client requests, route them to configured internal services, and then return these responses. In addition to managing routing, an API gateway can unify responses from multiple services, enforce authentication and authorization, perform data transformations, implement traffic control and provide centralized monitoring.
In this sense, an API Gateway offers several advantages, especially in microservices-based architectures. Among these advantages, we can highlight the following:
- Service routing and abstraction: An API gateway centralizes requests, receives client calls and forwards them to the corresponding microservices. This allows the internal complexity of services to be abstracted, providing a simpler experience for consumers, who do not need to worry excessively when calling a given API.
- Centralized security: Instead of implementing authentication and authorization in each microservice individually, it is possible to configure these policies in a unified way directly in the gateway. This reduces code duplication and provides a centralized point of control, facilitating the application of policies such as the use of JWT tokens or OAuth2-based authentication.
- Performance optimization: The gateway can help to significantly optimize performance by aggregating several calls to microservices in a single request. This reduces the number of round-trip calls that the client needs to make, saving time and bandwidth.
- Load balancing and failover: An API gateway can distribute requests across microservice instances so that the load is balanced efficiently. It can also monitor service availability and redirect requests to healthy services in case of failure.
- Data handling: The gateway can act as middleware, converting request and response formats as needed. For example, transforming a REST request into a GraphQL call or even normalizing data for different API versions.
- Traffic control: Limiting the number of requests per client or enforcing timeout policies can be easily done at the gateway level, preventing individual microservices from being overloaded with excessive calls.
- Centralized monitoring: API gateways provide a central point for collecting metrics and logs, making it easy to monitor performance, track failures and audit activity.

Implementing an API Gateway with Ocelot
In the context of ASP.NET Core, there are excellent tools that help implement an API gateway. One of the most used is Ocelot.
Ocelot is a NuGet package that acts as a set of middleware that brings together several functions present in API gateways, such as routing, authentication and authorization, rate limiting, request aggregation and others.
To explore Ocelot’s capabilities, we will create a web API to retrieve records from a content management system (CMS), and then we will create another project to add Ocelot and create the API gateway.
In this example, we will not focus on the API structure, as this is not relevant to the context of the post—so we will only create what is essential to implement Ocelot. You can customize the API example if you find it necessary; the example provided in the post is for demonstration purposes only.
Another important point is that Ocelot may not work for older versions of .NET, such as .NET Framework, so it is important that, when reproducing the example in the post, you have a recent version of .NET. The post uses .NET 8.
You can access the project source code in this GitHub repository: Publish CMS source code.
To create the sample API, you can use the following commands.
Creating the solution:
dotnet new sln -n PublishCMS
Creating the API project and add it to the solution:
dotnet new webapi -n Content.Api
dotnet sln add Content.Api/Content.Api.csproj
Then, open the project and create the following classes below:
- Folder Models
namespace Content.Api.Models;
public class ContentItem
{
    public Guid Id { get; set; }
    public string Title { get; set; }
    public string Body { get; set; }
    public string Author { get; set; }
    public List<string> Categories { get; set; }
    public DateTime PublishedDate { get; set; }
}
- Folder Services
using Content.Api.Models;

namespace Content.Api.Services
{
    public interface IContentService
    {
        IEnumerable<ContentItem> GetContentItems();
    }
}
using Content.Api.Models;

namespace Content.Api.Services;
public class ContentService : IContentService
{
    public IEnumerable<ContentItem> GetContentItems()
    {
        return new List<ContentItem>
        {
                new ContentItem
                {
                    Id =  new Guid("b198e834-b670-40c9-99bd-4a00c02df3b8"),
                    Title = "Understanding Microservices Architecture",
                    Body = "Microservices architecture allows building systems as a suite of independently deployable services. It helps in scaling and development efficiency...",
                    Author = "John Doe",
                    Categories = new List<string> { "Software Development", "Architecture", "Microservices" },
                    PublishedDate = new DateTime(2023, 5, 9)
                },
                new ContentItem
                {
                    Id = new Guid("59d01fb0-a679-40f3-adac-407af3cea5ad"),
                    Title = "The Rise of Artificial Intelligence in Healthcare",
                    Body = "AI is revolutionizing the healthcare industry by providing innovative solutions for diagnosis, patient care, and operational efficiency...",
                    Author = "Joe Smith",
                    Categories = new List<string> { "Healthcare", "AI", "Innovation" },
                    PublishedDate = new DateTime(2023, 6, 7)
                },
                new ContentItem
                {
                    Id = new Guid("80118e83-facf-49ee-b92e-67c1aafa33f6"),
                    Title = "Top 10 Investment Strategies for 2024",
                    Body = "With the global economy facing uncertainty, it's crucial to have a diversified investment portfolio. Here are the top 10 strategies to consider in 2024...",
                    Author = "Michael Cart",
                    Categories = new List<string> { "Finance", "Investment", "Economy" },
                    PublishedDate = new DateTime(2024, 1, 3)
                },
                new ContentItem
                {
                    Id = new Guid("3c4ae9f5-b3ec-47d7-ad93-aff609ac920e"),
                    Title = "How to Cook the Perfect Steak: A Guide for Beginners",
                    Body = "Cooking a perfect steak requires the right balance of heat, timing, and technique. Follow these steps to impress at your next dinner party...",
                    Author = "Sarah Lever",
                    Categories = new List<string> { "Cooking", "Lifestyle", "Food" },
                    PublishedDate = new DateTime(2023, 8, 9)
                }
        };
    }
}
- Folder Controllers
using Content.Api.Services;
using Microsoft.AspNetCore.Mvc;

namespace Content.Api.Controllers
{
    [ApiController]
    [Route("api/[controller]")]
    public class ContentController : ControllerBase
    {
        private readonly IContentService _contentService;

        public ContentController(IContentService contentService)
        {
            _contentService = contentService;
        }

        [HttpGet]
        public IActionResult GetAll() => Ok(_contentService.GetContentItems());
     }
}
- Program.cs class:
using Content.Api.Services;

var builder = WebApplication.CreateBuilder(args);
builder.Services.AddScoped<IContentService, ContentService>();

builder.Services.AddEndpointsApiExplorer();
builder.Services.AddSwaggerGen();
builder.Services.AddControllers();

var app = builder.Build();

if (app.Environment.IsDevelopment())
{
    app.UseSwagger();
    app.UseSwaggerUI();
}

app.MapControllers();
app.UseHttpsRedirection();
app.Run();
Change the Properties/launchSettings.json file to set the API port to 5001, as this will be used by the API gateway.

Here we have a simple API, which just returns some sample content data for a blog. Now let’s create the Ocelot project. To do this, run the commands below:
Creating the API gateway project and adding it to the solution:
dotnet new webapi -n Content.ApiGateway
dotnet sln add Content.ApiGateway/Content.ApiGateway.csproj
Adding the Ocelot NuGet package:
cd Content.ApiGateway
dotnet add package Ocelot
Open the project and replace the existing code with the code below:
using Ocelot.DependencyInjection;
using Ocelot.Middleware;

var builder = WebApplication.CreateBuilder(args);

builder.Configuration.AddJsonFile("ocelot.json", optional: false, reloadOnChange: true);
builder.Services.AddOcelot();

var app = builder.Build();

await app.UseOcelot();

app.Run();
Note that we are declaring that the ocelot.json file will be used as the basis for Ocelot’s configurations. We also declare the AddOcelot() method so that an instance of Ocelot is created when the application starts. Finally, we declare the UseOcelot(); method to start the Ocelot server.
Next, let’s create the file with the API gateway configurations, and in it declare the rules to be followed by the API gateway. So, in the root of the project, create a new file called ocelot.json and add the code below to it:
{
  "Routes": [
    {
      "DownstreamPathTemplate": "/api/content",
      "DownstreamScheme": "http",
      "DownstreamHostAndPorts": [
        {
          "Host": "localhost",
          "Port": 5001
        }
      ],
      "UpstreamPathTemplate": "/cms/content",
      "UpstreamHttpMethod": [ "GET" ]
    }
  ],
  "GlobalConfiguration": {
    "BaseUrl": "http://localhost:5000"
  }
}
In this file, we are defining the rules for the API routes to redirect incoming requests (upstream) to internal services (downstream), where:
"DownstreamPathTemplate": "/api/content": Defines the internal path of the API to which the request will be redirected. In this case, when the request is made to the API gateway, it will be routed to /api/content."DownstreamScheme": "http": Defines the protocol used for downstream communication, which, in this case, is HTTP."DownstreamHostAndPorts": Defines the host and port of the internal service. Here, it is configured for localhost on port 5001—that is, the API created previously, running locally on this port."UpstreamPathTemplate": "/cms/content": Specifies the path that the client will use to access the service via API gateway. When someone accesses /cms/content, Ocelot will redirect the request to the configured downstream path (/api/content)."UpstreamHttpMethod": [ "GET" ]: Specifies that only HTTP GET requests will be routed through this rule.GlobalConfiguration:"BaseUrl": "http://localhost:5000": Defines the base URL where Ocelot is running. In this case, the gateway will be listening for requests at the URL http://localhost:5000.
Testing the API Gateway
These are the basic configurations for routing APIs through Ocelot. In the example in the post, we only have one API, but you could add as many APIs and routes as necessary.
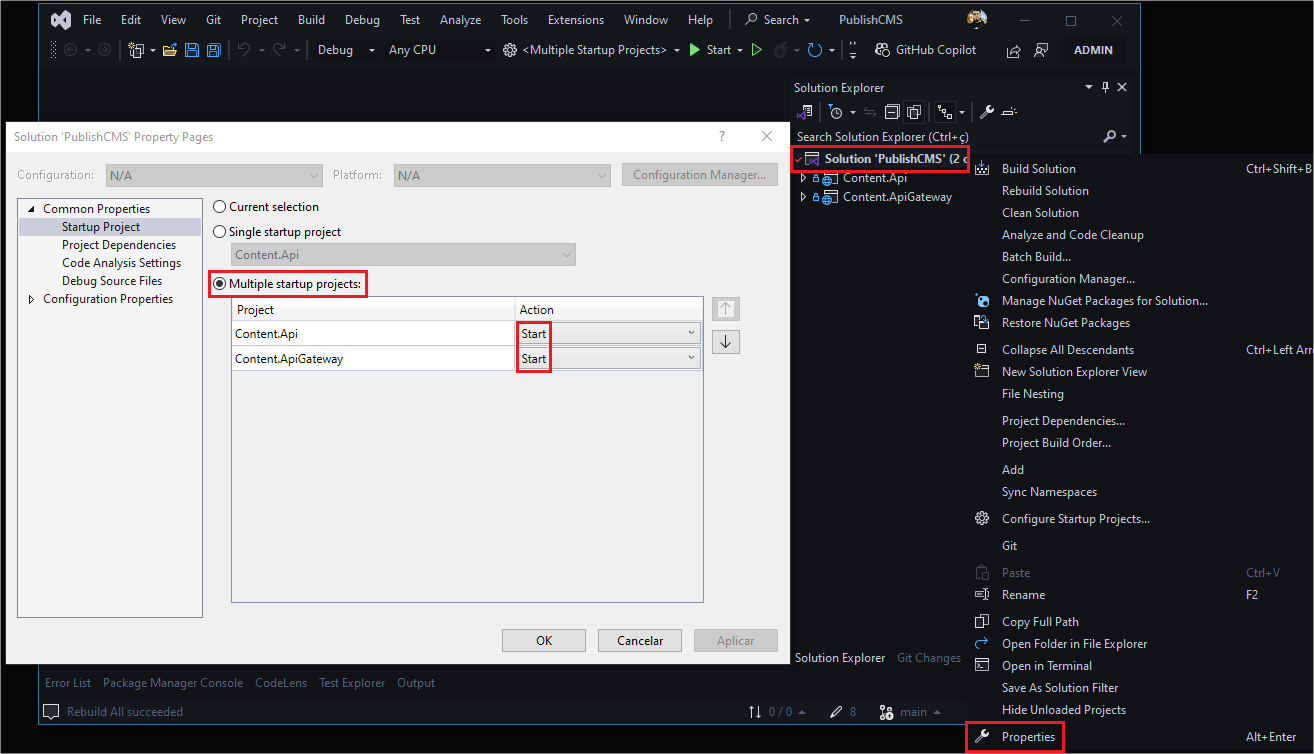
Now let’s test and check if the API gateway is working correctly. To do this, you need to configure both projects to run simultaneously, so in Visual Studio, just do the following:
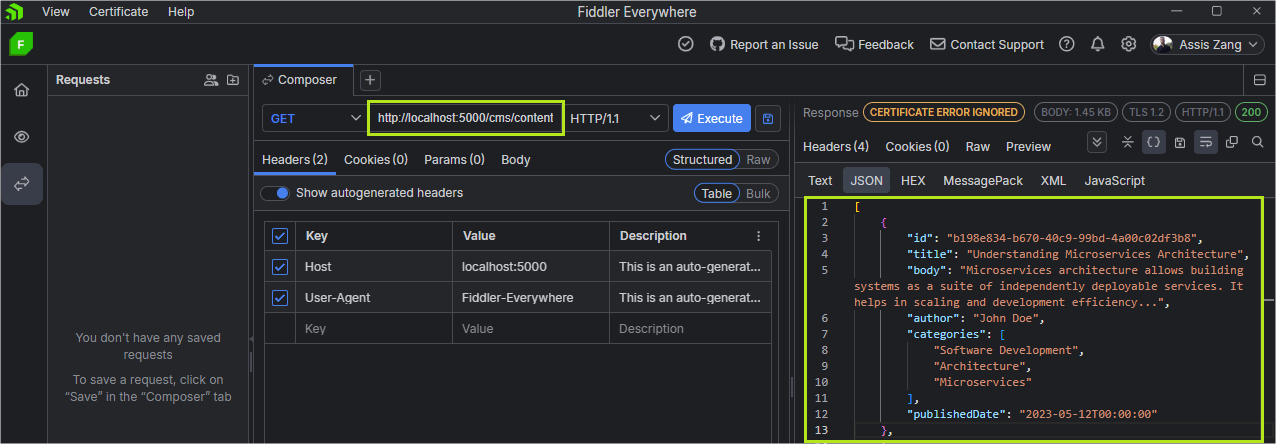
Then, run the application and request the route http://localhost:5000/cms/content:
Note that the API gateway created a bridge between the client (your request) and the API (/api/content). This way, we were able to access the API resources without accessing it directly; instead we requested the API gateway.
Limiting the Number of Requests
So far, we have used the API gateway routing function, which forwards a request to a previously configured endpoint, but we have not yet added any restrictions to the gateway. To add access restriction policies to the API gateway, we can use Ocelot’s Rate Limiting.
In the ocelot.json file, add the following snippet just below where the "UpstreamHttpMethod" configuration is created:
,"RateLimitOptions": {
   "ClientWhitelist": [],
   "EnableRateLimiting": true,
   "Period": "2m",
   "PeriodTimespan": 2,
   "Limit": 2
 }
Then, inside the "GlobalConfiguration" block, add the following:
,
    "RateLimitOptions": {
      "HttpStatusCode": 429,
      "ClientIdHeader": "ClientId",
      "QuotaExceededMessage": "Too many requests. Please try again later."
    }
In the configuration above, we are using Ocelot’s rate limit features:
EnableRateLimiting: Enables the rate limit.Period: Defines the period to calculate the limit. Example: “2m” for 2 minutes.PeriodTimespan: Amount of time the period will last (number of minutes, hours, etc.).Limit: Maximum number of requests allowed in the period (in this case 2).ClientWhitelist: List of client IDs that are exempt from the rate limit (can be left blank or filled with specific IDs).HttpStatusCode: HTTP response code sent to the client when the rate limit is exceeded (usually429 - Too Many Requests).ClientIdHeader: Header that identifies the client to apply the rate limit.QuotaExceededMessage: Custom message that will be returned when the limit is reached.
Now, run the applications again and make three requests in a row to the endpoint http://localhost:5000/cms/content. The third request will return an HTTP code 429 - Too Many Requests, as shown in the images below:
Adding Cache in Memory
Ocelot has mechanisms to handle in-memory and distributed caching through CacheManager. To download the CacheManager NuGet package to your API Gateway project, open a terminal at the root of your API Gateway project and run the following command:
dotnet add package Ocelot.Cache.CacheManager
Then, in the ocelot.json file, add the following code, just below the UpstreamHttpMethodconfiguration:
,
"FileCacheOptions": {
"TtlSeconds": 300
}
Here we are configuring the timeout for the data to be stored in the in-memory cache, which in this case is 300 seconds, equivalent to 5 minutes.
Finally, in the API gateway’s Program.cs file, in the AddOcelot() method, add the following:
.AddCacheManager(x =>
{
x.WithDictionaryHandle();
});
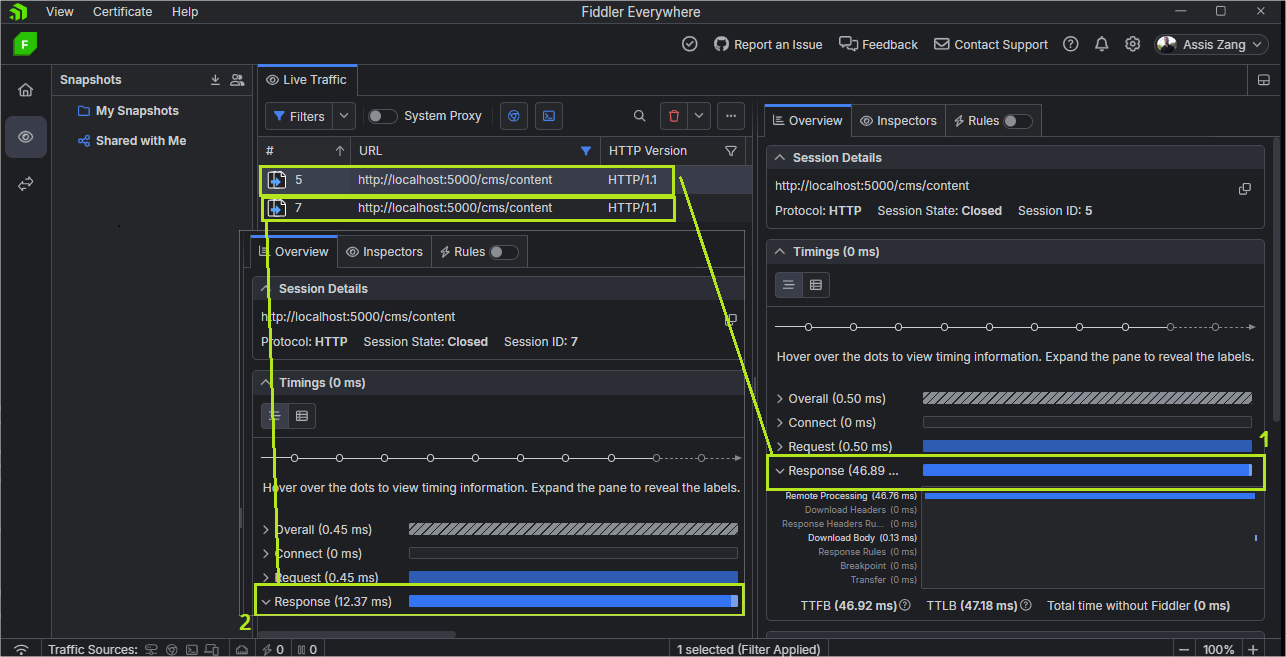
Now, if you run the project again, and make two requests, you may notice that the second one will be faster since the data was returned from the cache:
Conclusion
API gateways are an essential resource for medium- and large-scale applications due to their wide range of features and mainly because they enable the unification of functions and rules applicable to web APIs.
The need to use an API gateway should be considered in scenarios where several APIs share the same rules, such as authentication and authorization, data transformation, rate limiting, and logging. In addition, with an API gateway, it is possible to make advanced configurations such as load balancing, monitoring, Service Discovery, and others.
In this post, we had an introduction to API gateways using Ocelot, which is an open-source tool for ASP.NET Core in NuGet package format. We also explored some of Ocelot’s functions in practice, such as endpoint routing, rate limit, and in-memory caching.
So, if you are interested, try to reproduce the example in the post and explore the various options offered by Ocelot.


