ASP.NET Core Basics: Documenting APIs

Summarize with AI:
Well-documented APIs are essential for the success of a web project. Check out this post for some important resources for documenting APIs in ASP.NET Core.
Application Programming Interfaces (APIs) are a way for two software components to communicate with each other using a set of definitions (authentication, input and output data, etc.) and protocols (REST, SOAP, GraphQL, etc.), where a client makes a request and a server responds with a success or error.
Although it is possible to use an API with little or no documentation, it is always recommended that relevant information about an API is available and easily accessed. After all, it is through documentation that developers can learn about the details of a new API, which often brings essential functionalities for integration with other systems.
Imagine you are visiting a city you have never been to. Wouldn’t it be nice to have a map with the main tourist attractions? You could find places just by looking for them, but it may take much longer than expected. Imagine trying to find your way around the city just by looking at street names and asking residents.
An API’s documentation serves as a good map for developers, providing clear directions on how to use each functionality. You don’t have to guess your way around, just follow the instructions.
In this post, we will explore the main resources available for working with API documentation in ASP.NET Core, such as summaries and XML files. In addition, we will check out some third-party tools such as Swagger and Docfx.
Creating the Application and Adding Documentation Resources
The example application will not use any database. Instead, we’ll use previously configured ones to demonstrate the functionalities discussed in the post.
We will create a web API in ASP.NET Core to manage event data. During the development of the base application, we will explore the documentation resources and see what configurations and implementations are required for this.
You can check the source code of the model application at this link: EventMaster source code.
Prerequisites
- .NET 8 or higher
- Visual Studio (some configurations will be made using Visual Studio, which can be done another way, but those are not covered in this post)
So, to create the base application, you can run the command below, or, if you prefer, you can use Visual Studio and choose the ASP.NET Core Web API template.
Create command:
dotnet new webapi -n EventMaster
Creating the Entities with Summary Comments
The <summary> tag is a comment block used to provide a concise and meaningful description of what a given element does, usually placed above the element being documented. Visual Studio IntelliSense uses summary tags to display additional information about a type or member.
So, to create the entities, first, create a new folder called “Models” and inside it create the class below:
- Event
namespace EventMaster.Models;

public class Event
{
    /// <summary>
    /// The unique identifier for the event.
    /// </summary>
    public Guid Id { get; set; }

    /// <summary>
    /// The name of the event. The event name must be unique and must not contain special characters
    /// </summary>
    public string Name { get; set; }

    /// <summary>
    /// The date of the event.
    /// </summary>
    public DateTime Date { get; set; }

    /// <summary>
    /// The location of the event.
    /// </summary>
    public string Location { get; set; }

    /// <summary>
    /// The list of speakers for the event.
    /// </summary>
    public List<string> Speakers { get; set; }
}
Note that the event name summary has relevant information that shows subtle details.
Creating the Controller
Now let’s create the controller to make the API endpoints available.
Create a new folder called “Controllers” and inside it create the controller below:
- EventController
using EventMaster.Models;
using Microsoft.AspNetCore.Mvc;

namespace EventMaster.Data
{
    /// <summary>
    /// Controller for managing events.
    /// </summary>
    [ApiController]
    [Route("api/event")]
    public class EventController : ControllerBase
    {
        private readonly List<Event> events = new List<Event>();

        public EventController()
        {
            events = GenerateSampleEvents();
        }

        /// <summary>
        /// Get all events.
        /// </summary>
        /// <returns>List of events.</returns>
        [HttpGet]
        [ProducesResponseType(200, Type = typeof(IEnumerable<Event>))]
        public IActionResult GetAllEvents()
        {
            return Ok(events);
        }

        /// <summary>
        /// Get an event by ID.
        /// </summary>
        /// <param name="id">Event ID.</param>
        /// <returns>Event details if found, otherwise returns NotFound.</returns>
        [HttpGet("{id}")]
        [ProducesResponseType(200, Type = typeof(Event))]
        [ProducesResponseType(404)]
        public IActionResult GetEventById(Guid id)
        {
            var entityById = events.SingleOrDefault(e => e.Id == id);
            return entityById != null ? Ok(entityById) : NotFound();
        }

        /// <summary>
        /// Create a new event.
        /// </summary>
        /// <param name="entity">Event details for creation.</param>
        /// <returns>Created event details.</returns>
        [HttpPost]
        [ProducesResponseType(201, Type = typeof(Event))]
        public IActionResult CreateEvent([FromBody] Event entity)
        {
            //Implementation
            return Created("/api/event", entity);
        }

        /// <summary>
        /// Update an existing event.
        /// </summary>
        /// <param name="id">Event ID.</param>
        /// <param name="entity">Updated event details.</param>
        /// <returns>NoContent if successful, NotFound if the event is not found.</returns>
        [HttpPut("{id}")]
        [ProducesResponseType(204)]
        [ProducesResponseType(404)]
        public IActionResult UpdateEvent(int id, [FromBody] Event entity)
        {
            //Implementation
            return NoContent();
        }

        /// <summary>
        /// Delete an event by ID.
        /// </summary>
        /// <param name="id">Event ID.</param>
        /// <returns>NoContent if successful, NotFound if the event is not found.</returns>
        [HttpDelete("{id}")]
        [ProducesResponseType(204)]
        [ProducesResponseType(404)]
        public IActionResult DeleteEvent(int id)
        {
            //Implementation
            return NoContent();
        }

        private List<Event> GenerateSampleEvents()
        {
            return new List<Event>
            {
                new Event
                {
                    Id = new Guid("c730d19e-7d7a-4e36-b450-92b011b7a24f"),
                    Name = "Tech Summit 2024",
                    Date = new DateTime(2024, 3, 15, 9, 0, 0),
                    Location = "Convention Center, San Francisco",
                    Speakers = new List<string> { "John Smith", "Emily Johnson", "Michael Lee" }
                },
                new Event
                {
                    Id = new Guid("f88b2443-95e4-4a89-9fc8-82b922c59391"),
                    Name = "Startup Launchpad",
                    Date = new DateTime(2024, 5, 20, 10, 0, 0),
                    Location = "Tech Hub, New York",
                    Speakers = new List<string> { "Sarah Brown", "David Clark" }
                },
                new Event
                {
                    Id = new Guid("b9284822-0e46-4ae1-bc6e-37e53a2f4e13"),
                    Name = "Data Science Conference",
                    Date = new DateTime(2024, 8, 10, 8, 30, 0),
                    Location = "University Auditorium, Chicago",
                    Speakers = new List<string> { "Alex Rodriguez", "Rachel Green", "Chris Thompson" }
                }
            };
        }
    }
}
Note that each endpoint has a summary describing what each endpoint does, in addition to specifying the HTTP code returned through the [ProducesResponseType(HTTP code)] annotation. Also present is the <param name=""> tag, which is used to specify details of the input parameters of a method.
If you declare the Event entity name property, you will be able to see the configured description in the summary.

Configuring the Program Class
Now let’s configure the Program class and make the API functional. So, replace the existing code in the Program class with the code below:
using Microsoft.OpenApi.Models;
var builder = WebApplication.CreateBuilder(args);
builder.Services.AddEndpointsApiExplorer();
builder.Services.AddControllers();

var app = builder.Build();

app.MapControllers();
app.UseHttpsRedirection();
app.Run();
Generating the XML Documentation File
Through Visual Studio it is possible to generate an XML file with the details of the documentation that we wrote in the summary. In addition, it brings other details based on the code created such as model and controller entities.
To generate the XML documentation file, we first need to configure it through Visual Studio. So, follow the steps below:
- Right-click on the project.
- In the tab that opens, select Properties.
- In the left tab, select Build.
- In the sub-tab, select Output.
- In the “XML documentation file path” field, add the file name with the extension—in this case,
EventMasterSwaggerAnnotation.xml.
The image below demonstrates the process:
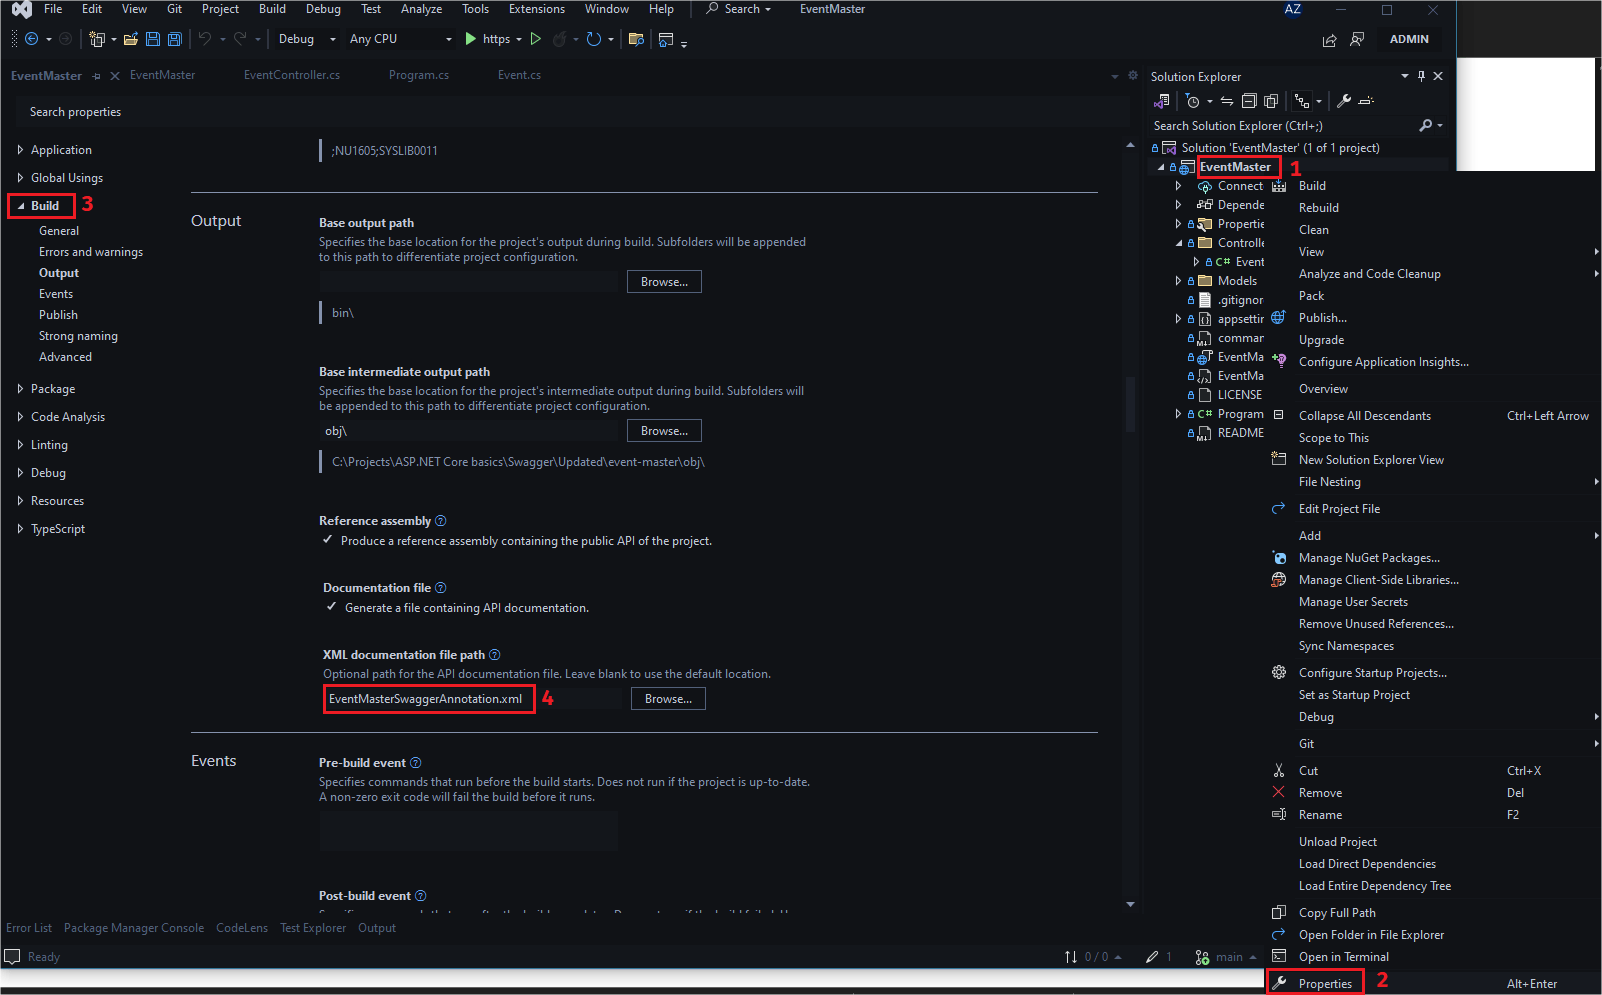
Now when the application is running, the XML file will be created in the application’s root directory.
Viewing Documentation Through an Interface
An alternative to viewing the previously configured API details is Swagger. To use this, you need to install the NuGet packages in the application.
dotnet add package Microsoft.AspNetCore.OpenApi
dotnet add package Swashbuckle.AspNetCore.Annotations
And in the Program.cs add the following code:
builder.Services.AddSwaggerGen(
    c =>
    {
        c.EnableAnnotations();
        c.SwaggerDoc("v1", new OpenApiInfo
        {
            Title = "EventMaster Web API",
            Description = "API to manager events",
            Contact = new OpenApiContact() { Name = "John Smith", Email = "jsmith@mayl.com" },
            License = new OpenApiLicense() { Name = "MIT License", Url = new Uri("https://opensource.org/licenses/MIT") }
        });
        c.IncludeXmlComments(Path.Combine(AppContext.BaseDirectory, "EventMasterSwaggerAnnotation.xml"));
    }
);

if (app.Environment.IsDevelopment())
{
    app.UseSwagger();
    app.UseSwaggerUI();
}
If you run the application, you can check Swagger’s features.
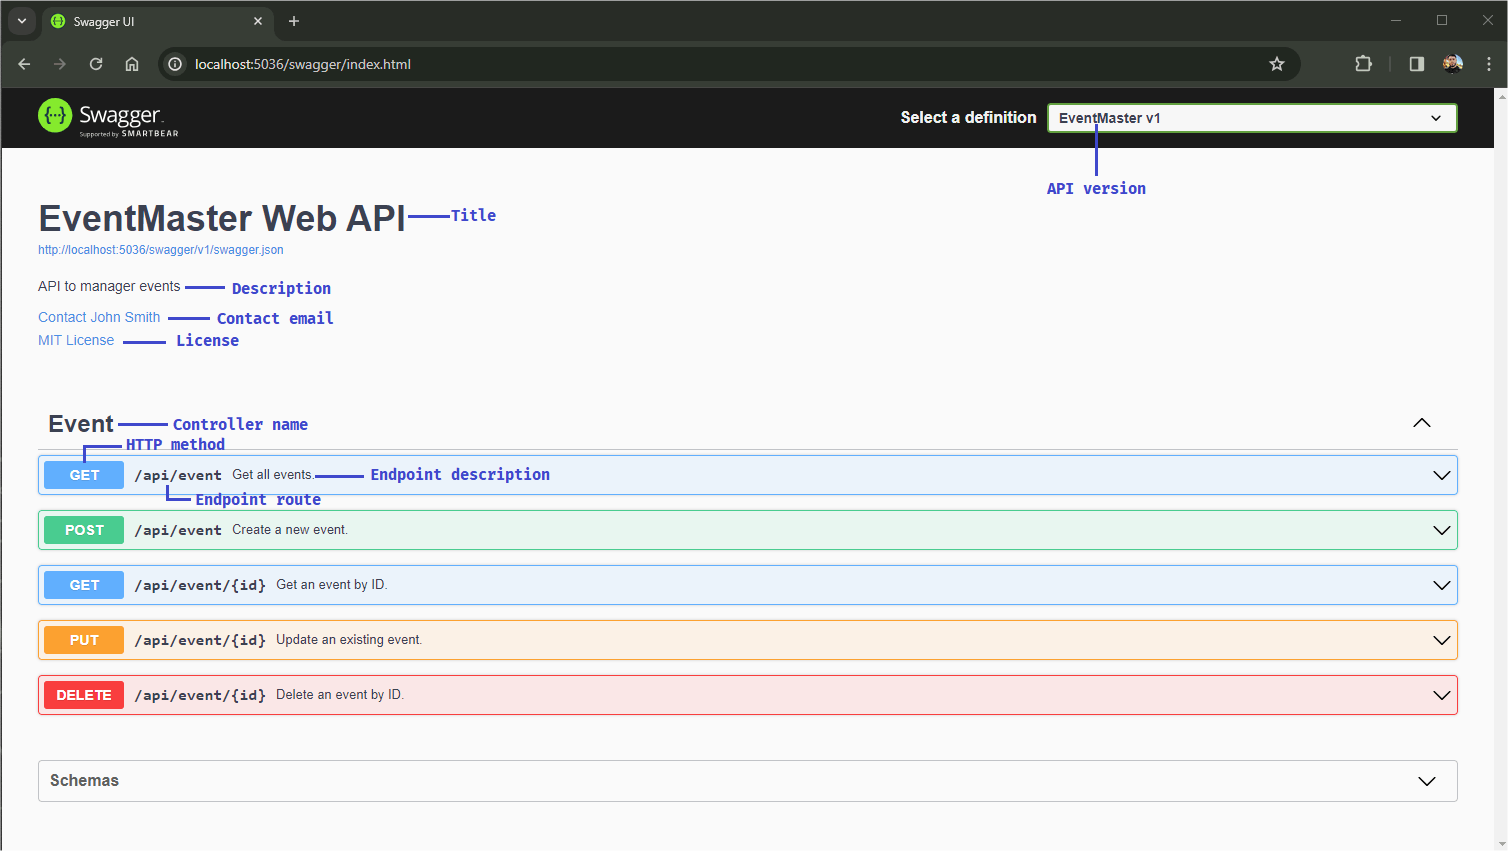
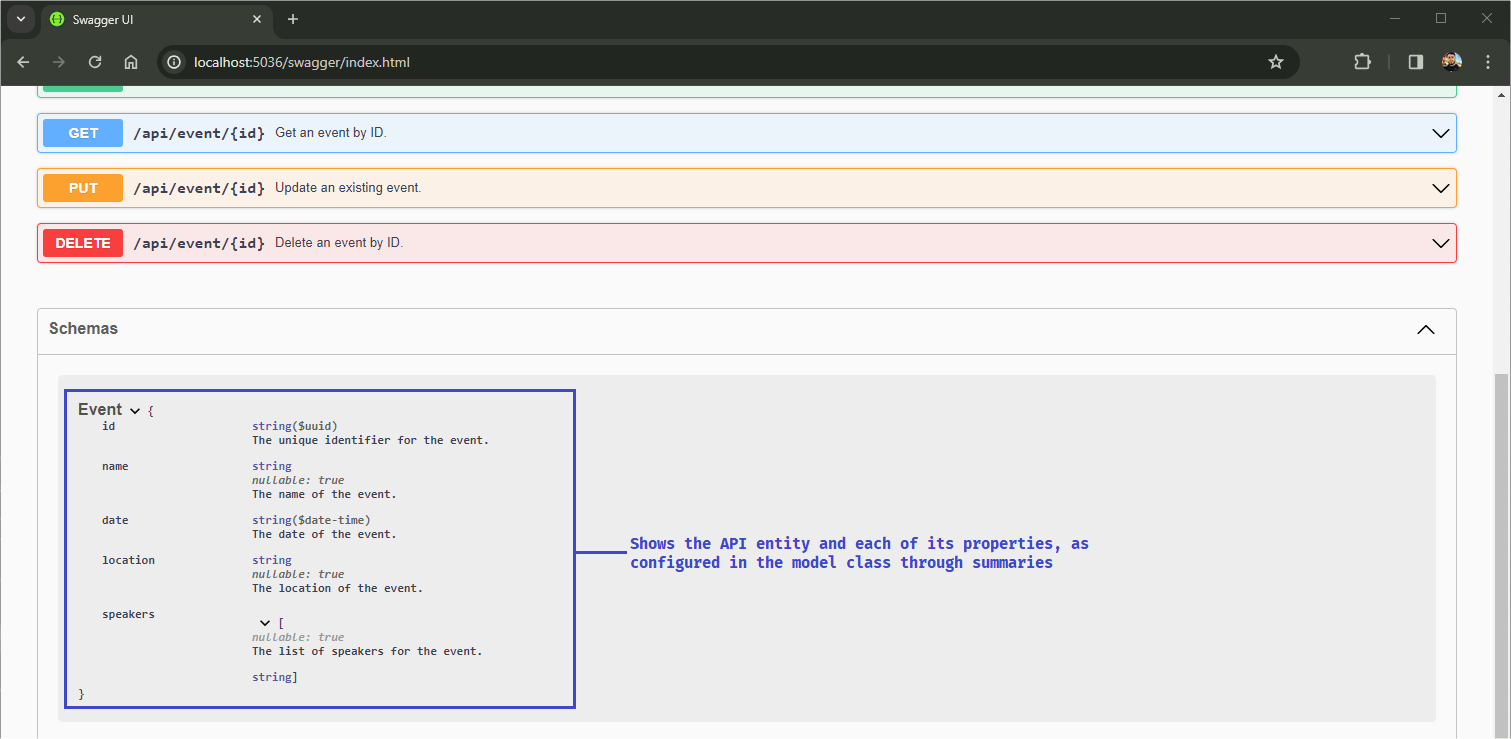
Note that all the details that were configured through the summaries are reflected in the Swagger interface, making it easier for anyone who needs information about the application to understand, without having to resort to the source code.
Generating Documentation with Docfx
Docfx is an API documentation generator for .NET, which supports C# and allows you to customize the documentation according to some pre-configured parameters.
Through terminal commands, docFX creates a static HTML website based on the referenced source code.
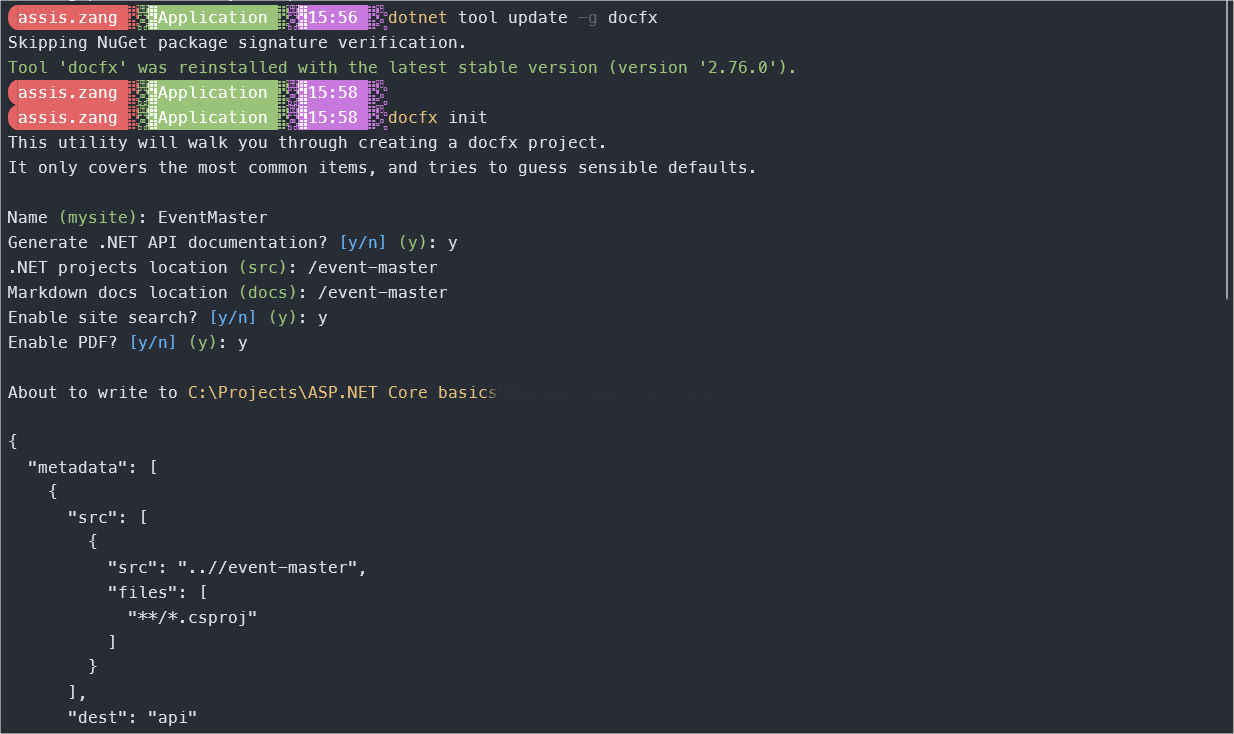
To generate documentation for the example project, inside the folder where the created project is located, open a terminal and run the command below to install the docfx dependencies:
dotnet tool update -g docfx
Then fill in the requested data as shown in the images below:

Now to build the documents, run:
docfx docfx.json --serve
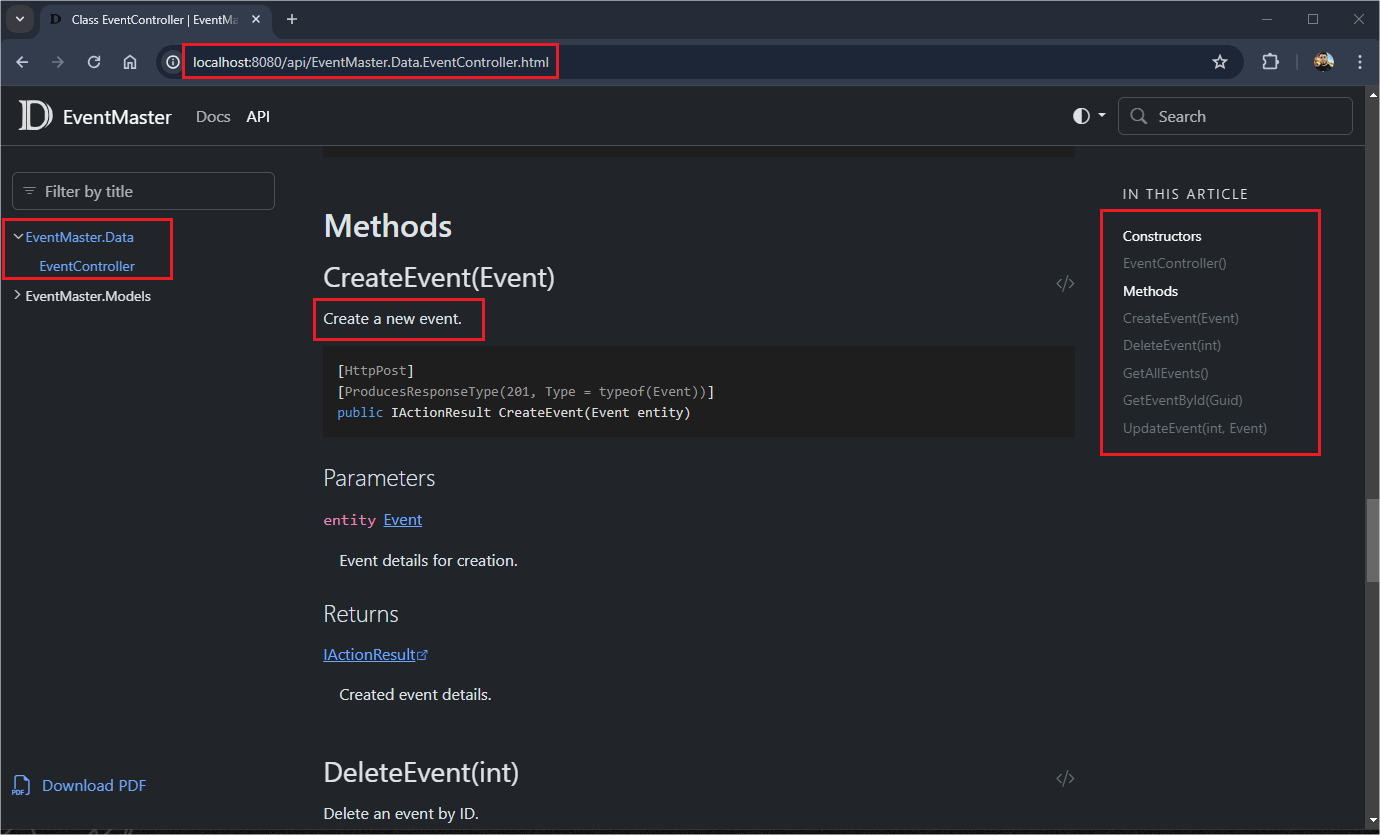
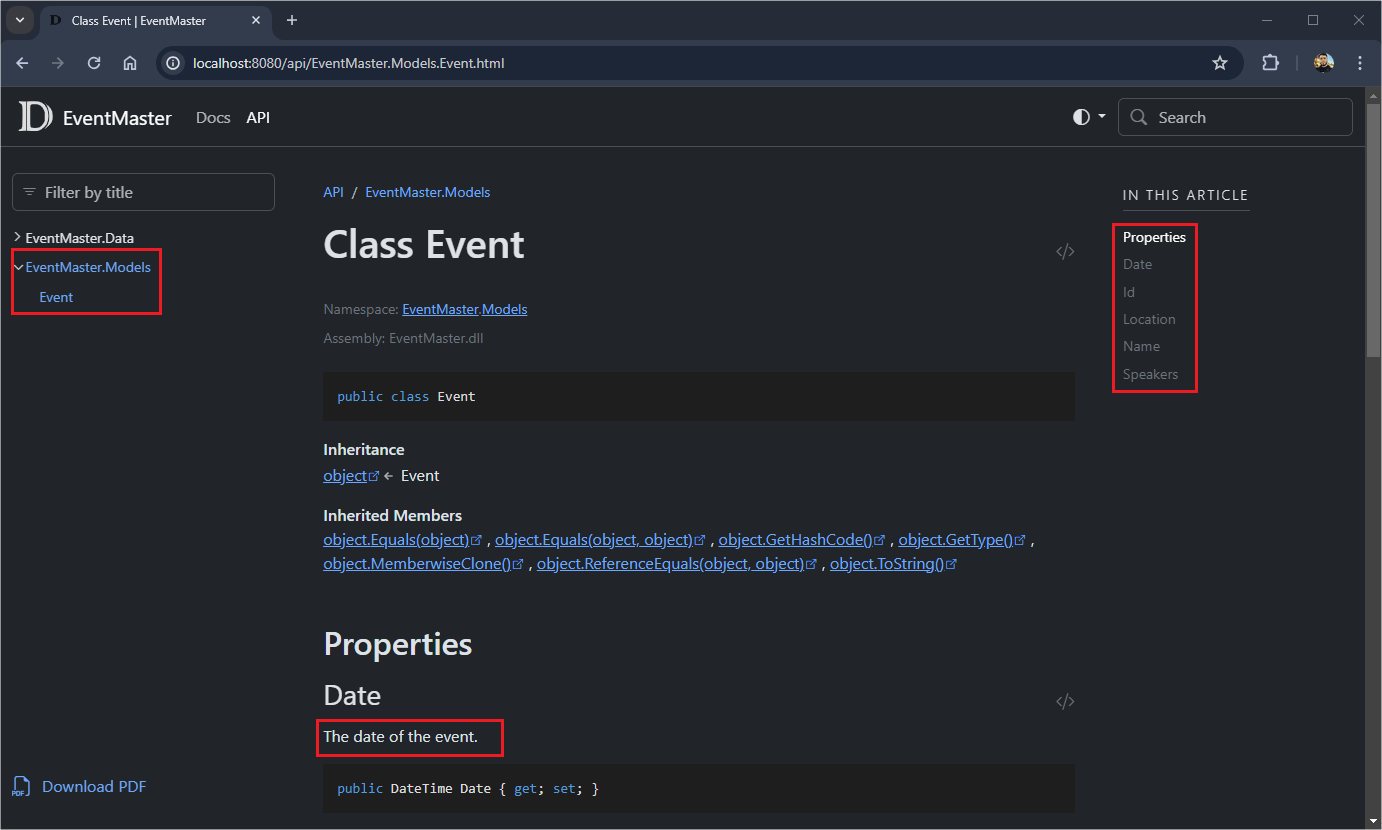
If you access http://localhost:8080, you can see the docfx interface with the newly generated API documentation.
Conclusion
Documenting APIs is essential to maintain the quality of a project and speed up the integration process between applications—after all, good documentation is similar to a map that provides relevant information to guide new adventurers.
In this post we saw some native ASP.NET Core resources for API documentation, such as summary and the XML file generated by Visual Studio. In addition, we saw third-party resources such as Swagger, which has an interactive interface, and docfx which provides HTML pages generated via terminal commands.
Learning about documentation is very important for anyone starting in software development, as it demonstrates that the developer understands the importance of recording and explaining how the code he produces works. Additionally, creating clear and concise documentation makes it easier to understand how an application works and helps other developers modify the code.


