New in .NET 8: ASP.NET Core Identity and How to Implement It

Summarize with AI:
Identity in ASP.NET Core is a powerful feature, and .NET 8 introduced new features that make it even more versatile. In this post, we will check out what Identity is and how to implement it in practice.
Through Identity, developers can quickly create secure APIs with ASP.NET Core. In addition to generating authentication tokens, .NET 8 also brought endpoints for registering and administering new users, as well as advanced features with refresh tokens.
In this blog post, we will understand Identity and explore some of its features such as user creation, authentication and authorization through a practical approach.
What Is ASP.NET Core Identity and What Are Its Advantages?
ASP.NET Core Identity is a membership system that adds login functionality to an ASP.NET Core application.
Identity comprises a framework for managing user authentication, authorization and other related capabilities.
Below are some aspects and advantages of ASP.NET Core Identity:
User authentication and authorization:
- Identity provides a robust user authentication and authorization system in ASP.NET Core applications. It supports multiple authentication methods, including cookies, tokens and external login providers (like Google or Facebook).
User and role management:
- Identity allows you to manage user accounts and roles in your application. You can easily create, update, delete and recover user information. Additionally, you can assign users to roles and manage role-based authorizations.
Password hashing:
- Security is a top priority, and Identity uses secure password hashing techniques to store user passwords. It employs industry-standard algorithms like PBKDF2 with HMAC-SHA256.
Two-Factor Authentication (2FA):
- Identity supports two-factor authentication, providing an extra layer of security for user accounts. Users can receive codes via email, SMS or authenticator apps.
Token-based authentication:
- Identity supports token-based authentication, allowing you to generate and validate tokens for secure communication between applications.
Integration with ASP.NET Core:
- ASP.NET Core Identity is fully integrated into the ASP.NET Core framework, making it easy to incorporate into your web applications. It leverages the built-in dependency injection system and works seamlessly with other ASP.NET Core components.
Customization and extensibility:
- Identity is designed to be customizable and extensible. You can modify the default data model, implement custom validation and extend the system to meet your application’s requirements.
Persistence Providers:
- Identity supports multiple storage providers for user data, such as Entity Framework Core, allowing you to choose the appropriate storage solution for your application.
Claims-Based Authorization:
- Identity allows you to use claims for more granular and flexible authorization. Claims represent specific attributes about a user, and you can use them to make access control decisions.
ASP.NET Core Identity UI:
- Identity comes with pre-built UI components that you can use in your app, including login, registration, password recovery and account management views. This can save development time and ensure a consistent user experience.
Overall, ASP.NET Core Identity provides a comprehensive solution for managing user-related resources in ASP.NET Core applications, offering security, flexibility and ease of integration.
Considerations for New Identity Endpoints
.NET 8 brought auxiliary endpoints to handle authentication when accessing its APIs easily and without resorting to external resources.
The new endpoints allow you to create your UI in your single-page application (SPA), which can access your API’s authentication routes and have a token and a refresh token that can have their lifetime configured and generated from authentication previously registered users. This system is quite common in web applications, but the news is that it has only been available for ASP.NET Core as of .NET 8.
Despite the advantages of Identity’s new features, an important point to take into consideration is that the access token provided is not configured as a JSON Web Token (JWT). Another point of attention is that the “/register” endpoint is not natively protected, so any client trying to access it can do so without much effort. Therefore, before using Identity endpoints, consider whether risks and potential vulnerabilities can be mitigated in your use case, and carefully analyze your needs and what ASP.NET Core Identity can offer.
If you need simple token-based authentication for your SPA, perhaps API Identity will suffice. However, if you are building something more robust, you should consider using an OpenID Connect server or some more complex means of authentication.
That said, below let’s see how to implement ASP.NET Core Identity and how to access its endpoints via the Swagger interface.
Implementing Identity
To implement Identity, let’s create an ASP.NET Core application using the Minimal API template. Using the Entity Framework Core resources, we will create all the Identity tables without much effort. Let’s explore some of its main features.
You can access the complete source code here: Identity Manager Source Code.
Prerequisites
- .NET 8 or higher installed
- EF Core installed globally (to install it you can use the command
dotnet tool install --global dotnet-ef. - An integrated development environment (IDE) with .NET support (this post uses Visual Studio Code)
To create the base application, use the following command:
dotnet new web -n IdentityManager
For the database, this post’s example uses SQLite, which is a simple relational database that is stored in the application’s directory.
To use SQLite together with EF Core, we need to download and install the NuGet packages for each one. Then in the application, open a terminal and execute the commands below:
dotnet add package Microsoft.AspNetCore.Identity.EntityFrameworkCore --version 8.0.0
dotnet add package Microsoft.EntityFrameworkCore.Design --version 8.0.0
dotnet add package Microsoft.EntityFrameworkCore.Sqlite --version 8.0.0
dotnet add package Microsoft.EntityFrameworkCore.Tools --version 8.0.0
The next step is to create a context class to communicate with the database that will be used to store the Identity tables. In the root of the project, create a new folder called “Data.” Inside that, create a new class called “ApplicationDbContext” and place the code below in it:
using Microsoft.AspNetCore.Identity.EntityFrameworkCore;
using Microsoft.EntityFrameworkCore;

namespace IdentityManager.Data;


public class ApplicationDbContext : IdentityDbContext
{
	public ApplicationDbContext(DbContextOptions options) : base(options)
	{
	}

	protected override void OnConfiguring(DbContextOptionsBuilder options) =>
	options.UseSqlite("DataSource = identityDb; Cache=Shared");
}
Note that the above class uses Identity resources through the “IdentityDbContext” interface.
Now let’s register the dependency injection of the context class, so everything will be ready to execute the migrations commands.
In the Program.cs file, add the code below:
builder.Services.AddDbContext<ApplicationDbContext>();
Then, in the application folder, open a terminal and execute the following EF Core commands:
dotnet ef migrations add InitialCreate
dotnet ef database update
These commands will create a database called “identityDb” at the root of the project. This database will have all tables relevant to Identity.
Note in the image below that Identity creates several tables to handle all Login requirements, Roles, Tokens, etc.
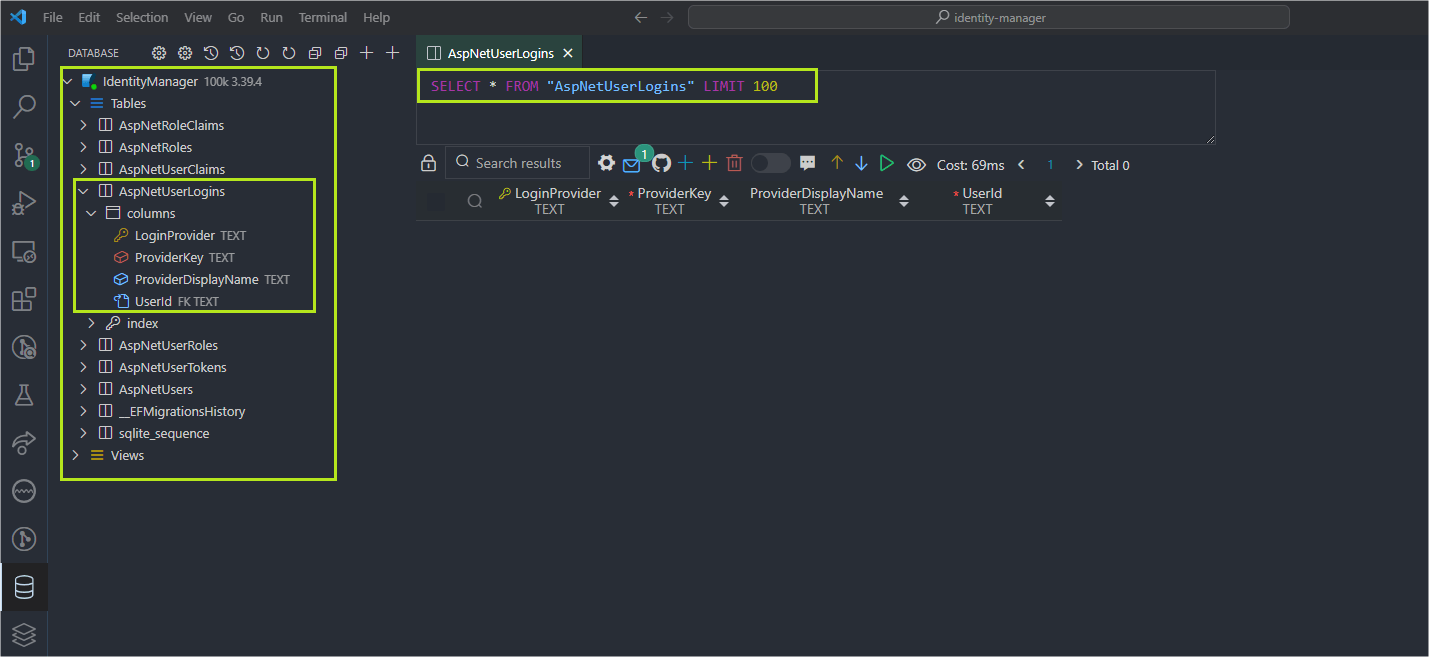
This feature makes Identity formidable—otherwise, all these tables and relationships between them would have to be architected and created by the developer, but this way, Identity automates the entire creation of the database structure to perform authentication and authorization in an API.
Now let’s create the configurations to inform Identity that we want the endpoints to be accessed only after authentication, in addition to making all Identity endpoints available for creating users and generating the token.
Replace the code present in the “Program.cs” file with the code below:
using IdentityManager.Data;
using Microsoft.AspNetCore.Identity;
using Microsoft.OpenApi.Models;

var builder = WebApplication.CreateBuilder(args);

// Add services to the container.
// Learn more about configuring Swagger/OpenAPI at https://aka.ms/aspnetcore/swashbuckle
builder.Services.AddEndpointsApiExplorer();
builder.Services.AddSwaggerGen(opt =>
{
	opt.SwaggerDoc("v1", new OpenApiInfo { Title = "MyAPI", Version = "v1" });
	opt.AddSecurityDefinition("Bearer", new OpenApiSecurityScheme
	{
		In = ParameterLocation.Header,
		Description = "Please enter token",
		Name = "Authorization",
		Type = SecuritySchemeType.Http,
		BearerFormat = "JWT",
		Scheme = "bearer"
	});

	opt.AddSecurityRequirement(new OpenApiSecurityRequirement
	{
		{
			new OpenApiSecurityScheme
			{
				Reference = new OpenApiReference
				{
					Type=ReferenceType.SecurityScheme,
					Id="Bearer"
				}
			},
			new string[]{}
		}
	});
});
builder.Services.AddDbContext<ApplicationDbContext>();
builder.Services.AddIdentityApiEndpoints<IdentityUser>().AddEntityFrameworkStores<ApplicationDbContext>();
builder.Services.AddAuthorization();

var app = builder.Build();

// Configure the HTTP request pipeline.
if (app.Environment.IsDevelopment())
{
	app.UseSwagger();
	app.UseSwaggerUI();
}

app.UseHttpsRedirection();

app.MapGroup("/identity").MapIdentityApi<IdentityUser>();

var summaries = new[]
{
	"Freezing", "Bracing", "Chilly", "Cool", "Mild", "Warm", "Balmy", "Hot", "Sweltering", "Scorching"
};

app.MapGet("/weatherforecast", () =>
{
	var forecast = Enumerable.Range(1, 5).Select(index =>
		new WeatherForecast
		(
			DateOnly.FromDateTime(DateTime.Now.AddDays(index)),
			Random.Shared.Next(-20, 55),
			summaries[Random.Shared.Next(summaries.Length)]
		))
		.ToArray();
	return forecast;
})
.RequireAuthorization()
.WithName("GetWeatherForecast")
.WithOpenApi();

app.Run();

record WeatherForecast(DateOnly Date, int TemperatureC, string? Summary)
{
	public int TemperatureF => 32 + (int)(TemperatureC / 0.5556);
}
Now let’s explain each part of the code above:
builder.Services.AddEndpointsApiExplorer();
This method adds the endpoint exploration service to the services collection and is used to enable features related to API documentation generation.
builder.Services.AddSwaggerGen();
This adds support for Swagger features—in this case, SwaggerGen, which is used to automatically generate documentation based on annotations in source code.
Some options define a Bearer Token (JWT) security scheme, indicating that this security scheme is necessary to access the API’s protected operations. This configuration is useful when you have JWT token-based authentication and want Swagger to show how users can securely authenticate and access the API.
builder.Services.AddDbContext<ApplicationDbContext>();
This adds the Entity Framework Core database context (DbContext) to the services collection to define models and configure migrations.
builder.Services.AddIdentityApiEndpoints<IdentityUser>().AddEntityFrameworkStores<ApplicationDbContext>();
This is the new method introduced in .NET 8 and its function is to configure Identity integration in the application. The IdentityUser class passed as a parameter specifies the type of user that will be used.
The AddIdentityApiEndpoints() method adds controllers and services necessary for authentication and authorization, such as registration, login, logout, profile management, etc.
The AddEntityFrameworkStores() method configures the Entity Framework as the storage mechanism for Identity data.
builder.Services.AddAuthorization();
The AddAuthorization() method adds the authorization service to the collection of services. This is necessary to configure authorization policies, which define the rules for allowing or denying access to protected resources.
Note that there is also an endpoint “/weatherforecast” that returns temperature data. The extension method RequireAuthorization() was added to it, which is a method that belongs to the “Fluent API” concept and in this case requires authorization—in other words, the authorization generated by Identity as we will see below.
Executing the Authorization with Identity Endpoints
To see Identity endpoints and their functionalities in practice, let’s first run the application. In the application terminal, execute the command below:
dotnet runThe application will start and you can access the Swagger interface in the browser, accessing the local address http://localhost:PORT/swagger/index.html.
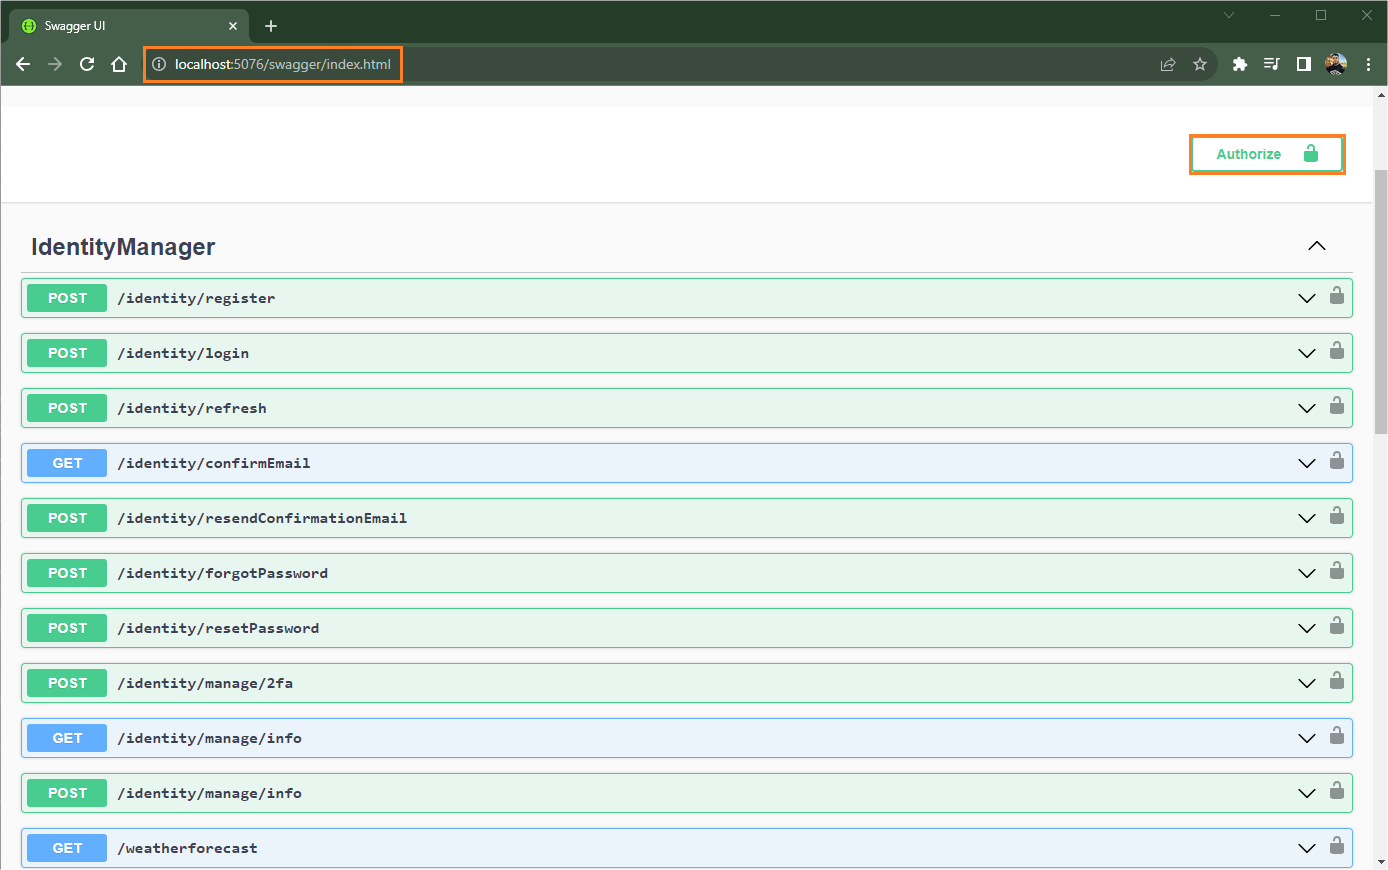
Note that Swagger has made available all the Identity endpoints that we need for authentication and authorization to access the APIs. Also note that there is an authorization button to place the generated authorization token.
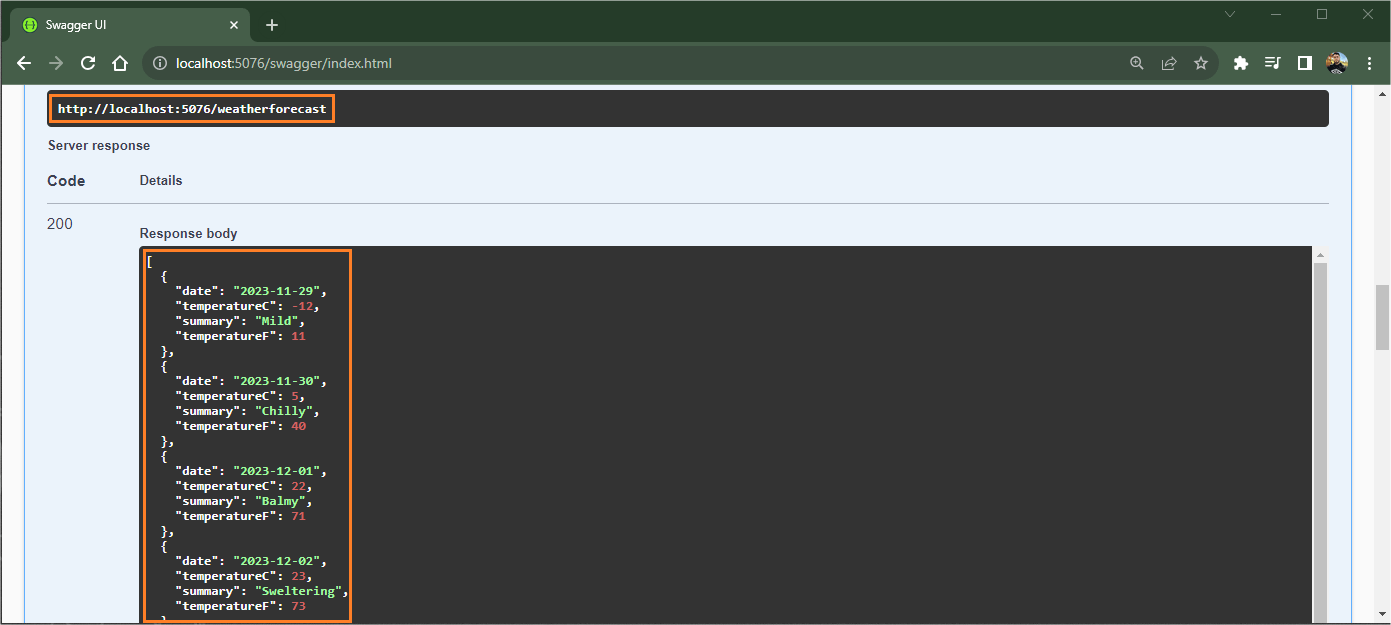
To test it, try running the “/weatherforecast” endpoint without authentication, and the result will be an error: 401 - Unauthorized. This happens because we do not generate a token and do not use it when accessing the endpoint.
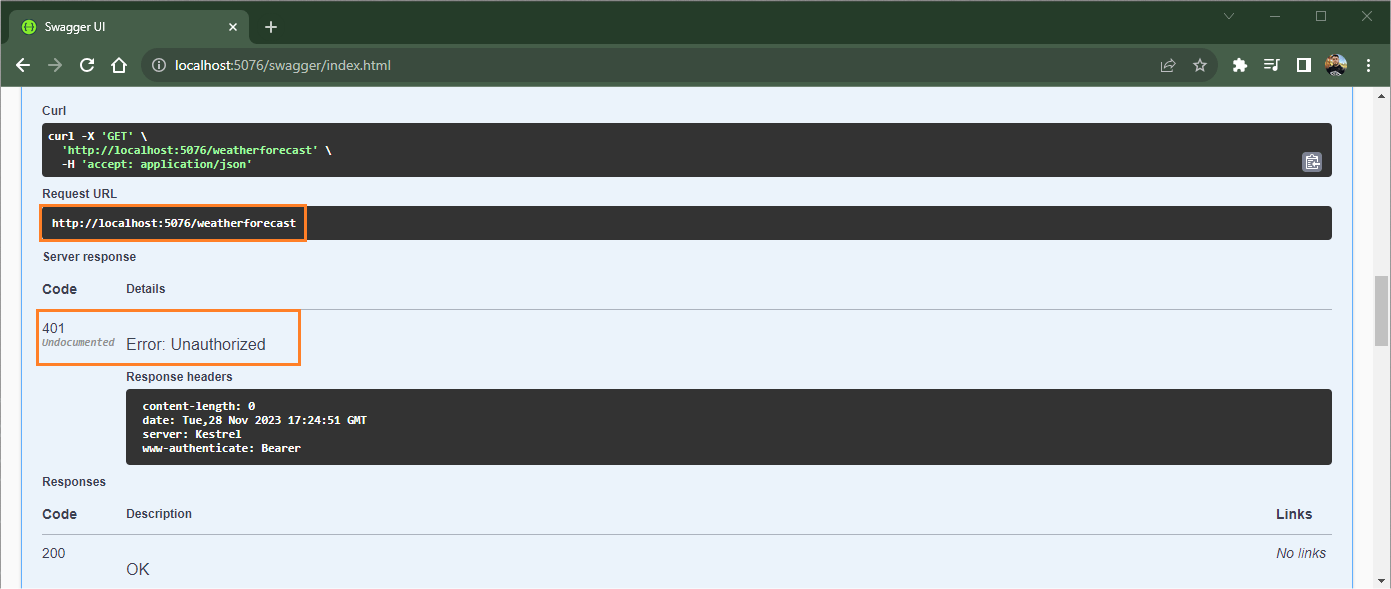
To solve it, let’s create a user and generate the token to access the “weatherforecast” endpoint. So, access the “/register” endpoint, and in the body of the request, enter an email address and a valid password. Click on execute to create your user in the database.
To access the “/login” endpoint, enter the previously created credentials again, and execute. Note that the response brought the generated token and a refresh token, as shown in the image below:
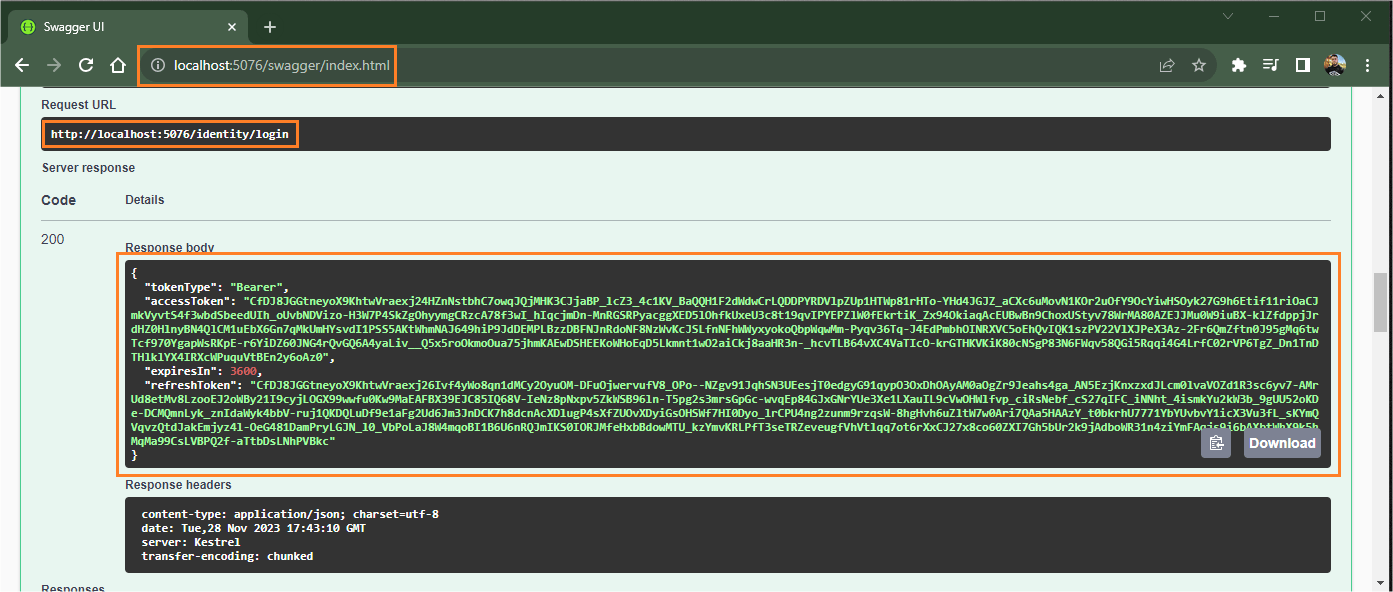
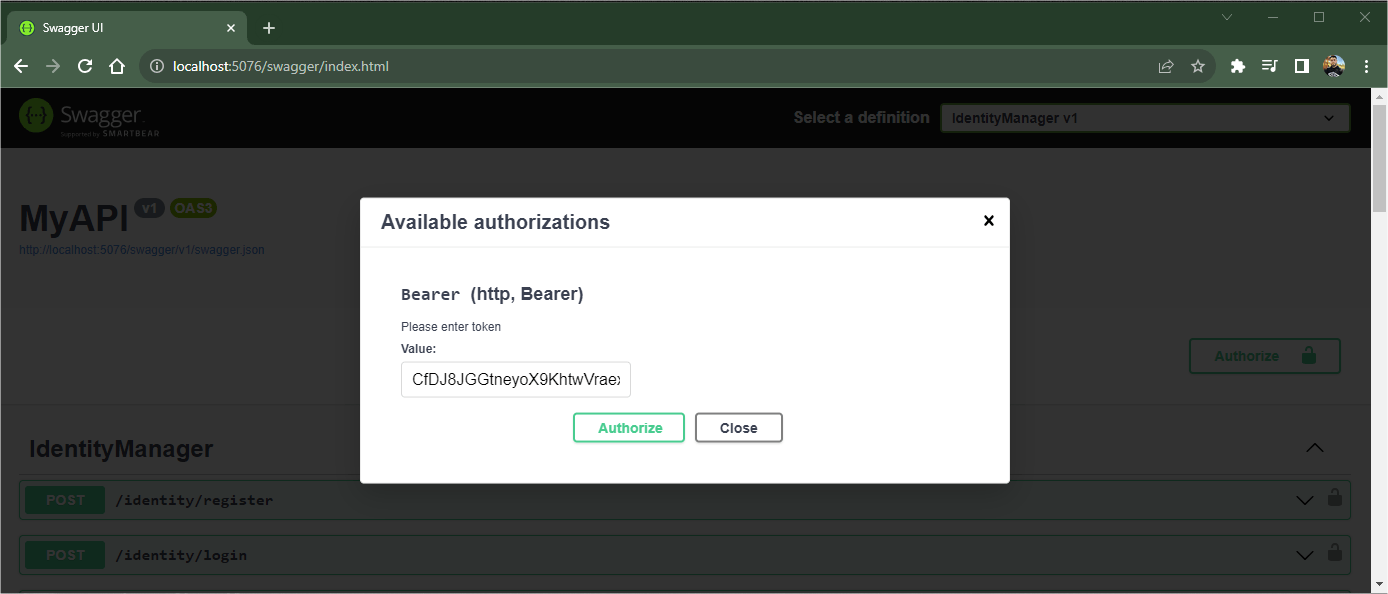
Now click on the “Authorize” button. In the window that opens, paste the generated token and click “Authorize.”
Now try to access the “weatherforecast” endpoint again and note that you will be able to access the data without problems as the client is now authenticated.
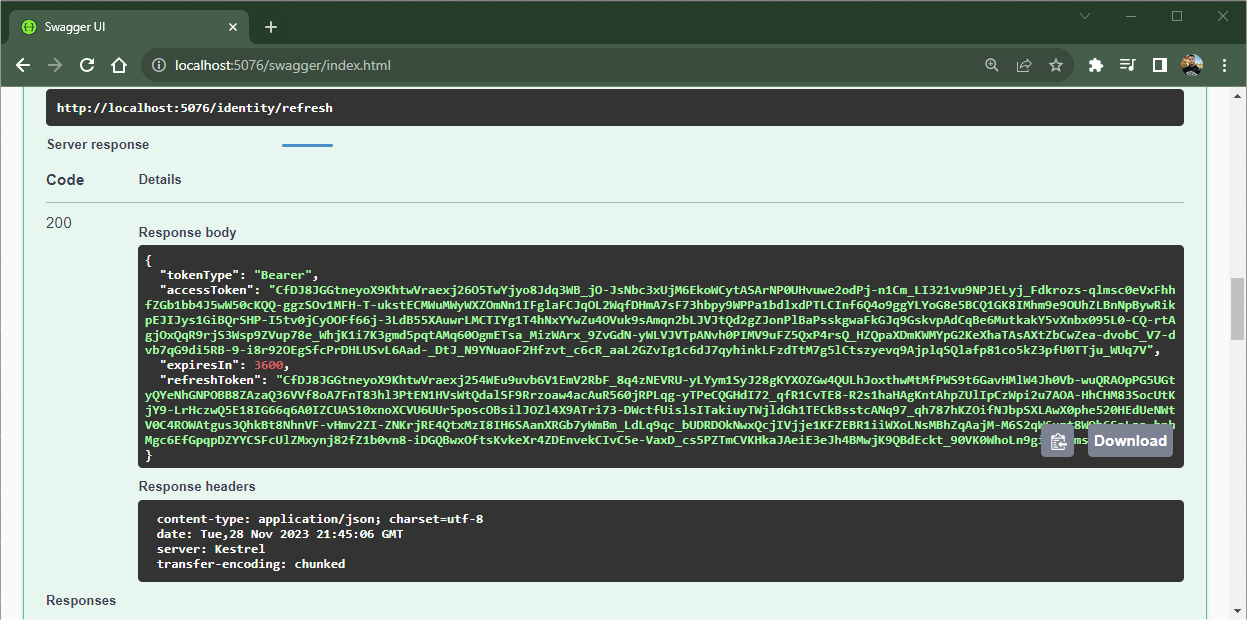
Another available feature is the refresh token, which generates a new token. To do this, simply send the previously obtained refresh token in the body of the request to the “/refresh” endpoint, then the response will return a new token and a new refresh token, as shown in the image below:
In addition to user registration and login with authorization and authentication, there are other important features available in ASP.NET Core Identity, such as email confirmation and password change, among others.
Conclusion
Identity is a powerful feature natively available in ASP.NET Core. Through Identity, it is possible to manage authentication and authorization efficiently and securely.
With the improvements introduced in .NET 8, Identity has become even more robust and flexible, providing developers with a comprehensive set of tools to handle the complexity of security requirements in their applications.
One of the notable features of this release is improvements to the Identity API, offering a more intuitive and simplified development experience. Developers can now make the most of Identity’s capabilities with less code, making the implementation and maintenance process more efficient.
Throughout the post, we created a simple application. We applied the Identity structure to it, allowing authentication to be done directly through the Swagger interface, which makes it easier when it is necessary to do some quick tests on the endpoints.
In addition, we saw the new AddIdentityApiEndpoints feature available in .NET 8 that configures new endpoints for authentication and token generation.
As described throughout the post, despite being a great resource to facilitate the development of authentication systems in SPAs, remember to consider the possible risks when using Identity’s native token system.
By using Identity’s resources, it is possible to save considerable analysis and development time, so always consider using it if it fits your needs.


