Get Started Integrating AI in Your ASP.NET Core Applications

Summarize with AI:
AI has the potential to transform data analysis and manipulation, making them significantly simpler. Learn how to integrate an ASP.NET Core application with the OpenAI API to perform data analysis directly on the backend.
The use of artificial intelligence (AI) has been growing ever since it became popular among the world’s population. Since then, many models have emerged, each with its particularities. One of the best-known is GPT, created by OpenAI.
OpenAI offers an API that allows developers to integrate advanced language models into their applications. With this integration, ASP.NET Core applications can benefit from features such as text generation, process automation and even customer support.
In this post, we’ll explore how to integrate an ASP.NET Core application with the OpenAI API to take advantage of one of the best features of natural language processing (NLP) artificial intelligence: sentiment analysis.
An Introduction to AI Models
In the context of AI and machine learning (ML), models are programs trained to identify patterns from pre-existing data, make predictions, make decisions and classify or generate new content without human intervention. Models use advanced algorithms to perform the tasks they are designed for.
There are several types of AI models, each with its purpose. Some main models include regression models, classification models, neural networks and language models.
In this post, we will focus on the NLP model—natural language processing. NLP is a field of artificial intelligence that aims to interpret and understand human language. It allows algorithms to process and analyze large volumes of natural language data. NLP models, such as those used in text generation, analyze input data (prompts) and, based on the training data, process the information to generate responses, usually in text format, such as machine translation and sentiment analysis.
Some of the best-known NLP models are those created by OpenAI. OpenAI is a company focused on research and development in the field of artificial intelligence and has become known worldwide in recent years mainly for services such as ChatGPT, which is a generative AI that has an interface and is used to generate text from prompts and training data.
Among the services offered by OpenAI are AI models, each with particularities such as purposes and costs.
We can highlight the following models:
- GPT-3.5 Turbo: It can understand and generate natural language or code and is optimized for chat, but it also works well for non-chat tasks.
- GPT-4o (“o” for “omni”): It is the most advanced GPT model. It accepts text or image inputs and produces text and has the same intelligence as GPT-4 Turbo, yet operates much more efficiently.
- GPT-4o mini: It is the most advanced in the small model category, and the cheapest model so far. It is also multimodal (it accepts text or image inputs and outputs text), has greater intelligence than GPT-3.5-turbo and is just as fast.
Note: This information was obtained from the official OpenAI website at the time the post was written and may or may not change in the future.
Advantages of Using AI in Web Applications
The use of AI has become increasingly popular, largely thanks to the fact that people can access advanced artificial intelligence resources for free (although with limitations) through interactive interfaces. An excellent example is ChatGPT, from OpenAI. However, the potential of AI goes far beyond this: It can be integrated into real applications to automate processes that previously required human intervention. Does this mean that AI will replace people? Not necessarily. Today, AI is a tool that facilitates activities and optimizes people’s time.
For example, an ecommerce company that requires its salespeople to spend hours filling out spreadsheets to update prices can automate this task with the help of AI, thus allowing salespeople to focus their efforts on attracting new customers and increasing their revenue. By adopting AI to automate repetitive tasks, countless possibilities open up to improve productivity and efficiency in several areas.
Hands-on with GPT-4o Mini
In this post, we will use the GPT-4o mini model, which is one of the AI models maintained by OpenAI. It stands out for its capacity, performance and price (currently the cheapest model). You can access the GPT-4o mini documentation here.
To demonstrate the use of GPT-4o mini, we will create an ASP.NET Core backend application that will receive product review data, and based on the text sent by the customer, the AI will interpret and save in a database whether the review was good, bad or neutral.
Before you start, you need to meet the requirements below. Note that these requirements are for using the OpenAI GPT-4o mini model. If you already use another model, you can use it, but possible additional configurations will not be covered in this post.
- You need to have an account on the OpenAI platform.
- You must have a paid plan that includes the use of the GPT-4o mini model. At the time this post was written, the minimum amount to use the model was $5.00. (This amount may change in the future.)
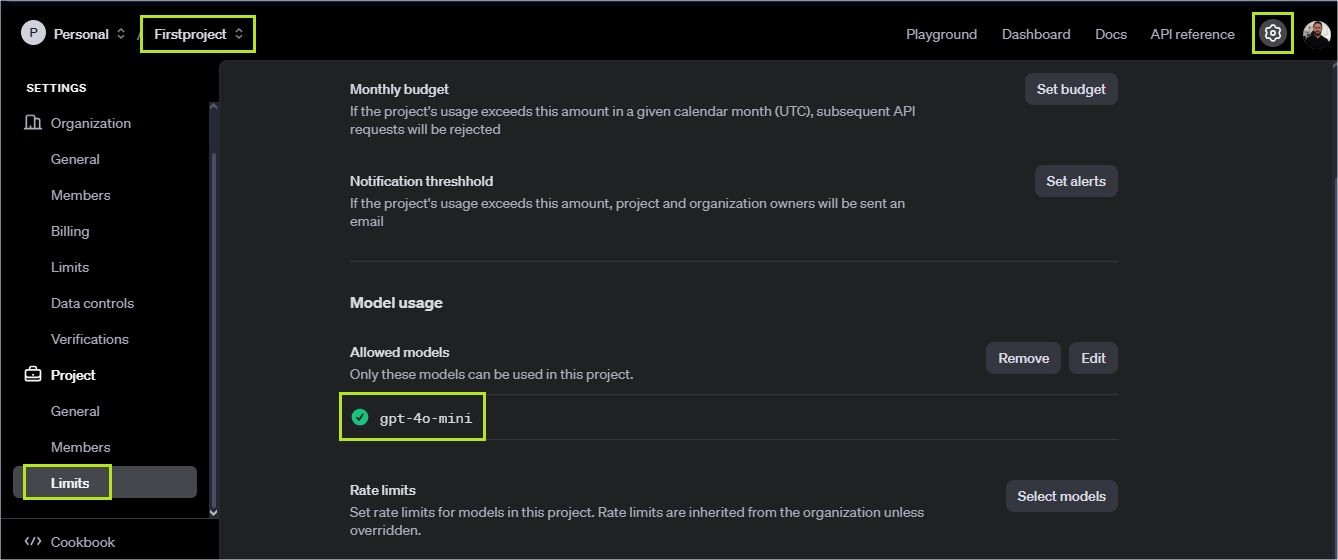
- You need to include gpt-4o-mini in your project limits. To do this, go to the platform page, click on the configuration icon and, in the left menu, click on the limits link, as shown in the image below.
Then, click on the edit button, select the allow tab, select gpt-4o-mini and then click save. This will allow the application to use the gpt-4o-mini model.
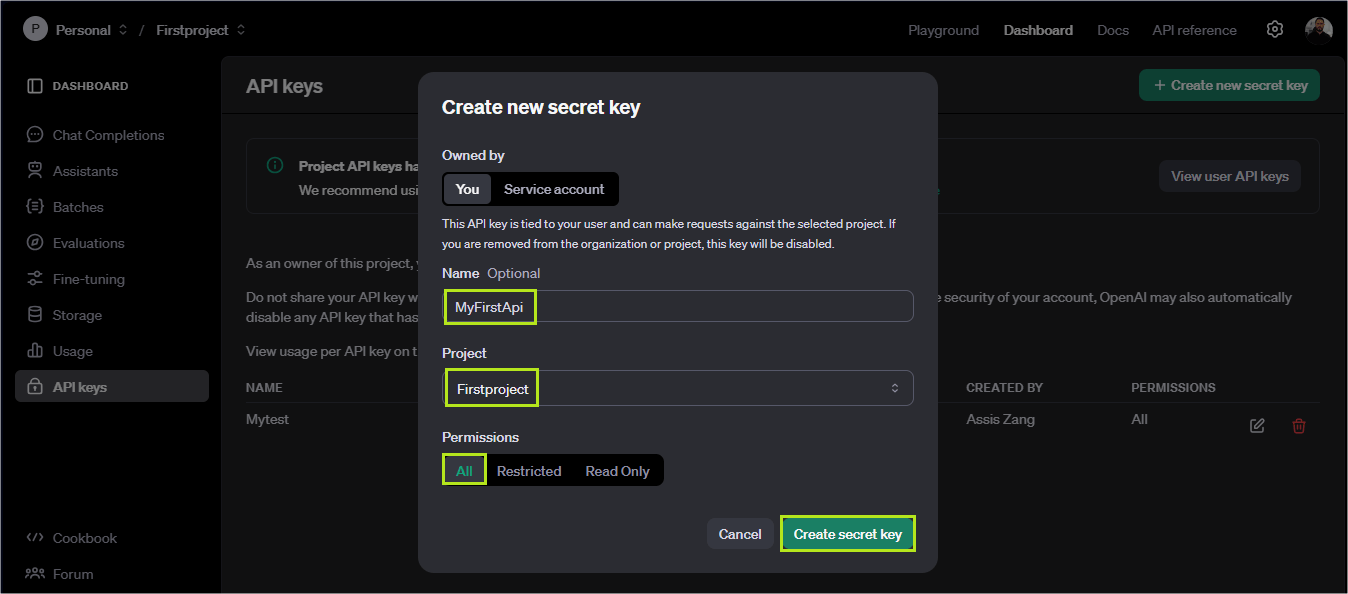
- You need to have an API key configured. To do this, go to the OpenAI platform, click on the top menu “Dashboard” and then, in the left menu, click on “API Keys.” On the screen that opens, there will be a button with the text “Create new secret key”—click on it. In the popup that opens, you can type a name (optional) and select the project in which you enabled gpt-4o-mini. In the permissions, you can leave “all” selected. Finally, click on “Create secret key.”
In the next popup, you will see your secret key. Copy it and leave it somewhere accessible. It will be useful later.
Creating an ASP.NET Core API and Integrating It with AI
All the configurations for using the OpenAI API with the GPT-4o mini model are ready. Now let’s implement a backend API with ASP.NET Core to receive data through a request, pass this data to the GPT-4o mini API and then process the result.
You can access the complete code build in this tutorial in this GitHub repository: FeedbackScan source code.
To create the application, you can use the following command:
dotnet new web -o FeedbackScan
This command will create a web application called “FeedbackScan” using the minimal API template.
Adding Project Dependencies
After creating the base application, add the following dependencies to the project:
<ItemGroup>
  <PackageReference Include="Microsoft.AspNetCore.OpenApi" Version="8.0.10" />
  <PackageReference Include="Microsoft.EntityFrameworkCore.SqlServer" Version="8.0.10" />
  <PackageReference Include="Microsoft.EntityFrameworkCore.Tools" Version="8.0.10">
    <PrivateAssets>all</PrivateAssets>
    <IncludeAssets>runtime; build; native; contentfiles; analyzers; buildtransitive</IncludeAssets>
  </PackageReference>
  <PackageReference Include="Microsoft.VisualStudio.Web.CodeGeneration.Design" Version="8.0.6" />
  <PackageReference Include="Swashbuckle.AspNetCore" Version="6.7.0" />
  <PackageReference Include="Azure.AI.OpenAI" Version="2.0.0" />
</ItemGroup>
Creating the Entity Classes
Then, create a new folder called “Models,” and inside it, create the following entity classes:
- CustomerFeedback: Class to represent the database entity, with all customer feedback data.
using System.ComponentModel.DataAnnotations;

namespace FeedbackScan.Models;
public class CustomerFeedback
{
    [Key]
    public string Id { get; set; }
    public string CustomerId { get; set; }
    public string CustomerName { get; set; }
    public string ProductId { get; set; }
    public string ProductName { get; set; }
    public string ReviewText { get; set; }

    [Range(1, 5)]
    public int Rating { get; set; }
    public string Sentiment{ get; set; }
    public string MainReason { get; set; }
    public DateTime CreatedDate { get; set; }
}
- FeedbackRequest: Class to receive data sent by the customer request API.
using System.ComponentModel.DataAnnotations;

namespace FeedbackScan.Models;
public class FeedbackRequest
{
    public string CustomerId { get; set; }
    public string CustomerName { get; set; }
    public string ProductId { get; set; }
    public string ProductName { get; set; }
    public string ReviewText { get; set; }

    [Range(1, 5)]
    public int Rating { get; set; }
}
- FeedbackResponse: Class to receive the response from the OpenAI API.
using System.Text.Json.Serialization;

namespace FeedbackScan.Models;
public class FeedbackResponse
{
    [JsonPropertyName("sentiment")]
    public string Sentiment { get; set; }

    [JsonPropertyName("mainReason")]
    public string MainReason { get; set; }
}
Creating the Context Class
Now, create a new folder called “Data” and, inside it, create the class below:
- FeedbackScanContext: Class that integrates with EF Core, setting the CustomerFeedback object to retrieve and manipulate database records.
using Microsoft.EntityFrameworkCore;

namespace FeedbackScan.Data
{
    public class FeedbackScanContext : DbContext
    {
        public FeedbackScanContext (DbContextOptions<FeedbackScanContext> options)
            : base(options)
        {
        }

        public DbSet<FeedbackScan.Models.CustomerFeedback> CustomerFeedback { get; set; } = default!;
    }
}
Creating the Endpoint Class
Then, create a new folder called “Endpoints” and, inside it, create the following class:
- CustomerFeedbackEndpoints: Class to organize the customer feedback API endpoints, using the minimal API model.
using Microsoft.EntityFrameworkCore;
using FeedbackScan.Data;
using FeedbackScan.Models;
using Microsoft.AspNetCore.Http.HttpResults;
using OpenAI.Chat;
using System.Text.Json;
namespace FeedbackScan.Endpoints;

public static class CustomerFeedbackEndpoints
{
    public static void MapCustomerFeedbackEndpoints(this IEndpointRouteBuilder routes, ChatClient chatService)
    {
        var group = routes.MapGroup("/api/CustomerFeedback").WithTags(nameof(CustomerFeedback));

        group.MapPost("/feedback-submission", async (FeedbackRequest request, FeedbackScanContext db) =>
        {
            string feedbackAnalysisPrompt = $@"Analyze the following customer feedback and return the sentiment (positive, negative, or neutral)
            and the main reason (with a maximum of 5 words) for that sentiment in the following JSON format:
            {{
              ""sentiment"": ""positive|negative|neutral"",
              ""mainReason"": ""reason for the sentiment""
            }}
            Feedback Text: {request.ReviewText}";

            var result = await chatService.CompleteChatAsync(feedbackAnalysisPrompt);

            var resultContent = result.Value.Content.FirstOrDefault().Text;

            var feedbackAnalysisResult = JsonSerializer.Deserialize<FeedbackResponse>(resultContent);

            var customerFeedback = new CustomerFeedback
            {
                Id = Guid.NewGuid().ToString(),
                CustomerId = request.CustomerId,
                CustomerName = request.CustomerName,
                ProductId = request.ProductId,
                ProductName = request.ProductName,
                ReviewText = request.ReviewText,
                Rating = request.Rating,
                Sentiment = feedbackAnalysisResult.Sentiment,
                MainReason = feedbackAnalysisResult.MainReason,
                CreatedDate = DateTime.Now
            };

            db.CustomerFeedback.Add(customerFeedback);
            await db.SaveChangesAsync();
            return TypedResults.Ok();
        })
        .WithName("FeedbackSubmission")
        .WithOpenApi();
    }
}
Let’s analyze this code.
First, we set up the endpoints, where the MapCustomerFeedbackEndpoints method defines a group of API endpoints at the /api/CustomerFeedback path. It uses the IendpointRouteBuilder interface to organize the endpoints related to customer feedback into a group with the CustomerFeedback tag. This makes it easier to manage and document the endpoints.
Next, the /feedback-submission endpoint is defined, which is of type POST and expects a FeedbackRequest object containing details of the feedback. Then, a prompt string (feedbackAnalysisPrompt) is declared to send to the OpenAI API, instructing it to parse the feedback text and return the sentiment (positive, negative or neutral) and the main reason for the sentiment, in a JSON format.
In this case, we are creating a custom prompt, so that the OpenAI API can parse the customer review text and return that data formatted in JSON, which can then be converted to the FeedbackResponse object.
Finally, an object (CustomerFeedback) is created using the return data from the OpenAI API and the request data, and then the record is saved to the database.
The .WithOpenApi() method is used to integrate the endpoint into the documentation generated by OpenAPI (or Swagger). This includes the endpoint in the application’s OpenAPI specification, making it easier to create automatic documentation. This allows tools like Swagger UI to generate a visual interface where developers can see and interact with the API endpoints. To learn more about the features available in the .WithOpenApi() method, visit Microsoft’s documentation page: ASP.NET Core Open API.
Setting the Database Connection String and API Key
Now, let’s set the database connection string and API key. Open the appsettings.json file and add the code below:
"ConnectionStrings": {
  "FeedbackScanContext": "Server=(localdb)\\mssqllocaldb;Database=FeedbackScan;Trusted_Connection=True;MultipleActiveResultSets=true"
},
"AI": {
  "OpenAI": {
    "ApiKey": "YOUR_API_KEY"
  }
}
Note that we are setting a basic local connection string to SQL SERVER. If you are using another database or have a different configuration, make the necessary changes.
We also set the API key, which is the key generated earlier in the Open API panel. So, replace the text “YOUR_API_KEY” with it.
Setting the Program Class
Now let’s change the Program class to use all the settings we created earlier.
So, replace the existing code in the class with the following:
using Microsoft.EntityFrameworkCore;
using FeedbackScan.Data;
using OpenAI;
using System.ClientModel;
using FeedbackScan.Endpoints;

var configuration = new ConfigurationBuilder()
           .SetBasePath(Directory.GetCurrentDirectory())
           .AddJsonFile("appsettings.json")
           .Build();

var apiKey = configuration["AI:OpenAI:ApiKey"];
OpenAIClient openAIClient = new OpenAIClient(new ApiKeyCredential(apiKey));
const string apiClient = "gpt-4o-mini";

var chatService = openAIClient.GetChatClient(apiClient);

var builder = WebApplication.CreateBuilder(args);

builder.Services.AddDbContext<FeedbackScanContext>(options =>
    options.UseSqlServer(builder.Configuration.GetConnectionString("FeedbackScanContext") ??
    throw new InvalidOperationException("Connection string 'FeedbackScanContext' not found.")));

builder.Services.AddEndpointsApiExplorer();
builder.Services.AddSwaggerGen();

var app = builder.Build();

if (app.Environment.IsDevelopment())
{
    app.UseSwagger();
    app.UseSwaggerUI();
}

app.UseHttpsRedirection();
app.MapCustomerFeedbackEndpoints(chatService);

app.Run();
First, we define the configuration variable to retrieve the settings from the appsettings.json file. Then, we search for the API key configuration, which is passed as a parameter to create the OpenAIClient class instance.
Next, the apiClient variable is used to store the value of the OpenAI model that we will use in the application—in this case, gpt-4o-mini. Then, the chatService variable is created, which is responsible for containing the OpenAI client instance, used to make requests to the API.
The connection string configuration is also created, and it is declared to EF Core that the database used is SQL SERVER.
Finally, the endpoints are mapped using the app.MapCustomerFeedbackEndpoints(chatService); method, which receives the chatService instance.
Generating the Database and Tables
To generate the database and tables, you can run the EF Core commands:
- Generate the scripts:
dotnet ef migrations add InitialCreate
- Run the scripts:
dotnet ef database update
Running and Testing the Application
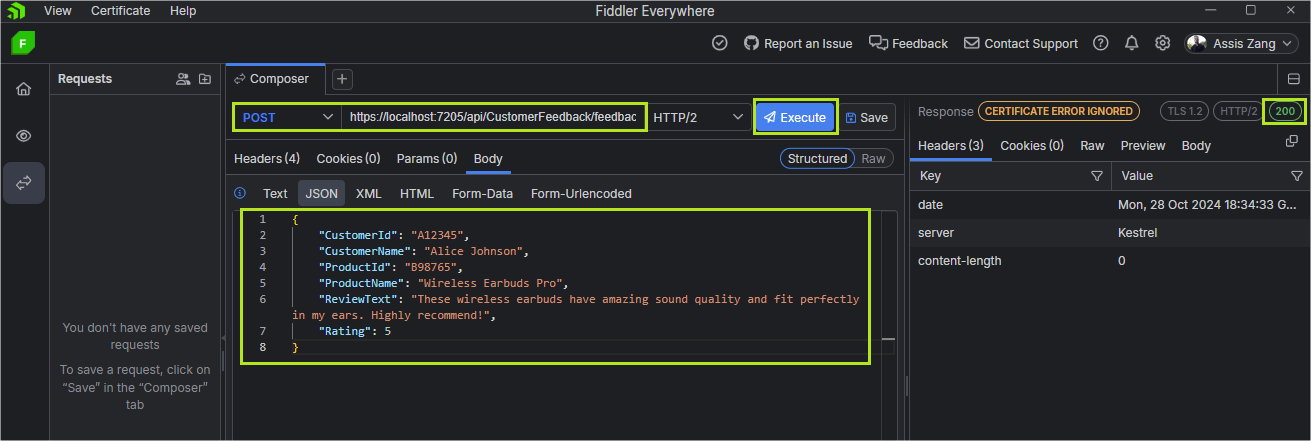
The application is ready. Now just create and run it by requesting the feedback-submission endpoint. For this step, this post will use Progress Telerik Fiddler Everywhere. You can use the JSON below to send in the request body:
{
    "CustomerId": "A12345",
    "CustomerName": "Alice Johnson",
    "ProductId": "B98765",
    "ProductName": "Wireless Earbuds Pro",
    "ReviewText": "These wireless earbuds have amazing sound quality and fit perfectly in my ears. Highly recommend!",
    "Rating": 5
}
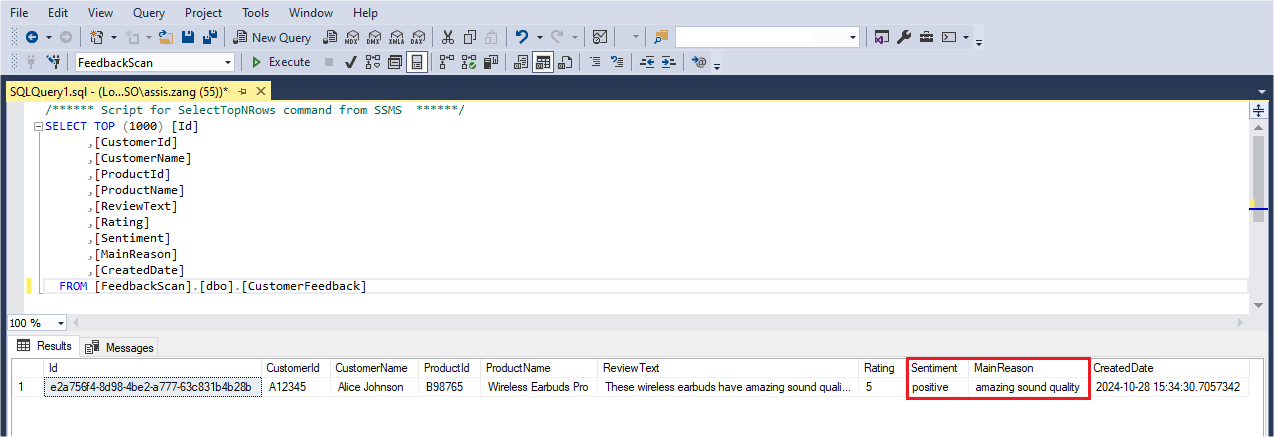
Note that the data has been saved in the database. We can see that the Sentiment and MainReason columns contain the data provided by the OpenAI API. In the request, the following prompt was sent:
Analyze the following customer feedback and return the sentiment (positive, negative, or neutral) and the main reason (with a maximum of 5 words) for that sentiment in the following JSON format:
            {{
              ""sentiment"": ""positive|negative|neutral"",
              ""mainReason"": ""reason for the sentiment""
            }}
Feedback Text: These wireless earbuds have amazing sound quality and fit perfectly in my ears. Highly recommend!
The return was as follows:
{{
            "sentiment": "positive",
            "mainReason": "amazing sound quality"
}}
Note that the AI of the GPT-4o mini model analyzed the text sent and returned what was expected—the sentiment expressed in the text and its main reason.
In this example, we are using the OpenAI API to automatically analyze the sentiment expressed by a customer review and generate a conclusion based on the data collected. This allows this data to be used for future analysis, eliminating the need for manual reading by a professional, leaving the AI to analyze the sentiment and provide an opinion for each review. With the help of AI, companies can quickly identify trends and areas for improvement, optimizing decision-making and continuously improving the customer experience.
Conclusion
Although it may seem very complex, using artificial intelligence resources can be extremely simple if we use the right tools.
In this post, we introduced AI models, focusing on the most well-known ones from OpenAI, especially the GPT-4o mini model, which we integrated into an ASP.NET Core application. We applied the sentiment analysis function, a common task in NLP (natural language processing) AIs, to analyze the text of a product review and identify whether the opinion was positive, negative or neutral, in addition to understanding the main reason for the review.
Regardless of which model you use, the most important thing is to reflect on how AI can help you in your day-to-day life, whether using sentiment analysis or any other aspect. So, take advantage of this tutorial today to practice using AI with ASP.NET Core and explore the endless possibilities.

