Blazor Basics: Localization Using Resource Files

Summarize with AI:
In this article, we will learn how to localize Blazor applications using resource files.
Editor’s note: If you are looking for information regarding Blazor localization and globalization within Telerik UI for Blazor, please visit our documentation pages.
The solution shown in this article works for Blazor Server and the new Blazor Web App project template of .NET 8. However, it does not work for WebAssembly projects.
You can access the code used in this example on GitHub.
Introduction
We’re going to implement localization for a Blazor web application. It will allow us to translate the web app into multiple languages.


The completed project will look like this. It contains a language selector on the top right and displays the menu options on the left as well as the content of the Home page in the selected language.
Installing the Required NuGet Packages
Since we’re using .NET, we don’t have to reinvent the wheel. Our solution builds on top of the Microsoft.Extensions.Localization package.
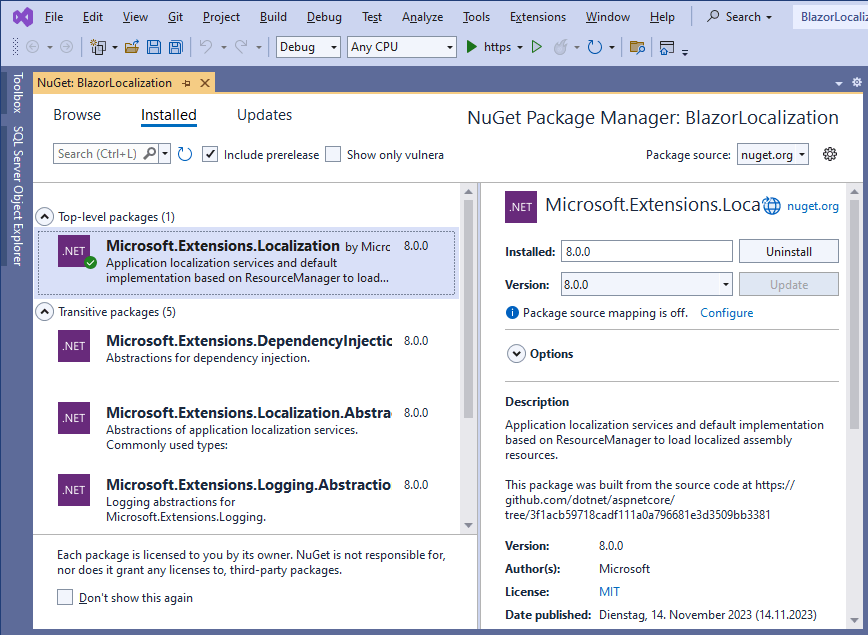
In a newly created Blazor project based on .NET 8’s single project Blazor Web App project template, we install the package.

Next, we open the Program.cs file and add the required services to the service container.
builder.Services.AddLocalization();
We also need to set up the localization middleware on the application host. I suggest setting it up right after the builder.Build() call to make sure that the localization middleware runs as early as possible.
string[] supportedCultures = ["en-US", "de-CH"];
var localizationOptions = new RequestLocalizationOptions()
    .SetDefaultCulture(supportedCultures[0])
    .AddSupportedCultures(supportedCultures)
    .AddSupportedUICultures(supportedCultures);

app.UseRequestLocalization(localizationOptions);
We need to configure the UseRequestLocalization method with a RequestLocalizationOptions object. We use collection initializers and add en-US and de-CH as cultures. We then use the array to populate the required options.
Creating the Translation Files as Resource Files
We create a Locales folder that will contain our translated texts. Inside this folder, we create a new resource file and name it Resources.resx.
The resource system in .NET works with a custom tool. We need to open the file properties in the Solution Explorer and set the PublicResXFileCodeGenerator as the custom tool.
It comes with Visual Studio and should be installed out of the box. When we save the file, a designer file should be generated in the background. Whenever we add a resource to the dictionary and save the file, the designer file should be regenerated.
Hint: Sometimes, the designer file won’t be generated. You can either unload and reload the project in Visual Studio or restart Visual Studio. Most of the time, this will fix the issue. Otherwise, you might want to restart your computer.

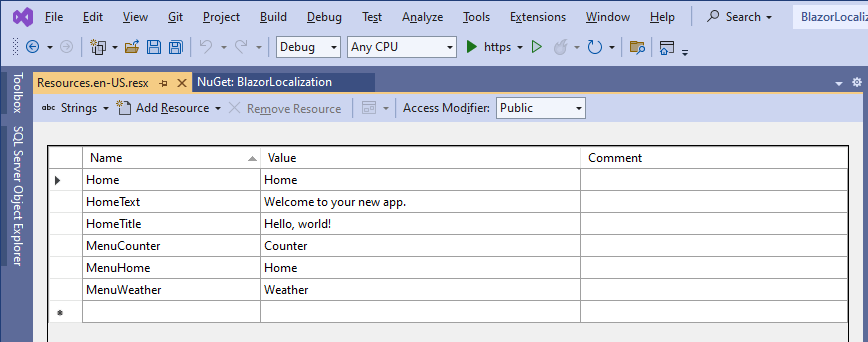
Let’s add the resources we need for this demo application.
Next, we want to specify the culture of this resource file in its file name. We rename it from Resources.resx to Resources.en-US.resx. I learned that if we create the file with this name from the beginning, we have even more issues with the designer file generation.
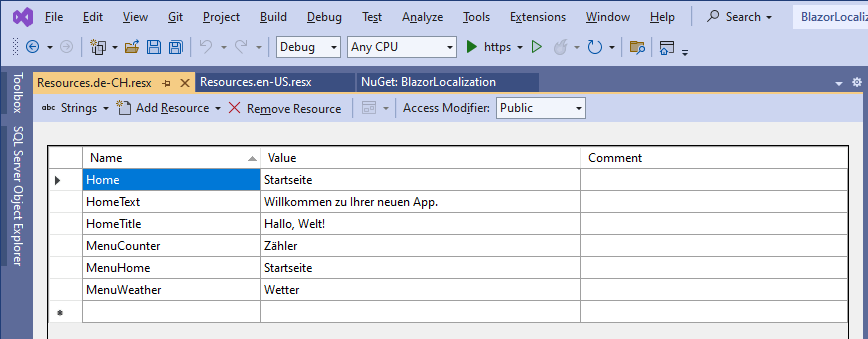
We also create another resource file and name it Resources.de-CH.resx where we will store the German translations.

Now, we’re ready to use the localized strings in our Blazor application.
Using Resources in Blazor Components
In the Home page component, we replace the file content with the following code:
@page "/"
@using Microsoft.Extensions.Localization
@using BlazorLocalization.Locales;
@using System.Globalization
@inject IStringLocalizer<Resources> localizer

<PageTitle>@localizer["Home"]</PageTitle>

@Thread.CurrentThread.CurrentCulture;
@Thread.CurrentThread.CurrentUICulture;

<h1>@localizer["HomeTitle"]</h1>

@localizer["HomeText"]
We need a few using statements providing access to the Localization namespace as well as our Resources class containing the localized strings.
Hint: We can also move the using statements into the
_Imports.razorfile. It will allow us to access the classes within these namespaces without explicitly adding a using statement in each component.
Next, we use the inject directive to create an instance of the generic IStringLocalizer class. We provide our Resources class as the generic type argument.
The localizer exposes an indexer, providing us access to the translated strings. We use the following syntax to access the value in the HomeTitle token:
@localizer["HomeTitle"]
Accessing translated strings using the string localizer is straightforward.
We also want to use the string localizer in the NavMenu component to translate the menu items. We use the following code in the NavMenu.razor file:
@using Microsoft.Extensions.Localization
@using BlazorLocalization.Locales;
@using System.Globalization
@inject IStringLocalizer<Resources> localizer

<div class="top-row ps-3 navbar navbar-dark">
    <div class="container-fluid">
        <a class="navbar-brand" href="">Blazor Localization</a>
    </div>
</div>

<input type="checkbox" title="Navigation menu" class="navbar-toggler" />

<div class="nav-scrollable" onclick="document.querySelector('.navbar-toggler').click()">
    <nav class="flex-column">
        <div class="nav-item px-3">
            <NavLink class="nav-link" href="" Match="NavLinkMatch.All">
                <span class="bi bi-house-door-fill-nav-menu" aria-hidden="true"></span> @localizer["MenuHome"]
            </NavLink>
        </div>

        <div class="nav-item px-3">
            <NavLink class="nav-link" href="counter">
                <span class="bi bi-plus-square-fill-nav-menu" aria-hidden="true"></span> @localizer["MenuCounter"]
            </NavLink>
        </div>

        <div class="nav-item px-3">
            <NavLink class="nav-link" href="weather">
                <span class="bi bi-list-nested-nav-menu" aria-hidden="true"></span> @localizer["MenuWeather"]
            </NavLink>
        </div>
    </nav>
</div>
Again, we have a few using statements, and we use the indexer of the localizer variable of the generic type IStringLocalizer with the Resources class as its type argument.
The CultureSelector Component
Now that we have the translated texts in our resources files and know how to access the information in Blazor components, we want to be able to change cultures from within the Blazor application.
We create a new component in the Layouts folder, and name it CultureSelector, and insert the following code:
@inject NavigationManager Navigation
@using System.Globalization

<div>
    <select @bind="Culture">
        <option value="en-US">English</option>
        <option value="de-CH">German</option>
    </select>
</div>

@code
{
    protected override void OnInitialized()
    {
        Culture = CultureInfo.CurrentCulture;
    }

    private CultureInfo Culture
    {
        get
        {
            return CultureInfo.CurrentCulture;
        }
        set
        {
            if (CultureInfo.CurrentCulture != value)
            {
                var uri = new Uri(Navigation.Uri)
                    .GetComponents(UriComponents.PathAndQuery, UriFormat.Unescaped);
                var cultureEscaped = Uri.EscapeDataString(value.Name);
                var uriEscaped = Uri.EscapeDataString(uri);

                var fullUri = $"Culture/Set?culture={cultureEscaped}&redirectUri={uriEscaped}";
                Navigation.NavigateTo(fullUri, forceLoad: true);
            }
        }
    }
}
The component template uses an HTML select element that renders a dropdown including a list of all available cultures.
In the code section, we initialize the current culture using the CultureInfo class. We also implement a Culture property that we bind to the select element in the template code. It contains a simple getter and a more advanced setter.
In the setter, we check whether the selected value is different from the current culture. If that is true, we build an URI including the culture value and trigger an internal page navigation using the NavigationManager.
Make sure to provide true to the forceLoad argument to ensure that the internal navigation will be executed.
Handling Culture Changes Using a Controller
Whenever we select a different culture in the CultureSelector component, an internal page navigation should happen. However, we haven’t implemented the target page yet.
Let’s add a new Controllers folder in the root folder and create an empty MVC controller named CultureController for the basis of the following controller implementation.
using Microsoft.AspNetCore.Localization;
using Microsoft.AspNetCore.Mvc;

namespace BlazorLocalization.Controllers;

[Route("[controller]/[action]")]
public class CultureController : Controller
{
    public IActionResult Set(string culture, string redirectUri)
    {
        if (culture != null)
        {
            var requestCulture = new RequestCulture(culture, culture);
            var cookieName = CookieRequestCultureProvider.DefaultCookieName;
            var cookieValue = CookieRequestCultureProvider.MakeCookieValue(requestCulture);

            HttpContext.Response.Cookies.Append(cookieName, cookieValue);
        }

        return LocalRedirect(redirectUri);
    }
}
We implement a Set method that accepts two parameters. It has a culture and a redirectUri argument, both of type string.
If the provided culture isn’t null, we create a new instance of the built-in RequestCulture object and provide the instances as the value of a cookie.
When using the Localization NuGet package installed at the beginning, we can choose from different options, how to change the culture. Using cookies is one of the simplest solutions, and it has worked great for me so far.
At the end of the method, we need to make sure that we append the created cookie to the response of our HTTP request and execute the redirect to the redirectUri.
To make the Blazor application aware of the newly implemented controller, we need to register the services handling ASP.NET Core Controllers in the Program.cs file.
We add the following line after the AddLocalization call:
builder.Services.AddControllers();
And we also need to add the following middleware registration on the web application host:
app.MapControllers();
The order doesn’t matter much, but I usually register the controllers before the MapRazorComponent<App>() registration.
Conclusion
The Microsoft.Extensions.Localization NuGet package provides us with types that allow us to implement localization with a few lines of code and well-known .NET tools, such as resource files.
Make sure to register the required services in the Program.cs file, and you should be good to go pretty quickly.
If you want to have more type safety when accessing the localized strings, you could also implement an enum containing the keys of the resource files and use the enum instead of magic strings when using the indexer of the IStringLocalizer interface.
If you want to learn more about Blazor development, you can watch my free Blazor Crash Course on YouTube. And stay tuned to the Telerik blog for more Blazor Basics.

Claudio Bernasconi
Claudio Bernasconi is a passionate software engineer and content creator writing articles and running a .NET developer YouTube channel. He has more than 10 years of experience as a .NET developer and loves sharing his knowledge about Blazor and other .NET topics with the community.

