Blazor Basics: Improved Performance with Component Virtualization

Summarize with AI:
We will learn how component virtualization optimizes the rendering performance of Blazor applications.
In this article of the Blazor Basics series, we will learn how to use component virtualization in Blazor to optimize the rendering performance of Blazor web applications.
You can access the code used in this example on GitHub.
Introduction
When working with data-driven applications, we sooner or later have to render an uncomfortable number of items in a list. As developers, we always want to keep the user interface as sharp as possible and only include the data required to perform a particular action.
But what if the product owner requests to render 10,000 or 100,000 items? What if the reasoning is that “the customer needs it”? As a good developer, we come up with a solution that works.
The fundamental issue with rendering thousands or hundreds of thousands of items is that rendering takes time, uses a lot of memory, and generally makes the website feel slow.
Component virtualization is a Blazor feature that helps us find a solution for such scenarios.
The Issue Without Virtualization
Before we can implement virtualization, we first need to create an example of what rendering thousands of items in Blazor could look like.
Consider the following code that renders orders on the screen.
<h1>Orders</h1>
@foreach (var order in Orders)
{
    <div style="display:flex;">
        <div style="width: 400px;">@order.Id</div>
        <div>$ @order.Value</div>
    </div>
}

@code {
    public record Order(Guid Id, int Value);

    public IList<Order> Orders { get; set; } = new List<Order>();

    protected override void OnInitialized()
    {
        var random = new Random();
        for (int i = 0; i < 100_000; i++)
        {
            Orders.Add(new Order(Guid.NewGuid(), random.Next(20, 9999)));
        }
    }
}
We define a list of Order objects containing an Id and a Value property. In the OnInitialized lifecycle method, we create a hundred thousand orders and add them to the Orders list.
In the component template, we have a foreach statement to render all items on the screen. In this example, we only render three divs for each order. In a more complex setting, this could be a whole object tree, including many more HTML elements.
Even though we use a relatively simple HTML markup, we already have a noticeable delay when navigating to the page. Also, with 1.4 GB of memory used, it’s definitely not ideal.
How to Implement Virtualization
Blazor provides a built-in Virtualize component that makes virtualizing components straightforward. And the best part: We can virtualize anything. It doesn’t matter if it’s another Blazor component, a simple HTML element or a mix of the two.
The following template code shows how to virtualize the example introduced above.
<Virtualize Items="Orders" Context="order">
    <div style="display:flex;">
        <div style="width: 400px;">@order.Id</div>
        <div>$ @order.Value</div>
    </div>
</Virtualize>
The Virtualize component exposes a few properties. The most important are Items and Context. We provide the list of items we want to virtualize as the argument of the Items property. And we provide a name for each item as the value of the Context property.
We can then use the order variable within the Virtualize component to define the template for each item.
When running the Blazor application using component virtualization, I couldn’t notice a delay when rendering the page. Also, the memory consumption in Google Chrome has gone down to 100 MB from 1.4 GB before without virtualization.
We get a fast page load and less memory consumption with such a simple thing as wrapping our item code within a Virtualize component.
How Does It Work?
You might wonder how it works behind the scenes. It’s tempting to assume that the Virtualize component implements paging, meaning that it only loads the viewable items on the screen. Unfortunately, it’s not that simple.
When we initialize the list of items within the OnInitialized method, we already fetched all items into memory. Wrapping our template code within a Virtualize component doesn’t change that. The items are still in memory.
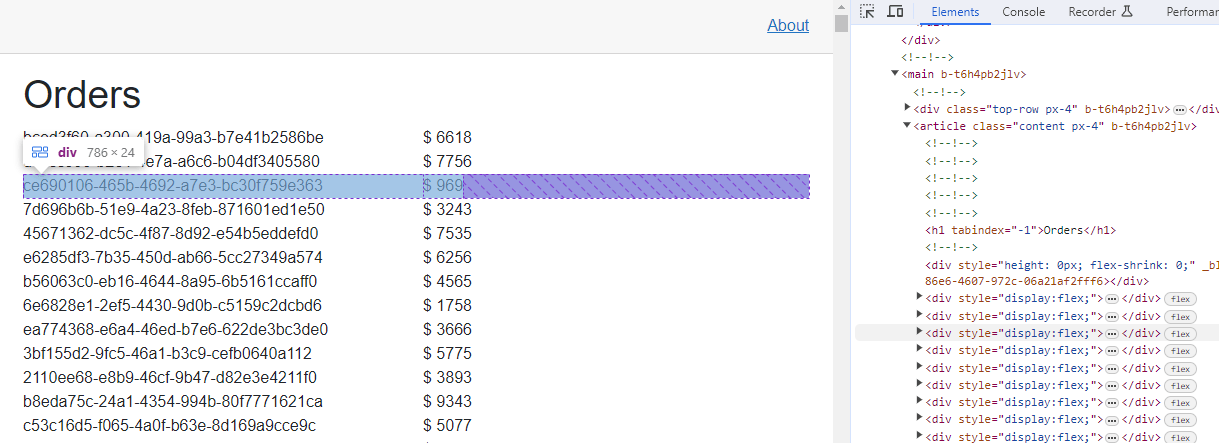
However, only a limited number of elements are rendered on the screen. We can observe that by opening the developer’s tools and looking at the elements tab. With virtualization, we only see a limited number of divs.

On the other hand, without virtualization, the page renders a div for every item in the list.
Controlling the Rendering Behavior
When scrolling, the Virtualize component renders additional components, making it seamless for the user.
The Virtualize component has an internal implementation that decides how many elements are rendered beyond what is currently visible on the screen. The internal algorithm is based on the height of an item and the height of its container.
We can use the Virtualize component’s OverscanCount property to change how many additional items are rendered.
<Virtualize Items="Orders" Context="order" OverscanCount="15">
    <div style="display:flex;">
        <div style="width: 400px;">@order.Id</div>
        <div>$ @order.Value</div>
    </div>
</Virtualize>
I usually keep the default when possible. Sometimes, depending on how complex and how big the content for a single item is, you want to manually set the OverscanCount property to gain more control of its rendering behavior.
For my example above, the default implementation renders about 15 additional items.
Lazy Loading Items
But what if loading the items is expensive? What if we only want to load the items that are actually visible on the screen? Yes, it’s possible.
Lazy Loading uses the ItemsProvider property instead of the Items property of the Virtualize component.
<Virtualize ItemsProvider="@LoadOrders" Context="order">
    <div style="display:flex;">
        <div style="width: 400px;">@order.Id</div>
        <div>$ @order.Value</div>
    </div>
</Virtualize>
Important: We can use either theItemsproperty with a collection that contains all items or theItemsProviderproperty with a method that loads items, but we cannot set them both. Otherwise, we will get anInvalidOperationExceptionat runtime.
Now let’s take a look at the LoadOrders method placed in the @code section of the LazyLoading page component.
private ValueTask<ItemsProviderResult<Order>> LoadOrders(ItemsProviderRequest request)
{
    StartIndex = request.StartIndex;
    Count = request.Count;

    StateHasChanged();

    var filteredOrders = Orders.Skip(request.StartIndex)
        .Take(request.Count);

    var result = new ItemsProviderResult<Order>(filteredOrders, Orders.Count());
    return ValueTask.FromResult(result);
}
First of all, we added two int properties to the page component for better illustration of lazy loading.
public int StartIndex { get; set; }
public int Count { get; set; }
The LoadOrders method gets a single argument of type ItemsProviderRequest. It contains a StartIndex and a Count property that is used to define what part of the data set is requested.
We take those two properties, set their values to their respective properties in the page component, and call the StateHasChanged method to let the page component know it has to rerender. It is required to see the correct state.
We display the count and the start index as part of the page title. It’s the simplest way to keep the information visible to the user.
<PageTitle>Lazy Loading Orders - @StartIndex:@Count</PageTitle>
Those first three lines of the LoadOrders method are essentially for demonstration and learning how ItemsProviders work under the hood. In a real implementation, we start with the following code.
We use LINQ to filter the data from the Orders property to only contain the data requested by the ItemsProviderRequest.
Next, we create an instance of the generic ItemsProviderResult type and provide the filtered orders and their count.
The method signature requires us to return a ValueTask of an ItemsProviderResult. We use the ValueTask.FromResult method in this case because our code isn’t asynchronous.
Note: Again, in this example, we load all the items when creating the page component and store them in the Orders property. In a scenario where you want to access an API and load orders from the database, you wouldn’t load all the orders up front. Instead, you can use theLoadOrdersmethod to write code that calls the API and provide theStartIndexand theCountproperties to define what subset of the data needs to be loaded.
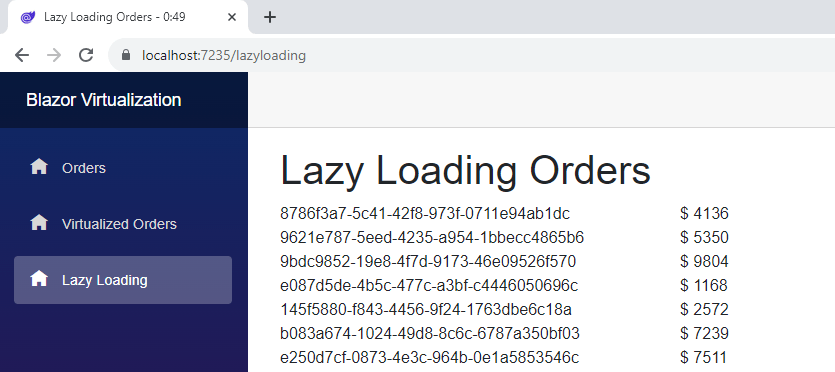
When running the application you can see the 0:49 added to the page tile (shown in the browser tab). It means that we start at index 0 and load 49 items.

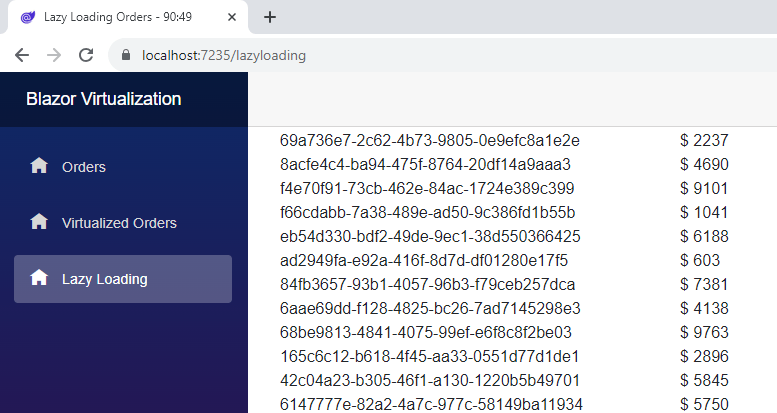
When scrolling through the content, those numbers update, and we see that the ItemsProvider method is called whenever we exceed the currently loaded items.

Remember that you can access the code used in this example on GitHub. In particular, the lazy loading example might be more straightforward to understand when working directly in code.
Gotchas with Virtualization and Lazy Loading
The provided Virtualize component does a lot of work to reduce the rendering performance required to show massive lists of data.
However, there are some limitations. For example, it is expected that all items have the same height. Otherwise, the Virtualize component isn’t able to calculate the scrolling range and, therefore, doesn’t know what to render.
Also, if you call an expensive API every 40-50 items, it can add a lot of overhead. For example, you can have HTTP requests, including latency for every request. Sometimes, it might be better to load all the data up front, even though the user needs to wait until the entire data set is downloaded.
As always in software engineering, this feature isn’t a use-it-everytime. It’s rather an additional item in the toolbox. Use it when it makes sense, and use something else when it doesn’t fit.
Conclusion
The built-in Virtualize component allows us to efficiently render large data sets by only rendering items visible on screen. The component uses internal algorithms to decide how many items to show at a time.
We can use the Items property to provide a prepopulated list of data or an ItemProvider to lazy load data as we go. Both approaches have their advantages and disadvantages, as explained in this article.
The OverscanCount allows us to control the number of items rendered simultaneously. It can be helpful to set this property to adjust the behavior to your use case. Increase it when an API call using lazy loading takes much time. Decrease it when rendering simple in-memory components to improve the page load performance.
All in all, the built-in Virtualize component can help you write more efficient Blazor applications.
You can access the code used in this example on GitHub.
If you want to learn more about Blazor development, you can watch my free Blazor Crash Course on YouTube. And stay tuned to the Telerik blog for more Blazor Basics.

Claudio Bernasconi
Claudio Bernasconi is a passionate software engineer and content creator writing articles and running a .NET developer YouTube channel. He has more than 10 years of experience as a .NET developer and loves sharing his knowledge about Blazor and other .NET topics with the community.

