Blazor Basics: Handling Images Dynamically

Summarize with AI:
We will learn how to render static and dynamically rendered images in Blazor applications.
Handling images is one of the fundamental tasks of any web framework. Blazor offers us two different options on how to render images.
We can use static image paths, meaning we always show the same image, no matter what. Or we can use dynamic image paths, meaning we use a C# variable and, depending on its content, a different image is rendered within the Blazor component.
Static Images
Let’s first render a static image. There is no right or wrong, but I usually place my images within the wwwroot folder since that folder is automatically accessible from the browser.
The folder already contains CSS and JavaScript files, and we can add our image files to this root folder. I always create a folder structure that makes sense for my projects. In this simple case, an images folder within the wwwroot folder is all we need.
I placed three images in the following path:
- images/
- burger.jpg
- pizza.jpg
- salad.jpg
Next, we want to render the images as part of a Blazor component template. It’s very simple. All we need to do is set the source property of an img element to the relative path within the wwwroot folder.
Take a look at the following code:
<img style="width: 300px" src="images/pizza.jpg" />
<img style="width: 300px" src="images/burger.jpg" />
<img style="width: 300px" src="images/salad.jpg" />
As you can see, there is no magic involved. It’s all standard HMTL. The most important thing to know is that paths are relative and start at the wwwroot folder.
The rendered images look like this:

Dynamically Rendering Images
Although rendering static images is the foundation, it gets more excited when working with dynamically rendered images.
Let’s say we are already hungry from the example above. I want to know what your favorite food is. I render a list of menu options, and you have to tell me what your favorite food is.
We reuse the same three images put inside the wwwroot folder within an images sub-folder.
But this time, we use a more advanced component implementation to solve the problem described above. However, thanks to using Blazor, it won’t be difficult.
Let’s start by implementing the code block of the component. As always, it contains the C# code we need to make this component interactive.
@code {
    public string? FavoriteFoodImageSource { get; set; }

    public void OnFoodClicked(string food)
    {
        FavoriteFoodImageSource = $"images/{food}.jpg";
    }
}
We have two code elements.
First, we define a public property called FavoriteFoodImageSource of type string?. It will contain the path to the image we want to render as the favorite food.
Next, we have an OnFoodClicked method with a single string parameter named food. We want to call this method when the user selects a menu. By doing so, they choose it as their favorite food.
Next, we implement the template code:
<p>Please select your preferred food:</p>

<div style="display: flex;">
    <div @onclick=@(() => OnFoodClicked("pizza"))>
        <img style="width: 300px; margin-right: 20px;" src="/images/pizza.jpg" />
    </div>
    <div @onclick=@(() => OnFoodClicked("burger"))>
        <img style="width: 300px; margin-right: 20px;" src="/images/burger.jpg" />
    </div>
    <div @onclick=@(() => OnFoodClicked("salad"))>
        <img style="width: 300px; margin-right: 20px;" src="/images/salad.jpg" />
    </div>
</div>
In the template code of our Blazor component, we ask the user to select their preferred food with a static text rendered by a p element.
Next, we render the three images for each menu option. In this part of the implementation, we use static image rendering because we always provide the same three options.
Hint: If you want to take it to the next level, the selection of menus could also be implemented using dynamic image rendering. For example, when you want to have 10 menu options in the web application, let the user choose from seven menu options. You could implement code that randomly selects seven out of 10 available options.
We also register the OnFoodClicked method as the click handler for the div wrapper around our image elements. We provide a string identifying the food we want to set as the preferred food.
To complete the example, we need to dynamically render the user’s selected favorite food.
We use the following template code:
@if (FavoriteFoodImageSource is not null)
{
    <div style="margin-bottom: 40px;">
        <p>This is your favorite food:</p>
        <img style="width: 300px" src="@FavoriteFoodImageSource" />
    </div>
}
We first use a conditional statement to render only that part of the component template when the user has selected a favorite food. When we first start the web application, the FavoriteFoodImageSource variable is initialized with null, and, therefore, we don’t want to render that part of the component template.
Within the if clause, we render an image using a regular img HTML element. The difference is that we do not provide a static string literal for the source property, but instead, we reference the FavoriteFoodImageSource property from the C# code block of the component.
Remember, we declare the variable in the code block of the Blazor component. It will be initialized with null at startup. Whenever the user clicks on one of the menu options, the OnFoodClicked method will be called, and the value of the FavoriteFoodImageSource property will be set accordingly.
Hint: Since theOnFoodClickedmethod will be registered as an event handler, we do not have to manually call theStateHasChangedmethod. The Blazor framework assumes that an event handler will make changes to the component template, and therefore, an internalized call to theStateHasChangedmethod will make sure the component is re-rendered.
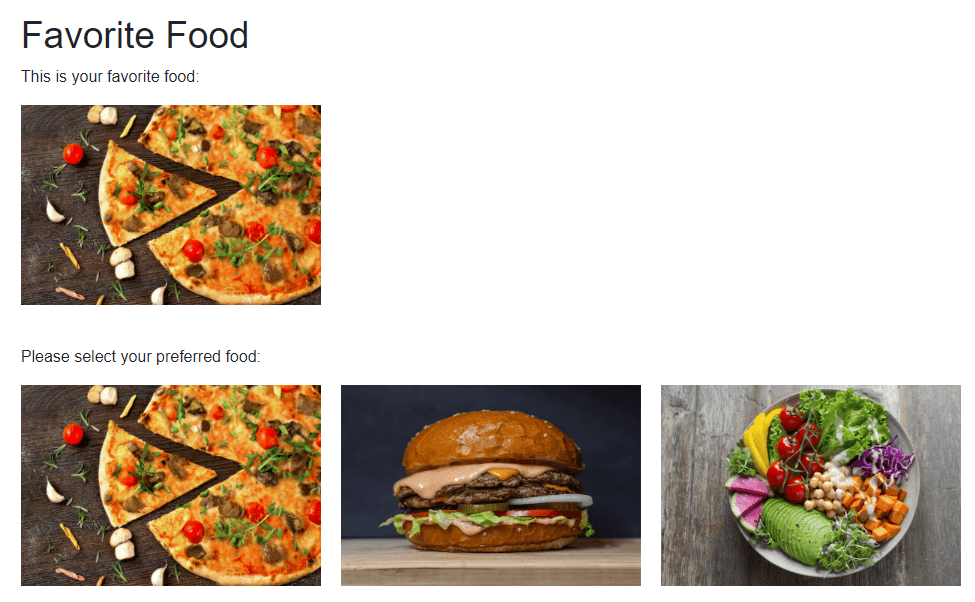
When we launch the application, the component looks like this.

It shows three different menu options and asks the user for their preferred food.
When the user clicks on one of the options (I’d always go with pizza), the condition evaluates to true, and the image of the preferred food will be rendered dynamically.

Conclusion
Image rendering is one of the fundamental tasks for any web framework. Blazor provides us with the wwwroot folder that is accessible by the browser and a simple API to set the source property of an HTML image element.
The difference between static and dynamic image rendering is how we provide the path to the image to the HTML image element.
For static images, we provide a string literal. For dynamically rendered images, we use a C# variable that we assign a value containing the relative path to the image within the wwwroot folder.
You can access the code used in this example on GitHub.
If you want to learn more about Blazor development, you can watch my free Blazor Crash Course on YouTube. And stay tuned to the Telerik blog for more Blazor Basics.

Claudio Bernasconi
Claudio Bernasconi is a passionate software engineer and content creator writing articles and running a .NET developer YouTube channel. He has more than 10 years of experience as a .NET developer and loves sharing his knowledge about Blazor and other .NET topics with the community.

