
Building Interactive Blazor Apps with WebAssembly

Summarize with AI:
See what’s new for Blazor WebAssembly in .NET 8 and create your first interactive WASM app.
JavaScript development has traditionally been inseparable from web development. However, a new avenue in web development is emerging, offering an alternative to JavaScript—WebAssembly. WebAssembly, commonly abbreviated as WASM, is a binary instruction format designed for web browsers. Its primary purpose is to serve as a compilation target for high-level languages such as C++.
In 2017, Microsoft initiated an experiment called Blazor with WebAssembly aiming to bring .NET to browsers. In 2019, this experiment officially became part of ASP.NET Core and its long-term support release cycle. As of .NET 8, Blazor is now five years old and continues to grow in features, support and developer adoption.
This article will explore the latest features introduced in .NET 8, delve into the mechanics of Blazor WebAssembly, outline the supported application types, and guide you through the process of creating your first Blazor interactive WebAssembly application using .NET 8.
Blazor WebAssembly in .NET 8 Overview
Blazor WebAssembly offers .NET developers an alternative to using JavaScript for web development by running .NET on the browser. By running .NET in the browser, .NET libraries (DLLs) work in the browser without recompilation. However, this comes at the cost of first-visit load times. When users load a Blazor WebAssembly application the first time, the .NET runtime is downloaded to the browser. This first-visit load time is crucial to user experience (UX) and search engine optimization (SEO).
In .NET 8, several remedies were included to eliminate delays through static server-side rendering (static SSR), progressive enhancement and automatic render mode. You can learn more about each render mode and the template options associated with them in the article Unified Blazor Web App Project Template Fully Explained.
Static Server

Static SSR renders static HTML on the server using ASP.NET Razor Components. As the name implies, static SSR does not offer any interactivity and relies on web standard form POSTs.
Progressive Enhancement
In .NET 8, Blazor seamlessly integrates conventional HTML and HTTP principles with contemporary methodologies, offering a dynamic spectrum ranging from static pages to complete single-page applications (SPAs). By employing progressive enhancement techniques, which include advanced navigation and form handling, Blazor effectively reduces page load times and optimizes performance, striking a harmonious balance while minimizing associated trade-offs.
Interactive WebAssembly
Interactive WebAssembly uses Blazor WebAssembly to render components in the client. Application logic is executed by the .NET WebAssembly runtime.
Interactive Server

Blazor’s render modes have become quite expansive in .NET 8. For the scope of this article, we’ll focus on interactive WebAssembly and some aspects of progressive enhancement. Having a solid grasp of these concepts will prepare you to incorporate other interactive modes later.
Blazor Interactive WebAssembly Overview
In traditional web applications, JavaScript is used to parse, compile and execute code. When WebAssembly was introduced as a web standard technology, an alternative to JavaScript was created. Since WebAssembly is byte code the browser can execute directly, the process of parsing and compiling code is now external to the browser.
Microsoft uses this execution path to run the .NET runtime on WebAssembly. The ability to run .NET code in the browser enables the Blazor framework and custom .NET application code. Any generic .NET library that doesn’t rely on framework specifics works under most circumstances. In addition, Blazor has a rich ecosystem of dedicated libraries and native UI component libraries like Telerik UI for Blazor.
Within reason, most .NET libraries will work in the browser. Exceptions include code that targets non-web platform specific features that do not exist on the browser.
Blazor WebAssembly Choices
With Blazor interactive WebAssembly, choosing to use a .NET server to host the application offers additional benefits such as server pre-rendering and progressive enhancement. These features can also be completely disabled for progressive web applications (PWAs) or static file hosting.
When starting a new Blazor WebAssembly project, these choices are easily made by choosing between two templates.

- Blazor Web App – A template for creating a Blazor application with server pre-rendering and progressive enhancement and optional server and client interactive modes.
- Blazor Standalone WebAssembly App – This template is used to create a Blazor WebAssembly app with client rendering and interactivity. It does not include a server project in the solution. This template is ideal for PWAs. PWA content can be added by checking the Progressive Web Application option during setup. In addition, it can be used to develop Blazor Hybrid with .NET MAUI apps.
- Telerik UI for Blazor App – This template is included when using Telerik UI for Blazor’s Visual Studio extensions. These extensions enhance the experience in developing Blazor web applications with Telerik UI for Blazor.
For this article, we’ll be focused on the Blazor Web App configuration. This configuration is the more common solution for writing web applications and offers the best first-visit load times.
Starting a New Blazor Web App Project
The Blazor Web App dialog provides multiple choices for generating a new Blazor application. Project customization options include Authentication settings, Render Mode specifications, Interactivity Location, and various other configurable parameters for tailoring the project according to specific requirements. For a Blazor interactive WebAssembly project, we’ll use the following settings.
- Authentication type: none
- Interactive render mode: WebAssembly
- Interactivity location: Per page/component
- Include sample pages is selected
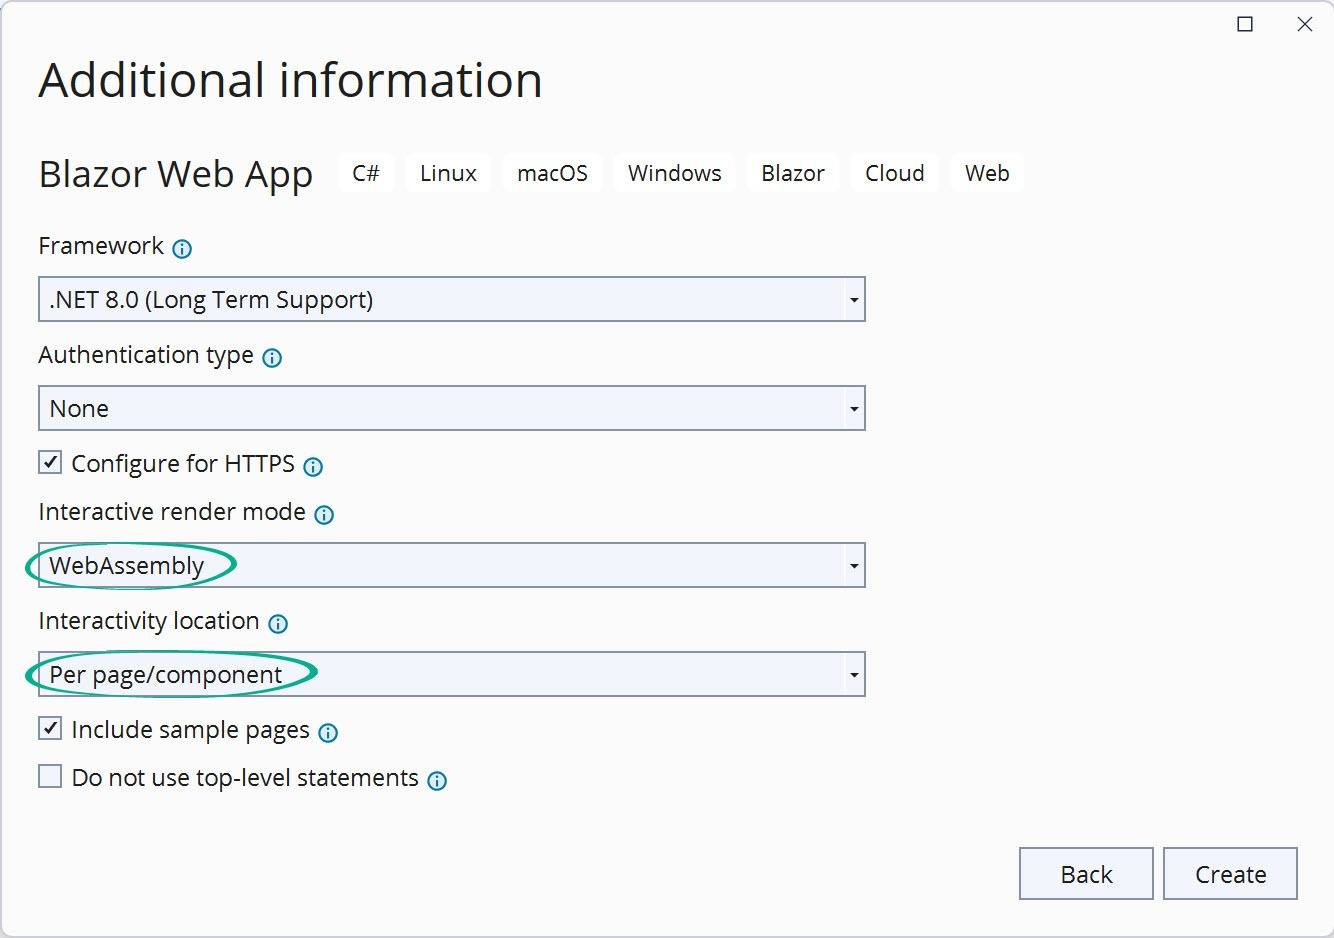
The Per/Page component option will configure the project to use progressive enhancement. This means some pages will render on the static server when no interactivity is required. Other pages will use server pre-rendering and WebAssembly for interactivity. By choosing this configuration, first-visit load time is addressed by server rendering. For non-interactive pages, the page will be fully rendered by the server. For interactive WebAssembly pages, a fully pre-rendered page will be displayed with a short delay before the page is interactive while the runtime is loaded for the first time.
The template will scaffold a new project with two solutions, the first an ASP.NET Core application and the second a Blazor client application. Let’s explore the two solutions and get an understanding of what each file is for.
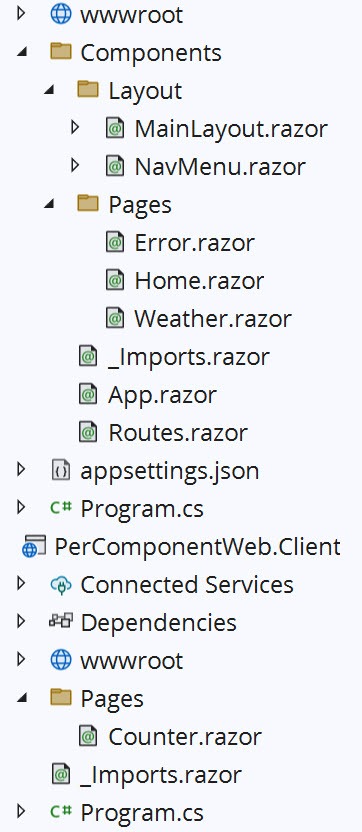
Server Solution
- /Wwwroot – Web standard static resources including: CSS, JavaScript, JSON, images and HTML. Content from this folder is always publicly available once the application is published.
- /Components – The default folder for all non-interactive components used in the application. Folders in Blazor will automatically determine the component’s namespace unless otherwise specified.
- /../Layout – Components in this folder are layout components.
- /../Layout/MainLayout.razor – The default layout for the application. This is the outermost rendered content of the application.
- /../Layout/MainLayout.razor.css – The CSS for HTML rendered by the MainLayout component.
- /../Pages – Components in this folder have a route directive and can be routed to by the application with a URL.
- /../Pages/Error.razor – A generic error page that is displayed when an error is encountered by the application.
- /../Pages/Home.razor – The default page, aka application root. This page is shown when the application’s root URL "/" is navigated to.
- /../Pages/Weather.razor – An example using static SSR, this component is rendered by the server and has no interactive mode. The sample uses streaming to optimize the page load time.
- /../Components/_Imports.razor – The _Imports.razor file acts as a global using statement for all .razor files that are siblings or children to it. The contents of this file my be appended to, depending on the options chosen for the project template.
- /../Components/App.razor – The App.razor file is the first component rendered by the application and contains the base HTML for the application. This includes the html, head and body elements. Included are references to static resources such as CSS, JavaScript, fonts and images the application requires. The HeadOutlet and Routes components are children of the App component. In this configuration, no render mode parameter is specified on these components.
- /../Components/Routes.razor – The Routes component is the router for the application. Components are rendered inside the Routes component when navigated to. The Routes component is affected by the Authentication template option.
- /appsettings.json – The application’s settings file in json format.
- /Program.cs – The applications entry point on the server. The application’s configuration is defined here.
Client Solution
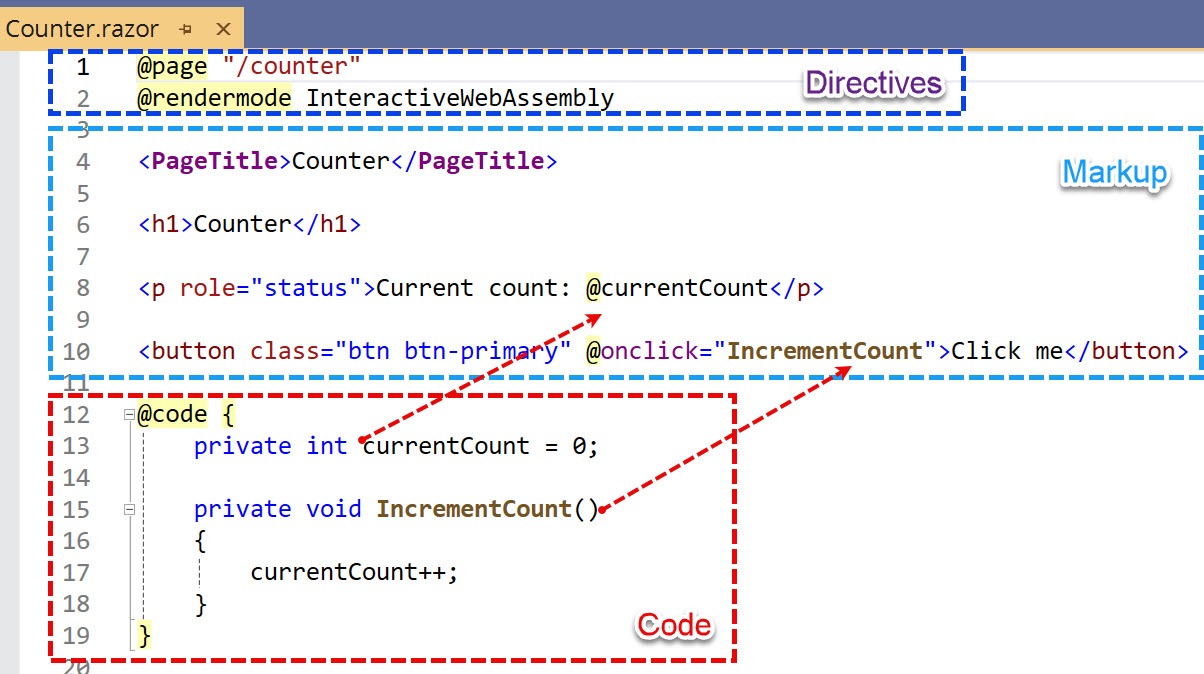
- /../Pages/Counter.razor – A simple example of Blazor interactive WebAssembly. This sample has HTML with a interactive button to trigger C# events.
- /_Imports.razor – The _Imports.razor file acts as a global using statement for all .razor files that are siblings or children to it. The contents of this file my be appended to, depending on the options chosen for the project template.
- /Program.cs – The application’s entry point on the client. The application’s configuration is defined here.
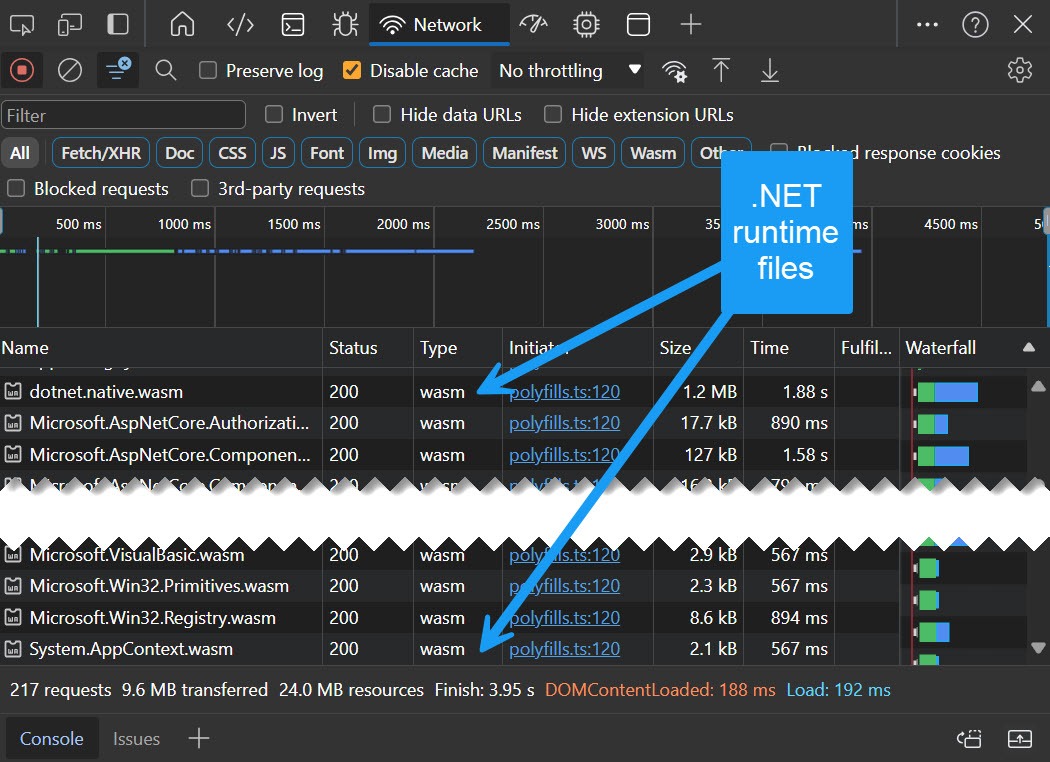
With the application scaffolding complete, we can start the application. The application will display home page immediately. When navigating to the counter component, the page will display instantly—however, a slight delay may be noticed when trying to click the count button. While the page is quickly rendered, the required resources for interactivity are still loading.
This delay is only noticeable the first time the application is loaded. Subsequent page visits and navigation will not experience further delays. The behavior can be confirmed through the browser debugging tools. Try clearing the application data and reloading the page while observing network traffic. Note the *.wasm files while the Counter page loads for the first time.
After verifying the application works properly, we can begin writing components.
Writing a Component for Blazor WebAssembly
Components for Blazor applications are called Razor Components because they use the Razor syntax, a mixture of C# and HTML. Razor Components are generally made of directives, markup and code blocks.
Directives add special functionality like routing or dependency injection. The same syntax for directives is also used in ASP.NET MVC or Razor Pages. Component markup is primarily HTML which is enhanced by Razor. The Razor syntax allows C# to be used in-line with markup and can render values in the UI.
The component’s logic is written inside a @code block. This is where component parameters and data bound values are defined. Alternatively, code be referenced using a code-behind. The Razor Component model allows us to break down our UI into manageable pieces. Components can then be assembled into larger UIs forming more complex components and pages.
Adding a New Component
Let’s create a simple component that displays a random list of article titles. Since the component will use WebAssembly interactivity mode, it will need to be created in the Client project’s Pages folder. A new .razor file is added with the name ArticleListView.
Next, tell Blazor to display the ArticleListView component when a user visits the domain.com/articles URL. Create a route by adding a @page directive with the value "/articles". Then add a few lines of sample markup to the component. We’ll use a simple list to set a placeholder for the logic we’ll need to write. The placeholder markup is shown below and displays a static list of items.
Display the component in the browser by starting the application and navigating to /articles by typing in the browser’s address bar.
@page "/articles"
<h3>List View</h3>
<ul>
    <li>Item 1</li>
    <li>Item 1</li>
    <li>Item 1</li>
</ul>
After verifying the component works, we can update the application’s navigation menu with the new page route. In the server project, add the articles route by copying the weather navigation element and replacing the weather values with articles. The weather navigation element is a combination of markup and the Blazor NavLink component. The NavLink component is a simple component included with Blazor to assist with building navigation bars.
Set the NavLink component’s href property to articles which corresponds to the @page route in the ArticleListView component. Inside the NavLink is an HTML template that includes an optional span to display an icon and the text Weather. Change the text Weather to Articles and restart the app. The app should display Articles in the menu.
<div class="nav-item px-3">
    <NavLink class="nav-link" href="articles">
        <span class="bi bi-list-nested-nav-menu" aria-hidden="true"></span> Articles
    </NavLink>
</div>
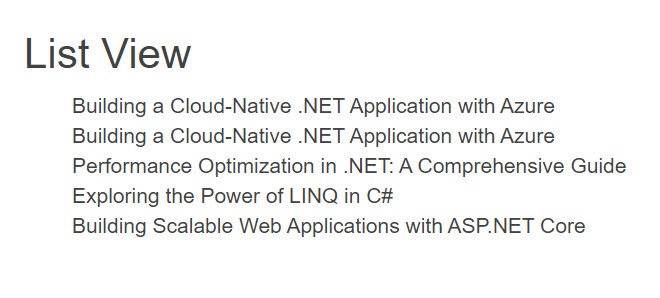
Let’s modify the component to display a fixed list of article titles. Define a @code block to contain the C# code for this component. The @code block is added beneath the component’s markup. Inside, add a fixed array of article titles. Then, we’ll write a method named GetArticles that takes a count parameter and returns a random number of articles based on the argument. Finally, in the markup section we’ll use a block of Razor code to replace the li elements with values returned from GetArticles. The easiest way to display values is by using a foreach loop, and writing each value within the loop.
An example of this component and the completed code can be seen on Telerik Blazor REPL, an online sandbox for creating, running and interacting with Blazor components. By starting the application and visiting articles you should see the same results as seen below.
Instead of calling GetArticles directly from Razor markup, we’ll tap into the component’s life-cycle methods. Using component life-cycle methods will create code that is easier to reason about and extend.
Let’s update the existing @code block to use the OnInitialized life-cycle event. When the component is created for the first time the OnInitalized{Async} event is invoked. This event is commonly used to set up the initial state of a component.
For the first load we’ll get five articles and display them in the list. In the updated sample, the articles field is added to hold the article titles when GetArticles is called during OnInitialized. The foreach loop is updated to iterate through values from the articles field.
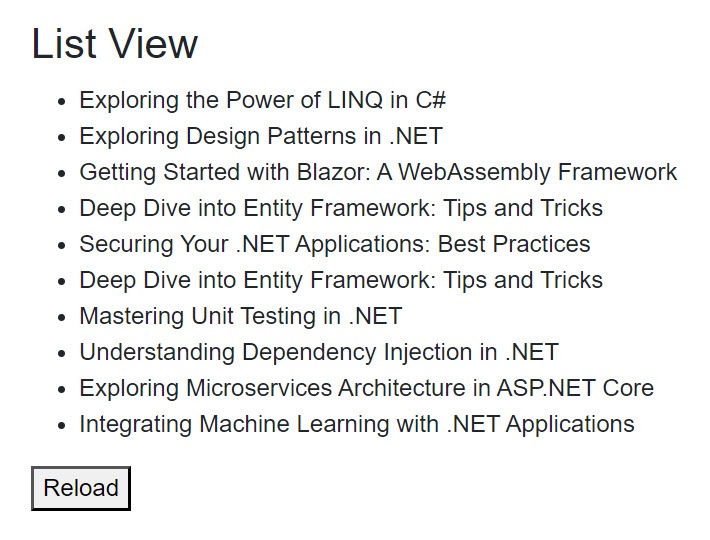
Up to this point, the component is pre-rendered by the server with five articles being chosen at random during initialization. Let’s continue to improve on the component by allowing users to interact with the component by loading more items.
First, we’ll add a button for users to interact with. The button’s @onclick event is bound to an private method in the component which will load 10 articles into the articles field. In the sample below, a button is added and bound to the Reload method. This method calls GetArticles with an argument of 10.
When the application is started and we navigate to /articles, five items are shown. If we try clicking the Reload button, it will not cause an update. Even though the component logic is correct and the component was placed in the Client project, we have not told Blazor how to handle interactivity. To fix this issue, the component needs a @rendermode attribute. The @rendermode is set to InteractiveWebAssembly, which tells Blazor to use the .NET WebAssembly runtime to execute logic.
After @rendermode InteractiveWebAssembly is added to the component, the app is restarted and expected behavior is observed. A sample of this component and with the completed code can be seen Blazor REPL below. Note that InteractiveWebAssembly is set globally in Blazor REPL and so the attribute is not applicable here.
The sample thus far shows how to components are built with interactive WebAssembly. In the next section, we’ll continue to improve the component by making HTTP requests and displaying data from a web endpoint.
Using HTTP Client with Blazor Interactive WebAssembly
Components using Blazor with interactive WebAssembly execute in a client’s browser, and data will need to be fetched from a server via an HTTP request. In addition, components will be pre-rendered server side when using an ASP.NET server. Two methods of fetching data will be used, one for the server and one for the client. This configuration is done through interfaces and dependency injection.
Server Setup
Let’s begin by configuring the server with a data service. The data service will be the same “article list” used in the previous examples and represents a database in a real-world application. The service has a single method—GetArticles—which returns a random number of article titles. In this version, Task and FromResult are used to represent an asynchronous call to a database or other long-running operation.
    public class ArticleService
    {
        string[] articleTitles = {
    "Mastering Asynchronous Programming in .NET",
    ... more article titles
    "Continuous Integration and Deployment in .NET"
        };

        public Task<string[]> GetArticleTitles(int count) => Task.FromResult(
            Enumerable.Range(1, count)
            .Select(index => articleTitles[Random.Shared.Next(articleTitles.Length)])
            .ToArray()
            );
    }
Next, an interface is needed so the service implementation can be changed easily through dependency injection. A new interface is created in the Client project named IArticleService. Since the Client project is already referenced by the Server, both projects will have access to the interface. The interface defines the method GetArticleTitles.
public interface IArticleService
{
     Task<string[]> GetArticleTitles(int count);
}
Now that an interface has been created it needs to be registered through dependency injection in Program.cs on the Server application. The service is registered by declaring a Scoped instance of ArticleService through the builder.Services collection.
var builder = WebApplication.CreateBuilder(args);

// Add services to the container.
builder.Services.AddScoped<IArticleService, ArticleService>();
//... other services

var app = builder.Build();
The ArticleListView component is now able to inject the service. In ArticleListView the sample article data and GetArticleTitles example can be removed and replaced with the IArticleService. Because GetArticles in the service is asynchronous we’ll use the OnInitializedAsync version of the life-cycle method. The Reload method is also updated to be asynchronous by replacing the void return type with async Task. The completed code for ArticleListView is shown below.
@page "/articles"
@rendermode InteractiveWebAssembly
@inject IArticleService service
<h3>List View</h3>

<ul>

    @foreach (var item in articles)
    {
        <li>@item</li>
    }

</ul>

<button @onclick="Reload">Reload</button>

@code {
    public string[] articles = [];
    protected override async Task OnInitializedAsync()
    {
        articles = await service.GetArticleTitles(5);
    }

    private async Task Reload()
    {
        articles = await service.GetArticleTitles(10);
    }

}
The application can be started successfully, however navigating to the /articles page will expose an error. The message There is no registered service of type 'ProjectName.Client.IArticleService' is displayed in the browser’s console. The error has occured because the component was pre-rendered successfully, but when the client attempted to execute the same component code it could not resolve a service for IArticleService. To complete the client logic, we’ll need to expose an web API endpoint and implement a service using HttpClient.
Minimal API
To expose the data from the server to the client the application will need a web API endpoint. A web API endpoint is created in the server project using a Minimal API. Minimal APIs enable fully functioning REST endpoints with minimal code and configuration. Using a Minimal API, the IArticleService can be used to serve JSON data from its GetArticleTitles method.
In the Program.cs file in the Server project, the MapGet method is added. Using MapGet we’ll assign a GET request to the desired endpoint—for this example, we’ll use /values. Since GetArticleTitles requires a parameter, we’ll map a value count which is passed to the endpoint through the GET request, "/values/{count}.
Next, in MapGet the IArticleService is resolved using the [FromServices] attribute and the GetArticleTitles method is called. This single line of code resolves an instance of our service and returns a JSON response containing article titles when /values is requested.
app.MapGet("/values/{count}",
    async (int count, [FromServices] IArticleService articles) =>
     await articles.GetArticleTitles(count)
     );
Start the application and visit the URL directly to see the JSON response in the browser. In the browser’s address bar, testing https://localhost:{port}/values/5 will return a JSON response with five items.
https://localhost:7041/values/5
[
    "Exploring the New Features in C# 10",
    "Building RESTful APIs with ASP.NET Core",
    "Building RESTful APIs with ASP.NET Core",
    "Performance Optimization in .NET: A Comprehensive Guide",
    "Exploring Design Patterns in .NET"
]
The Server project is now complete and we can finish wiring up the Client project.
Client Setup
Connecting to the web API endpoint requires using HttpClient from the Client project. Configuring the Client project requires adding an HTTP based implementation of IArticleService and registering the service and HttpClient with dependency injection.
First, a service named ArticleHttpService is created in the client project. The service implements IArticleService through the GetArticles method. An instance of HttpClient is injected into ArticleHttpService using constructor injection. Then the GetArticleTitles method is used to call the /values web endpoint. Using the GetFromJsonAsync<string[]> method from HttpClient a GET request is made and the JSON response is serialized to an array of string values. Finally, the method returns the serialized array. The completed service is shown in the code below.
public class HttpArticleService(HttpClient http) : IArticleService
{
    public Task<string[]> GetArticleTitles(int count) =>
    http.GetFromJsonAsync<string[]>($"values/{count}")!;
}
With the HttpArticleService created dependency injection needs to be configured in the Client project’s Program.cs file. The services are registered by declaring a Scoped instance of HttpClient and HttpArticleService through the builder.Services collection. When registering HttpClient the BaseAddress property is configured with the application’s base address.
builder.Services.AddScoped(sp => new HttpClient { BaseAddress = new Uri(builder.HostEnvironment.BaseAddress) });
builder.Services.AddScoped<IArticleService, HttpArticleService>();
The application can now be started and the ArticleHttpService will no longer encounter an error, however there is a noticeable refresh of the randomized data. When Blazor pre-renders the component on the server, it will execute the component’s full life-cycle. In addition, the Blazor WebAssembly client will initialize the component in the browser.
The two initialization cycles will cause two sets of data to be generated, once on the server and once on the client. To remedy the double initialization, we’ll utilize a Blazor feature called PersistentComponentState.
Persist Pre-rendered State
When a component is pre-rendered, it will complete its component life-cycle. The component will re-initialize when loaded in the browser, repeating the life-cycle process. The PersistentComponentState service allows us tap into the application life-cycle and leverage it for persisting a component’s state.
When a callback is subscribed through RegisterOnPersisting, the state is encoded and embedded in the rendered component’s HTML using the PersistAsJson method. The embedded state can be retrieved with the TryTakeFromJson method.
Let’s modify the ArticleListView to implement persistent state and eliminate additional calls to GetArticleTitles. First, the PersistentComponentState method is injected into the component as ApplicationState. Then a PersistingComponentStateSubscription instance is created to hold a callback delegate method.
...
@inject PersistentComponentState ApplicationState
...
@code {
    private PersistingComponentStateSubscription persistingSubscription;
}
Within the OnInitalizedAsync method, the ApplicationState instance is used to register a callback using RegisterOnPersisting. The PersistArticles method is added to the component and used to invoke PersistAsJson. When PersistAsJson is called a key and data are passed to the method and rendered with the component’s output.
protected override async Task OnInitializedAsync()
{
    // Subscribe to application life-cycle, register callback to persist state
    persistingSubscription = ApplicationState.RegisterOnPersisting(PersistArticles);

   ...
}

private Task PersistArticles()
{
    // Save state
    ApplicationState.PersistAsJson(nameof(articles), articles);

    return Task.CompletedTask;
}
With the state saved during pre-rendering, the component needs to be updated to retrieve the state. In the OnInitializedAsync method, the TryTakeFromJson is called, and if no state is present the component will call GetArticleTitles. When TryTakeFromJson has state, the articles array will be populated from the embedded state.
protected override async Task OnInitializedAsync()
{
    // Subscribe to application life-cycle, register callback to persist state
    persistingSubscription = ApplicationState.RegisterOnPersisting(PersistArticles);

    if (!ApplicationState.TryTakeFromJson<string[]>(nameof(articles), out var restoredArticles))
    {
        // State is not available
        articles = await service.GetArticleTitles(5);
    }
    else
    {
        // State is available
        articles = restoredArticles!;
    }
}
Finally, IDisposable interface is implemented by the component to properly dispose of the PersistentComponentState service.
void IDisposable.Dispose() => persistingSubscription.Dispose();
Now when we start the application and navigate to the /articles page, the list will display five items. The component will retain the initial five items and no longer refresh the items a second time.
The completed project can be downloaded from GitHub.
Conclusion
This article we explored the latest features introduced in .NET 8 and Blazor WebAssembly. We saw how using Blazor WebAssembly with a .NET server enables pre-rendering allowing apps to render quickly while leveraging client interactivity. Introducing pre-rendering came with the trade-off of requiring additional code to maintain state. Using the PersistentComponentState, we subscribed to events within the application life-cycle to achieve pre-rendering without unnecessarily reloading data. Building interactive Blazor apps with WebAssembly is a JavaScript alternative for .NET developers with a complete full-stack developer experience.

Ed Charbeneau
Ed
Related Posts
Comments
All articles
Topics
Web MobileMobile
Desktop
Design
Productivity
People
